


Hi All,
A very simple requirement of creating folder in the document library using web service comes many a times. So here is a simple three liner example that creates a folder in the document library.
All you need to do is add reference to the _vti_bin/DWS.asmx. Document workspace is the web service that manages all related to document workspace or even creating folder in normal team site document libraries.
DWorkSpace is webservice instance reference name.
DWorkSpace.Dws dwspace = new DWorkSpace.Dws();
dwspace.Credentials = System.Net.CredentialCache.DefaultCredentials;
dwspace.Url = "{your_site}/_vti_bin/DWS.asmx";
dwspace.CreateFolder("Shared Documents/DemoFolder");
That is it. You have just created DemoFolder inside Shared Documents library of your site url.
Tuesday, December 21, 2010
Thursday, December 16, 2010
_vti_bin folder name revealed
Hi All,
Well this post has nothing to do with actual coding or understanding about the SharePoint or workflow. However from this post, we are trying to have a new section in our blog is did you know
Did you know will try to give you some information which may be interesting.
So here is the first post for that section.
Let’s talk about Vermeer Technologies Incorporated. This company was a software company founded in 1994 and has only one product which was FrontPage.
Microsoft then acquired this company to get in to the web arena market.
So even today that company has existence in some or the other way. Can you get that? No, well here is the answer.
We all know that there is _vti_bin folder in SharePoint. So _vti (Vermeer Technologies Incorporated).. Get that? Cool, right?
Tuesday, December 14, 2010
Updating list to be on quick launch through web service
Hi All,
We all know that we can create SharePoint list or library from web service provided by SharePoint web services. However there are no full blown functionalities in it which can be achieved so easily from object model.
So basic question that comes in when we create a list or library from web service, there is no direct way to set it up to show in the quick launch bar.
So here is a sample code which shows how to create a list, how to add fields in it and how to display that list in the quick launch from web service.
So here we will get to know three things although two of them are covered separately in earlier posts.
WebListsService.Lists listService = new WebListsService.Lists();
listService.Credentials = System.Net.CredentialCache.DefaultCredentials;
listService.Url = "{list_asmx_url}";
XmlNode xnNewLists = listService.AddList("Products", "This is products list created by web service", 100);
XmlDocument xmlDoc = new XmlDocument();
XmlNode xnNewFields = xmlDoc.CreateNode(XmlNodeType.Element, "Fields", "");
xnNewFields.InnerXml +=
"<Method ID='1'>" +
"<Field Type='Text' Title='ProductName' DisplayName = 'Product Name' Required='TRUE' Description = 'Name of the Product'/>" +
"</Method>";
xnNewFields.InnerXml +=
"<Method ID='2'>" +
"<Field Type='Text' DisplayName='Price'/>" +
"</Method>";
xnNewFields.InnerXml +=
"<Method ID='3'>" +
"<Field Type='Number' DisplayName='Product Code'/>" +
"</Method>";
XmlNode xnProperties = xmlDoc.CreateNode(XmlNodeType.Element, "List", "");
XmlAttribute xnQuickLaunchAttribute = (XmlAttribute)xmlDoc.CreateNode(XmlNodeType.Attribute, "OnQuickLaunch", "");
xnQuickLaunchAttribute.Value = "True";
xnProperties.Attributes.Append(xnQuickLaunchAttribute);
XmlAttribute xnEnableversioningAttribute = (XmlAttribute)xmlDoc.CreateNode(XmlNodeType.Attribute, "EnableVersioning", "");
xnEnableversioningAttribute.Value = "True";
xnProperties.Attributes.Append(xnEnableversioningAttribute);
XmlNode updateList = listService.UpdateList("Products", xnProperties, xnNewFields, null, null, null);
And that's it. your job is done. your list or library is now on quick launch through web service.
Saturday, December 11, 2010
Finally the result is out
Hi,
Finally the result is out.
Looks like people are still not aware about Microsoft's new Visual studio light switch beta. I guess, we are still waiting for the full version.

Finally the result is out.
Looks like people are still not aware about Microsoft's new Visual studio light switch beta. I guess, we are still waiting for the full version.

Tuesday, November 9, 2010
The result is out
Hi All,
Finally the result is out and it looks like people do not want Google to come up with any gaming console.

Finally the result is out and it looks like people do not want Google to come up with any gaming console.

Friday, October 22, 2010
The result is out
Hi All,
Finally the result is out.
Looks like people want Microsoft to bring something like Google TV to the market.

Finally the result is out.
Looks like people want Microsoft to bring something like Google TV to the market.

Friday, October 8, 2010
Showing twitter followers and friends in SharePoint
Hi All,
Social networking has already a hit in the internet now and almost every site has one or the other social networking integration. At least they show the followers and friends for sure.
So why SharePoint stay behind? SharePoint has one very powerful web part, which is content editor web part. Twitter provides a fantastic way to display the list of followers and friend. All you need is internet connection and you are good to go.
Open any page where in you want to show the twitter followers and friends. Add content editor web part. And add the following code.
Replace SharepointKings username to your own name.
And here is the result that you get. Here it is a snap only; however you’ll get animated follower list and friends. Try it in your SharePoint site and you will get the animated list.

Social networking has already a hit in the internet now and almost every site has one or the other social networking integration. At least they show the followers and friends for sure.
So why SharePoint stay behind? SharePoint has one very powerful web part, which is content editor web part. Twitter provides a fantastic way to display the list of followers and friend. All you need is internet connection and you are good to go.
Open any page where in you want to show the twitter followers and friends. Add content editor web part. And add the following code.
<script type="text/javascript" src="http://ajax.googleapis.com/ajax/libs/jquery/1.3.2/jquery.min.js"></script>
<script type="text/javascript" src="http://twitter-friends-widget.googlecode.com/files/jquery.twitter-friends-1.0.min.js"></script>
<script type="text/javascript">
$(document).ready(function(){
$('#friends').twitterFriends({
debug:1
,username:'sharepointkings'
});
});
</script>
<div id="friends"></div>
<div class="twitter-friends" options="{
friends:1
,username:'sharepointkings'
}"></div>
Replace SharepointKings username to your own name.
And here is the result that you get. Here it is a snap only; however you’ll get animated follower list and friends. Try it in your SharePoint site and you will get the animated list.

Wednesday, October 6, 2010
Getting SharePoint Rich text field data using JavaScript
Hi All,
We all know that we can get a value of single line text field, drop downs, choice field value using jQuery very easily using jQuery.
However the same is not true in case of using multiline rich text field. When you try to apply same methods of jQuery, it fails to returns you the value.
Well, to get the same stuff done with multiline rich text field, we need to use the same technique but in some different way.
To demonstrate, add one column in your list which is multiline rich text field. And now on NewForm of that list, add one content editor web part. (I prefer take up the SharePoint discussion list which has default rich text field)
I have done the same using JavaScript even have not used jQuery file. I have added content editor web part and placed the following code in it. To demonstrate, I have replaced the onclick handlers of the page to our own handler which pops up the content of rich text field as alert.
I n function1(z) we have taken rich text field control client ID, you can get the same by looking into the page view source.
var textName = "{rich field client ID}"
and when you add the above code to the content editor web part and then create New Item and click on Ok, and see what you get.
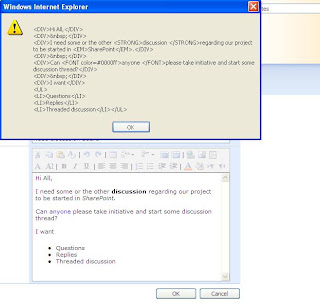
Clicking on OK button is replaced by our own code just to demonstrate how to fetch the value of rich text field in SharePoint. In real scenarios, this can be done in different ways.
Hope that this idea of how to fetch value of multiline rich text field will help many.
We all know that we can get a value of single line text field, drop downs, choice field value using jQuery very easily using jQuery.
However the same is not true in case of using multiline rich text field. When you try to apply same methods of jQuery, it fails to returns you the value.
Well, to get the same stuff done with multiline rich text field, we need to use the same technique but in some different way.
To demonstrate, add one column in your list which is multiline rich text field. And now on NewForm of that list, add one content editor web part. (I prefer take up the SharePoint discussion list which has default rich text field)
I have done the same using JavaScript even have not used jQuery file. I have added content editor web part and placed the following code in it. To demonstrate, I have replaced the onclick handlers of the page to our own handler which pops up the content of rich text field as alert.
<script type="text/javascript" language="javascript">
var objForm = document.forms[0];
var count;
window.onload = StartUpCustomScript;
function StartUpCustomScript() {
ChangeOkButtonOnclickEvent("Input", "SaveItem");
}
function ChangeOkButtonOnclickEvent(tagName, identifier) {
var len = identifier.length;
var tags = document.getElementsByTagName(tagName); /*find all Input type controls on page (ie. control with tag <Input/>)*/
for (var i = 0; i < tags.length; i++) {
var tempString = tags[i].name;
if (tempString.indexOf(identifier) == tempString.length - len) /*find any Input type controls on page has its name ending with 'SaveItem'*/
{
//alert(tempString);
if (tags[i].attributes["onclick"] != null) {
/*if found, replace it default onclick with our custom script*/
var func = tags[i].attributes["onclick"].value.replace("if (!PreSaveItem())", " return function1('" + tags[i].name + "');if (!PreSaveItem())");
/*remove its default onclick event*/
tags[i].onclick = null;
/*re-register its onlick event with new script*/
tags[i].attachEvent("onclick", new Function(func));
}
}
}
//return null;
}
function function1(z)
{
var textName = "ctl00_m_g_1a3ed0d9_ea62_4a4e_adc0_30d1184b5ad0_ctl00_ctl04_ctl01_ctl00_ctl00_ctl04_ctl00_ctl00_TextField";
var bodyText, spamWordText, clientWordText;
var rtClientCount=0;
var arrBodyText = new Array();
var arrSpamWordText = new Array();
count=0;
spamWordText="";
clientWordText="";
var docEditor = RTE_GetEditorDocument(textName);
var textRange=docEditor.body.createTextRange();
bodyText=textRange.htmlText;
alert(bodyText);
return true;
}
</script>
I n function1(z) we have taken rich text field control client ID, you can get the same by looking into the page view source.
var textName = "{rich field client ID}"
and when you add the above code to the content editor web part and then create New Item and click on Ok, and see what you get.

Clicking on OK button is replaced by our own code just to demonstrate how to fetch the value of rich text field in SharePoint. In real scenarios, this can be done in different ways.
Hope that this idea of how to fetch value of multiline rich text field will help many.
Finally the result is out
Hi All,
We asked about new Internet Explorer 9 and this is what we got. Looks like IE9 is heating up the market.

We asked about new Internet Explorer 9 and this is what we got. Looks like IE9 is heating up the market.

Tuesday, September 28, 2010
SharePoint Cascading drop downs using jQuery
Hi All,
How many times you require functionality where in based on the selection of parent drop down generates the values to the child drop down. Examples, selection of country fills the states drop down.
Well, of course there is a way like creating custom field which can definitely achieve this job. However this requires us to write down the code and .ascx custom fields and deploy on the server to get it to the action.
We can achieve the same with the help of jQuery. Yes, no files and no code. Without them we can achieve this. So why to wait? Let’s explore more in this.
Before we start the exam, you will need to fantastic jQuery from
jQuery 1.3.2.min.js
and SPServices jQuery from
SPServices jQuery
Once you download these two .js files, upload them to any of the document library where you have the permission over the site.
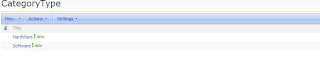
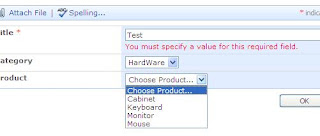
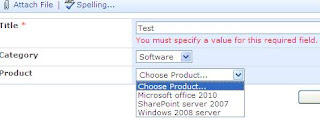
Now go ahead and create one list. I am calling it a CategoryType and adding two values in the list.
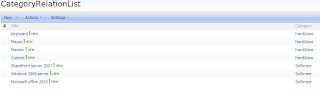
Now I am creating one more list and call it as a CategoryRelationList and create one column called Category which is a look up column to the CategoryType title column and add few items.
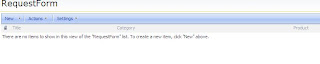
And now to put it in action, we will create one more list and we call it RequestForm and create two columns, Category look up to CategoryType list title column and Product look up column to the CategoryRelationList title column. This is the list where we will use the cascading drop down service from SPServices jquery library
Now here comes a good part. Now you have two ways to achieve this, the simplest which I believe is by using Content editor web part on both new form and edit form. Add content editor web part and add following lines to it. (Check your document library path in src attribute where you have kept two js files which we downloaded earlier)
OR the other way to achieve this is open SharePoint designer and then open site where this list is located, open NewForm.aspx, check out the form and find the following line.
<asp:Content ContentPlaceHolderId="PlaceHolderMain" runat="server">
Add the above script exactly below this. Save it and check in. This will also do the job for you. Do the same for edit form as well.
Now let me explain each parameter in the script.
relationshipList – This is the name of the list where we have kept the relationship.
relationshipListParentColumn – This is the parent column in the relationship list.
relationshipListChildColumn – This is the child column in the relationship list.
parentColumn – parent column in the list where we want to implement this.
childColumn – child column in the list where we want to implement this.
Now see it in action. Open the list and click on new and see the magic.
Hope that you have enjoyed this post. Keep giving the comments. we love them. :)
How many times you require functionality where in based on the selection of parent drop down generates the values to the child drop down. Examples, selection of country fills the states drop down.
Well, of course there is a way like creating custom field which can definitely achieve this job. However this requires us to write down the code and .ascx custom fields and deploy on the server to get it to the action.
We can achieve the same with the help of jQuery. Yes, no files and no code. Without them we can achieve this. So why to wait? Let’s explore more in this.
Before we start the exam, you will need to fantastic jQuery from
jQuery 1.3.2.min.js
and SPServices jQuery from
SPServices jQuery
Once you download these two .js files, upload them to any of the document library where you have the permission over the site.
Now go ahead and create one list. I am calling it a CategoryType and adding two values in the list.

Now I am creating one more list and call it as a CategoryRelationList and create one column called Category which is a look up column to the CategoryType title column and add few items.

And now to put it in action, we will create one more list and we call it RequestForm and create two columns, Category look up to CategoryType list title column and Product look up column to the CategoryRelationList title column. This is the list where we will use the cascading drop down service from SPServices jquery library

Now here comes a good part. Now you have two ways to achieve this, the simplest which I believe is by using Content editor web part on both new form and edit form. Add content editor web part and add following lines to it. (Check your document library path in src attribute where you have kept two js files which we downloaded earlier)
<script language="javascript" type="text/javascript" src=" /Shared%20Documents/jquery-1.3.2.min.js"></script>
<script language="javascript" type="text/javascript" src=" /Shared%20Documents/jquery.SPServices-0.5.6.min.js"></script>
<script language="javascript" type="text/javascript">
$(document).ready(function() {
$().SPServices.SPCascadeDropdowns({
relationshipList: "CategoryRelationList",
relationshipListParentColumn: "Category",
relationshipListChildColumn: "Title",
parentColumn: "Category",
childColumn: "Product",
debug: true
});
});
</script>
OR the other way to achieve this is open SharePoint designer and then open site where this list is located, open NewForm.aspx, check out the form and find the following line.
<asp:Content ContentPlaceHolderId="PlaceHolderMain" runat="server">
Add the above script exactly below this. Save it and check in. This will also do the job for you. Do the same for edit form as well.
Now let me explain each parameter in the script.
relationshipList – This is the name of the list where we have kept the relationship.
relationshipListParentColumn – This is the parent column in the relationship list.
relationshipListChildColumn – This is the child column in the relationship list.
parentColumn – parent column in the list where we want to implement this.
childColumn – child column in the list where we want to implement this.
Now see it in action. Open the list and click on new and see the magic.


Hope that you have enjoyed this post. Keep giving the comments. we love them. :)
Monday, September 20, 2010
Integrating twitter with SharePoint
Hi All,
Interesting integration with SharePoint has come. And yes, you have heard it right. It is the integration of twitter with SharePoint. We have done this for MOSS 2007. If this can be done with 2007 version of SharePoint, it certainly can be done in SPS 2010.
Before starting this topic, first we need to understand the structure of twitter XML file that we will be using in this post. We all know the so popular and ever increasing twitter site. So many people updates some or the other thing on twitter. In twitter they are called statuses.
If you already have an account in twitter or do not have, this XML file has no concern with this, because we can anyways see tweets of anybody even though you do not have account. This XML file read the latest tweet, followers, following and updates. Also shows your user name, photo, location, description and website. Well, actually you need to observe the XML file properly and from there you can get an idea about what all parameters you can retrieve.
For example, if I talk about my profile, malayvasavada, then I need to look for this XML file.
http://twitter.com/users/show/malayvasavada.xml
http://twitter.com/users/show/{twitter user name}.xml
Open this XML in Internet explorer. (In Google chrome, it cannot display properly) And you can see similar to this.
So I get following XML file.
As you can see, from the XML, you can get so much information. Name, location, photo URL, even the background color of my twitter profile site, latest tweet, date and time of tweet. So now the point is how to use this XML file and how to present it in SharePoint.
Okay, let us go ahead and use XML web part that SharePoint provides. Create one web part page in any site under any document library. Click on add web part and then add XML web part. Now in the XML Web part, modify shared we part properties. In the XML link, provide the twitter XML file path. Click on Apply and Ok.
Now see what you have got.

You can see profile, latest tweet and followers and so on so forth. However, it is not formatted. It looks ugly. So we need to format this output. When we have XML file with us, the formatting options comes with XSLT files.
You can use Visual Studio to create XSLT file because Visual Studio gives you a fantastic UI to create and suggestions for the attribute and tags.
I have already created one XSLT file here. See below code. You can format according to your need. Just make sure that XML tag remains the same. You can change the layout in term of tables, td and tr, width and height.
Open XSL editor in the web part property. Copy and paste the above XML file. Just make sure that the first line has to be at first column, first row area. Exactly at the top of the window and left corner, otherwise you will get an error. "The XSL specified by the XSL property or XSL Link property is not valid, or the XSL file cannot be accessed. Make…..". You might stretch your head whole day finding what went wrong.
And this is the overall result combining XML and XSLT. You have just integrated twitter with SharePoint. Cool, isn’t it?

Interesting integration with SharePoint has come. And yes, you have heard it right. It is the integration of twitter with SharePoint. We have done this for MOSS 2007. If this can be done with 2007 version of SharePoint, it certainly can be done in SPS 2010.
Before starting this topic, first we need to understand the structure of twitter XML file that we will be using in this post. We all know the so popular and ever increasing twitter site. So many people updates some or the other thing on twitter. In twitter they are called statuses.
If you already have an account in twitter or do not have, this XML file has no concern with this, because we can anyways see tweets of anybody even though you do not have account. This XML file read the latest tweet, followers, following and updates. Also shows your user name, photo, location, description and website. Well, actually you need to observe the XML file properly and from there you can get an idea about what all parameters you can retrieve.
For example, if I talk about my profile, malayvasavada, then I need to look for this XML file.
http://twitter.com/users/show/malayvasavada.xml
http://twitter.com/users/show/{twitter user name}.xml
Open this XML in Internet explorer. (In Google chrome, it cannot display properly) And you can see similar to this.
So I get following XML file.
<?xml version="1.0" encoding="UTF-8" ?>
<user>
<id>100438644</id>
<name>Malay Vasavada</name>
<screen_name>malayvasavada</screen_name>
<location>Pune</location>
<description />
<profile_image_url>http://a1.twimg.com/profile_images/600111137/Copy_of_Malay1_normal.JPG</profile_image_url>
<url />
<protected>false</protected>
<followers_count>2</followers_count>
<profile_background_color>EBEBEB</profile_background_color>
<profile_text_color>333333</profile_text_color>
<profile_link_color>990000</profile_link_color>
<profile_sidebar_fill_color>F3F3F3</profile_sidebar_fill_color>
<profile_sidebar_border_color>DFDFDF</profile_sidebar_border_color>
<friends_count>10</friends_count>
<created_at>Wed Dec 30 07:43:33 +0000 2009</created_at>
<favourites_count>0</favourites_count>
<utc_offset>19800</utc_offset>
<time_zone>New Delhi</time_zone>
<profile_background_image_url>http://s.twimg.com/a/1284676327/images/themes/theme7/bg.gif</profile_background_image_url>
<profile_background_tile>false</profile_background_tile>
<profile_use_background_image>true</profile_use_background_image>
<notifications />
<geo_enabled>false</geo_enabled>
<verified>false</verified>
<following />
<statuses_count>24</statuses_count>
<lang>en</lang>
<contributors_enabled>false</contributors_enabled>
<follow_request_sent />
<listed_count>1</listed_count>
<show_all_inline_media>false</show_all_inline_media>
<status>
<created_at>Sat Sep 18 04:01:32 +0000 2010</created_at>
<id>24819814760</id>
<text>Silverlight 5? Hummm....something very good is coming to web. Keep watching.</text>
<source>web</source>
<truncated>false</truncated>
<in_reply_to_status_id />
<in_reply_to_user_id />
<favorited>false</favorited>
<in_reply_to_screen_name />
<retweet_count />
<retweeted>false</retweeted>
<geo />
<coordinates />
<place />
<contributors />
</status>
</user>
As you can see, from the XML, you can get so much information. Name, location, photo URL, even the background color of my twitter profile site, latest tweet, date and time of tweet. So now the point is how to use this XML file and how to present it in SharePoint.
Okay, let us go ahead and use XML web part that SharePoint provides. Create one web part page in any site under any document library. Click on add web part and then add XML web part. Now in the XML Web part, modify shared we part properties. In the XML link, provide the twitter XML file path. Click on Apply and Ok.
Now see what you have got.

You can see profile, latest tweet and followers and so on so forth. However, it is not formatted. It looks ugly. So we need to format this output. When we have XML file with us, the formatting options comes with XSLT files.
You can use Visual Studio to create XSLT file because Visual Studio gives you a fantastic UI to create and suggestions for the attribute and tags.
I have already created one XSLT file here. See below code. You can format according to your need. Just make sure that XML tag remains the same. You can change the layout in term of tables, td and tr, width and height.
<?xml version="1.0" encoding="utf-8" ?>
<xsl:stylesheet version="1.0" xmlns:xsl="http://www.w3.org/1999/XSL/Transform" xmlns:msxsl="urn:schemas-microsoft-com:xslt" exclude-result-prefixes="msxsl">
<xsl:output method="html" indent="yes" />
<xsl:template match="/user">
<style type="text/css">
.dsc{ font-weight:bold; vertical-align:top; text-align:left; } .prof { background-color:#
<xsl:value-of select="profile_background_color" />
; color:#
<xsl:value-of select="profile_text_color" />
; } .prof a { color:#
<xsl:value-of select="profile_link_color" />
; text-decoration:none; overflow:auto; }
</style>
<table width="100%" style="background-image:url({profile_background_image_url}); text-align:center;">
<tr>
<td colspan="3" align="center">
<img src="http://assets1.twitter.com/images/twitter_logo_s.png" />
</td>
</tr>
<tr>
<td colspan="3" align="center">
<a href="http://twitter.com/{screen_name}" target="_blank">
<xsl:value-of select="screen_name" />
</a>
<img src="{profile_image_url}" />
</td>
</tr>
<tr>
<td align="center" colspan="3">
City: <xsl:value-of select="location" />
</td>
</tr>
<tr>
<td align="center" colspan="3">
Language: <xsl:value-of select="lang" />
</td>
</tr>
<tr>
<td align="center" colspan="3">
Status: <xsl:value-of select="status/text" />
</td>
</tr>
<tr>
<td align="center" colspan="3">
Last Status Created Date: <xsl:value-of select="status/created_at" />
</td>
</tr>
<tr>
<td>
Friends count: <xsl:value-of select="friends_count" />
</td>
<td>
Followers_count: <xsl:value-of select="followers_count" />
</td>
<td>
Statuses_count: <xsl:value-of select="statuses_count" />
</td>
</tr>
</table>
</xsl:template>
</xsl:stylesheet>
Open XSL editor in the web part property. Copy and paste the above XML file. Just make sure that the first line has to be at first column, first row area. Exactly at the top of the window and left corner, otherwise you will get an error. "The XSL specified by the XSL property or XSL Link property is not valid, or the XSL file cannot be accessed. Make…..". You might stretch your head whole day finding what went wrong.
And this is the overall result combining XML and XSLT. You have just integrated twitter with SharePoint. Cool, isn’t it?

Friday, September 17, 2010

Thursday, September 2, 2010
SharePoint designer does not update email body and email 'to' list
Hi All,
Well here comes one more limitation of SharePoint Designer 2007. I have created one workflow which sends an email for some action. Now I needed to add one more person into email list. So I went to SharePoint designer workflow, and changed to list by adding person email.
I was comfortable thinking that now mail also will go to new person whom I included. But wait a minute, this does not seems to be true, when somebody created new item, mail went off, however new person whom I included didn’t get that mail.
Okay, this is one problem. What is next? Next is the email body problem. I changed the email body as well to include some more details and some formatting, however even this does not seem to be reflecting in the email.
Hence I went through several articles and finally come to know that once it is applied to the list, then you cannot make such changes for emails. Even though you may feel after clicking final finish button that workflow is updating, but it is not.
So I had to recreate entire workflow just to include one more person and to change email body. I am not sure if this problem still persists in SharePoint Designer 2010. Yet have to experiment on this.
Tuesday, August 31, 2010
Set default search to list scope in SharePoint
Hi All,
We know built in search functionality in SharePoint. When configured properly, you can search from entire site just anything and search will categorize the results for you.
However a simple scenario came to me last week. When you are on any list AllItems.aspx page and if you have observed, by default search scope on top right is set to “This site: {site name}”.
This List: {list name} by default instead of This Site: {site name} so that they directly can put in words and search from that list.
So go ahead and open view source of the page, search for This List: {list name} and take out its ID. It should be ending with SBScopesDDL.
And add content editor web part on AllItems.aspx and paste the following code. Do not forget to reference correct jQuery js location.
And you are good to go. Observe the top search box, you will find by default This List : {list name} selected.
We know built in search functionality in SharePoint. When configured properly, you can search from entire site just anything and search will categorize the results for you.
However a simple scenario came to me last week. When you are on any list AllItems.aspx page and if you have observed, by default search scope on top right is set to “This site: {site name}”.
This List: {list name} by default instead of This Site: {site name} so that they directly can put in words and search from that list.
So go ahead and open view source of the page, search for This List: {list name} and take out its ID. It should be ending with SBScopesDDL.
And add content editor web part on AllItems.aspx and paste the following code. Do not forget to reference correct jQuery js location.
<script type="text/javascript" src="http://ajax.googleapis.com/ajax/libs/jquery/1.3.2/jquery.min.js"></script>
<script type="text/javascript" >
$(document).ready(function() {
//Below function makes sure that if the status is not suspended in edit mode, it disables the reason text //area
var text = $("select[title$='Search Scope'] :selected").text();
$("#ctl00_PlaceHolderSearchArea_ctl01_SBScopesDDL").val("This List: YOUR LIST NAME ");
});
</script>
</script>
And you are good to go. Observe the top search box, you will find by default This List : {list name} selected.
Monday, August 30, 2010
How to disallow users to add web part in web part zone
Hi All,
I was working on one stuff and suddenly a question came from one of my friends that is there any way where in I can prevent users from adding web part to web part zone, however they can certainly change the web part’s property and all.
So I tried something and found out the answer. Easy answer is in the SharePoint designer and other answer is the feature file for that web part.
Open the SharePoint designer; connect to the site and the page where that web part is. Move your mouse cursor to the area of the web part zone. Right click the area, and select web part zone properties and you will find something like this
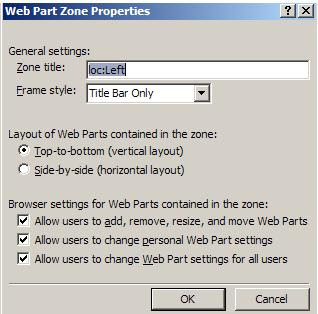
Here you can unselect the first option which will prevent any user to add any more web parts to the web part zone.
Save the page, although page will become customized, however this method solves the purpose.
The other approach is simple in the manifest file, add one allowlayoutchange="false" attribute to the web part zone tag in xml file.
I hope this will help many.
Friday, August 27, 2010
Using jQuery for Search in SharePoint
Hi All,
I came across to a wonderful jQuery technique for using the search web service in SharePoint. This jQuery returns the same result which you can see after hitting the search button on top of the page after giving some words to find.
This jQuery is completely configurable in the sense of taking time to return the result, number of results to be returns and so on.
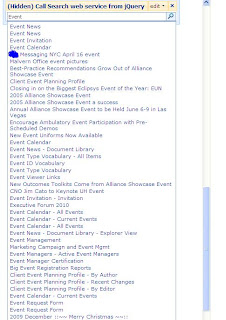
To achieve this fantastic trick and to achieve the most common task done by jQuery, fetching the result and showing as a suggestion under textbox, copy below code and paste it in the content editor web part of your page.
You can replace the configuration section in this script which is quickSearchConfig in the start of the script. You can also change the jQuery link at the start script tag by downloading that js file, storing in your document library and then giving url of document library till the js file.
As you can see delay, minimum number of characters to use for start calling a web service, scope, number of results and animation time are configurable options.
Here is the result out of this.
Thanks for the wonderful Post by Jan.
I came across to a wonderful jQuery technique for using the search web service in SharePoint. This jQuery returns the same result which you can see after hitting the search button on top of the page after giving some words to find.
This jQuery is completely configurable in the sense of taking time to return the result, number of results to be returns and so on.
To achieve this fantastic trick and to achieve the most common task done by jQuery, fetching the result and showing as a suggestion under textbox, copy below code and paste it in the content editor web part of your page.
<script type="text/javascript" src="http://ajax.googleapis.com/ajax/libs/jquery/1.3.2/jquery.min.js"></script>
<script type="text/javascript">
// QuickSearch v0.1
// Created by Jan Tielens, http://weblogs.asp.net/jan
// This sample code is provided on an “as is” basis and without warranty of any kind.
// *** Customizable parameters ***
var quickSearchConfig = {
delay: 500, // time to wait before executing the query (in ms)
minCharacters: 3, // minimum nr of characters to enter before search
scope: "All Sites", // search scope to use
numberOfResults: 75, // number of results to show
resultsAnimation: 200, // animation time (in ms) of the search results
resultAnimation: 0 // animation time (in ms) of individual result (when selected)
};
</script>
<style type="text/css">
.quickSearchResultDivUnselected
{
background: white;
border: 1px solid white;
margin-left: 2px;
overflow: hidden;
text-overflow: ellipsis;
}
.quickSearchResultDivSelected
{
background: #EEEEEE;
border: 1px solid Gray;
margin-left: 2px;
overflow: hidden;
text-overflow: ellipsis;
}
</style>
<table id="quickSearchTable" class="ms-sbtable ms-sbtable-ex" border="0">
<tbody>
<tr class="ms-sbrow">
<td class="ms-sbcell">
<input style="width: 100%" id="quickSearchTextBox" class="ms-sbplain" title="Enter search words"
style="width: 170px" alt="Enter search words" maxlength="200" value="" />
</td>
<td class="ms-sbgo ms-sbcell" style="width: 14px">
<img title="Go Search" style="border-top-width: 0px; border-left-width: 0px; border-bottom-width: 0px;
border-right-width: 0px" alt="Go Search" src="/_layouts/images/gosearch.gif" />
</td>
<td style="width: 1px">
</td>
</tr>
</tbody>
</table>
<div id="quickSearchResults" style="display: none;">
</div>
<script type="text/javascript">
var quickSearchTimer;
var quickSearchSelectedDivIndex = -1;
function showResultsDiv(text) {
var div = $("#quickSearchResults");
var prevTable = div.prev();
var divCss = {
"left": prevTable.offset().left,
"padding": 2,
"position": "absolute",
"top": prevTable.offset().top + prevTable.height() + 1,
"border": "1px solid #7f9db9",
"width": prevTable.width() - 3,
"background": "white",
"max-width": prevTable.width() - 3
};
div.css(divCss).append(text).slideDown(quickSearchConfig.resultsAnimation);
}
$(document).ready(function() {
$('#quickSearchTextBox').keyup(function(event) {
var previousSelected = quickSearchSelectedDivIndex;
// catch some keys
switch(event.keyCode) {
case 13: // enter
var selectedDiv = $("#quickSearchResults>div:eq(" + quickSearchSelectedDivIndex + ") a");
if(selectedDiv.length == 1)
window.location = selectedDiv.attr("href");
break;
case 38: // key up
quickSearchSelectedDivIndex--;
break;
case 40: // key down
quickSearchSelectedDivIndex ++;
break;
}
// check bounds
if(quickSearchSelectedDivIndex != previousSelected) {
if(quickSearchSelectedDivIndex < 0)
quickSearchSelectedDivIndex = 0;
if(quickSearchSelectedDivIndex >= $("#quickSearchResults>div").length -1)
quickSearchSelectedDivIndex = $("#quickSearchResults>div").length - 2;
}
// select new div, unselect the previous selected
if(quickSearchSelectedDivIndex > -1) {
if(quickSearchSelectedDivIndex != previousSelected) {
unSelectDiv( $("#quickSearchResults>div:eq(" + previousSelected + ")"));
selectDiv($("#quickSearchResults>div:eq(" + quickSearchSelectedDivIndex + ")"));
}
}
// if the query is different from the previous one, search again
if($('#quickSearchTextBox').data("query") != $('#quickSearchTextBox').val()) {
if (quickSearchTimer != null) // cancel the delayed event
clearTimeout(quickSearchTimer);
quickSearchTimer = setTimeout(function() { // delay the searching
$("#quickSearchResults").fadeOut(200, initSearch);
} , quickSearchConfig.delay);
}
});
});
function unSelectDiv(div) {
// first stop all animations still in progress
$("#quickSearchResults>div>div").stop(true,true);
div.removeClass("quickSearchResultDivSelected").addClass("quickSearchResultDivUnselected");
$("#details", div).hide();
}
function selectDiv(div) {
div.addClass("quickSearchResultDivSelected");
$("#details", div).slideDown(quickSearchConfig.resultAnimation);
}
function initSearch() {
// first store query in data
$('#quickSearchTextBox').data("query", $('#quickSearchTextBox').val());
// clear the results
$("#quickSearchResults").empty();
// start the search
var query = $("#quickSearchTextBox").val();
if(query.length >= quickSearchConfig.minCharacters) {
showResultsDiv("Searching ..."); // display status
search(query);
}
}
function search(query) {
quickSearchSelectedDivIndex = -1;
var queryXML =
"<QueryPacket xmlns='urn:Microsoft.Search.Query' Revision='1000'> \
<Query domain='QDomain'> \
<SupportedFormats><Format>urn:Microsoft.Search.Response.Document.Document</Format></SupportedFormats> \
<Context> \
<QueryText language='en-US' type='STRING' >SCOPE:\"" + quickSearchConfig.scope + "\"" + query + "</QueryText> \
</Context> \
<SortByProperties><SortByProperty name='Rank' direction='Descending' order='1'/></SortByProperties> \
<Range><StartAt>1</StartAt><Count>" + quickSearchConfig.numberOfResults + "</Count></Range> \
<EnableStemming>false</EnableStemming> \
<TrimDuplicates>true</TrimDuplicates> \
<IgnoreAllNoiseQuery>true</IgnoreAllNoiseQuery> \
<ImplicitAndBehavior>true</ImplicitAndBehavior> \
<IncludeRelevanceResults>true</IncludeRelevanceResults> \
<IncludeSpecialTermResults>true</IncludeSpecialTermResults> \
<IncludeHighConfidenceResults>true</IncludeHighConfidenceResults> \
</Query></QueryPacket>";
var soapEnv =
"<soap:Envelope xmlns:xsi='http://www.w3.org/2001/XMLSchema-instance' xmlns:xsd='http://www.w3.org/2001/XMLSchema' xmlns:soap='http://schemas.xmlsoap.org/soap/envelope/'> \
<soap:Body> \
<Query xmlns='urn:Microsoft.Search'> \
<queryXml>" + escapeHTML(queryXML) + "</queryXml> \
</Query> \
</soap:Body> \
</soap:Envelope>";
$.ajax({
url: "/_vti_bin/search.asmx",
type: "POST",
dataType: "xml",
data: soapEnv,
complete: processResult,
contentType: "text/xml; charset=\"utf-8\""
});
function processResult(xData, status) {
var html = "";
$(xData.responseXML).find("QueryResult").each(function() {
var divWidh = $("#quickSearchTable").width() - 13;
var x = $("<xml>" + $(this).text() + "</xml>");
x.find("Document").each(function() {
var title = $("Title", $(this)).text();
var url = $("Action>LinkUrl", $(this)).text();
var description = $("Description", $(this)).text()
html +=
"<div class='quickSearchResultDivUnselected' style='width:" + divWidh + "px;max-width:" + divWidh +"px'> \
<a href='" + url + "'>" + $("Title", $(this)).text() + "</a> \
<div style='display:none' id='details' style='margin-left:10px'>"
+ description +
"<br/>" + url + " \
</div> \
</div>";
});
if(x.find("TotalAvailable").text() != "")
html += "<div style='text-align:right'>Total results: " + x.find("TotalAvailable").text() + "</div>";
else
html += "<div style='text-align:right'>Total results: 0</div>";
});
$("#quickSearchResults").empty().append(html);
$("#quickSearchResults>div>a").hover(
function() { selectDiv($(this).parent()); },
function() { unSelectDiv($(this).parent()); }
);
showResultsDiv();
}
}
function escapeHTML (str) {
return str.replace(/&/g,'&').replace(/</g,'<').replace(/>/g,'>');
}
</script>
You can replace the configuration section in this script which is quickSearchConfig in the start of the script. You can also change the jQuery link at the start script tag by downloading that js file, storing in your document library and then giving url of document library till the js file.
As you can see delay, minimum number of characters to use for start calling a web service, scope, number of results and animation time are configurable options.
Here is the result out of this.

Thanks for the wonderful Post by Jan.
Thursday, August 26, 2010

Thursday, August 19, 2010
Securing connection string in web.config
Hi All,
Although Microsoft has given us the API classes and web services to work with SharePoint. Many programmers try to reach to the database and perform the select queries.
This is not recommended at all, and that is why MS has given us the object model and web service to work with for SharePoint.
However in case if you use database for querying purpose and if you are storing the database connection information in web config file of your web application and referencing from the code somewhere, then I would strongly recommend you to secure this connection string.
It does not depend on whether you are connecting with windows authentication or forms authentication. Hiding server name and database name is as important as hiding user name and password.
So here are simple steps to perform for securing and encrypting the connection strings. Remember we should encrypt all connection strings mentioned in connectionstring tag in web.config.
Remember that encryption happens on the basis of RSA provider.
Open the visual studio command prompt. Type in this commend
aspnet_regiis -pe "connectionStrings" -app "/SPKings"
Where SPkings is the web application and here is the result of this encryption.
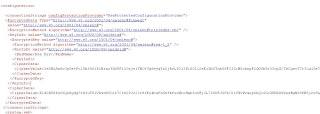
After this encryption, you do not need to perform any decryption in your code. Runtime will automatically decrypt this connectionstring for you. There will be very light performance issue, very light, However this is okay according to me instead of opening the username, password or server name and database name to any other person.
Wednesday, August 18, 2010
Send SMS for Alert in SharePoint 2010
Hi All,
Although we haven’t got a chance to put our hands dirty on this feature. However it certainly takes the alert system to the next level.
We all are familiar with sending alert by email in SharePoint 2007. In SharePoint 2010, you can also send SMS to the mobile.
Advantage of sending SMS over email is email can get into a mass span category and some time lose an important update. However this is not the case with SMS.
In central administration, you need to provide the URL of SMS service, credentials. You can check the SMS service by hitting the test service button.
It works over Office Mobile Service Protocol like mail uses SMTP. This OMS actually allows client to send text and multimedia messages to server which processes the request and sends to the destination mobile number.
Even the SMS can also be replied and service can then deliver this reply in terms of SMTP mail.
We will be checking more on this and as soon as get a chance, we will play with it and let you know the result.
Monday, August 16, 2010
Unable to connect to asp.net development server
Hi All,
Yesterday I was working with one web service project and in that I was required to create a method which calls SharePoint web services.
However till day before yesterday everything was okay. Suddenly now Visual studio has started giving me unable to connect to the asp.net development server error.
I tried hard to Google it out, and got so many different answers. Like install SP1, Install SP2, platform related answers, operating system related, framework related, many other tips and tricks. I tried almost everything.
But not sure what went wrong or my visual studio got corrupted or what. However I found a fantastic answer to this problem.
It is just two easy steps to perform. One think is for sure, every time you turn your computer off and then re starts it again and try to build and run, it will give you error. So every time you need to perform this action.
Visit Amit Kumar Singh's post site and follow the two simple steps. Thanks to Amit kumar singh.
Keep the .rar file with you and every time you restart your machine, unrar the file and copy the exe. Steps are mentioned in the site. Go through the post. It is a very useful post.
Thursday, August 12, 2010
Update an item sends an email problem in SharePoint
Hi All,
One major requirement with SharePoint is you set up a workflow which sends a notification mail to list of people when anyone updates the item in the list.
Now this is cool. However the problem here is when actually nothing is modified, then also SharePoint kicks an email and people gets it and wonder what has changed when nothing was actually changed in any of the list items.
To give you a simple scenario, create one list, go to SharePoint designer and create a workflow, attach to the list and select the option which says trigger when item is updated. In workflow send an email to yourself. Now go to the list, create one item. Open the same item, without changing anything, click on ok and there you go. You caught the problem; you still get an email even though you did not change anything.
Well before diving to the solution let me make one thing very clear. What we are looking for is an out of the box solution. We do not want to write any code. Event handler is the best place to write a code and handle this situation, because we can get new value and the old value of the field in the event handler. We can compare all fields with previous and current value and if any of them is modified, then we can send an email else leave it as it is.
But we are talking about the no code solution. So definitely there are some drawbacks to it. But it definitely solves this problem.
All you need to do is create fields as many fields as you have in the list. If you have seven fields, then you need to create seven more fields in the same list. You can name them anything, but to make it a meaningful, keep the same name of the field, and only append copy to it. Example, we have Title field in the list and new field will be TitleCopy. If Details is the field, then new field will be DetailsCopy.
Soon you will come to know why we are doing this. Well to give you a quick answer, to compare these fields.
After creating Copy fields as we discussed. Follow these steps.
2) Create one workflow from File-New workflow menu.
3) Give a name to the workflow.
4) Attach it to the list.
5) Select trigger this workflow when item is created.
6) We need to define a condition which is always true, you can make condition like if 1 ==1, then in action, Set TitleCopy to ListName:Title, then DetailsCopy to ListName:Details.
Like this set all copy fields to the original fields.
This is your first workflow. Now we also need to create second workflow. I know question has come to your mind that why do we need to create a workflow for assigning this values. We could have created the calculated column and assign the values. Well, I have not done this. Why? You need to find it yourself. Try doing this and you will realize that okay we cannot take approach of calculated columns.
Coming back to the point, create one more workflow, attach it to the same list, and give it a name and select trigger this workflow when item is updated and this time your condition will be like this:
If Title is not equal to ListName:TitleCopy or Details is not equals to ListName:DetailsCopy. In this way, make a condition by combining OR for all fields. If this is true, then send an email in the action.
Add second step in the workflow, check the condition if Title is not equals to ListName:TitleCopy, then in action, set TitleCopy to the ListName:Title.
Add another step in the workflow, check the condition if Details is not equals to ListName:Details, then in action, set DetailsCopy to the ListName:Details.
Add steps for all fields in the list. Now you again must be wondering why we are creating each step for comparing and assigning the values of the field. Well, I would say try it yourself in putting all condition in one step and see the result. You will realize that okay we cannot that this approach. And hence each step must be performed for each individual field.
What we have done here is, first workflow will be triggered when we create the item and assign the values to the copy fields in the list.
Second workflow will be triggered when we modify the list item and in that we have checked the original value which is currently in the Copy fields with the changed fields. If any of them is changed, then only we trigger an email and after triggering we again compare which field is actually changed and we assign the changed value to the Copy field so as to compare it with the next time.
I know question might come that these all copy fields will also be visible at the time of creating, editing and viewing list items. Well you can write a code not to show these copy fields while performing create, edit or viewing the items. Or you can also use jQuery technique to hide them.
I recommend you read Using jQueries in SharePoint for how to hide fields and other stuff.
Now we have solved the problem of sending mail when not updating anything in the list. Mail will be send only when something is actually changed. Try it yourself and do share your thoughts on this.
Monday, August 9, 2010
Finally the result is out
Hi All,
We asked which Os would you prefer to deploy your SPS 2010 applications?
And here is what we have
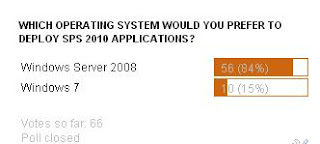
Looks like people prefers server operating system than clinet to deploy their applications.
We asked which Os would you prefer to deploy your SPS 2010 applications?
And here is what we have

Looks like people prefers server operating system than clinet to deploy their applications.
Tuesday, August 3, 2010
Exporting Access table to SharePoint list
Hi All,
We know that there is a way to export data of list to access easily through open in access option. There is also an option in access 2007 to fetch the data from SharePoint list. So what we are doing here is importing data from list or exporting data from list to access. What about the vice versa? What if we want to export table from access to SharePoint list.
To demonstrate this, I had downloaded the asset database template readily available for download from the internet. Just for the information that now many database templates are available for access database which had ready tables and forms as well for entering data and updating, deleting the data. There are reports also available. If you have not tried this, go ahead and download asset database template and you can see reports and forms for this.
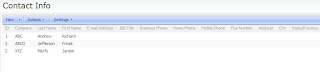
Coming back to our topic, I have entered some contact information. I will recommend you change the name of the table contacts, because in team site we already have a list called contacts. I have changed the name of that table to Contact Info.
I have added three contacts in that because when you create an entry in the asset table, we need to specify which contact has this asset.

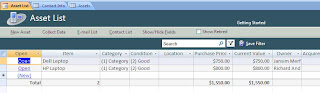
And now click on move to SharePoint from external data tab.
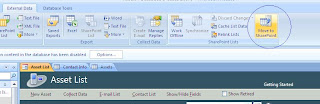
Moment you click on that option, you are presented with a screen which asks you the URL of the site where you want to move this data. Provide the site URL there.
Once you click on next, magic begins and as you can see it not only creates an asset list also populates the data in it. What is more interesting part is, it also creates and populates the relational tables as well. In our case for example contact info is our relational table.

I took dummy entries to demonstrate this concept, However when placed practically this helps a lot.
We know that there is a way to export data of list to access easily through open in access option. There is also an option in access 2007 to fetch the data from SharePoint list. So what we are doing here is importing data from list or exporting data from list to access. What about the vice versa? What if we want to export table from access to SharePoint list.
To demonstrate this, I had downloaded the asset database template readily available for download from the internet. Just for the information that now many database templates are available for access database which had ready tables and forms as well for entering data and updating, deleting the data. There are reports also available. If you have not tried this, go ahead and download asset database template and you can see reports and forms for this.
Coming back to our topic, I have entered some contact information. I will recommend you change the name of the table contacts, because in team site we already have a list called contacts. I have changed the name of that table to Contact Info.
I have added three contacts in that because when you create an entry in the asset table, we need to specify which contact has this asset.


And now click on move to SharePoint from external data tab.

Moment you click on that option, you are presented with a screen which asks you the URL of the site where you want to move this data. Provide the site URL there.
Once you click on next, magic begins and as you can see it not only creates an asset list also populates the data in it. What is more interesting part is, it also creates and populates the relational tables as well. In our case for example contact info is our relational table.


I took dummy entries to demonstrate this concept, However when placed practically this helps a lot.
Monday, August 2, 2010
Visio 2010, SharePoint Designer 2010 and VS 2010 Workflows
Hi All,
Yesterday I was discussing with my friends about new Office 2010 application. I came across a new interesting feature of it. We all know Visio software in office suite. But what we do not know is the enhancement that has been done at great extends to this Visio application.
We all know that we used to create workflows in either Visual studio or SharePoint Designer depending on the requirement. If it is rule based and simple and one time only, then the same can be achieved through SharePoint Designer, However if it is quite complex, then Visual Studio is anyways always there with us to help.
Visio 2010 and Visual Studio 2010 have come together to help us even more now. We have a template of workflow available in SharePoint Designer which helps us to create a workflow in Visio 2010 as well. After creating a workflow, we can export this workflow from Visio to SharePoint Designer 2010 or Visual Studio 2010.
You can also export the workflow created in the Designer 2010 to Visio 2010 for better presentation and graphical view. You can only design the workflow in Visio; you cannot not configure it in Visio. Configuration is a part of Designer 2010.
As and when we get more updates and information, we will share it with you. Yet we have to make our hands dirty on this. Soon we will.
Friday, July 30, 2010
Displaying date only problem in mail from SharePoint designer
Hi All,
When I was working with sending reminder workflow which I discussed in my earlier post, I faced one more problem. I needed to send a birth date as well in the mail.
Now I created that birth date column as date and time and kept format date only. I did not select date and time in format, hence I assumed that if I include this field in the mail. It should display only date. However it sends date but it also appends 12 : 00 AM along with that, which is not proper.
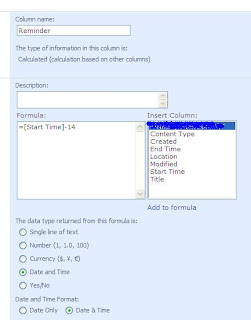
So what is the correct way? The answer is calculated column. Create one calculated column of type single line of text and give it appropriate name and use this formula =TEXT({your field},"mm/dd/yyyy"). Replace {your field} with the date column and you use this new calculated column instead of actual date column.
You should be good to go with getting mail with date only instead of date and 12:00 AM time.
When I was working with sending reminder workflow which I discussed in my earlier post, I faced one more problem. I needed to send a birth date as well in the mail.
Now I created that birth date column as date and time and kept format date only. I did not select date and time in format, hence I assumed that if I include this field in the mail. It should display only date. However it sends date but it also appends 12 : 00 AM along with that, which is not proper.
So what is the correct way? The answer is calculated column. Create one calculated column of type single line of text and give it appropriate name and use this formula =TEXT({your field},"mm/dd/yyyy"). Replace {your field} with the date column and you use this new calculated column instead of actual date column.
You should be good to go with getting mail with date only instead of date and 12:00 AM time.
Tuesday, July 27, 2010
Creating reminder workflow in SharePoint designer
Hi All,
One common requirement in workflow is reminder workflow. Reminder can be anything. It can be a birthday, anniversary or it can be an important meeting.
You might want to send a reminder email to attendees, or want to send a reminder email to team members about the birthdays or anniversaries.
Well let us design such a workflow which sends a reminder email to particular people about upcoming birthday before 14 days.
First open the site and create one calendar list. Call it a birthday calendar.
Create one calculated column of type date and time and select format as date and time. Name that column “reminder”.
Just mae sure that your start time and end time should not end with 12:00: AM, otherwise workflow will trigger, however mail will not be sent. My advice, keep Start time and end time with the time ending with 12:05 AM, should be fine or any other time than 12:00 AM.
Now open SharePoint Designer and we will create a workflow from here for the birthday calendar list.
Create a new workflow, attach it with the birthday calendar list and select automatically start the workflow, when the new item is created.
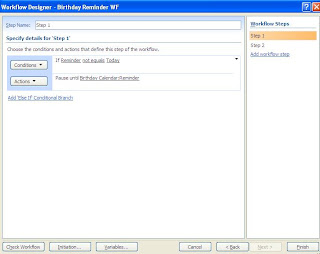
We need to divide this workflow into two steps. First step will check the date and time and pause the workflow for the time and second step will send an email to a person.
Step 1 condition will be
And step2 will be
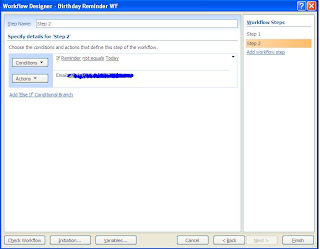
Change the email address to a list of people whom you want to send an email. While sending an email, you can use the fields of the item and decorate the mail body according to your need.
To test this, click on create new item and enter start date 14 days after today’s date and see you should get an email in a moment.
There you go; you have set up the reminder workflow. However this is not a recursive workflow, that every year you get an email. This is a onetime workflow and needs to be recreated every year. We are working on making this recursive, so that it actually works as a service. Although the same can be achieved through SP timer definition for sure.
One common requirement in workflow is reminder workflow. Reminder can be anything. It can be a birthday, anniversary or it can be an important meeting.
You might want to send a reminder email to attendees, or want to send a reminder email to team members about the birthdays or anniversaries.
Well let us design such a workflow which sends a reminder email to particular people about upcoming birthday before 14 days.
First open the site and create one calendar list. Call it a birthday calendar.
Create one calculated column of type date and time and select format as date and time. Name that column “reminder”.

Just mae sure that your start time and end time should not end with 12:00: AM, otherwise workflow will trigger, however mail will not be sent. My advice, keep Start time and end time with the time ending with 12:05 AM, should be fine or any other time than 12:00 AM.
Now open SharePoint Designer and we will create a workflow from here for the birthday calendar list.
Create a new workflow, attach it with the birthday calendar list and select automatically start the workflow, when the new item is created.
We need to divide this workflow into two steps. First step will check the date and time and pause the workflow for the time and second step will send an email to a person.
Step 1 condition will be
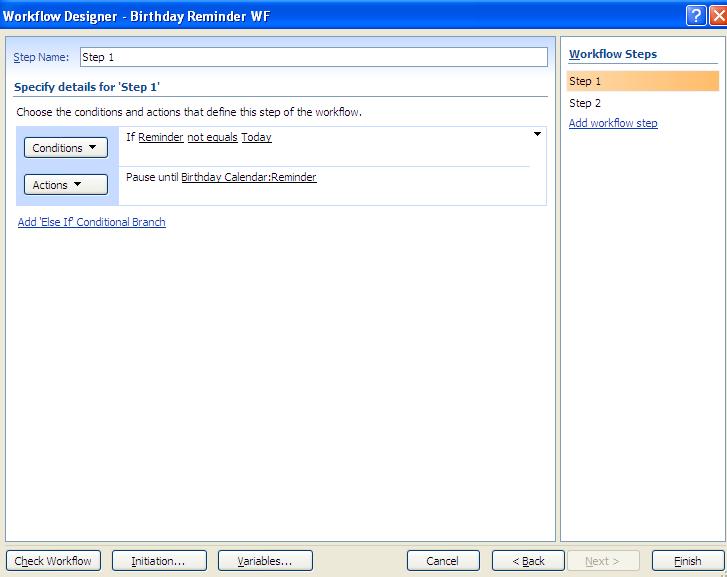
And step2 will be

Change the email address to a list of people whom you want to send an email. While sending an email, you can use the fields of the item and decorate the mail body according to your need.
To test this, click on create new item and enter start date 14 days after today’s date and see you should get an email in a moment.
There you go; you have set up the reminder workflow. However this is not a recursive workflow, that every year you get an email. This is a onetime workflow and needs to be recreated every year. We are working on making this recursive, so that it actually works as a service. Although the same can be achieved through SP timer definition for sure.
Monday, July 26, 2010
Publishing infrastructure feature - Access Denied
Hi All,
We all know about publishing infrastructure feature in SharePoint. Whenever we want to deal with publishing site with publishing pages, we need to activate this feature. Even when we want to add CQWP, at that time we need to activate this feature.
Well, it may happen that even you are the administrator of the site collection, and you are the one who installed the SharePoint and even logged in with those credentials, you get “Access Denied” while activating the infrastructure feature.
Well the reason is, your team site (if you are activating this feature from the top level team site) and central administration runs in different credentials as far as application pool is concern.
So you need to change some settings from IIS. Open the IIS and locate your site, before that right click on central administration web site and click on properties and go to Home directory and observe the application pool.
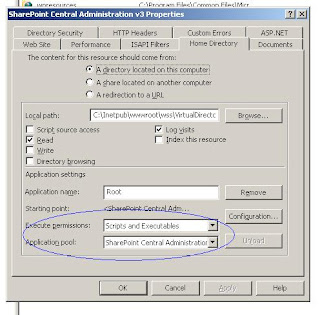
Now go to the team site web site, right click it, click on properties, go to home directory and you will see a same name application pool which is your site name. Change it to the one which is similar to central administration.
Then reset the IIS and there you go, you should be able to activate the publishing infrastructure feature.
Thursday, July 22, 2010
Finally the result is out
Hi All,
We asked what do you think about new Google's upcoming operating system. can it beat MS Windows 7?
Most of us think that no, Google cannot beat MS Windows 7.

We asked what do you think about new Google's upcoming operating system. can it beat MS Windows 7?
Most of us think that no, Google cannot beat MS Windows 7.

Tuesday, July 20, 2010
Conditional Formatting using SharePoint Designer
Hi All,
We all know data view web part. Data view web part has a feature called conditional formatting. We can format the column of the view based on some condition.
We even can show or hide the data in column based on condition. Another point to note is condition need not be the same field on which you would like to apply conditional formatting.
I have created one sample list for demonstrating this feature. I have one simple list which has Item Code, Year and Month and Qty Ordered.
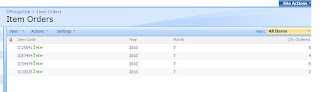
And we will make our conditional formatting on Qty Ordered based on some criteria.
Create one full vertical web part page and name it QtyOrdered.aspx.
Now open SharePoint Designer 2007 and open the site. Open the QtyOrdered.aspx page in designer.
In Click to insert a web part keep your cursor and then click on Insert data view under Data View menu.
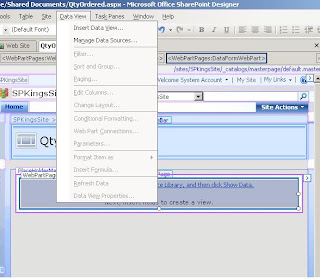
Click on Item Orders (List Name) and then Show Data. By holding the Ctrl Key, click on Item Code and Qty Ordered Column and then click on Insert select field as and then click multiple item view.
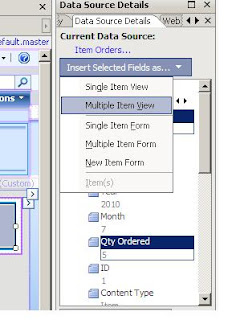
And you will have something like this
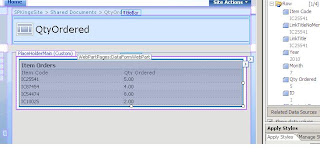
Now open the Images folder, I have three images in it. If you do not have any images with you, then download some good images or look in to 12 hives images folder and drag images to this images folder in SharePoint Designer.
Drag green.gif after Qty Order column value 5. And then provide alternate text as green arrow when asked.
Do the same for red.gif. Drag it to the side of green.gif and do the same, provide alternate text and click OK.
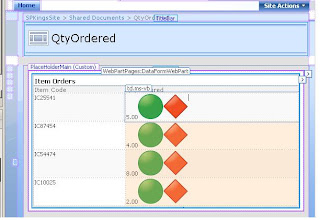
Right click red arrow and then click on conditional formatting. Click create (On right side top), Hide content. Observe that you can apply hiding, showing and formatting here. We want to hide on some criteria. We will create condition that if Qty Ordered is greater than 5, then show green else show red.
Apply following condition over red arrow.
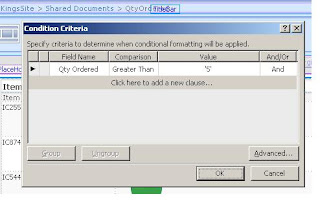
Do the same for Green Arrow, but this time with the reverse criteria.
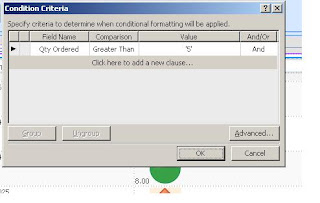
After you do this, you can see the effect of the conditions that we just defined.
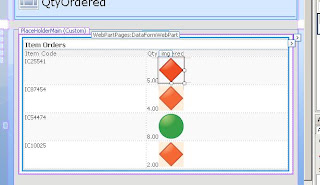
Save the page, open your site; navigate to the library where you created the web part page. Click on that page and there you go. See the result.
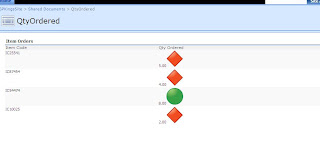
You can change the value, insert new data and see the result changing accordingly.
Monday, July 19, 2010
Create an alert for specific view
Hi All,
While creating an alert in the list, we often see one option which says we can create an alert for some specific views. This is obvious because there are so many people might work on that list and everybody is not interested in everybody’s task.
Hence we opt of creating alert for specific views. However when you see the view options while creating an alert, you do not see all views that are there for the list.
Criteria for a view to appear in alert selection list are:
1) That view should be a public view.
2) It must have where clause.
3) It should not have content approval.
4) It cannot be a hidden view.
If view fits in to above criteria, then that view will appear in the selection list while creating alert.
Wednesday, July 14, 2010
The remote server returned an error: (409) Conflict in SharePoint
Hi All,
I was trying to upload document in document library through SharePoint webservice.I was getting error "The remote server returned an error: (409) Conflict" when it try to create folder in SharePoint document library.Finally I found that the error was just because was "FolderName" has some special characters "@" so SharePoint refuse to create that folder through web service.
Hope it will help you.
Friday, July 9, 2010
How to impersonate user identity in WSS
Hi All,
There are some situations where in we need to change the executing code identity. Whenever code runs in WSS and in SharePoint, code actually executes in the logged in user’s identity. However this is not true in terms of workflow or the event handler where user does not play any identity role.
In these cases it is the system account that is considered as logged in user and all tasks are performed on that credential.
If we want to change the logged in user identity and make the code run on some other user’s identity at that time we can impersonate the identity of logged in user.
For example, in event handler or in workflow you want to change the user’s identity for executing code, you can do so with the help of SPUserToken class.
All we need to do is first take a reference of SPUser by getting user from SiteUsers method, and then pass the user token while initiating SPSite object. Once you do this, your code will run under specified user.
Before showing up the example, I would like to note here is that this process is different than RunWithElevatedPrivileges because this change of user token does not change the windows logged in user identity, it’s the User identity with respect to the WSS that changes. And the other important point to bring out here is that to perform the above mentioned code, your code first must run under RunWithElevatedPrivileges to user SPUserToken and change user.
That is it. you have just changed the User token while executing the code.
There are some situations where in we need to change the executing code identity. Whenever code runs in WSS and in SharePoint, code actually executes in the logged in user’s identity. However this is not true in terms of workflow or the event handler where user does not play any identity role.
In these cases it is the system account that is considered as logged in user and all tasks are performed on that credential.
If we want to change the logged in user identity and make the code run on some other user’s identity at that time we can impersonate the identity of logged in user.
For example, in event handler or in workflow you want to change the user’s identity for executing code, you can do so with the help of SPUserToken class.
All we need to do is first take a reference of SPUser by getting user from SiteUsers method, and then pass the user token while initiating SPSite object. Once you do this, your code will run under specified user.
Before showing up the example, I would like to note here is that this process is different than RunWithElevatedPrivileges because this change of user token does not change the windows logged in user identity, it’s the User identity with respect to the WSS that changes. And the other important point to bring out here is that to perform the above mentioned code, your code first must run under RunWithElevatedPrivileges to user SPUserToken and change user.
SPSite objSite = SPContext.Current.Site;
SPWeb objWeb = SPContext.Current.Web;
SPUser objUser = objWeb.SiteUsers[@"domain\user"];
SPUserToken usertoken = objUser.UserToken;
using (SPSite SiteColl =
new SPSite(objSite.ID, usertoken)) {
using (SPWeb web =
SiteColl.OpenWeb(objWeb.ID)) {
}
}
That is it. you have just changed the User token while executing the code.
Monday, July 5, 2010
Finally the result is out
Hi All,
Finally the result is out and here it is.
Q. Do you think Google online doc is giving very stiff competition to MS Office 2010?
We gave four options to chose from.
1)Yes, MS has to work more now on their Office suite.
2)No, Google cannot beat Microsoft in Office space.
3)Both are equal in their own advantages
4)I prefer Open office than MS and Google products.
Looks like people believe that Google has to work more in the field of Office to beat MS.

Monday, June 28, 2010
SharePoint 2010 Exams (MCTS)
Guys,
Now prepare yourself again for another set of MCTS exam for sharepoint 2010
This time also 4 exam but not like 2007 like 2 for wss and 2 for sharepoint.
All the exam this time will be for sharepoint 2010 with 4 part segregation
check out this links
70-667: TS: Microsoft SharePoint 2010, Configuring
70-668: PRO: Microsoft SharePoint 2010, Administrator
70-573: TS: Microsoft SharePoint 2010, Application Development
70-576: PRO: Designing and Developing Microsoft SharePoint 2010 Applications
now we will see who will crack this first.
P.S.: as per links about it shows
Published: July 12, 2010(In development)
no idea about this published date
Thursday, June 24, 2010
Difference between SharePoint Foundation 2010 and SharePoint server 2010
Hi All,
I just wanted to share a little information on SharePoint Foundation 2010 and SharePoint server 2010. Many people are confused about these two terms and do not know the difference between these two products.
Well let me tell you the basic difference between these two. Well actually we all know the basic difference between these two.
SharePoint Foundation 2010 is the other name of WSS 3.0. When I say other name, means this product is very similar to WSS 3.0 it is free downloadable and can be used in Server 2008 or Windows 7. It has also less number of features than SharePoint server 2010.
So it is the same story that what SharePoint server 2007 has is WSS 3.0 does not have. WSS 3.0 has less functionality and free as well and SharePoint 2007 has much more advanced features but a paid product.
Similar, SharePoint Foundation 2010 is a free download and has less feature than SharePoint Server 2010 which cost license and has much more advanced features like BCS, my site, enhanced BI, excel services and much more.
Friday, June 18, 2010
Finally the result is out
Hi All,
we asked if you have started using Windows 7 for SharePoint 2010 development.
19% saied yes, already started.
29% said, not yet, but they would love to.
12% said, we will never use it.
1% does not know about Windows 7.
2% don't know about SharePoint 2010.

we asked if you have started using Windows 7 for SharePoint 2010 development.
19% saied yes, already started.
29% said, not yet, but they would love to.
12% said, we will never use it.
1% does not know about Windows 7.
2% don't know about SharePoint 2010.

Tuesday, June 8, 2010
Advantages and limitations of Site definition and site template
Hi All,
This is really a simple post about advantages and limitation of site template and site definition. Although a little old topic. However, In learning, nothing is old. it is as new as today’s date.
Still many times same question being asked in the interview and we may not be able to answer properly on this question.
This post is the answer of that question.
Advantages of site template
• Data is stored in SQL server content database and so there is no need of synchronization.
• Custom templates are easy to create.
• Customization can be achieved from browser.
• Templates are easy to deploy.
• You can easily use SharePoint designer to make the changes on the site and then create the site template.
Advantages of site definition
• Data is stored on web server, so performance is better.
• You can customize list or document library at deep level.
• You can group your site definition under different tabs on site creation page.
• Defining new menu or performing specific action like sending an email, generating lookup values are possible through site definition.
Limitation of site template
• Less efficient in terms of large scale environment.
• All site templates appear under custom tab while creating site.
• If site template is based on site definition, then that site definition must be on web front server for custom template to work.
Limitation of site definition
• Requires developer skill.
• Editing site definition after deployment is difficult.
• Cannot apply SharePoint from site definition.
• (Sounds interesting, but yes) user cannot create two lists of the same type with different default content.
• Site definition must be deployed on each web server.
Monday, June 7, 2010
Creating custom field in SharePoint 2007 – Part 1
Hi All,
Many times the most common requirement is such that we have to build custom field in SharePoint and hence I though of sharing information on how we can create custom fields.
I am going to break this series of creating custom filed in to parts because there is so much fun in it to learn so many techniques while creating custom field.
Hence we are going to start with very basic text box control which will validate if the entered address starts with http or ftp or not.
Before diving more into coding part, first let me give you highlight on what all files are necessary for this.
1) Control ascx file - This is required for the field that we are going to develop; this will actually play a role while assigning field to the actual type (textbox, drop down etc).
2) Control xml file - This will define the type of the field and register to the SharePoint to make it understand that there is some field type that needs to be rendered at the time of creating field. We can define much more here. We will see them in upcoming series.
3) Control cs file – Coding related to the control which tells SharePoint about getting and setting the value of field and also to assign properties to the control in the code.
4) Field file – To validate the value entered in the field and throw the exception if validation fails. This will prevent item being added in the list. At the end, if we do not want any validation to happen, this file can return the value which is entered in the field.
Now let us start our journey of creating simple and basic text box custom field. Thank God I am not starting with Hello World.
Open Visual Studio and create a project with appropriate name to you. Now add one file and its extension should be .ascx. Make sure that you reference System.Web and Microsoft SharePoint assembly in the project.
Type in below code in that.
You can give your own ID to the rendering template and your own ID to textbox control.
Now add one more file. Call it as an xml file. And then type in the following code in it.
Now let me explain you each tag here. We will explore more and more tag in upcoming series. First the Type Name is the name that you want to give to this field. Type Display Name is the name of the field that will appear when you add the column to the list. Type Short Description as a name suggest is the description about this field. Parent Type is also an interesting value. We will see more on this in upcoming series. As of now we have taken it as Text. FieldTypeClass is the entire assembly reference with the field class name. We are going to add field class soon. SPKingsTextBoxField is the name of the field class in my project. Sortable true means you are allowing your end user to sort this column in list view web part and on AllItems and EditItems page. If this is false, they cannot sort this field. Filterable means filter can appear in that field column. If specified false, then you cannot filter on that column.
Change the appropriate references for your project assembly wherever it applies.
Add one more class and name it according to your choice. And paste the following code in it. I have demonstrated whole class file with namespace. This class is Control class for our custom field. Change your references accordingly. Make sure that your default template name should be equal to the rendering template id that you have in the ascx file. And your protected textbox ID should be equal to the textbox id that you gave in ascx file.
As you can see override Value method actually does the work of getting and setting the value of the field.
Now add one more class name it according to your choice. This is the field class for our custom field. And write down the following code. I have taken namespace and class of my project in this reference code. Change it to your own need.
As you can see, the only interesting part in this file as of now is GetValidateString method which handles the entered value in the field. Here we are getting the value by converting it to the string and then checking against the http and ftp, if not then we are throwing SPFieldValidationException which is basically throws the message at the time of clicking on OK button on the form.
Now this is it. All we need to do is copy respective files at respective locations. First build the project and sign it with strong key. Deploy that DLL to the GAC and then see its property. Take out the public key token and modify it in your XML field file.
Now copy this DLL to GAC (which you have just done), copy XML file to the 12 hive XML directory and copy ascx file to the CONTROLTEMPLATES folder under 12 hives. Reset the IIS.
I have created one dummy list to show you the custom field in action. Create column, now when you click on create column, on the page where you land up, you will see one more field being added and which is SPKings TextBox in my case. Give field name WebSite and select SPKings TextBox field type and click on OK.
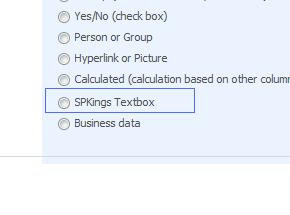
This will add WebSite column with our own field in the list. Go ahead and click on New to add the item in the list. Type in www.SharePointKings.com. And the moment after clicking OK button, our field validates the entered value with our own written logic and throws the exception with the message that we wrote in the code.
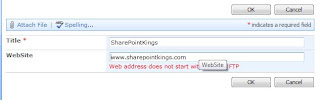
Now change the value to http://www.SharePointKings.com and click on OK. This time it passes the validation and value gets entered in the list. Open the same item for editing and see the value is in WebSite column. Try to modify that column again by removing http and click on OK, again it will validate the value and throws the exception.
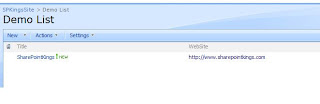
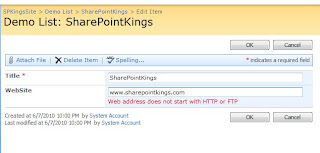
So this is the end of my first part of this series. Hope that you have liked this post and look forward to read further interesting part. I will be back soon with part 2.
Many times the most common requirement is such that we have to build custom field in SharePoint and hence I though of sharing information on how we can create custom fields.
I am going to break this series of creating custom filed in to parts because there is so much fun in it to learn so many techniques while creating custom field.
Hence we are going to start with very basic text box control which will validate if the entered address starts with http or ftp or not.
Before diving more into coding part, first let me give you highlight on what all files are necessary for this.
1) Control ascx file - This is required for the field that we are going to develop; this will actually play a role while assigning field to the actual type (textbox, drop down etc).
2) Control xml file - This will define the type of the field and register to the SharePoint to make it understand that there is some field type that needs to be rendered at the time of creating field. We can define much more here. We will see them in upcoming series.
3) Control cs file – Coding related to the control which tells SharePoint about getting and setting the value of field and also to assign properties to the control in the code.
4) Field file – To validate the value entered in the field and throw the exception if validation fails. This will prevent item being added in the list. At the end, if we do not want any validation to happen, this file can return the value which is entered in the field.
Now let us start our journey of creating simple and basic text box custom field. Thank God I am not starting with Hello World.
Open Visual Studio and create a project with appropriate name to you. Now add one file and its extension should be .ascx. Make sure that you reference System.Web and Microsoft SharePoint assembly in the project.
Type in below code in that.
<%@Control Language="C#" Debug="true"%>
<%@Assembly Name="Microsoft.SharePoint, Version=12.0.0.0, Culture=neutral, PublicKeyToken=71e9bce111e9429c" %>
<%@Register TagPrefix="SharePoint" Assembly="Microsoft.SharePoint, Version=12.0.0.0, Culture=neutral, PublicKeyToken=71e9bce111e9429c" namespace="Microsoft.SharePoint.WebControls"%>
<SharePoint:RenderingTemplate ID="SPKingsTextbox" runat="server">
<Template>
<asp:TextBox ID="txtTextBox" runat="server" />
</Template>
</SharePoint:RenderingTemplate>
You can give your own ID to the rendering template and your own ID to textbox control.
Now add one more file. Call it as an xml file. And then type in the following code in it.
<?xml version="1.0" encoding="utf-8" ?>
<FieldTypes>
<FieldType>
<Field Name="TypeName">SPKings Textbox</Field>
<Field Name="TypeDisplayName">SPKings Textbox</Field>
<Field Name="TypeShortDescription">SPKings Textbox</Field>
<Field Name="ParentType">Text</Field>
<Field Name="FieldTypeClass">SharePointKings.CustomControls.SPKingsTextBoxField, SharePointKings.CustomControls, Version=1.0.0.0, Culture=neutral, PublicKeyToken=ed861ccbb4ad6887</Field>
<Field Name="Sortable">TRUE</Field>
<Field Name="Filterable">TRUE</Field>
</FieldType>
</FieldTypes>
Now let me explain you each tag here. We will explore more and more tag in upcoming series. First the Type Name is the name that you want to give to this field. Type Display Name is the name of the field that will appear when you add the column to the list. Type Short Description as a name suggest is the description about this field. Parent Type is also an interesting value. We will see more on this in upcoming series. As of now we have taken it as Text. FieldTypeClass is the entire assembly reference with the field class name. We are going to add field class soon. SPKingsTextBoxField is the name of the field class in my project. Sortable true means you are allowing your end user to sort this column in list view web part and on AllItems and EditItems page. If this is false, they cannot sort this field. Filterable means filter can appear in that field column. If specified false, then you cannot filter on that column.
Change the appropriate references for your project assembly wherever it applies.
Add one more class and name it according to your choice. And paste the following code in it. I have demonstrated whole class file with namespace. This class is Control class for our custom field. Change your references accordingly. Make sure that your default template name should be equal to the rendering template id that you have in the ascx file. And your protected textbox ID should be equal to the textbox id that you gave in ascx file.
using System;
using System.Collections.Generic;
using System.Text;
using System.Web;
using System.Web.UI.WebControls;
using Microsoft.SharePoint.WebControls;
namespace SharePointKings.CustomControls
{
public class SPKingsTextboxControl : BaseFieldControl
{
protected TextBox txtTextBox;
/// <summary>
/// setting template name
/// </summary>
protected override string DefaultTemplateName
{
get
{
return @"SPKingsTextbox";
}
}
/// <summary>
/// get set value
/// </summary>
public override object Value
{
get
{
EnsureChildControls();
return txtTextBox.Text.Trim();
}
set
{
EnsureChildControls();
txtTextBox.Text = (string)this.ItemFieldValue;
}
}
/// <summary>
/// create child control
/// </summary>
protected override void CreateChildControls()
{
if (Field == null) return;
base.CreateChildControls();
}
}
}
As you can see override Value method actually does the work of getting and setting the value of the field.
Now add one more class name it according to your choice. This is the field class for our custom field. And write down the following code. I have taken namespace and class of my project in this reference code. Change it to your own need.
using System;
using System.Collections.Generic;
using System.Text;
using Microsoft.SharePoint;
namespace SharePointKings.CustomControls
{
public class SPKingsTextBoxField: SPFieldText
{
#region Contstructors
public SPKingsTextBoxField(SPFieldCollection fields, string fieldName)
: base(fields, fieldName)
{
}
public SPKingsTextBoxField(SPFieldCollection fields, string typeName, string displayName)
: base(fields, typeName, displayName)
{
}
#endregion
public override string GetValidatedString(object value)
{
string strTxtValue = Convert.ToString(value).Trim();
if (!strTxtValue.ToUpper().StartsWith("HTTP") &&
!strTxtValue.ToUpper().StartsWith("FTP"))
{
throw new SPFieldValidationException("Web address does not start with HTTP or FTP");
}
return strTxtValue;
}
}
}
As you can see, the only interesting part in this file as of now is GetValidateString method which handles the entered value in the field. Here we are getting the value by converting it to the string and then checking against the http and ftp, if not then we are throwing SPFieldValidationException which is basically throws the message at the time of clicking on OK button on the form.
Now this is it. All we need to do is copy respective files at respective locations. First build the project and sign it with strong key. Deploy that DLL to the GAC and then see its property. Take out the public key token and modify it in your XML field file.
Now copy this DLL to GAC (which you have just done), copy XML file to the 12 hive XML directory and copy ascx file to the CONTROLTEMPLATES folder under 12 hives. Reset the IIS.
I have created one dummy list to show you the custom field in action. Create column, now when you click on create column, on the page where you land up, you will see one more field being added and which is SPKings TextBox in my case. Give field name WebSite and select SPKings TextBox field type and click on OK.

This will add WebSite column with our own field in the list. Go ahead and click on New to add the item in the list. Type in www.SharePointKings.com. And the moment after clicking OK button, our field validates the entered value with our own written logic and throws the exception with the message that we wrote in the code.

Now change the value to http://www.SharePointKings.com and click on OK. This time it passes the validation and value gets entered in the list. Open the same item for editing and see the value is in WebSite column. Try to modify that column again by removing http and click on OK, again it will validate the value and throws the exception.


So this is the end of my first part of this series. Hope that you have liked this post and look forward to read further interesting part. I will be back soon with part 2.
Subscribe to:
Posts (Atom)