Sometimes we
may require creating a custom workflow action when default activity choices
offered by designer do not suffice our need.
In this post,
I am going to show you how to create a custom action for designer.
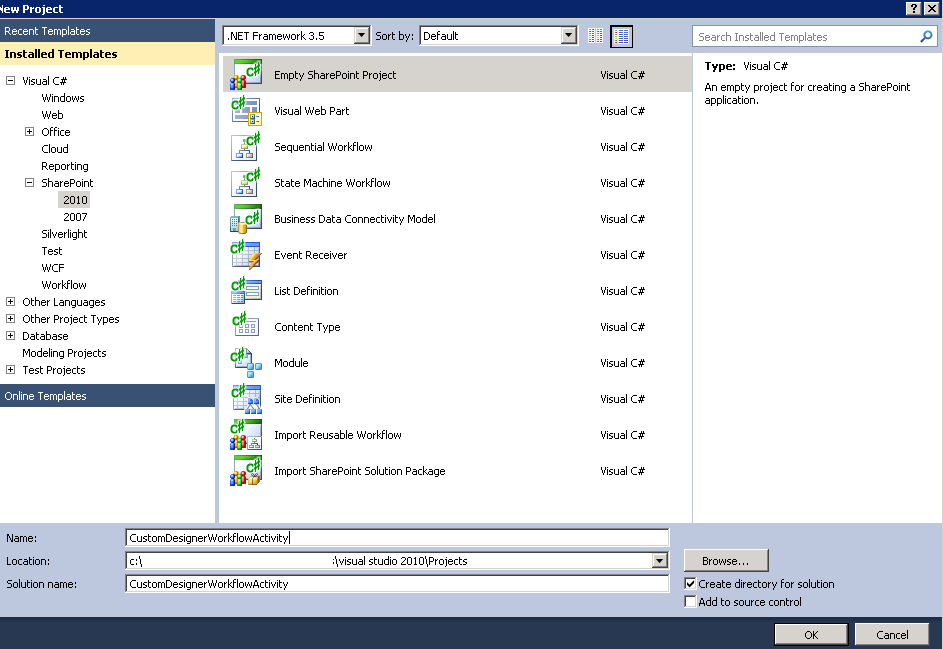
You would
need Visual Studio for this. So open up VS studio and select Visual C# , empty
project in SharePoint 2010.
Give it a
name you want.
Deploy it as
a farm solution.

Now go ahead
and add one more project. This time select workflow – workflow activity
library.

Now add two
DLL references. Microsoft.SharePoint.dll and Microsoft.SharePoint.WorkflowActions.dll
Now we are
going to create three properties which will act as parameters in our custom
activity. One will be the site URL, other will be Web Name and the last will be
the name of the contact list.
These
properties are decorated with certain attributes and declared as dependency
properties. So go ahead and add three dependency properties.
public static DependencyProperty SiteUrlProperty = DependencyProperty.Register("SiteUrl",
typeof(string), typeof(CreateContactListType),
new PropertyMetadata(""));
[DescriptionAttribute("Url
of site where contact list will be created")]
[BrowsableAttribute(true)]
[DesignerSerializationVisibilityAttribute(DesignerSerializationVisibility.Visible)]
[ValidationOption(ValidationOption.Optional)]
public string SiteUrl
{
get
{
return ((string)(base.GetValue(CreateContactListType.SiteUrlProperty)));
}
set
{
base.SetValue(CreateContactListType.SiteUrlProperty,
value);
}
}
public static DependencyProperty WebNameProperty = DependencyProperty.Register("WebName",
typeof(string), typeof(CreateContactListType),
new PropertyMetadata(""));
[DescriptionAttribute("Name
for Web")]
[BrowsableAttribute(true)]
[DesignerSerializationVisibilityAttribute(DesignerSerializationVisibility.Visible)]
[ValidationOption(ValidationOption.Optional)]
public string WebName
{
get
{
return ((string)(base.GetValue(CreateContactListType.WebNameProperty)));
}
set
{
base.SetValue(CreateContactListType.WebNameProperty,
value);
}
}
public static DependencyProperty ContactListNameProperty = DependencyProperty.Register("ContactListName",
typeof(string), typeof(CreateContactListType),
new PropertyMetadata(""));
[DescriptionAttribute("Name
for contact list")]
[BrowsableAttribute(true)]
[DesignerSerializationVisibilityAttribute(DesignerSerializationVisibility.Visible)]
[ValidationOption(ValidationOption.Optional)]
public string
ContactListName
{
get
{
return ((string)(base.GetValue(CreateContactListType.ContactListNameProperty)));
}
set
{
base.SetValue(CreateContactListType.ContactListNameProperty,
value);
}
}
Now we need
to write logic in Execute method as to what needs to be done when this activity
executes.
So we are
going to create a contact list in specified web with specified name. Remember
return closed as that means activity has
successfully completed as a status.
protected override ActivityExecutionStatus Execute(ActivityExecutionContext executionContext)
{
CreateContactList();
return ActivityExecutionStatus.Closed;
}
private void
CreateContactList()
{
using (SPSite oSPSite
= new SPSite(SiteUrl))
{
using (SPWeb
oSPWeb = oSPSite.AllWebs[WebName])
{
Guid ContactListID =
oSPWeb.Lists.Add(ContactListName, ContactListName + "
Created From Designer",
SPListTemplateType.Contacts);
SPList contactList =
oSPWeb.Lists[ContactListID];
contactList.OnQuickLaunch = true;
contactList.Update();
}
}
}
We are done
with writing our code. It’s time to register the project with strong name. Go
ahead in property of this project and give it a strong name.
Now right
click the CustomDesignerWorkflowActivity project and add SharePoint mapped
folder.

Select Template-1033-Workflow

Now we need
to add .actions file which is very important from Designer stand point.
Add new item
in the workflow folder and give a name as DesignerCustomActualActivity.actions
This is the
file which actually tells SharePoint to make this action available in Designer.
Now add this
XML in that file.
<?xml version="1.0" encoding="utf-8" ?>
<WorkflowInfo>
<Actions Sequential="then" Parallel="and">
<Action Name="Create Contact List"
ClassName="DesignerCustomActualActivity.CreateContactListType"
Assembly="DesignerCustomActualActivity, Version=1.0.0.0,
Culture=neutral, PublicKeyToken=5e36fcb66a91895d"
AppliesTo="all"
Category="SPKings Activity">
<RuleDesigner Sentence="Contact List Name %1 in %2 within site %3.">
<FieldBind Field="ContactListName" Text="Contact List Name"
DesignerType="TextArea" Id="1"/>
<FieldBind Field="WebName" Text="Web Name"
DesignerType="TextArea" Id="2"/>
<FieldBind Field="SiteUrl" Text="Url of base site" Id="3"
DesignerType="TextArea"/>
</RuleDesigner>
<Parameters>
<Parameter Name="ContactListName" Type="System.String, mscorlib"
Direction="In" />
<Parameter Name="WebName" Type="System.String, mscorlib"
Direction="In" />
<Parameter Name="SiteUrl" Type="System.String, mscorlib"
Direction="In" />
</Parameters>
</Action>
</Actions>
</WorkflowInfo>
If you
observe closely, we have defined action in tag and inside it we registered our
assembly and defined our own category. We can have the same name in category
whenever we create our custom actions so that all our custom action comes under
that category.
Then we set
the rule designer and in that we have bounded our all three properties with
their data type. Then we set the same three as parameters as input because we
will be setting the properties.
Now we need
to add these into the package. So double click on the package in the project
and then click on advanced.


Now add
assemblies. You can get this info from GAC If you deploy this application’s DLL
in GAC, from there you can get public key token information and then register
it here.
If you get an
access denied while dragging DLL to assembly or not able to install even
through gacutil, then deploy the solution, you will get that in assembly and
from there you can get it.
Just a handy
tip, there is one more way to get public key token if you do not want to deploy
the DLL in GAC and then get the token. Read this post.
Now one more
change left and that needs to be done in web.config file of web application. Open
up the web.config file of your web application from wss\virtual directory
folder and find a tag Authorized Type and add our custom assembly information
as mentioned below.
Now build the
application and then deploy the application. It’s time to test our custom
action in action and to see if it has appeared in designer.
Open
designer, connect with the site. Create workflow and click on actions. Here we
are with our own custom action.

Click on the
create contact list action and we get this. These come from the action file
that we created.

Set up the
parameters. Save and publish the workflow.
And set up a
workflow to run on item adding. Add the item and see the list gets created in
the web name you have mentioned in the designer. Execute method gets called
when this action gets executed.