Sunday, August 30, 2009

Creating and working with Survey in SharePoint - Part 2

Hi All,

Here I am back with some more interesting stuff in survey list. In previous post we discussed about the advantages of survey list. But it is not true in every case. It has got many other limitations as well. Here in this article, we are going to discuss about one basic difficulty about survey.

I would first suggest you to read Creating and working with Survey in SharePoint - Part 1 of the series.

For further reading read Creating and working with Survey in SharePoint - Part 3

Creating and working with Survey in SharePoint - Part 4

Creating and working with Survey in SharePoint - Part 5

If you want to have some HTML in survey’s question, then we cannot insert that. Sometimes we may require making some font bold, something italic and we want to underline something. We need to increase the font size, we may require to add hyperlink in question, then we cannot do it.

So anyways we have to overcome this problem anyhow. So here is a way how you can insert HTML in the question of survey.

First make a note of one very important point, you have to repeat these steps for each and every page that you have for the survey. Means if you have branching question then you get more than one page to respond.

Before getting actually in to this, you first need to understand that how we will replace the normal text with HTML text.

Ok, let us go back to our first question. Open the question and add the following words before and after Department.


See the effect of this change on questions. We can clearly read startitalic and enditalic in first question.


We have added these words and we will replace this word with startitalic with <i> and enditalic </i> in content editor web part. You can use whatever word that you want, we only need to replace those words in the web apart. Let us see how we will do this now.

Go ahead and add one content editor web part below the questions. Edit the page and add the content editor web part.

Click on modify shared web part, click on source editor and write the code as shown in below.

<script language="JavaScript">
var ClassName;
ClassName = 'ms-formlabel';

var elements = new Array();

var elements = document.getElementsByTagName('td');

for(var e=0;e<elements.length;e++)
{
if(elements[e].className == ClassName)
{

elements[e].innerHTML = elements[e].innerHTML.replace('startitalic','<i>');

elements[e].innerHTML = elements[e].innerHTML.replace('enditalic','</i>');


}

}

</script>


Let us have a look on this above code. Here what we have done is that we have first taken out ms-formlable class as questions belong to this class in SharePoint architecture. We then take all ID because all questions are in TD tag and then we find our forcefully entered two words and replace them with proper HTML tag and there you go. See the effect of the above code.


Let us go ahead and change our third question. Make the following change in it.


Now again go ahead and change the existing editor web part with following addition with above code.

elements[e].innerHTML = elements[e].innerHTML.replace('linebreak','<br/>');

elements[e].innerHTML = elements[e].innerHTML.replace('startunderline','<u>');

elements[e].innerHTML = elements[e].innerHTML.replace('endunderline','</u>');


The effect of the above code is shown below. We have also broken question in two lines.


Now let us go and create hyperlink in the same question. Here is a trick to add hyperlink to the question. Let us say for example we want to have a hyperlink on “like” word and that should take to the Home page link and it should open in new page. In addition to this, it should be of bigger size than other words.

So here is a simple answer of the tuff question. Add just one more line to your content editor web part.

elements[e].innerHTML = elements[e].innerHTML.replace('like','<a href="/sites/Test/default.aspx" target="_blank" style ="font-size:14pt" >like</a>');


and see the effect of above code.


I hope that now you have the clear picture. All it takes is the knowledge of HTML and you can insert anything, almost anything with HTML in the questions.

I will soon come up with part 3. keep reading it.

Creating and working with Survey in SharePoint -Part 1

Hi All,

Today we will learn about SharePoint Survey list. A very useful and very interesting list with many advantage and bit of limitations as well. First let us understand the advantage.

Whenever you want to collect the responses from various people, across your organization about any event, any activity or any other thing, Survey is best suited list. It allows you to collect the responses in various ways. You can ask the questions and they can answer those questions and then result can be analyzed by taking it to the excel sheet or through graphical summary or by watching all responses at once.

You can have as many questions as you want and the format of their answers can also be of great varieties. For example, you may want to ask one question whose answer is simple text or multiple line of text with formatting. You can also have a question whose answer is choice (selection in terms of radio buttons, check boxes, drop downs). You can have question whose answer can be a date. We can have all these with built in survey list.

Another advantage of survey is that you can also add branching logic in it. That means, let us say, you have one question which depends upon the answer of some other question. To show or not to show a question depends upon the answer of previous question. This kind of branching can also be done in survey list.

So all and all at very basic level, if we would like to collect responses from people, survey is the best choice.

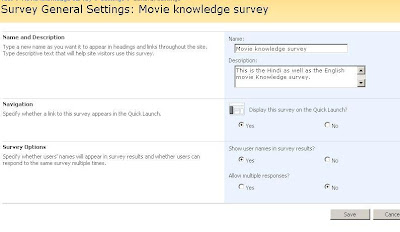
Let’s see the basic steps involved in the creating Survey List. Go to Create and select the Survey under tracking category. Give the name and description like shown below. Observe that you have one setting which says allow multi responses. If you want to collect multiple responses from individual person, then you should allow this else don’t allow this. This basically allows responder to respond to survey more than one time.


So we are going to create movie quiz. Once you are done with the creation of the survey list, we now need to add questions to add and have to decide what kind of answer each question has.

I know many people may not like this survey as it seems funny. But my main intension is to let you know how we can create it and what are the options available for answers and how branching can be done.

So go ahead and add the questions to it. Click on settings -> Add Question and add the first question. Click next question after creating each question.

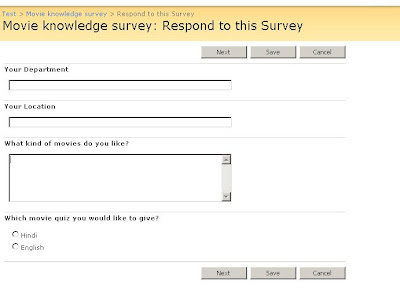
1) Your Department -> Single line of text
2) Your Location -> Single line of text
3) What kind of movies do you like? -> Multiple lines of text and plain text.

Ok, now we are going to give user a choice. Either he can go for Hindi quiz or he can go for English quiz.

So go ahead and create one question, again by selecting settings->Add Question.

4) Which movie quiz would you like to give? -> Choice, Type: Radio button and add Hindi and English in the text box provided.

Now we actually want to branch the user directly to the questions of Hindi cinema and English Cinema depending on user’s choice. We cannot branch the question right now. That can be done after adding all questions and that will be done from the survey settings page. So now we will move ahead and add the Hindi cinema questions.

Go ahead and add question.

5) Rate yourself in Hindi Cinema.>Rating scale. Here we can define the sub questions and each question can have rating scales. So add following questions to it.
a. Old year movies (1950-1970)
b. Medium year movies (1971-2000)
c. Latest movies (2000-2009)


6) Add next question. Name the actor whose famous dialogue is “Kitne Aadmi the?” Choice, drop down and add following options. Jay, Gabbar, Veeru

7) Add next question. Name the upcoming movie of Akshay Kumar which is said to be captured under water. Single line of text.

8) Add next question. Rate yourself in English Movies.>Rating scale. Here we can define the sub questions and each question can have rating scales. So add following questions to it.
a. Old year movies (1950-1970)
b. Medium year movies (1971-2000)
c. Latest movies (2000-2009)


9) Add next question. Name the actor who was gifted God power in the movie "Bruce Almighty'. Single line of text.

10) Add next question. What was the version number mention in the latest movie of “Die Hard" series? Choice and options are 3.0, 4.0, and 3.5.

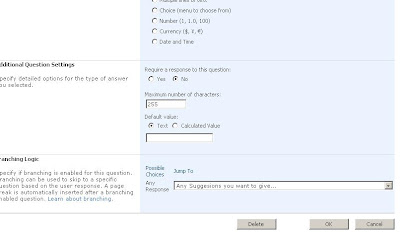
11) Last we will ask about the suggestion. Add question “Any suggestions that you want to give…” Multi lines of text.

If you want to have page break and then want to ask next question in next page, then add page separator and then add the next question so that this question will come on next page and not one the same page.

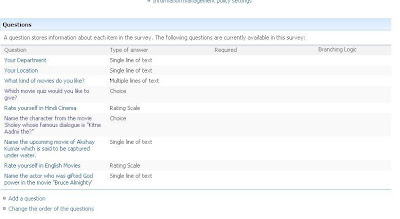
After adding these questions, your settings page should look something like this


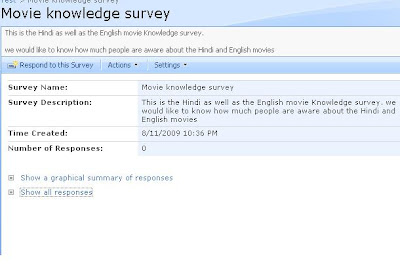
Now, open the main page of survey list. It should look like below image and it shows description of the survey, number of responses when it was created and click to see all responses and show a graphical summary.


Ok, now go to survey settings and see that Branching logic column is empty as we have yet not defined any branching. We want to branch the question as per the question in which we asked that what movie quiz you would like to give. If user selects Hindi, then we want to jump to the Hindi questions without asking for English movie questions and if user selects English, we need to jump to the English movie questions without asking for Hindi movie questions.

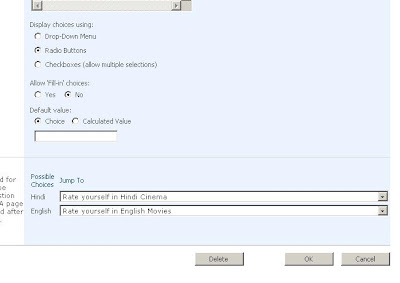
So go ahead and click the question which asks for the selection of movie quiz and select like shown below. This defines that when user clicks on Hindi he will be redirected to the first Hindi question else he will be redirected to English question.


Add one more branching with the question which asks about Akshay Kumar’s upcoming movie and add branching logic as shown below. We need to add this branch because if user selects Hindi, then all questions of English movie will also come and we don’t want that so we will branch to the last question from this Akshay Kumar’s question so that no English questions asked. Here what we have done is whatever the response is, we will jump to the last question.


Now go back and click on respond to this survey. You will see that it asks only up to the question whose answer branches the next question.


Fill the details, select Hindi and click next, then as you can see you are presented with a screen where you get the Hindi movie questions and one interesting thing is save button in between. That means if you have very long survey and it has many branching logic, then you can save the survey and then continue at your own convenience at any time.


Click next and finally fills up the final text box and there you go, you are done with responding your first survey. If you observe the column Completed, you will find “yes” because we have completed the survey. If you would have saved it in between somewhere, you would have find it “No”, that means it is partially saved. You get “Yes” only when somebody fills the entire survey.

I will discuss bit deep about this in my coming articles of survey series. If you now click on respond to survey, you will get an error saying that you cannot give response for more than one time. If you have saved your survey, then you can click on the survey and complete that survey again.

One very important thing to note here is that person who creates the survey has to make sure that whether to allow user to see only his response or he can see everybody’s response. Same goes for editing options, should he allows to change other’s response or his own only. These settings are very important, if these options are set, then even user clicks on View all responses, he will be able to see only his response. Same is true in the case of graphical summary. He cannot see other responses from other people.

This is basically called Item level security. To set this on survey, go to Settings->Survey settings->advanced settings. Here you will find an option to set these properties. There you can also set to allow these responses to be a part of SharePoint search.

You can also export the result into excel as the option is available in the action menu.

Read Creating and working with Survey in SharePoint -Part-2

and

Creating and working with Survey in SharePoint - Part 3

Creating and working with Survey in SharePoint - Part 4

Creating and working with Survey in SharePoint - Part 5

for further interesting reading.

Thursday, August 27, 2009

SQL query on SharePoint content database: Step by Step 1

After a very long time we are back with fetching information directly from sharepoint content database with the help of SQL query.

check our previous post(s) here

But for this time we are going step by step.

First of all each and every web application has its own content database.


site collection(s)

To find the information about site collection there is a table called “Sites”
--This table content information of site collection(s)
select * from sites

--Number Site collection in a web application
select count(*) as 'Total Number OF Site Collection' from sites


Useful fields in sites table are ‘ID’ and ‘RootWebID’


Sites (a.k.a SPWeb)

To find the information about all the web in web application (that includes all the site collection) there is a table called “Web”
--This table content information of all the web
select * from webs
ID field of webs table is foreign key from rootwebid of sites table
So you can have relation like
--Relation of sites and web
Select * from webs inner join Sites on Webs.Id = Sites.RootWebId
Below are the useful fields.
Select
id,--unique ID
siteid,--site collection ID
parentwebid,--Null if top level site otherwise ID of webs
fullurl,--relative url
title,--web Title
description,--Web Description
masterurl,--Master page URL
custommasterurl,--Custom master page URL
sitelogourl,--site logo URL
sitelogodescription
from webs
inner join Sites on Webs.Id = Sites.RootWebId


This is the relation between web application, site collection, and then web from the database architectural point of view.

We will go further with list and libraries, and items but that will be step by step

Disclaimer

Running Direct queries on Sharepoint Database is not recommended by Microsoft.
Simply it's not for the faint of heart. Directly querying or modifying the database can place extra load on a server, or can expose information to users in a way that violates security policies or personal information management policies.We highly recommend doing all testing in a non-production environment and only for R & D purpose.

Saturday, August 15, 2009

Changing sequence and adding new menu items in SharePoint

Hi All,

As I have explained you in my previous post about the menu items in the toolbar on AllItems.aspx page. We will take the same code and sample here and I will explain you today how to play with the Menu items inside the menus.

So this post is all about changing the sequence of menu items and adding new menu items.

First let me show you how you can change the position of individual items in the menu. Considering we are playing with Actions menu and we want to change the “View RSS Feed” to appear with the Edit in Datasheet option.

Ok, let me clarify one thing very clearly. We should not change the default place of menu items as they are actually categorized properly and they have been placed in respective group items. For example, it doesn’t make sense if you place Alert Me option with Edit in Datasheet option. Does it make sense to have this option with Datasheet option? Answer is absolutely no.

But this is just for fun purpose and also to give you an idea about how to do that. Before we actually go in to the code, I would like to share here that each of these menu options fall under MenuGroupID.

First observe the below figure closely. See Red circle, Bur circle and green circle.


Now see the below image of menu items


See, There is only one red circle because see the first category. We have only one single item here which is EditInDatasheet. See two blue circles, we have two items in the menu category (Export to Spreadsheet and Open with Access) and last we have again two circles shown in green color represents last two options. (View RSS Feed and Alert Me). As you can see all belongs to MenuGroupId. First item has id number 200; second two items have id number 400 and last two items have id number 500.

So now we will play the trick and we will move View RSS Feed with EditinDatasheet. All we need to do is just change the MenuGroupId of RSS Feed from 500 to 200 so that it will come with ExportinDatasheet.

foreach (Control childControl in ParentControl.Controls)
{

if (childControl.ToString().ToUpper() == "Microsoft.SharePoint.WebControls.ActionsMenu".ToUpper())
{

ActionsMenu Menu = (ActionsMenu)childControl;
Menu.Visible = true;

if (Menu.GetMenuItem("ViewRSS") != null)
{
Menu.GetMenuItem("ViewRSS").MenuGroupId = 200;
}

break;
}
CheckControl(childControl);
}


See the effect of this code,


If we want View RSS Feed to appear first and Datashet option to come second, then just a little modification will do this for us. We only need to add one single line only.

if (Menu.GetMenuItem("ViewRSS") != null)
{
Menu.GetMenuItem("ViewRSS").MenuGroupId = 200;
Menu.GetMenuItem("ViewRSS").Sequence = 0;
}


This is the way you can change the menu item from one place to the other place.

Now how about adding a menu item template to Menu? Let us go ahead and add menu item template to the Actions menu.

MenuItemTemplate objTemplate = Menu.AddMenuItem("MailMeID", "Mail Me From Hotmail",
"/_layouts/images/SPSPROFL.GIF",
"This will take you to hotmail", "", strClientURL);

objTemplate.MenuGroupId = 200;


Once you click on this item, it will take you to hotmail.com. Ok, now how about adding a client side code to it? As you can see in my previous code, I kept the last parameter blank. That is where we need to right the client event.

Just to demonstrate you, I have used the built in Client Click of RSS feed and assigned it to our new menu item.


if (childControl.ToString().ToUpper() == "Microsoft.SharePoint.WebControls.ActionsMenu".ToUpper())
{
ActionsMenu Menu = (ActionsMenu)childControl;
Menu.Visible = true;
string strClientURL = "window.location = '/sites/Test/_layouts/listfeed.aspx?List=%7BA6B5F63B%2DB860%2D418F%2DBEB0%2D8DAFC72C1C6B%7D';";
MenuItemTemplate objTemplate = Menu.AddMenuItem("MailMeID", "Mail Me From Hotmail",
"/_layouts/images/SPSPROFL.GIF",
"This will take you to hotmail", "", strClientURL);


objTemplate.MenuGroupId = 200;

break;
}


You can change this url to your desired page in the site. Once you click on Mail me from Hotmail, it will take you to RSS Feed page.


If you add one more single line of code which is shown below, we get that new menu item with separator. It separates it with the other menu items with one line. Note that we have commented the MenuGroupID assignment, so that it becomes a separate group.

if (childControl.ToString().ToUpper() == "Microsoft.SharePoint.WebControls.ActionsMenu".ToUpper())
{

ActionsMenu Menu = (ActionsMenu)childControl;
Menu.Visible = true;

string strClientURL = "window.location = '/sites/Test/_layouts/listfeed.aspx?List=%7BA6B5F63B%2DB860%2D418F%2DBEB0%2D8DAFC72C1C6B%7D';";

MenuItemTemplate objTemplate = Menu.AddMenuItem("MailMeID", "Mail Me From Hotmail",
"/_layouts/images/SPSPROFL.GIF",
"This will take you to hotmail", "", strClientURL);

Menu.AddMenuItemSeparator();

//objTemplate.MenuGroupId = 200;

break;
}


Ok, now once again let us get the DesigntimeHTML and see what the new things that we have got,


Check out the new menu item added. I have highlighted it with blue underline and also see the new MenuGroupID that we got. It is 2147483647. So now we know that if any other menu item we want to add with the same group, we need to assign this number to the new MenuItemtemplate as we saw in the beginning of this post.

I am finding more interesting about this, I will be eager to share it with you all-time supportive readers.

Hiding / Removing Menu and Menu items in SharePoint

Hi All,

Today we are going to discuss something on tool bar action. We all know that we get toolbar where we have New menu, action menu available when we are in AllItems.aspx.

Let us see how we can remove the toolbar specific item, means sometime we may require removing NewMenu and sometimes we may want to remove ActionMenu or even from Settings menu, then here is a way we can do this.

We can also hide specific item from New Menu, Action Menu or Settings menu. First we need to iterate through all controls on AllItems.aspx and once we find the specific menu we are looking for, then we can cast that control in to specific menu and then call visible method to set it to true and false.

First let me give you a highlight on what are these classes.

Microsoft.SharePoint.WebControls.NewMenu
Microsoft.SharePoint.WebControls.ActionsMenu
Microsoft.SharePoint.WebControls.SettingsMenu


So to demonstrate, go ahead and create one class which inherit from web part class and write down the following code in createchildcontrol event. Deploy it on your site and edit the AllItems page that you want to work with and add the webpart above AllItems web part (form web part).

protected override void CreateChildControls()
{
foreach (Control ctrl in this.Page.Controls)
{
CheckControl(ctrl);
}
base.CreateChildControls();
}


Now, in this code we will check each control on the page and once we find our required control, then we will cast that control and set the visible property.

private void CheckControl(Control ParentControl)
{
try
{
foreach (Control childControl in ParentControl.Controls)
{

if (childControl.ToString().ToUpper() == "Microsoft.SharePoint.WebControls.NewMenu".ToUpper())
{
NewMenu Menu = (NewMenu)childControl;
Menu.Visible = false;

if (Menu.GetMenuItem("NewFolder") != null)
Menu.GetMenuItem("NewFolder").Visible = false;
break;
}
CheckControl(childControl);
}
}
}


Above code will iterate all controls till it finds the New Menu and once it gets the New Menu, we cast the control in the NewMenu class object and set its property to false, means we cannot see NewMenu.

Below figure shows the result of above code.


Same way, if we run the below code

foreach (Control childControl in ParentControl.Controls)
{

if (childControl.ToString().ToUpper() == "Microsoft.SharePoint.WebControls.ActionsMenu".ToUpper())
{

ActionsMenu Menu = (ActionsMenu)childControl;
Menu.Visible = false;
break;
}
CheckControl(childControl);
}


Then, you can see the result as shown in the below screen


Similarly, if you write the below code,

foreach (Control childControl in ParentControl.Controls)
{

if (childControl.ToString().ToUpper() == "Microsoft.SharePoint.WebControls.SettingsMenu".ToUpper())
{
SettingsMenu Menu = (SettingsMenu)childControl;
Menu.Visible = false;
break;
}
CheckControl(childControl);
}


Then, you can see the result as shown in the below screen.


Ok, let us proceed. From the List Settings option, I have enabled to new folder option.


So ideally you will find New Folder option when you click in New from the tool bar. However if you write the following code, then it will hide the New Folder option.

foreach (Control childControl in ParentControl.Controls)
{

if (childControl.ToString().ToUpper() == "Microsoft.SharePoint.WebControls.NewMenu".ToUpper())
{
NewMenu Menu = (NewMenu)childControl;
Menu.Visible = true;

if (Menu.GetMenuItem("NewFolder") != null)
Menu.GetMenuItem("NewFolder").Visible = false;
break;
}
CheckControl(childControl);
}


Ok, same goes for the other menu items in the other menu as well. For example, let’s remove the Alert Me option from Actions menu. Question is how to do that? In above example, we used NewFolder as MenuItem and found it. But what needs to be passed as parameter in GetMenuItem method?

Let me give you a wonderful trick. Even I was not aware about this. I worked on it and find out that it’s the ID of the MenuItem. Where to find that ID, I’ll tell you how I found it. See the below figure. Once, you come in the IF condition of your menu option, set a break point and then observe the following red circle marks. This is the Menu.GetDesignTimeHTML() method that you can check in local window or immediate window. I have taken this HTML after my debug point crossed the code that makes “Alert Me” visible false, that is the reason you cannot find Alert Me text here. If you observe this HTML before the code gets execute from that point, you will be able to see that as well.


Use the ID of the menu item in code. Just remember avoid everything including _ character in the ID and take the rest of all character and pass it to the GetMenuItem method.

And now see the below code

foreach (Control childControl in ParentControl.Controls)
{

if (childControl.ToString().ToUpper() == "Microsoft.SharePoint.WebControls.ActionsMenu".ToUpper())
{

ActionsMenu Menu = (ActionsMenu)childControl;
Menu.Visible = true;

if (Menu.GetMenuItem("SubscribeButton") != null)
Menu.GetMenuItem("SubscribeButton").Visible = false;

break;
}
CheckControl(childControl);
}


So, from where I come to know that I have to pass “SubscribeButton” as parameter? Yes, its from the designtimHTML. Once you get all the code, then you can use it.

So after executing the above code, see the result below.” Alert me” menu item is not there in Actions menu.


So if I want to hide View RSs Feed, I will use the ID “ViewRSS” and run the code and I will get the result. (Check the red circle in the DesigntimeHTML figure).

foreach (Control childControl in ParentControl.Controls)
{

if (childControl.ToString().ToUpper() == "Microsoft.SharePoint.WebControls.ActionsMenu".ToUpper())
{

ActionsMenu Menu = (ActionsMenu)childControl;
Menu.Visible = true;

if (Menu.GetMenuItem("ViewRSS") != null)
Menu.GetMenuItem("ViewRSS").Visible = false;

break;
}
CheckControl(childControl);
}


Same way you can check the DesignTimeHTML for Settings menu and play with the MenuItem under Settings Menu.

Hope you’ve liked my research. Thank you in advance. :)

Sunday, August 2, 2009

Working with KPI List – Part 1

Hi All,

We all know about the importance of goal in business. Business works on set goals, so it is very important to track where they are, matching the goal, ahead of goal or behind the goal. To answer this question, SharePoint has come up with feature called KPI (Key Performance Indicator).

Key Performance Indicator as name suggests, it gives an idea about where we are performing related to goal. They are found in Report center site, so if you are in WSS working environment, do not think of using this feature because you are not going to get this. This is moss feature.

So let’s get started and understand how it works.

KPI is a special type of list, so while creating a list; we need to select this special list as KPI list, not a normal custom list. When you create a KPI list, then click new, you will see the difference. This is the difference.

Here is a sample of creating KPI list and how the data is entered in it. So first we will create a normal list which will hold the data that will be used in KPI list. Create a list as shown below.


Now observe here that we have sales goal against January of each year. Keep this thing as of now in your mind.

Let us go back to KPI list, Create KPI list and name it as you like.

Once you are done with creation, just click on new and observe the change, here you can see four options.


As you can see, first options says you can create KPI using list options, second option says that you can create KPI using excel workbook, third says that you can create KPI using Sql server 2005 analysis services and the last options says that you can create KPI using manual entry.

We are going to see three out of these four. We will not cover analysis service KPI. We will cover rest of it.

So let us get started and try to create KPI from List option. So click on the first option, once you click on it, it will take you to a page where you can enter the List url from which we want to fetch the data, select the list that we created earlier and click on number of list items in view. Scroll below and enter 8 and 6 respectively like shown below.


Let me explain you what all settings we just did. We have counted the number of items in the list. If total number of items in the list meets criteria of 8 or above, KPI gives green symbol. If total number of items in the list is 6 or 7 then it gives us yellow triangle. If total number of items is below 6 than it gives red square symbol.

So let us go back and see how many items we have in list, we have five items entered in it.


Now let’s go ahead and add more two rows in the list.


Now go back to KPI list and refresh the page and see symbol changes to the yellow triangle that meets to our criteria.


Now go back and add one more item to it to complete our goal of 8 items in the list and that will turn our KPI symbol to green circle.


That completed our simple example of generating KPI based on total number of items in the list. If you have observed while creating KPI, you must have seen other two options as well. It says that you can also go for the percentage value. Other is calculating average, calculating sum etc kind of a function. We will go for calculating average sales. So let’s add one more KPI which is again from List data. So click on new and select KPI from list option. In the page, shown name the KPI and then select third radio button. Select your list by specifying URL and selecting view as All items, here you can also mentioned your specific view for which you want to generate KPI, so this gives us more flexibility for criteria based KPI as well. After this select column as “Sales Goal” and select average from the drop down. Provide 1000 in the goal and 600 in warning textbox. You should have something which looks similar to shown below.


We have specified that if the average sale is 1000 or more, we are safe and it shows green symbol. If it’s between 600 to 999, we are in a warning stage else we are in danger zone and indicated by red square.

Here we have this entry in our base list.


Because average sales is higher than we specified (which is $1,000 in our case), KPI indicator shows us green symbol.


To know more on the same KPI, just click on the KPI item that we have just created; it will take you to a page which shows more detailed information.


Now, go ahead and change the sales values accordingly. When you change the value which makes the average change in them, when average goes below 999 it will start showing yellow triangle and if average changes below 600, it will start showing red square.

Ok, now let us start analyzing the other options which is entering manual information KPI, it is very simple process of giving static data. You just need to give a value and select the criteria goal for it and it simple displays the image depending on the value that you have entered like shown below.

You can also create a KPI indicator which will come from the excel file. But before starting on this, you need to create SSP for this, because the excel file that we are going to use here must be under the trusted location. So create the SSP from central administration and click on the excel trusted file location. Give the entire path till your library name in which your excel book resides. Once you are done with this, then only you will be able to use this feature. So go ahead and create one more KPI indicator and this time select the indicator using data in excel work book. Once you click on this, you need to give the URL of the workbook. So go ahead and select your work book. Now here, once you select the workbook, you need to give the cell number here to mention your indicator value. Along with this you also need to give the cell number for goal and cell number for warning.

This is the snapshot of excel workbook that I have created. In this workbook, in Shhet1 I have mentioned Sales data.


Here D11 cell is an average of sales goal value of D4 to D8 which is our target value as indicator. H$ value indicates the goal to achieve and H7 is the warning sales goal. So let’s specify these values in respective field as shown below.


Just see at the indicator field in KPI list,

Let’s prepare one workbook which look like this, here D11 is calculated column which is average of all sales figures. Cell H4 represents the goal to be achieved and cell H6 represents the warning match.

So here we will specify our criteria like shown above in workbook figure.

Go ahead and have a look at the KPI list how it looks like.


Try to open the workbook for editing and see the changes in the indicator values, you will see different indicators shown in the KPI list.

Now, we are almost done with our examples of KPI. Just one more topic left to discuss which a KPI web part is. We are done with creating KPI list, its supporting list but there is one more thing, which is web part that supports the KPI list. So let’s go ahead and add web parts. Click on edit page, where you want to put this web part. This web part will basically pulls the KPI data from the KPI list and shows details at one go.

Find web part which is named “Key Performance indicators” under Dashboard category. Once you add it, click on modify shared web part and select the KPI list.


One more web part is there which says KPI Details under same Dashboard category. So go ahead and add that web part on the page, click on modify shared web part. Select KPI list, here you will find all KPIs that you have mentioned in the KPI list in the drop down. From there you can select KPI. In this example, I have selected the excel sales data calculation KPI and selected icon as checkmark and result is shown below.


That is it. i will soon come with part 2.


Share your SharePoint Experiences with us...
As good as the SharePointKings is, we want to make it even better. One of our most valuable sources of input for our Blog Posts comes from ever enthusiastic Visitors/Readers. We welcome every Visitor/Reader to contribute their experiences with SharePoint. It may be in the form of a code stub, snippet, any tips and trick or any crazy thing you have tried with SharePoint.
Send your Articles to sharepointkings@gmail.com with your Profile Summary. We will Post them. The idea is to act as a bridge between you Readers!!!

If anyone would like to have their advertisement posted on this blog, please send us the requirement details to sharepointkings@gmail.com