Sunday, December 28, 2008

Highlight SharePoint List rows conditionally

Hi All,here is some JQuery Stuff that will help you to highlight rows of SharePoint List items based on some condition.


<script type="text/javascript">
if(typeof jQuery=="undefined"){
var jQPath="http://ajax.googleapis.com/ajax/libs/jquery/1.3.1/";
document.write("<script src='",jQPath,"jquery.min.js' type='text/javascript'><\/script>");
}
</script>
<script>

$(document).ready(function(){

$Text = $("td .ms-vb2:contains('Sales')");

$Text.parent().css("background-color", "green");

$Text =$("td .ms-vb2:contains('Account')");

$Text.parent().css("background-color", "orange");

});

</script>


above JQuery code will highlight if Column has 'Sales' then row will highlight with color green.if column has value Account then it will highlight with orange color.

Look at second Post http://www.sharepointkings.com/2009/04/sharepoint-calculated-column-and-jquery.html

Wednesday, December 17, 2008

Create Custom Web Part in SharePoint

Hello Everyone !

Are you new to SharePoint development? Do you want to see how to create a custom web part?

Let me explain you from basic. Although there are many ways to create a web part but lets look at one way.


Following steps are involved in the creation of a custom web part:
1. Creation of Web Part project.
2. Creation of controls used in the web part.
3. Loading the control as web part.
4. Deploying the web part code in the SharePoint site.
5. Adding the web part on the site page.

Let’s understand each step with the help of an example.

Step 1: Open Visual Studio and create a new blank solution as shown in figure. 1.


Figure.1
Step 2: Add a new project of type web application under the newly created solution as shown in the figure.2 below.


Figure.2

Delete the existing class from it. Add a new web user control in this project and give some appropriate name to it as shown in figure. 3


Figure .3
Code snippet for the user control and its code behind is given below:


using System;
using System.Collections;
using System.Configuration;
using System.Data;
using System.Linq;
using System.Web;
using System.Web.Security;
using System.Web.UI;
using System.Web.UI.HtmlControls;
using System.Web.UI.WebControls;
using System.Web.UI.WebControls.WebParts;
using System.Xml.Linq;

namespace MyWebControls
{
public partial class MyUserControl : System.Web.UI.UserControl
{
protected void Page_Load(object sender, EventArgs e)
{

}

protected void MyButton_Click(object sender, EventArgs e)
{
Response.Write("Good Morning " + txtUserName.Text);
}
}
}

Step 3: Create a new project under the solution of type class library as shown in figure.4 below.


Figure. 4

Delete the default class and add a new class as shown in the figure.5


Figure .5

Add Reference of Windows SharePoint Services to this project as shown in the figure. 6 below.


Figure.6

Code snippet is shown below:
Generate a new GUID.

using System;
using System.Collections.Generic;
using System.Linq;
using System.Text;
using System.Web.UI;
using System.Web.UI.WebControls.WebParts;
using System.Xml.Serialization;
using System.Runtime.InteropServices;
using Microsoft.SharePoint;
using Microsoft.SharePoint.WebControls;
using Microsoft.SharePoint.WebPartPages;

namespace MyWebPart
{
[Guid("52D7FA40-EF93-45ad-806E-9B77C782A93B")]
[System.Security.Permissions.PermissionSet(System.Security.Permissions.SecurityAction.Assert, Unrestricted = true)]
public class MyWebPartClass : System.Web.UI.WebControls.WebParts.WebPart
{
public MyWebPartClass()
{

this.ExportMode = WebPartExportMode.All;
}

string virtualpath = @"~/UserControls/MyUserControl.ascx";
protected override void CreateChildControls()
{
MyWebControls.MyUserControl objMyUserControl = (MyWebControls.MyUserControl)Page.LoadControl(virtualpath);
this.Controls.Add(objMyUserControl);
}

}
}

Step 4: Go to the properties of the web part project and select the build output path to the bin folder of the web application virtual directory. Before compiling add reference of the web part control project to it.

Add a safe control entry (below the safe control entries which are already present) to the web.config file of the web application which is present inside the virtual directory.


Change the trust level to Full as shown below.


Step 5:
Add Control to site:

Create a new folder within the virtual directory of the web application to store the user control. Give it a name such as UserControls.

Now go to Site Settings and click web parts as shown in the figure below


Figure.7
Click on New Web parts. Select the web part we deployed and click populate gallery.


Figure.8

Go to the page on which you want to add the web part. Click the site settings àEdit Page as shown in the figure. 9 below.


Figure.9

Select the web part from the list of web parts. That’s it your web part is ready to play its role.


Figure.10


Figure.11

I hope this post will help many developers. If you still need more clarification please write to us at

sharepointkings@gmail.com
We will be happy to help you as always.


Understanding Workflow Tracking Service - Part 1

Hi All,

I have been working with workflows for many months and I love to explore each and every thing with respect to workflow. I learn about different activities and different ways to create the workflows and much more other stuff that can be done in workflow. One of the good stuff to do with workflow is services. Services can be attached to the workflow runtime.

Every workflow has instance and there is always a workflow runtime which handles this workflow. There are many services available that can be attached to the workflow runtime.

Here is a list of services that can be added to the workflow runtime.

(1) Workflow Persistence service
(2) Workflow Queuing service
(3) Workflow runtime service
(4) Workflow scheduler service
(5) Workflow Tracking service
(6) Workflow Transaction service

Here we are going to go with Workflow Tracking service. In this article we are going to cover the understanding on tracking service of workflow.

Read Understanding Workflow Tracking Service - Part 2
for further reading.

Workflow has one primary service which is SqlTrackingService. There are two additional services are also available which are ConsoleTracking as well as SimpleFileTrackingService. But we are going to discuss SqlTrackingService.

First let me give you a highlight on this tracking. When your workflow gets started, an instance of it gets created and starts running. This instance then fires several events internally when activities get executed. If you want to capture all these details, you can do it with the help of tracking service. You can track other things also like your own custom tracking. Let’s say at the end of every activity or in between any activity you would like to make a cross mark saying that this and this part of activities have completed executing. Something like this is possible with the tracking service.

If you want to track your custom data, you will have to prepare Tracking profile which is nothing but an XML which shows that what data to capture and what not to capture.

So Bottom line is to track the actions taking place in workflow and actions that you want to track on your own can be achieved easily through tracking service. All you need to have is SqlServer and Tracking service to attach to workflow runtime.

All this information is stored in database. So once we have data in database, then it becomes easy to have query on them and to generate reports from them.

One big advantage of querying this tracking data is WF also comes with SQLTrackingQuery class built in with it. So just play with an object of this class and have some fun getting the answers of your query. So even no need to write specific SELECT Commands for this.

Built in tracking is actually divided in three parts.

(1) Activity tracking

Activity tracking allows you to track activity related events like activity cancellation, activity execution, and unhandled exceptions in activity etc. ActivityTrackingpoint and ActivityTrackingLocation object allows you to track all these.

(2) Workflow Tracking

Workflow Tracking allows you to track workflow related events like workflow starting, workflow stopping and workflow terminated etc.

(3) User Tracking

User related all custom tracking that you would like to capture. Because user tracking is workflow to workflow specific.

If you closely look at this concept, this is very similar to tracing in ASP.NET where you have different severity levels and based on that what all information you want to capture can be traced at any point of time.

To really analyze data captured by service, WF also comes with the Tool called WorkflowMonitor. This is useful to see the execution of workflow as GUI. Where you come to know what all activities are done for specific instance and what all activities are pending to execute.

We will have a real fun in executing this service and then analyze the data captured by tracking service and using the Workflow Monitoring tool.

I will continue this article and in part 2 we will explore the tracking service practically.

Monday, December 15, 2008

Iterate SharePoint list items using SharePoint web service

Hi all,
here is some chunks of that will help you out to iterate list item in SharePoint list using SharePoint web service. to parse all list items you should know XmlNameSpace from result xml schema,but here in this case I have remove that XmlNameSpace using Regx.so it is easy to iterate result xml schema.

Following example will fetch all list items from SharePoint list and show all title to console.

for better result copy the code and paste it in your console application add necessary assemblies,
include SharePoint list.asmx webrefrence name this reference as "ListService".


using System;
using System.Collections.Generic;
using System.Linq;
using System.Text;
using System.Text.RegularExpressions;
//List service proxy
using SharePointKingsDemo.ListService;
using System.Net;
using System.Xml;
using System.Xml.Linq;
using System.Xml.XPath;

namespace SharePointKingsDemo
{
///


/// Created By:Jayesh Prajapati.
/// Purpose:how to use SharePoint web service.,how to iterate each row in SharePoint list.
/// iterate each SharePoint list item without xmlname space.
/// This demo will work on .NET framework 3.5
///

class Program
{
//find replace xmlnamespace..
private static readonly Regex StripXmlnsRegex =
new Regex(@"(xmlns:?[^=]*=[""][^""]*[""])",
RegexOptions.IgnoreCase RegexOptions.Multiline RegexOptions.Compiled RegexOptions.CultureInvariant);

//to find and replace short XmlNameSpace like z:,rs: from xmlresponse by GetListItems method
private static readonly Regex removeShortNameSpace = new Regex
(@"(?<lessthan><)(?<closetag>[/])?(?<shortname>\w+:)\s*", RegexOptions.IgnoreCase RegexOptions.Multiline RegexOptions.Compiled RegexOptions.CultureInvariant);


static void Main(string[] args)
{
//list webservice proxy instance..
ListService.Lists listService = new Lists();
CredentialCache credential = new CredentialCache();
//credentials username,password,domain..
NetworkCredential networkCredential = new NetworkCredential("username", "password","domain");
credential.Add(new Uri("http://localhost"),"NTLM",networkCredential);
listService.Credentials = credential;
listService.Url = "http://localhost/_vti_bin/lists.asmx";

//xmldocument to create necessary nodes for getalllistitems method..
XmlDocument xdoc =new XmlDocument();
XmlNode queryNode =xdoc.CreateNode(XmlNodeType.Element,"Query","");

//get all list items whose id is greater than zero i.e all list item..
string strQuery = @"<Where><Gt><FieldRef Name='ID'/><Value Type='Counter'>0</Value></Gt></Where>";
queryNode.InnerXml=strQuery;
XmlNode viewNode = xdoc.CreateNode(XmlNodeType.Element,"ViewFields","");
string strViewFields = "<FieldRef Name=\"ID\" /><FieldRef Name=\"Title\" />";
viewNode.InnerXml=strViewFields;
XmlNode nodeQueryOption = xdoc.CreateNode(XmlNodeType.Element,"QueryOptions","");
nodeQueryOption.InnerXml="<IncludeMandatoryColumns>FALSE</IncludeMandatoryColumns><DateInUtc>TRUE</DateInUtc>";
string rowlimit = "100";
string webid = "";

//get items from test sharepoint list..
XmlNode result = listService.GetListItems("test","", queryNode, viewNode, rowlimit, nodeQueryOption, webid);

//remove namespace xmlnls from result xml..
string xmlResponse = StripXmlnsRegex.Replace(result.InnerXml, "");

//find and replace short XmlNameSpace like z:,rs: from responce with space..
xmlResponse = removeShortNameSpace.Replace(xmlResponse, delegate(Match m)
{
Group closetag = m.Groups["closetag"];
if (closetag.Length !=0)
{
return "</";
}
else
{
return "<";
}

});

//load xml from removed XmlNameSpace and short name of XmlNameSpace..
XDocument xmlDoc = new XDocument();
xmlDoc = XDocument.Parse(xmlResponse);

//iterate each row in sharepoint list.
//in result xml each row is in element "row"
var Items = from item in xmlDoc.XPathSelectElements("//row")
select new
{
//get Title Field of SharePoint list...
Title = Convert.ToString(item.Attribute("ows_Title").Value)
};
//display each item in title field in console..
Array.ForEach(Items.ToArray(), item => Console.WriteLine(item.Title));
Console.ReadLine();


}
}
}

give your comments on this post, for alternate approch to parse web service response using xpath see following article..

http://www.sharepointkings.com/2008/11/how-to-iterate-sharepoint-list-fields.html


Friday, December 12, 2008

How to deploy a workflow in moss

Hi All,

Deploying a workflow is one of the major concerns when you develop the workflow because developing the software or anything is only half job done. The other half is deploying the code and software that you have developed.

so here we look forward on how to deploy a workflow in moss.

I will give you here the brief idea about how exactly we can proceed to have a structure of workflow and finally what files are needed for workflow to deploy.

Here keep in mind that I am talking about the workflows developed using the Visual Studio. we are not talking about workflow designed by the Sharepoint Designer.

To start with, you should have a workflow dedicated project in which your entire workflow will reside.

Give name of the Project and then Create Folder Structure inside it just like shown below.


The above should be the structure where you can have your feature Files and related ASPX files if any like association and initiation pages for the workflow.

Now double click the workflow.xml and right click and select insert snippet and then Windows Sharepoint Service Workflow> and then workflow.XML Which will give you the complete XML which you are required to use.


Snippets give you the clear idea about the replacement of tokens that we have to make. So all the green tokens need to be replaced by appropriate values.

Replace Name with the name of the Workflow that you want to give.

ID must be unique GUID. Generate it from Visual Studio Tools>Create GUID option

Tokens are self explanatory. So replace it accordingly.

Same way, use the Insert snippet and this time select feature.xml


Replace the Unique GUID and other tokens.

So here are the total files that are required for workflow to deploy:

(1) Your workflow code assembly
(2) Feature file
(3) Custom Forms if needed
(4) Workflow file which is also called workflow definition file.

Folder under feature and folder under layouts will have the same name.

Copy those folders and paste them in respective 12 hive folder. Give your assembly strong name and build your project. Place assembly in GAC.

Now your feature is ready for deployment.

Install the feature and activate that feature, so if your feature is installed at site level, you will find it at site collection administration or else you will find in the site administration under specific web. And if the feature is activated, you will find the workflow in Workflow Settings under document library and list.

Wednesday, December 10, 2008

Web Part Error : Cannot deserialize the Web Part

Hi Guys,
                Facing another web part error ? Wondering what to do when you receive the error Cannot deserialize the web part every where on the page ?


 I have faced a similar situation and have found a solution for it. Solution is very simple ....

I am assuming that your wss is running under the Network Service Credentials. If that is the case and you have just restarted the server machine and started getting this error then follow these steps............

1. Go to the windows directory and find the TEMP folder e.g c:\windows\TEMP.
Right click the TEMP folder and select the security tab. 
2. Click the add button for adding a new user. write the name network service and press check names. Give Read/Write rights and press OK.
3. Go to the location c:\windows\system32\Logfiles folder and follow the instructions given in step 2.


That's it. Refresh the page and the error is gone !!

If it is still troubling you . Write to us at sharepointkings@gmail.com with a screenshot of the error page (if possible). We will feel happy to help you as always.

Tuesday, December 9, 2008

Business Data Catalog (BDC) Part - 7

Hi All,

Here i am back with yet another article on BDC series.

suggest to go and read below articles on BDC before proceeding here.

Business Data Catalog (BDC) Part - 1

Business Data Catalog (BDC) Part - 2

Business Data Catalog (BDC) Part - 3

Business Data Catalog (BDC) Part - 4

Business Data Catalog (BDC) Part - 5

Business Data Catalog (BDC) Part - 6

Ok, let’s continue our series of BDC as part 7.

Till now what we are doing was all without writing any code. Now let’s write a code. We may require this if we are not using the BDC Web parts to display the data from BDC Definition. It is like fetching record with the help of ADO.NET and displaying on grid or using the way you like.

So let’s get started.

Here we are going to design a console application to understand each class that is required to connect and methods that are required to access different entities for any application definition.

First I would like to list down the assemblies that we are going to use in this applications.

using Microsoft.Office.Server;
using Microsoft.Office.Server.ApplicationRegistry.Infrastructure;
using Microsoft.Office.Server.ApplicationRegistry.MetadataModel;
using Microsoft.Office.Server.ApplicationRegistry.Runtime;
using Microsoft.Office.Server.ApplicationRegistry.SystemSpecific.Db;

First, we will go forward to using the SSP in which our Definition resides. (Our XML that we imported).

Then you have to set the SSP for using in the application.

string strSSPName = "{ssp_name}";

SqlSessionProvider.Instance().SetSharedResourceProviderToUse(strSSPName);


Then, you need to get the Line of Business objects. Get all definitions in that SSP.

NamedLobSystemDictionary objLOBSysDictionary = ApplicationRegistry.GetLobSystems();

Here what I am doing is making the conditions because I have three definition installed in my machine and I want to give you an example of entities and methods I have all these ready in one of my definitions so I am making conditions. You can write code in your own way.

Ok, now what we will do is we will loop through every BDC Definition and print its name in console.

foreach (LobSystem objLOBSys in objLOBSysDictionary.Values)
{
Console.WriteLine("Name of your BDC Application is : " + objLOBSys.Name + Environment.NewLine);
}

NamedDataClassDictionary objNamedClasses = objLOBSys.GetDataClasses();


Now take out the name of the entities.

foreach (DataClass objClass in objNamedClasses.Values)
{
Console.WriteLine("Entities: " + objClass.Name + Environment.NewLine);
}


Now I am making condition of my own application, you can use your defined application. If you have used the XML that we have discussed so far in previous articles of BDC series, then this approach will be fine for you.

I will take out the Author class and get its methods defined in that.

if (objLOBSys.Name == "Authors")
{
DataClass clsAuthors = objNamedClasses["Author"];

NamedMethodDictionary objMethods = clsAuthors.GetMethods();
foreach (Method objMethod in objMethods.Values)
{
Console.WriteLine("Method: " + objMethod.Name + Environment.NewLine);
}
}
NamedLobSystemInstanceDictionary objInstances = objLOBSys.GetLobSystemInstances();


As we have defined single instance as AuthorTraders, we will get the one single value for this.

foreach (LobSystemInstance objInstance in objInstances.Values)
{
Console.WriteLine("Instance: " + objInstance.Name + Environment.NewLine);
}


Now, let’s get the Author entity.


Entity authorEntity = objInstance.GetEntities()["Author"];

FilterCollection filterColl = authorEntity.GetFinderFilters();


Filter Collection will get all the filters applied on it.

Because we have City as filter so let’s pass it as a parameter.

(filterColl[0] as WildcardFilter).Value = "Oakland";
IEntityInstanceEnumerator authorEnum =

authorEntity.FindFiltered(filterColl, objInstance);
while (authorEnum.MoveNext())
{
DataTable dt =

(authorEnum.Current as DbEntityInstance).EntityAsDataTable;

PrintOnConsole(dt.Rows[0]);

}

private static void PrintOnConsole(DataRow objDR)
{
foreach (DataColumn objColumn in objDR.Table.Columns)
{
Console.Write(objDR[objColumn] + "\t" );
}

Console.Write(Environment.NewLine);
}


Here is the Full Code after explaining all functionality.

namespace BDCConsoleApplication
{
public class Program
{
static void Main(string[] args)
{
string strSSPName = "MATS SSP";

SqlSessionProvider.Instance().SetSharedResourceProviderToUse(strSSPName);

NamedLobSystemDictionary objLOBSysDictionary = ApplicationRegistry.GetLobSystems();

///This Makes the Loop of All Definition installed
///at Farm level that will come as Application Name in objLOBSys.Name

foreach (LobSystem objLOBSys in objLOBSysDictionary.Values)
{

if (objLOBSys.Name == "Authors")
{
Console.WriteLine("________________________________________________________" + Environment.NewLine);
}

Console.WriteLine("Name of your BDC Application is : " + objLOBSys.Name + Environment.NewLine);

///Get data classes method will give us all entities in that application

NamedDataClassDictionary objNamedClasses = objLOBSys.GetDataClasses();

foreach (DataClass objClass in objNamedClasses.Values)
{
Console.WriteLine("Entities: " + objClass.Name + Environment.NewLine);
}


if (objLOBSys.Name == "Authors")
{

DataClass clsAuthors = objNamedClasses["Author"];

NamedMethodDictionary objMethods = clsAuthors.GetMethods();

foreach (Method objMethod in objMethods.Values)
{
Console.WriteLine("Method: " + objMethod.Name + Environment.NewLine);
}

NamedLobSystemInstanceDictionary objInstances = objLOBSys.GetLobSystemInstances();

foreach (LobSystemInstance objInstance in objInstances.Values)
{
Console.WriteLine("Instance: " + objInstance.Name + Environment.NewLine);

Entity authorEntity = objInstance.GetEntities()["Author"];

FilterCollection filterColl = authorEntity.GetFinderFilters();

(filterColl[0] as WildcardFilter).Value = "Oakland";

IEntityInstanceEnumerator authorEnum =

authorEntity.FindFiltered(filterColl, objInstance);

while (authorEnum.MoveNext())
{
DataTable dt =

(authorEnum.Current as DbEntityInstance).EntityAsDataTable;

PrintOnConsole(dt.Rows[0]);

}
}
}
}

Console.ReadLine();

}

///
/// Prints the Record on Cosole Screen
///

///
private static void PrintOnConsole(DataRow objDR)
{
foreach (DataColumn objColumn in objDR.Table.Columns)
{
Console.Write(objDR[objColumn] + "\t" );
}

Console.Write(Environment.NewLine);
}

}


See, we wrote a code without using traditional ADO.Net Approach. This is the other way to get the data from BDC. The power here is that you can actually treat XML as a connection bridge for the database and code and then have flexibility to use it in your own way.

I will continue our series of BDC in my next article.

Friday, December 5, 2008

Business Data Catalog (BDC) Part - 6

Hi All,

I am back with the series of BDC.

I suggest to go and read below articles on BDC before proceeding here.

Business Data Catalog (BDC) Part - 1

Business Data Catalog (BDC) Part - 2

Business Data Catalog (BDC) Part - 3

Business Data Catalog (BDC) Part - 4

Business Data Catalog (BDC) Part - 5

and later

Business Data Catalog (BDC) Part - 7

Let's continue the series and start our part 6.

Ok, in this article we are going to discuss about the relations between the tables. We have relations in our table with primary key and foreign key concept in database. Here relationship in terms of BDC web parts with the keys.

So let’s jump in to practical to understand it better.

We will use the Same XML that we used in previous part 5. Always remember to keep using latest XML that we keep modify in each part one by one.

Before proceeding further we will change our XML now to include au_id primary key in this XML. So that we can use it for relation with other tables through XML as well.

We will take authors and titleauthors. Which authors has written what titles and royaltyper column from it. It is enough to see the scenario in action although may not sound logical.

Ok, you need to add one more Entity Type in our XML in <Entities> Tab.

<Entity EstimatedInstanceCount="20" Name="Title">

<Identifiers>

<Identifier Name="title_id" TypeName="System.String"/>

</Identifiers>

</Entity>


Now that once we have added this.

Go inside <Entity EstimatedInstanceCount="100" Name="Author">, we have <Methods> tab, go inside that and paste this code.

<Method Name="GetTitlesForAuthors">

<Properties>

<Property Name="RdbCommandText" Type="System.String">Select au_id, title_id, royaltyper From titleauthor Where au_id=@au_id</Property>

<Property Name="RdbCommandType" Type="System.String">Text</Property>

</Properties>

<Parameters>

<Parameter Direction="In" Name="@au_id">

<TypeDescriptor TypeName="System.String" IdentifierName="au_id" Name="au_id"/>

</Parameter>

<Parameter Direction="Return" Name="Titles">
<TypeDescriptor TypeName="System.Data.IDataReader, System.Data, Version=2.0.3600.0, Culture=neutral, PublicKeyToken=b77a5c561934e089" IsCollection="true" Name="SalesOrderDataReader">

<TypeDescriptors>

<TypeDescriptor TypeName="System.Data.IDataRecord, System.Data, Version=2.0.3600.0, Culture=neutral, PublicKeyToken=b77a5c561934e089" Name="SalesOrderDataRecord">

<TypeDescriptors>

<TypeDescriptor TypeName="System.String" IdentifierEntityName="Title" IdentifierName="title_id" Name="title_id">

<LocalizedDisplayNames>

<LocalizedDisplayName LCID="1033">title_id</LocalizedDisplayName>

</LocalizedDisplayNames>

</TypeDescriptor>


<TypeDescriptor TypeName="System.Int32" Name="royaltyper">

<LocalizedDisplayNames>

<LocalizedDisplayName LCID="1033">royaltyper</LocalizedDisplayName>

</LocalizedDisplayNames>

</TypeDescriptor>

</TypeDescriptors>

</TypeDescriptor>

</TypeDescriptors>

</TypeDescriptor>

</Parameter >

</Parameters>

</Method >

Also add the association right after </Entities>


<Associations>

<Association AssociationMethodEntityName="Author" AssociationMethodName="GetTitlesForAuthors" AssociationMethodReturnParameterName="Titles" Name="AuthorToTitle" IsCached="true">

<SourceEntity Name="Author" />

<DestinationEntity Name="Title" />

</Association>

</Associations>

As you come to know here, what we did is we have used au_id as input paramter to the new destination, that is titleauthor table.

We want to display title_id and royaltyper columns in that new webpart which soon we are going to use on our page for the relation.

And finally then we have made the association between two entities for having parent child relationship.

Ok, now let’s go ahead and add one more web part on the page.

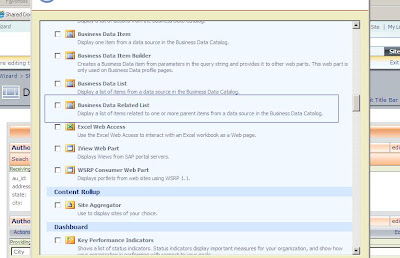
Edit the page, and add a web part named “Business Data Related List”.


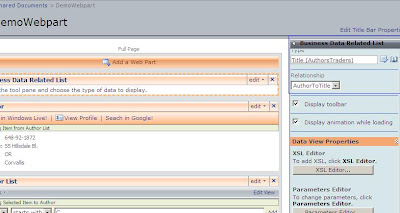
Now modify the newly added web part and select AuthorTraders in Type selector. The moment you do this, we can come to know the relationship that we defined automatically selected in relationship dropdown in terms of AuthorToTitle.


Once, you have that webpart on your page, next step is to connect that web part with the parent one. So go ahead to the Author List web part, the main parent web part and connect it with the TitleList.


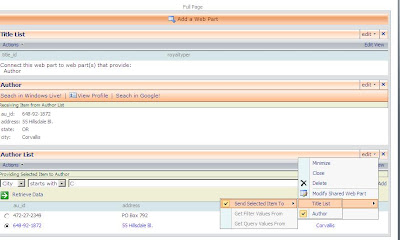
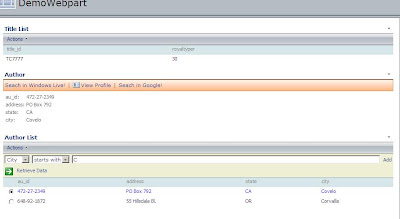
And see the magic. Select au_id from parent list and see both web parts will give you the result.


I will continue the series further for more detailing on BDC.

Thursday, December 4, 2008

Enterprise Custom Fields with project server (PWA) Part-1

Hi guys,

With the request from the users we are here with another post for Enterprise Custom fields with project server (PWA).

We will go step by step to understand how custom field works in PWA or project server.

What is Enterprise Custom Fields?
In simple word Enterprise Custom Fields are useful for storing some extra value or parameter regarding the project.

That value can be useful for reporting or some kind of bifurcation or filtration or to indicating some value which is related to project for business but not in technical term.

You can say it’s a tag that we can give to any project.


How to Use Enterprise Custom Fields?
Let’s have an example:
You are using project server as a repository to monitor all your projects in your organization.

Now suppose you have multiple clients and you are using only one instance of PWA or project server (and you should).
So in this scenario your may have multiple project from multiple clients in same place now how to bifurcate which project is form which client.

At this moment you can use Enterprise custom Fields to store client name and use this as a filtration. This is the simplest example so that everyone can understand what is the use of this Custom Fields.

But in the real scenario this fields can be use in many-many other ways.


Types OF Use Enterprise Custom Fields
You can create Custom Fields against each project, against each Resource or against each task.
So you can create Custom Field by project, Custom Field by Resource, Custom Field by task.


How PWA or Project Server Works with Use Enterprise Custom Fields?
You will find Enterprise Custom Fields in
Server Settings -> Enterprise Custom Field Definition.

Over there you will find some of the predefined Custom Fields.

This place is the repository of custom fields like master location of custom fields.
First you have to create new custom field over here just like entering in master (one time job).

Then that custom field will be available to that entity (project, resource or task).
For an example if you create a custom field with entity project then that custom field available in each project.

You can field that custom field available to each project.
Please check graphical representation for understanding.


Most of the functional points are covered regarding Enterprise Custom Field.

We will come soon with implementation of Custom Field programmatically.

Mean while if you have any doubt then please feel free to comment over here.

Wednesday, December 3, 2008

Access denied or Cannot complete this action error message when you try to connect to a Windows SharePoint Services Web site

Hi All,
            One of the most common error message encountered while working with SharePoint Site is access denied or cannot complete this action. Have you ever wondered what is the reason behind this??
Let me tell you.. First have a look at this Microsoft Support Article:

In addition to this i sometimes got this error message in the event viewer log as well. I developed a custom web part and deployed its dll's in the bin folder of the site. When i tried to add the webpart on a web part page i got the access denied error message. Somehow i could not figure out why i am getting the error message even though i am the administrator of the site and machine.
Then i studied the error message in detail. It was mentioned that error message is getting generated because the account under which the service is running is not having permission to access the bin folder of the site.
Then i simply went to the virtual directory folder of the site and clicked on the properties of the bin folder(Right Click --> Properties). I selected the security tab and found out that the account under which the wss services were running (Network Service Account) was not present at all.
I added the network service account and gave appropriate rights and that's it !!! Webpart started working....
I hope this blog post will reduce your headache to a cetain extent. 
Still if you are facing problems like this and couldn't find solution contact sharepointkings@gmail.com and we will help you out.


How to add a new list item to SharePoint using the List Item web service

How to add a new list item to SharePoint using the List Item web service ?

Problem Statement:
I want to add data into the "SalesReport" List on a sharepoint Site.

Solution:


Right click on the references folder and then ‘Add Web Reference…”.
WebService Reference: http:///_vti_bin/Lists.asmx

Type in the url to sites webservice you wish to call in the next box,
give it an appropriate name (we have given it as SharePointkingsWebService ) and click ok.

Create a method and place the below code.

try
{

SharePointkingsWebService.Lists list = new SharePointkingsWebService.Lists();
list.Credentials = System.Net.CredentialCache.DefaultCredentials;
list.Credentials = new System.Net.NetworkCredential("SharePointkings", "Password", "SharePointkings");
XmlDocument doc = new XmlDocument();
XmlElement batch_element = doc.CreateElement("Batch");
string item = "" + "New" + "This is a test by Sharepoint Team" + "";
batch_element.InnerXml = item;
list.UpdateListItems("SalesReport", batch_element);

return true;
}
catch (Exception ex)
{
return false;
}


....And the job is done!!!

Tuesday, December 2, 2008

Business Data Catalog (BDC) Part - 5

Hi All,

I suggest to go and read below articles on BDC before proceeding here.

Business Data Catalog (BDC) Part - 1

Business Data Catalog (BDC) Part - 2

Business Data Catalog (BDC) Part - 3

Business Data Catalog (BDC) Part - 4

Also

Business Data Catalog (BDC) Part - 6

Business Data Catalog (BDC) Part - 7

Ok, let’s continue the series of BDC.

Now we have the complete XML and example in our hand, we can play with it. Search is something very important nowadays.

Here we are going to integrate the search in our BDC Example. Let’s directly play with it to see it in action.

Open the XML, locate to the in the XML. You must find it almost at the end of the XML.

So after that , write down the following Tags.

<Actions>
<Action Name="Seach in Windows Live!" Position="1" IsOpenedInNewWindow="true"
Url="http://search.live.com/results.aspx?q={0}" ImageUrl="">
<ActionParameters>
<ActionParameter Name="au_fname" Index="0" />
</ActionParameters>
</Action>
</Actions>

This will add one more option in toolbar of the detailed view profile page. Let’s add one more Action in the toolbar. We used this query string because if you search in Live., you should know that this is the query string that is used for search in Live.

Add this tag inside <Actions></Actions> tag only. That means we will have two actions. Let’s this action search it from Google. So we use its Query string and pass our parameter.

<Action Name="Seach in Google!" Position="2" IsOpenedInNewWindow="true"
Url="http://www.google.com/search?q={0}" ImageUrl="">
<ActionParameters>
<ActionParameter Name="au_fname" Index="0" />
</ActionParameters>
</Action>


Perform the same steps again to import the Application Definition XML File from central administrator and from your SSP.

Check out the actions now.


Tuesday, November 25, 2008

Business Data Catalog (BDC) Part - 4

Hi All,

I suggest to go and read below articles on BDC before proceeding here.

Business Data Catalog (BDC) Part - 1

Business Data Catalog (BDC) Part - 2

Business Data Catalog (BDC) Part - 3

you can also read part 5 after reading part 4.

Business Data Catalog (BDC) Part - 5

Business Data Catalog (BDC) Part - 6

Business Data Catalog (BDC) Part - 7

Let’s continue our series of BDC Further.

Now as we are ready with our BDC, we can proceed and use this BDC in a list or document library. Go to any list or library and create column.

Ok, give the name of the column. I’ll give “Authors”.


And select type Business Data and select Authors definition as we did in our previous part. So as you do this, you will get the clear idea because now you have four columns available that we had in our XML. There is an option to select the selected column, let’s keep it address and press OK.


Now, when you will try to insert a record, just like people picker, it will give you an option to select the au_fname and city as we have these parameters in search in our BDC XML. As you see, when you search, you get result from database and it can be seen in the box.


Because we have kept the address column in display, it shows the address of that contact. If you want to see all the parameters that we have used in BDC just click on that arrow and click on View Profile.


See, you can see profile like this.


One very important thing to note. As you can see the refresh button available in the BDC column. This is given because once the data is changed in underlying database table, it will be fetched there directly and you can see the updated data there.

Have a look at the current value of Address.


Let's make a change in underlying datasource.

we are going to change in the address column, change to "New Adress".


And then go back to the list and hit the refresh button and see the change. It will give you one message in one page saying that it will update the datasource and it will take time and so on. just go ahead and press OK.


That’s it. Now explore the BDC in terms of Field in your own way. You will love it.


I’ll continue the series on BDC in my next article as well.

Monday, November 24, 2008

Business Data Catalog (BDC) Part - 3

Hi All,

Here i am back with one more part of BDC.

I suggest to go and read below articles on BDC before proceeding here.

Business Data Catalog (BDC) Part - 1

Business Data Catalog (BDC) Part - 2

After reading part3, you can proceed further from part 4.

Business Data Catalog (BDC) Part - 4

Business Data Catalog (BDC) Part - 5

Business Data Catalog (BDC) Part - 6

Business Data Catalog (BDC) Part - 7

Ok, let’s continue our series of BDC.

Now we will take a closer look at BDC Application and going to make connectable BDC Web parts.

To do that we have to modify our existing BDC XML. Open that XML and find this line.

SELECT au_fname, city, state,address FROM authors WHERE City = @city.


Replace the line with the following line.

SELECT au_fname, city, state,address FROM authors WHERE (City LIKE @city) AND (fname
LIKE @au_fname)


Now add one more FileDescriptor entry in <FileDescriptors> Tag

<FilterDescriptor Type="Wildcard" Name="au_fname"/>


Add MethodInstance Tag in XML, you will find it at the very bottom of our XML.


<MethodInstance Name="AuthorSpecificFinderInstance" Type="SpecificFinder" ReturnParameterName="Authors" />


Now, add one more default value Tag in Parameter City and Direction IN tag.

<DefaultValue MethodInstanceName="AuthorSpecificFinderInstance" Type="System.String">%</DefaultValue>


Add one entire new DefaultValue Tag also.

<Parameter Direction="In" Name="@au_fname">

<TypeDescriptor TypeName="System.String" AssociatedFilter="au_fname" Name="au_fname" IdentifierName="au_fname">

And perform the same steps as we performed in part 1. This time you will find out a new message coming indicating creating profile.


<DefaultValues>

<DefaultValue MethodInstanceName=" <DefaultValue MethodInstanceName="AuthorFinderInstance" Type="System.String">%</DefaultValue>
" Type="System.String">%</DefaultValue>

<DefaultValue MethodInstanceName="AuthorSpecificFinderInstance" Type="System.String">%</DefaultValue>

</DefaultValues>

</TypeDescriptor>

</Parameter>


Once you are done with uploading, you observe one thing. This time it didn’t give warning that it gave in last two parts.

Now go back to your site, import the application definition in business data list web part once again and then perform test once to make sure that web part works.

For example, I have written Oakland as city search and I got the result.


Ok, we have tested this one. Now it’s time to add one more web part in the page. Edit the page and this time adds Business Data Item web part.

Now, Edit the Business Data Item web part and select the same application definition file.

And perform the connection between two web parts.


That is it. Go out of Edit mode now and enjoy the relation between two tables with no code.


I will continue the series of BDC with yet another example.

Friday, November 21, 2008

FullTextSqlQuery with QueryText max length issue

Hi all,

As mentioned in one of our previous post for search part 2
we are using FullTextSqlQuery object from Microsoft.Office.Server.Search.Query.

But we are facing problem for while creating query and assigning to QueryText method.

QueryText method accepts string object but it has a limitation.

You can assign maximum 4096 character string to QueryText.

We came to know about this by disassembling this DLL.

What we found is strange thing.

While setting QueryText property it will check

If object is type of FullTextSqlQuery then QueryText max length equals to 4096 char

Else if object is type of KeywordQuery then QueryText max length equals to 1024 char.

If length is more that this limit then it will give ArgumentOutOfRangeException();

We don’t know why is it so?

But just guessing that may be this limitation for rank optimization.

So conclusion is

FullTextSqlQuery QueryText should be < 4096 char
KeywordQuery QueryText should be < 1024 char.

Business Data Catalog (BDC) Part - 2

Hi All,

Here i am back again with part 2 of Business Data Catalog.

See Business Data Catalog (BDC) Part - 1

Business Data Catalog (BDC) Part - 3

Business Data Catalog (BDC) Part - 4

Business Data Catalog (BDC) Part - 5

Business Data Catalog (BDC) Part - 6

Business Data Catalog (BDC) Part - 7

Read the above part1 to understand BDC concept, because many things in this part are in seqence. so before starting on part 2, i recommend you go through part 1 and then after reading part 2, you can readu further part of series.

Ok, let’s continue our discussion on BDC. Earlier in part 1, we discussed how single data can be returned based on query of au_fname.

Now we will change the query, so that we can enhance our example and expand it to return multiple result set.

Take the same XML that we have used in our first part, we will modify it.

Find the section where we have written.

SELECT au_fname, city, state,address FROM authors WHERE au_fname = @au_fname.


Change this line to

SELECT au_fname, city, state,address FROM authors WHERE City LIKE @City.

Notice the difference is parameter change and same way instead of = operator, I used LIKE so that it can return multiple result set.

Find the FileDescriptor by au_fname and replace it with the following file descriptor.

If you observe, we have changed Type from Comparator to Wildcard.


<FilterDescriptor Type="Wildcard" Name="City" >
<Properties>
<Property Name="UsedForDisambiguation" Type="System.Boolean">true</Property>
</Properties>
</FilterDescriptor>

Change the Parameter tag also where you have au_fname. Change it to City like below.

<Parameter Direction="In" Name="@City">
<TypeDescriptor TypeName="System.String" IdentifierName="au_fname" AssociatedFilter="City" Name="city">
<DefaultValues>
<DefaultValue MethodInstanceName="AuthorFinderInstance" Type="System.String">%</DefaultValue>
</DefaultValues>
</TypeDescriptor>
</Parameter>

Ok, we are ready with our changes; all you have to do is perform the same steps performed in part 1.

Go to your SSP, under Business Data Catalog, import business definition. Import the definition, you will find the same warning coming again. Ignore it for now too.

Go back to your site; add web part of type business data list. And use this new application and now you will find city as parameter instead of au_fname.


I will continue with part 3 of BDC where we will explore BDC in more detail.

Thursday, November 20, 2008

Business Data Catalog (BDC) Part - 1

Hi All,

In a simplest manner if I explain you what BDC means that it can be nothing better than saying that fetching, displaying and interacting business data into the MOSS.

see Business Data Catalog (BDC) Part 2

and

Business Data Catalog (BDC) Part - 3

Business Data Catalog (BDC) Part - 4

Business Data Catalog (BDC) Part - 5

Business Data Catalog (BDC) Part - 6

Business Data Catalog (BDC) Part - 7

for further reading.

One important thing to keep in mind that it is not available in standard edition of MOSS, for this facility you have to buy very expensive Enterprise edition of MOSS.

Any database record can be brought in to MOSS with the help of BDC. The main advantage of using BDC is that it is no code solution. By no code, I mean you do not need to write functions that uses the stored procedure to fetch the data, returns you data reader or dataset and then you use them to bind it to grid or loop through them and bind it to any source control.

Yes, here you need not to write any code for that. All you need to write is one XML file that will be the bottom line for BDC to execute. Yes, of course it needs practice to work on that XML, but once you are comfortable with it, then really it is an easy task.

Being XML in the background process of BDC, you can connect almost with every source of database. You can connect you SQL Server, Oracle, My SQL or most databases. You can then have a facility to make a search out of it that displays the result set in the grid form that is the built in form of BDC.

Here we have to use BDC web part to display the data being fetched and executed by XML.

So without talking much let’s dive into BDC first part to understand very basic concept of it.

Here we will take Pubs database of SQL Server as an example to understand BDC. Consider Authors table in it. We have au_fname column as a text field. We will create a BDC XML that will connect to SQL Server database and fetch the record from the search query from BDC web part and then web part display the result.
Let’s start with the XML.

<?xml version="1.0" encoding="utf-8" standalone="yes" ?>

<LobSystem xmlns:xsi="http://www.w3.org/2001/XMLSchema-instance" xsi:schemaLocation="http://schemas.microsoft.com/office/2006/03/BusinessDataCatalog BDCMetadata.xsd" Type="Database" Version="1.0.0.1" Name="Authors" xmlns="http://schemas.microsoft.com/office/2006/03/BusinessDataCatalog">

<Properties>

<Property Name="WildcardCharacter" Type="System.String">%</Property>

</Properties>

<LobSystemInstances>

<LobSystemInstance Name="AuthorsTraders">

<Properties>

<!--AuthenticationMode can be set to PassThrough, RevertToSelf, RdbCredentials, or WindowsCredentials. -->

<Property Name="AuthenticationMode" Type="System.String">PassThrough</Property>

<Property Name="DatabaseAccessProvider" Type="System.String">SqlServer</Property>

<Property Name="RdbConnection Data Source" Type="System.String">I3punestn7
</Property>

<Property Name="RdbConnection Initial Catalog" Type="System.String">Pubs</Property>

<Property Name="RdbConnection Integrated Security" Type="System.String">SSPI</Property>

<Property Name="RdbConnection Pooling" Type="System.String">false</Property>

</Properties>

</LobSystemInstance>

</LobSystemInstances>

<Entities>

<Entity EstimatedInstanceCount="100" Name="Author">

<!-- EstimatedInstanceCount is an optional attribute-->

<Properties>

<Property Name="Address" Type="System.String">address</Property>

</Properties>

<Identifiers>

<Identifier Name="au_fname" TypeName="System.String" />

</Identifiers>

<Methods>

<!-- Defines a method that brings back Customer data from the back-end database.-->

<Method Name="GetAuthors">

<Properties>

<Property Name="RdbCommandText" Type="System.String">

SELECT au_fname, city, state,address FROM authors WHERE au_fname = @au_fname

</Property>

<Property Name="RdbCommandType" Type="System.Data.CommandType">Text</Property>

<!-- For database systems, can be Text, StoredProcedure, or TableDirect. -->

</Properties>

<FilterDescriptors>

<!-- Define the filters supported by the back-end method (or sql query) here. -->

<FilterDescriptor Type="Comparison" Name="au_fname" >

<Properties>

<Property Name="Comparator" Type="System.String">Equals</Property>

</Properties>

</FilterDescriptor>

</FilterDescriptors>

<Parameters>

<Parameter Direction="In" Name="@au_fname">

<TypeDescriptor TypeName="System.String" IdentifierName="au_fname" AssociatedFilter="au_fname" Name="au_fname">

<DefaultValues>

<DefaultValue MethodInstanceName="AuthorFinderInstance" Type="System.String">Dean</DefaultValue>

</DefaultValues>

</TypeDescriptor>

</Parameter>

<Parameter Direction="Return" Name="Authors">

<TypeDescriptor TypeName="System.Data.IDataReader, System.Data, Version=2.0.3600.0, Culture=neutral, PublicKeyToken=b77a5c561934e089" IsCollection="true" Name="AuthorsDataReader">

<TypeDescriptors>

<TypeDescriptor TypeName="System.Data.IDataRecord, System.Data, Version=2.0.3600.0, Culture=neutral, PublicKeyToken=b77a5c561934e089" Name="AuthorsDataRecord">

<TypeDescriptors>

<TypeDescriptor TypeName="System.String" IdentifierName="au_fname" Name="au_fname">

<LocalizedDisplayNames>

<LocalizedDisplayName LCID="1033">au_fname</LocalizedDisplayName>

</LocalizedDisplayNames>

</TypeDescriptor>

<TypeDescriptor TypeName="System.String" Name="address" >

<!-- Do not use the AssociatedFilter attribute in return parameters.-->

<LocalizedDisplayNames>

<LocalizedDisplayName LCID="1033">address</LocalizedDisplayName>

</LocalizedDisplayNames>

<Properties>

<Property Name="DisplayByDefault" Type="System.Boolean">true</Property>

</Properties>

</TypeDescriptor>

<TypeDescriptor TypeName="System.String" Name="State">

<LocalizedDisplayNames>

<LocalizedDisplayName LCID="1033">state</LocalizedDisplayName>

</LocalizedDisplayNames>

<Properties>

<Property Name="DisplayByDefault" Type="System.Boolean">true</Property>

</Properties>

</TypeDescriptor>

<TypeDescriptor TypeName="System.String" Name="city">

<LocalizedDisplayNames>

<LocalizedDisplayName LCID="1033">city</LocalizedDisplayName>

</LocalizedDisplayNames>

</TypeDescriptor>

</TypeDescriptors>

</TypeDescriptor>

</TypeDescriptors>

</TypeDescriptor>

</Parameter>

</Parameters>

<MethodInstances>

<MethodInstance Name="AuthorFinderInstance" Type="Finder" ReturnParameterName="Authors" />

</MethodInstances>

</Method>

</Methods>

<!-- Enter your Action XML here -->

</Entity>

</Entities>

</LobSystem>


Now, you have to go to your central administration. Go there and go to your SSP created. There under Business Data Catalog section click on import application definition. Browse through your XML that we have just created, and import it.

When you import the application, if you find this message coming on the screen, ignore it for now. Else there is a problem with your XML, you need to correct it.


Once you are done with this, hit OK and come to a page where it shows a summary about your application that you have just uploaded.


Now open a page where you want to import this BDC web part. Open your site and click on edit this page. Add web part, search for Business Data List web part under Business Data Section of All Web parts. Once imported, click on tool pane.


And then search for your web part from there, and select the application that we had uploaded.


After importing it, it will look very similar to this.


Now query the data and you will see the result set.

When I worked with the BDC, I got in lot of troubles. I initially faced lot of problems because nothing was succeeding. Even my XML was right, at the last moment when I press retrieve data, it was giving me Error. Then I looked very carefully at XML then I realized that number of fields that you want to retrieve must be there in the type descriptor tag. Also keep in mind that if there are three fields in the query, you must have only three type descriptor in XML. This is my hard work. :)

So finally you have data in return.


This ends our first part. I will continue this with next part when we will achieve some more functionality.

Wednesday, November 19, 2008

Understanding Record Management Feature Part 5 – Auditing

Hi All,

You can read other articles of the series.

Understanding Record Management Feature Part 1 - Document Information Panel

Understanding Record Management Feature Part 2 - Labeling

Understanding Record Management Feature Part 3 - Barcode

Understanding Record Management Feature Part 4 –Expiration Policy

Let’s continue our discussion for records management features. Here we will take up one of the very important feature of record management and that is Auditing.

Auditing enables you to capture several information regarding the items in the document library and content types like who made the change, what change and at what time. Who opened the document, viewed the document, view item properties, editing the items, moving and copying the items and much more.

It actually allows the administrator to have a log for each user’s actions that he took. Administrator can retrieve the entire history of all the actions performed by all users.

These all things need to capture in terms of generating the report at any point of time. Once we enable the auditing option, we will have to go to the top site level to administer all the changes and make the audit of your document library.

The main thing to understand is what all information is captured by the audit log. We know that we can audit for several actions but if we do not know what kind of information it gathers that it is of no use. So first let us understand that what kind of information that audit log actually stores.

(1) Item name and Location
(2) Site from which that item change happened
(3) Type of the item, is it a list item or is it a document library item
(4) User ID for this event
(5) Date and time, when it happened
(6) Which action is actually taken on that item

These are the important parameters that log returns us and we need to analyze them.

But the most important thing to take in mind is auditing tells you that item is changed, it does not say anything about what is changed, so it should not be mislead with versioning of the item.

We will have an option from there to download the report of the audit. That report itself requires several practices to learn and understand what to read and how to read it. We also will see that once we generate report for each property.

Let’s start our practical tour to understand this feature in more detail.

Go to the document library. I am going to use my same document library which I used in my previous three posts. Go to Document Library Settings ->Information Management Policy feature->Define a Policy.

Select Enable auditing and check the first option as I am going to demonstrate you each option in it one by one. So for now check the first option which is Opening or downloading documents, viewing items in lists, or viewing item properties.


Before proceeding ahead I would like to introduce one more important thing is that apart from handling different auditing for individual items in document library, you can also audit some of the site level actions like editing content types and columns, search queries used to search the results, editing users and permission at site level. You can also keep track of these actions at a site level too.

Go to top level site action->site settings->modify all site settings->collection administration option-> under it site collection audit settings. But Make sure that this will enable auditing on each item on each list, so there is a maximum chance to run out of your disk space as it will potentially log large information.


Once, we have enabled it I created one document named it audit document and other users have updated its properties and viewed properties and afterwards I generated report from it and I got the following result. To view the report, go to site collection administration and under it view log report. Select content viewing report under first section titled “Content Activity Reports".


In the same way you can check for other items and check the log and analyze the data.


That’s it. This ends the series of Record management feature.


Share your SharePoint Experiences with us...
As good as the SharePointKings is, we want to make it even better. One of our most valuable sources of input for our Blog Posts comes from ever enthusiastic Visitors/Readers. We welcome every Visitor/Reader to contribute their experiences with SharePoint. It may be in the form of a code stub, snippet, any tips and trick or any crazy thing you have tried with SharePoint.
Send your Articles to sharepointkings@gmail.com with your Profile Summary. We will Post them. The idea is to act as a bridge between you Readers!!!

If anyone would like to have their advertisement posted on this blog, please send us the requirement details to sharepointkings@gmail.com