Thursday, July 28, 2011

Client Object Model – Part 4

We are going to see more about client object model with respect to ECMA script for SharePoint. If you have not gone through part 1 to part 3, I would recommend you reading them first and then continue reading from here.

This post is continuation to last part 3. As I have mentioned in the last post, that because we do not get intellisense for methods for ECMA script, we need to know what are the methods available for us. We used get_title() and get_description()as an example in last post. There are many more methods available not only for web also for lists, views and for every object that exist in SharePoint just like we have all of them for server side API.

The main problem is where to get it from? How to know names of those methods? Other problem is they are case sensitive, so we have to be extra careful.

To get all properties available for specified object, open a SharePoint site and then navigate to your page where you have added a code to get title and description of current web in content editor web part in internet explorer.

Now I have Internet Explorer 9 so I pressed Alt key, clicked on Tools menu and click on F12 Developer tools or simply press F12 key to get developer tools.


If you have IE7 or IE8, then also there should be an option for tools menu and then go to developer tools option.

After getting developer tools, you should be able to view source code in the developer pane. There are different tabs in the window as well. We are interested in scripts tab. This tab shows you all the scripts in the page. If you have loaded any of the JavaScript files instead of writing a code in content editor then you should be able to locate those functions in the file here in this tab.

Check out the code written by us and locate it.


We want to see all properties related to web, so right click the line and select insert breakpoint.

currentweb = currentcontext.get_web();


Hit start debugging


You will find breakpoint comes and waits so that we can step through each line.

Hover the mouse on it and check out all properties by scrolling down the entire list.


Same way you can get all properties of site, list, views, groups etc. objects of SharePoint and then you know what to use while you code in script.

Hope this helps. Have happy finding properties. Read Part-5 for more reading.

Tuesday, July 26, 2011

Client Object Model – Part 3

In this post, we are going to see how we can work with SharePoint using JavaScript as our scripting language. This is called ECMA script. All functions that relates to SharePoint JavaScript are located in the files starting with SP in layouts folder.

One of very important files is SP.js. This is one of the file that we have to use in every script that we write while writing ECMA script for SharePoint.

We are going to do the same thing that we did in post 1 and post 2. So if you have not gone through post 1 and post 2, I would recommend you reading them first and then continue reading from here.

Now there are two ways we can write this ECMA script. It can be either on the content editor web part on a page or it can be on any aspx page developed in visual studio and used it in SharePoint.

If we use content editor web part, then we have to write following line as the first line in the script.

ExecuteOrDelayUntilScriptLoaded(initialize, "sp.js");

Now initialize is the name of the function. So if you have a different function name, then you need to mention that name instead of initialize.

All JavaScript files actually loads randomly. We can never say with guarantee that this file will be loaded after this file. So we never know when the functions are available to call. Hence this method waits for SP.js to load and then only call our initialize function. This ensures that after sp.js is loaded, we can use all its methods in the JavaScript code.

If you use ASPX page and want to refer JavaScript functions for SharePoint, then this should be used in ASPX.

<SHAREPOINT:SCRIPTLINK name="SP.js" runat="server" ondemand="true" localizable="false"></SHAREPOINT:SCRIPTLINK>

We are going to add content editor web part and then we will write a simple script which will prompt web title and description for us.

Do remember one very important thing. Via ECMA script you cannot access object from any other site. It works only on the current context. All operations can be done only on the current site.

Add one content editor web part in the page where you want. Now let’s write down a simple script in editor web part.


<script type="text/javascript">
var currentcontext = null;
var currentweb = null;

ExecuteOrDelayUntilScriptLoaded(LoadCurrentSite, "sp.js");


function LoadCurrentSite()

{
currentcontext = new SP.ClientContext.get_current();
currentweb = currentcontext.get_web();
currentcontext.load(currentweb);
currentcontext.executeQueryAsync(Function.createDelegate(this, this.ExecuteOnSuccess),
Function.createDelegate(this, this.ExecuteOnFailure));

}

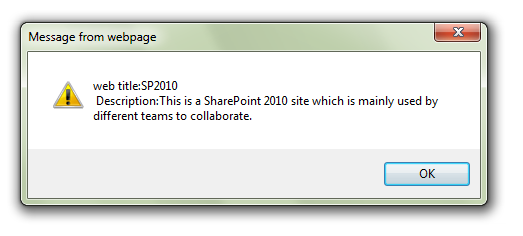
function ExecuteOnSuccess(sender, args) {
alert('web title:' + currentweb.get_title() + '\n Description:' + currentweb.get_description());
}

function ExecuteOnFailure(sender, args) {
alert('request failed ' + args.get_message() + '\n' + args.get_stackTrace());
}

</script>


Now here what we have done is we have written a simple line of code which says wait till sp.js load and once it is loaded, we call LoadCurrentSite function which we have defined.

ExecuteOrDelayUntilScriptLoaded(LoadCurrentSite, "sp.js");

This function gets the current context and then loads the web and at the end we call it two functions asynchronously. If succeed then one function and if fails then the other function. If succeed, we would be able to get the title and description with the help of currentweb.get_title() and currentweb.get_description() function.

Remember that it has to be in lower case, otherwise you will face a problem and it might take a lot of time just to detect what went wrong when actually this could be the problem with letter cases. All method should have get_ and then the name.

We are going to see how to get all properties because here we do not have intellisense with us to support.

One very useful tip is whenever we call a load method for web; it actually loads all properties for the web creating unnecessary traffic between server and client. We can reduce this with the help of calling only those properties which we need.


In our case, we needed title and description. We could have changed our code little to create much more efficient. So let’s do that. All we need to do is change one line.

currentcontext.load(currentweb);
to
currentcontext.load(currentweb,'Title','Description');

Final output


Read Part-4

Thursday, July 21, 2011

Client Object Model – Part 2

In this post, we are going to see how we can use Silverlight client object model for SharePoint. If you have not gone through Part – 1 - managed client object model, I recommend you reading them first and then continue reading here.

We are going to create Silverlight project this time. So go ahead and add Silverlight application. You will see two projects loaded in solution. One is the web project which will generate the .xap file and the other is the client project that we need for our SharePoint.

A Silverlight application run on the browser that means it runs on the client side and whenever requires it interacts with serve with the help of WCF calls as far as database connectivity is concern. But in this model with SharePoint, we do not need to write anything extra with WCF. It has already been taken care of.

You need to add two DLL to the client project as shown in image below.

Microsoft.SharePoint.Client.Silverlight.dll and Microsoft.SharePoint.Client.Silverlight.Runtime.dll

They are located at C:\Program Files\Common Files\Microsoft Shared\Web Server Extensions\14\TEMPLATE\LAYOUTS\ClientBin


Create a simple UI in mainpage.xaml file


We need to understand that Silverlight application works on asynchronous model which means that once the process is started, we cannot block the UI. It works on the call back function for success and failure. So if you try to write down same line of code which we did in our previous part 1 post, it will not work at all.

We need to change the code this time due to Silverlight asynchronous model.

Write down following code to your xaml cs file.


using System;
using System.Collections.Generic;
using System.Linq;
using System.Net;
using System.Windows;
using System.Windows.Controls;
using System.Windows.Documents;
using System.Windows.Input;
using System.Windows.Media;
using System.Windows.Media.Animation;
using System.Windows.Shapes;
using Microsoft.SharePoint.Client;


namespace SilverlightSPCOM
{
public partial class MainPage : UserControl
{
private ClientContext context = null;
private Web web = null;
private delegate void UpdateUIMethod();


public MainPage()
{
InitializeComponent();
}

private void btnRetrive_Click(object sender, RoutedEventArgs e)
{
LoadData();
}

private void LoadData()
{

context = ClientContext.Current;

web = context.Web;

context.Load(web);

context.ExecuteQueryAsync(LoadSucces, LoadFailed);


}

private void DisplayData()
{
this.lblWebTitle.Text = web.Title;

this.lblWebDescription.Text = web.Description;
}

private void LoadSucces(object sender, ClientRequestSucceededEventArgs e)
{
UpdateUIMethod updateUI = DisplayData;
this.Dispatcher.BeginInvoke(updateUI);
}

private void LoadFailed(object sender, ClientRequestFailedEventArgs e)
{
MessageBox.Show("Request Failed: " + e.Message + ", Stack Trace:" + e.StackTrace);
}


}
}


Because we will host this application inside SharePoint, we are not passing any URL for SharePoint site as we did in previous post. We will take reference of current SharePoint site.

When we click the button, we call function with two parameters which are method delegates. Respective method triggers based on the response we get from server. If we get success, then our first method will trigger or else the second. Observe that we call it asynchronously so that it does not block UI.

Build the solution.

Now to deploy this application in SharePoint we have two different options. One is we can deploy the generated .XAP file in ClientBin folder to some document library which has proper permission for users or we can deploy this XAP file to 14\TEMPLATE\LAYOUTS\ClientBin folder.

Now we are set with the deployment. All we have to do is open a page where you want to view this Silverlight application which accesses SharePoint data with client object model.

Edit the page, add Silverlight web part.

Once you add Silverlight web part, you will be prompt to give path of XAP file. If you have deployed in document library, give path of document library/file name.xap or else give path of 14\TEMPLATE\LAYOUTS\ClientBin\file name.xap.

Once done, save your changes on the page and see the simple magic happening on the page.


Read more in Part-3

Friday, July 15, 2011

Result is out

Finally the result is out

It looks like people think that integrating Windows Phone OS will help Nokia to regain the market.

Still there are number of people who thinks that they will now loose more market and there are people who were not aware about Microsoft OS integrating with Nokia.

Thursday, July 14, 2011

Client Object Model - Part 1

From this post, we are going to start new series for client object model. If you have not gone through previous post Client Object Model which describes you what client object model is all about, I would strongly encourage you to read that first and then come back and continue reading here.

We are going to star with managed client object model. Managed client object model works on the .Net CLR. That means any normal application that runs on the .Net CLR installed platform.

I am going to show you by taking windows application as an example and look into some of the very basic stuff to get the web properties.

First create a windows application project and take a reference of two DLLs that are needed to work with.

They are Microsoft.SharePoint.Client.dll and Microsoft.SharePoint.Client.Runtime.dll and you can find them 14/ISAPI folder.

public void LoadData()
{
string webUrl = "{site URL}"; //replace this with your site URL

ClientContext context = new ClientContext(webUrl);

Web web = context.Web;

context.Load(web);

context.ExecuteQuery();

this.lblWebTitle.Text = web.Title;

this.lblWebDescription.Text = web.Description;


}

private void button1_Click(object sender, EventArgs e)
{
LoadData();

}

As you can see there is very little difference between server object model and COM as far as classes are concern. SPWeb becomes Web, SPContext becomes ClientContext.

Do remember one thing, until and unless we call executequery method, nothing happens. As soon as executequery method is invoked, then managed client object model bundles up all requests together and then pass it to the server. There is no network traffic till then.


Overall approach with client object model is you bundle up all requests that you want to query to server (web properties, lists properties etc) and then call them at once by invoking executequery method.

We are going to see more and more examples with different approaches. Next is doing same with the help of Silverlight Client.

Tuesday, July 12, 2011

Client Object Model – SharePoint 2010 / SharePoint Foundation 2010

New client object model is introduced in SharePoint 2010 and Foundation 2010. Let us see what this new client model is all about and why has this been introduced.

Note: please consider term Client Object Model wherever I use COM word. It has nothing to do with COM windows component.

Earlier to 2010 environment, in 2007 if we want to access SharePoint data outside of server environment, we had only one choice and that was obvious a web service.

We had two options. A code that runs on the server which requires server API and a code that runs on a client which requires calling web services. Calling web services and fetching result and then manipulating that result was not that easy. There were so many different ways to iterate through results, different ways to query SharePoint from web services. These were never an easy job.

Intention of client object model helps developer to write a code which runs on the client and call server without using web services. So the main advantage is you no need to install SharePoint for development.


There are three different client object model in SharePoint 2010.
1) .Net managed client model - This is used via .Net CLR – you need to add Microsoft.SharePoint.Client.dll, Microsoft.SharePoint.Client.Runtime.dll for this. You can find them in 14 hives ISAPI folder.

2) Silverlight client – we can use SharePoint DLLs to be used in Silverlight applications which can be integrated to the SharePoint 2010. SharePoint 2010 provides a great ways to integrate Silverlight applications to the environment. You can deploy your applications as well as you can just upload your entire Silverlight application in document library and use it in SharePoint 2010. You need to add Microsoft.SharePoint.Client.Silverlight.dll and Microsoft.SharePoint.Client.Silverlight.Runtime.dll for this. You can find them in 14\TEMPLATE\LAYOUTS\ClientBin folder.

3) ECMA script client model – Now we have a flexibility to call SharePoint data from JavaScript as well. We can get a context of SharePoint objects now in JavaScript. You need to add SP.js file for this. You can find this in 14\TEMPLATE\LAYOUTS folder.

Other big advantage is that you no need to learn a complete new classes and objects. It’s just that there are some different names of classes now. Those names are not changed much. Example, SPContext has become ClientContext, SPSite has become Site, SPWeb has become Web, SPList has become List.

Small changes have been done and few different ways of creating list, list items, iterating through items, fetching data through query have been introduced in client object model. We are going to see as many examples as we can as we move along with the series.

The way COM works is it bundles all request made to the server in to a XML form and then passes to the server, processes them on the server and then return the JSON response. We have to read the JSON response and then process the result. We do not have to process actually, it’s just that it returns the response and we can use different techniques to read them. We are going to see them all as we proceed with this beautiful journey with COM.

Monday, July 11, 2011

Assign value to hyperlink or picture field from designer

Recently I came across to a requirement to automatically assign value to picture field. Now we know that when we define hyperlink or picture field in list when format URL as picture, we need to provide path and the alternate name to image.

I had to do the same thing but with the help of SharePoint designer. Based on some condition, I needed to assign value to the picture field. So here is a simple way we do this.

Declare one variable in your SharePoint designer workflow. I have used ImgURL as string.


Now, I have some conditions in my workflow, however idea is to show you how to assign image path to picture field.

All you have to do is store value in that variable. Use build dynamic string from action options.


Remember one thing, there is one space after comma and the second text.

That’s it. When you update or store value in that field via designer. Use this string variable as source to set value in that field.

Hope this helps.

Friday, July 8, 2011

Remove all survey response from web service

Well I ran into a trouble when I needed to remove all responses from survey. It is far easy to remove all items from the list when you have the permission to access the UI. However when it even comes to the survey responses, there is a big problem. There is no way to edit response in data sheet. Only way is to go to the content and structure in site settings, locate the survey list and then increase the limit to 1000 items and keep deleting in the bunch of 1000 items.

Again the problem is what if you have got more than 50,000 responses. You will end up spending hours removing 1000 items 50 times. This is definitely something which is not worth doing.

Read following posts and you will also come to know about some other stuff.

Delete List Item using web service


Remove all response from SharePoint survey

You can treat this post as continuation of above links.

In this post, I am going to show you a way to remove all responses from survey with the help of web service. Yes web service has come to a rescue as far as removing all responses from survey is concern.

I am writing one function and on button click I am calling that function. Take a list reference from the SharePoint URL interest of you and then start wiring up below code.


public static ArrayList GetListIDs(String ListName)
{
Lists.Lists ListReference = new Lists.Lists();
ListReference.Credentials = System.Net.CredentialCache.DefaultCredentials;
ListReference.Url =
"web site url/_vti_bin/Lists.asmx";

XmlDocument xmlDoc = new System.Xml.XmlDocument();

XmlNode ndViewFields =
xmlDoc.CreateNode(XmlNodeType.Element, "ViewFields", "");
ndViewFields.InnerXml = "<FieldRef Name='ID' />";

XmlNode ndListItems =
ListReference.GetListItems(ListName, null, null,
ndViewFields, "20000", null, null);

//convert String to XMLReader
XmlReaderSettings readersettings = new XmlReaderSettings();
readersettings.ConformanceLevel = ConformanceLevel.Fragment;
readersettings.IgnoreWhitespace = true;
readersettings.IgnoreComments = true;
XmlReader xmlreader =
XmlReader.Create(new StringReader(ndListItems.OuterXml), readersettings);

ArrayList lstID = new ArrayList();

while (xmlreader.Read())
{
if (xmlreader.Name == "z:row")
lstID.Add(xmlreader.GetAttribute("ows_ID").ToString());
}

return lstID;
}


Above function is used to get All IDs of items that are there in the survey. Remember 20000 is the item limit, increase this number as many items as you would like to return.


public static void DeleteItems(String ListName, ArrayList lstID)
{
try
{
Lists.Lists ListReference = new Lists.Lists();
ListReference.Credentials = System.Net.CredentialCache.DefaultCredentials;
ListReference.Timeout = 300000;
ListReference.Url =
" web site url/_vti_bin/Lists.asmx ";


string strBatch = "";

foreach (String ID in lstID)
{
strBatch += "<Method ID='1' Cmd='Delete'><Field Name='ID'>" + ID + "</Field></Method>";
}

XmlDocument xmlDoc = new System.Xml.XmlDocument();
XmlElement elBatch = xmlDoc.CreateElement("Batch");

elBatch.InnerXml = strBatch;

ListReference.UpdateListItems(ListName, elBatch);
}
catch (Exception ex)
{
throw ex;
}
}


And above code takes those IDs as a reference and deletes them from the list. The above code may not be the perfect way to do this job but it certainly better than one approach which is looping through 1 to 50000 items and delete one by one. Rather mentioned approach is better to construct a string and then pass that entire string as a one single batch to perform the operation.

Just take care that you need to increase the time out property based on the number of items that you have. Otherwise you may get a server timeout exception.

Hope this helps.

Thursday, July 7, 2011

Hide I Like It and Notes and Tags

If we have a requirement to hide social features from SharePoint 2010 or from windows foundation server which is I Like it and Notes and Tags options, then we can do so with the help of central administration.

Remember this feature is a farm level feature, so if you make a change, it is going to affect every web application that you’ve created and needs to be done on every server running SharePoint.


Now open central administration, go to System settings, Farm management, click on manage features


Deactivate social feature


Come back to any site in any web application, you will now not see I Like it and Tags and Notes option in the ribbon.


Now this is a farm level settings, but if you wish to hide and unhide based on individual users or groups or active directory groups, then also there is one way to do so.

Again go to central administration-> Application management ->service applications->manage service applications

Look for User profile service applications, click on the link.

Then under people, click on manage user permissions.


Now here, add individual users or Active Directory Group and select appropriate options for social features. If you want to enable it, keep the check box selected or else de select the check box to hide those features from specific users or groups.


Share your SharePoint Experiences with us...
As good as the SharePointKings is, we want to make it even better. One of our most valuable sources of input for our Blog Posts comes from ever enthusiastic Visitors/Readers. We welcome every Visitor/Reader to contribute their experiences with SharePoint. It may be in the form of a code stub, snippet, any tips and trick or any crazy thing you have tried with SharePoint.
Send your Articles to sharepointkings@gmail.com with your Profile Summary. We will Post them. The idea is to act as a bridge between you Readers!!!

If anyone would like to have their advertisement posted on this blog, please send us the requirement details to sharepointkings@gmail.com