Tuesday, August 31, 2010

Set default search to list scope in SharePoint

Hi All,

We know built in search functionality in SharePoint. When configured properly, you can search from entire site just anything and search will categorize the results for you.

However a simple scenario came to me last week. When you are on any list AllItems.aspx page and if you have observed, by default search scope on top right is set to “This site: {site name}”.

This List: {list name} by default instead of This Site: {site name} so that they directly can put in words and search from that list.

So go ahead and open view source of the page, search for This List: {list name} and take out its ID. It should be ending with SBScopesDDL.

And add content editor web part on AllItems.aspx and paste the following code. Do not forget to reference correct jQuery js location.

<script type="text/javascript" src="http://ajax.googleapis.com/ajax/libs/jquery/1.3.2/jquery.min.js"></script>

<script type="text/javascript" >

$(document).ready(function() {
//Below function makes sure that if the status is not suspended in edit mode, it disables the reason text //area
var text = $("select[title$='Search Scope'] :selected").text();

$("#ctl00_PlaceHolderSearchArea_ctl01_SBScopesDDL").val("This List: YOUR LIST NAME ");

});

</script>
</script>


And you are good to go. Observe the top search box, you will find by default This List : {list name} selected.

Monday, August 30, 2010

How to disallow users to add web part in web part zone

Hi All,

I was working on one stuff and suddenly a question came from one of my friends that is there any way where in I can prevent users from adding web part to web part zone, however they can certainly change the web part’s property and all.

So I tried something and found out the answer. Easy answer is in the SharePoint designer and other answer is the feature file for that web part.

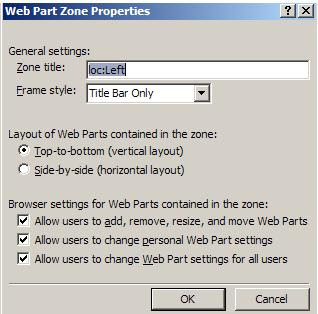
Open the SharePoint designer; connect to the site and the page where that web part is. Move your mouse cursor to the area of the web part zone. Right click the area, and select web part zone properties and you will find something like this


Here you can unselect the first option which will prevent any user to add any more web parts to the web part zone.

Save the page, although page will become customized, however this method solves the purpose.

The other approach is simple in the manifest file, add one allowlayoutchange="false" attribute to the web part zone tag in xml file.

I hope this will help many.

Friday, August 27, 2010

Using jQuery for Search in SharePoint

Hi All,

I came across to a wonderful jQuery technique for using the search web service in SharePoint. This jQuery returns the same result which you can see after hitting the search button on top of the page after giving some words to find.

This jQuery is completely configurable in the sense of taking time to return the result, number of results to be returns and so on.

To achieve this fantastic trick and to achieve the most common task done by jQuery, fetching the result and showing as a suggestion under textbox, copy below code and paste it in the content editor web part of your page.


<script type="text/javascript" src="http://ajax.googleapis.com/ajax/libs/jquery/1.3.2/jquery.min.js"></script>
<script type="text/javascript">
// QuickSearch v0.1
// Created by Jan Tielens, http://weblogs.asp.net/jan
// This sample code is provided on an “as is” basis and without warranty of any kind.

// *** Customizable parameters ***
var quickSearchConfig = {
delay: 500, // time to wait before executing the query (in ms)
minCharacters: 3, // minimum nr of characters to enter before search
scope: "All Sites", // search scope to use
numberOfResults: 75, // number of results to show
resultsAnimation: 200, // animation time (in ms) of the search results
resultAnimation: 0 // animation time (in ms) of individual result (when selected)
};
</script>

<style type="text/css">
.quickSearchResultDivUnselected
{
background: white;
border: 1px solid white;
margin-left: 2px;
overflow: hidden;
text-overflow: ellipsis;
}
.quickSearchResultDivSelected
{
background: #EEEEEE;
border: 1px solid Gray;
margin-left: 2px;
overflow: hidden;
text-overflow: ellipsis;
}
</style>
<table id="quickSearchTable" class="ms-sbtable ms-sbtable-ex" border="0">
<tbody>
<tr class="ms-sbrow">
<td class="ms-sbcell">
<input style="width: 100%" id="quickSearchTextBox" class="ms-sbplain" title="Enter search words"
style="width: 170px" alt="Enter search words" maxlength="200" value="" />
</td>
<td class="ms-sbgo ms-sbcell" style="width: 14px">
<img title="Go Search" style="border-top-width: 0px; border-left-width: 0px; border-bottom-width: 0px;
border-right-width: 0px" alt="Go Search" src="/_layouts/images/gosearch.gif" />
</td>
<td style="width: 1px">
</td>
</tr>
</tbody>
</table>
<div id="quickSearchResults" style="display: none;">
</div>

<script type="text/javascript">
var quickSearchTimer;
var quickSearchSelectedDivIndex = -1;

function showResultsDiv(text) {
var div = $("#quickSearchResults");
var prevTable = div.prev();

var divCss = {
"left": prevTable.offset().left,
"padding": 2,
"position": "absolute",
"top": prevTable.offset().top + prevTable.height() + 1,
"border": "1px solid #7f9db9",
"width": prevTable.width() - 3,
"background": "white",
"max-width": prevTable.width() - 3
};

div.css(divCss).append(text).slideDown(quickSearchConfig.resultsAnimation);
}

$(document).ready(function() {
$('#quickSearchTextBox').keyup(function(event) {
var previousSelected = quickSearchSelectedDivIndex;

// catch some keys
switch(event.keyCode) {
case 13: // enter
var selectedDiv = $("#quickSearchResults>div:eq(" + quickSearchSelectedDivIndex + ") a");
if(selectedDiv.length == 1)
window.location = selectedDiv.attr("href");
break;
case 38: // key up
quickSearchSelectedDivIndex--;
break;
case 40: // key down
quickSearchSelectedDivIndex ++;
break;
}

// check bounds
if(quickSearchSelectedDivIndex != previousSelected) {
if(quickSearchSelectedDivIndex < 0)
quickSearchSelectedDivIndex = 0;
if(quickSearchSelectedDivIndex >= $("#quickSearchResults>div").length -1)
quickSearchSelectedDivIndex = $("#quickSearchResults>div").length - 2;
}

// select new div, unselect the previous selected
if(quickSearchSelectedDivIndex > -1) {
if(quickSearchSelectedDivIndex != previousSelected) {
unSelectDiv( $("#quickSearchResults>div:eq(" + previousSelected + ")"));
selectDiv($("#quickSearchResults>div:eq(" + quickSearchSelectedDivIndex + ")"));
}
}

// if the query is different from the previous one, search again
if($('#quickSearchTextBox').data("query") != $('#quickSearchTextBox').val()) {
if (quickSearchTimer != null) // cancel the delayed event
clearTimeout(quickSearchTimer);
quickSearchTimer = setTimeout(function() { // delay the searching
$("#quickSearchResults").fadeOut(200, initSearch);
} , quickSearchConfig.delay);
}
});
});

function unSelectDiv(div) {
// first stop all animations still in progress
$("#quickSearchResults>div>div").stop(true,true);

div.removeClass("quickSearchResultDivSelected").addClass("quickSearchResultDivUnselected");
$("#details", div).hide();
}

function selectDiv(div) {
div.addClass("quickSearchResultDivSelected");
$("#details", div).slideDown(quickSearchConfig.resultAnimation);
}

function initSearch() {
// first store query in data
$('#quickSearchTextBox').data("query", $('#quickSearchTextBox').val());

// clear the results
$("#quickSearchResults").empty();

// start the search
var query = $("#quickSearchTextBox").val();
if(query.length >= quickSearchConfig.minCharacters) {
showResultsDiv("Searching ..."); // display status
search(query);
}
}

function search(query) {
quickSearchSelectedDivIndex = -1;
var queryXML =
"<QueryPacket xmlns='urn:Microsoft.Search.Query' Revision='1000'> \
<Query domain='QDomain'> \
<SupportedFormats><Format>urn:Microsoft.Search.Response.Document.Document</Format></SupportedFormats> \
<Context> \
<QueryText language='en-US' type='STRING' >SCOPE:\"" + quickSearchConfig.scope + "\"" + query + "</QueryText> \
</Context> \
<SortByProperties><SortByProperty name='Rank' direction='Descending' order='1'/></SortByProperties> \
<Range><StartAt>1</StartAt><Count>" + quickSearchConfig.numberOfResults + "</Count></Range> \
<EnableStemming>false</EnableStemming> \
<TrimDuplicates>true</TrimDuplicates> \
<IgnoreAllNoiseQuery>true</IgnoreAllNoiseQuery> \
<ImplicitAndBehavior>true</ImplicitAndBehavior> \
<IncludeRelevanceResults>true</IncludeRelevanceResults> \
<IncludeSpecialTermResults>true</IncludeSpecialTermResults> \
<IncludeHighConfidenceResults>true</IncludeHighConfidenceResults> \
</Query></QueryPacket>";

var soapEnv =
"<soap:Envelope xmlns:xsi='http://www.w3.org/2001/XMLSchema-instance' xmlns:xsd='http://www.w3.org/2001/XMLSchema' xmlns:soap='http://schemas.xmlsoap.org/soap/envelope/'> \
<soap:Body> \
<Query xmlns='urn:Microsoft.Search'> \
<queryXml>" + escapeHTML(queryXML) + "</queryXml> \
</Query> \
</soap:Body> \
</soap:Envelope>";

$.ajax({
url: "/_vti_bin/search.asmx",
type: "POST",
dataType: "xml",
data: soapEnv,
complete: processResult,
contentType: "text/xml; charset=\"utf-8\""
});

function processResult(xData, status) {
var html = "";
$(xData.responseXML).find("QueryResult").each(function() {
var divWidh = $("#quickSearchTable").width() - 13;

var x = $("<xml>" + $(this).text() + "</xml>");
x.find("Document").each(function() {
var title = $("Title", $(this)).text();
var url = $("Action>LinkUrl", $(this)).text();
var description = $("Description", $(this)).text()

html +=
"<div class='quickSearchResultDivUnselected' style='width:" + divWidh + "px;max-width:" + divWidh +"px'> \
<a href='" + url + "'>" + $("Title", $(this)).text() + "</a> \
<div style='display:none' id='details' style='margin-left:10px'>"
+ description +
"<br/>" + url + " \
</div> \
</div>";
});
if(x.find("TotalAvailable").text() != "")
html += "<div style='text-align:right'>Total results: " + x.find("TotalAvailable").text() + "</div>";
else
html += "<div style='text-align:right'>Total results: 0</div>";
});

$("#quickSearchResults").empty().append(html);
$("#quickSearchResults>div>a").hover(
function() { selectDiv($(this).parent()); },
function() { unSelectDiv($(this).parent()); }
);
showResultsDiv();
}
}

function escapeHTML (str) {
return str.replace(/&/g,'&amp;').replace(/</g,'&lt;').replace(/>/g,'&gt;');
}
</script>


You can replace the configuration section in this script which is quickSearchConfig in the start of the script. You can also change the jQuery link at the start script tag by downloading that js file, storing in your document library and then giving url of document library till the js file.

As you can see delay, minimum number of characters to use for start calling a web service, scope, number of results and animation time are configurable options.

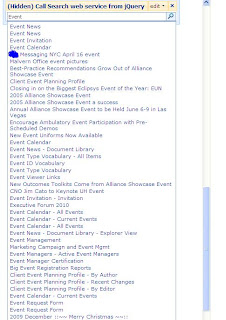
Here is the result out of this.


Thanks for the wonderful Post by Jan.

Thursday, August 19, 2010

Securing connection string in web.config

Hi All,

Although Microsoft has given us the API classes and web services to work with SharePoint. Many programmers try to reach to the database and perform the select queries.

This is not recommended at all, and that is why MS has given us the object model and web service to work with for SharePoint.

However in case if you use database for querying purpose and if you are storing the database connection information in web config file of your web application and referencing from the code somewhere, then I would strongly recommend you to secure this connection string.

It does not depend on whether you are connecting with windows authentication or forms authentication. Hiding server name and database name is as important as hiding user name and password.

So here are simple steps to perform for securing and encrypting the connection strings. Remember we should encrypt all connection strings mentioned in connectionstring tag in web.config.

Remember that encryption happens on the basis of RSA provider.

Open the visual studio command prompt. Type in this commend

aspnet_regiis -pe "connectionStrings" -app "/SPKings"

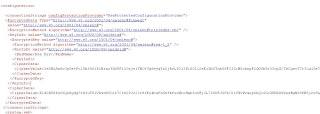
Where SPkings is the web application and here is the result of this encryption.


After this encryption, you do not need to perform any decryption in your code. Runtime will automatically decrypt this connectionstring for you. There will be very light performance issue, very light, However this is okay according to me instead of opening the username, password or server name and database name to any other person.

Wednesday, August 18, 2010

Send SMS for Alert in SharePoint 2010

Hi All,

Although we haven’t got a chance to put our hands dirty on this feature. However it certainly takes the alert system to the next level.

We all are familiar with sending alert by email in SharePoint 2007. In SharePoint 2010, you can also send SMS to the mobile.

Advantage of sending SMS over email is email can get into a mass span category and some time lose an important update. However this is not the case with SMS.

In central administration, you need to provide the URL of SMS service, credentials. You can check the SMS service by hitting the test service button.

It works over Office Mobile Service Protocol like mail uses SMTP. This OMS actually allows client to send text and multimedia messages to server which processes the request and sends to the destination mobile number.

Even the SMS can also be replied and service can then deliver this reply in terms of SMTP mail.

We will be checking more on this and as soon as get a chance, we will play with it and let you know the result.

Monday, August 16, 2010

Unable to connect to asp.net development server

Hi All,

Yesterday I was working with one web service project and in that I was required to create a method which calls SharePoint web services.

However till day before yesterday everything was okay. Suddenly now Visual studio has started giving me unable to connect to the asp.net development server error.

I tried hard to Google it out, and got so many different answers. Like install SP1, Install SP2, platform related answers, operating system related, framework related, many other tips and tricks. I tried almost everything.

But not sure what went wrong or my visual studio got corrupted or what. However I found a fantastic answer to this problem.

It is just two easy steps to perform. One think is for sure, every time you turn your computer off and then re starts it again and try to build and run, it will give you error. So every time you need to perform this action.

Visit Amit Kumar Singh's post site and follow the two simple steps. Thanks to Amit kumar singh.

Keep the .rar file with you and every time you restart your machine, unrar the file and copy the exe. Steps are mentioned in the site. Go through the post. It is a very useful post.

Thursday, August 12, 2010

Update an item sends an email problem in SharePoint

Hi All,

One major requirement with SharePoint is you set up a workflow which sends a notification mail to list of people when anyone updates the item in the list.

Now this is cool. However the problem here is when actually nothing is modified, then also SharePoint kicks an email and people gets it and wonder what has changed when nothing was actually changed in any of the list items.

To give you a simple scenario, create one list, go to SharePoint designer and create a workflow, attach to the list and select the option which says trigger when item is updated. In workflow send an email to yourself. Now go to the list, create one item. Open the same item, without changing anything, click on ok and there you go. You caught the problem; you still get an email even though you did not change anything.

Well before diving to the solution let me make one thing very clear. What we are looking for is an out of the box solution. We do not want to write any code. Event handler is the best place to write a code and handle this situation, because we can get new value and the old value of the field in the event handler. We can compare all fields with previous and current value and if any of them is modified, then we can send an email else leave it as it is.

But we are talking about the no code solution. So definitely there are some drawbacks to it. But it definitely solves this problem.

All you need to do is create fields as many fields as you have in the list. If you have seven fields, then you need to create seven more fields in the same list. You can name them anything, but to make it a meaningful, keep the same name of the field, and only append copy to it. Example, we have Title field in the list and new field will be TitleCopy. If Details is the field, then new field will be DetailsCopy.

Soon you will come to know why we are doing this. Well to give you a quick answer, to compare these fields.

After creating Copy fields as we discussed. Follow these steps.


2) Create one workflow from File-New workflow menu.
3) Give a name to the workflow.
4) Attach it to the list.
5) Select trigger this workflow when item is created.
6) We need to define a condition which is always true, you can make condition like if 1 ==1, then in action, Set TitleCopy to ListName:Title, then DetailsCopy to ListName:Details.

Like this set all copy fields to the original fields.

This is your first workflow. Now we also need to create second workflow. I know question has come to your mind that why do we need to create a workflow for assigning this values. We could have created the calculated column and assign the values. Well, I have not done this. Why? You need to find it yourself. Try doing this and you will realize that okay we cannot take approach of calculated columns.

Coming back to the point, create one more workflow, attach it to the same list, and give it a name and select trigger this workflow when item is updated and this time your condition will be like this:

If Title is not equal to ListName:TitleCopy or Details is not equals to ListName:DetailsCopy. In this way, make a condition by combining OR for all fields. If this is true, then send an email in the action.

Add second step in the workflow, check the condition if Title is not equals to ListName:TitleCopy, then in action, set TitleCopy to the ListName:Title.

Add another step in the workflow, check the condition if Details is not equals to ListName:Details, then in action, set DetailsCopy to the ListName:Details.

Add steps for all fields in the list. Now you again must be wondering why we are creating each step for comparing and assigning the values of the field. Well, I would say try it yourself in putting all condition in one step and see the result. You will realize that okay we cannot that this approach. And hence each step must be performed for each individual field.

What we have done here is, first workflow will be triggered when we create the item and assign the values to the copy fields in the list.

Second workflow will be triggered when we modify the list item and in that we have checked the original value which is currently in the Copy fields with the changed fields. If any of them is changed, then only we trigger an email and after triggering we again compare which field is actually changed and we assign the changed value to the Copy field so as to compare it with the next time.

I know question might come that these all copy fields will also be visible at the time of creating, editing and viewing list items. Well you can write a code not to show these copy fields while performing create, edit or viewing the items. Or you can also use jQuery technique to hide them.

I recommend you read Using jQueries in SharePoint for how to hide fields and other stuff.

Now we have solved the problem of sending mail when not updating anything in the list. Mail will be send only when something is actually changed. Try it yourself and do share your thoughts on this.

Monday, August 9, 2010

Finally the result is out

Hi All,

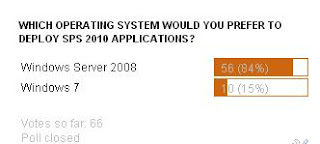
We asked which Os would you prefer to deploy your SPS 2010 applications?

And here is what we have


Looks like people prefers server operating system than clinet to deploy their applications.

Tuesday, August 3, 2010

Exporting Access table to SharePoint list

Hi All,

We know that there is a way to export data of list to access easily through open in access option. There is also an option in access 2007 to fetch the data from SharePoint list. So what we are doing here is importing data from list or exporting data from list to access. What about the vice versa? What if we want to export table from access to SharePoint list.

To demonstrate this, I had downloaded the asset database template readily available for download from the internet. Just for the information that now many database templates are available for access database which had ready tables and forms as well for entering data and updating, deleting the data. There are reports also available. If you have not tried this, go ahead and download asset database template and you can see reports and forms for this.

Coming back to our topic, I have entered some contact information. I will recommend you change the name of the table contacts, because in team site we already have a list called contacts. I have changed the name of that table to Contact Info.

I have added three contacts in that because when you create an entry in the asset table, we need to specify which contact has this asset.


And now click on move to SharePoint from external data tab.


Moment you click on that option, you are presented with a screen which asks you the URL of the site where you want to move this data. Provide the site URL there.

Once you click on next, magic begins and as you can see it not only creates an asset list also populates the data in it. What is more interesting part is, it also creates and populates the relational tables as well. In our case for example contact info is our relational table.


I took dummy entries to demonstrate this concept, However when placed practically this helps a lot.

Monday, August 2, 2010

Visio 2010, SharePoint Designer 2010 and VS 2010 Workflows

Hi All,

Yesterday I was discussing with my friends about new Office 2010 application. I came across a new interesting feature of it. We all know Visio software in office suite. But what we do not know is the enhancement that has been done at great extends to this Visio application.

We all know that we used to create workflows in either Visual studio or SharePoint Designer depending on the requirement. If it is rule based and simple and one time only, then the same can be achieved through SharePoint Designer, However if it is quite complex, then Visual Studio is anyways always there with us to help.

Visio 2010 and Visual Studio 2010 have come together to help us even more now. We have a template of workflow available in SharePoint Designer which helps us to create a workflow in Visio 2010 as well. After creating a workflow, we can export this workflow from Visio to SharePoint Designer 2010 or Visual Studio 2010.

You can also export the workflow created in the Designer 2010 to Visio 2010 for better presentation and graphical view. You can only design the workflow in Visio; you cannot not configure it in Visio. Configuration is a part of Designer 2010.

As and when we get more updates and information, we will share it with you. Yet we have to make our hands dirty on this. Soon we will.


Share your SharePoint Experiences with us...
As good as the SharePointKings is, we want to make it even better. One of our most valuable sources of input for our Blog Posts comes from ever enthusiastic Visitors/Readers. We welcome every Visitor/Reader to contribute their experiences with SharePoint. It may be in the form of a code stub, snippet, any tips and trick or any crazy thing you have tried with SharePoint.
Send your Articles to sharepointkings@gmail.com with your Profile Summary. We will Post them. The idea is to act as a bridge between you Readers!!!

If anyone would like to have their advertisement posted on this blog, please send us the requirement details to sharepointkings@gmail.com