Thursday, December 19, 2013

CAML Designer for SharePoint 2013

If you've been using U2U CAML query builder for SharePoint 2003, MOSS 2010 and SharePoint 2010, you must be looking for the same builder also for SharePoint 2013.

Here is a great new CAML builder with lot of new features as well as some ready snippets for server side object model, client side object model and JavaScript object model as well.

Check the below link.

CAML Designer 2013

I hope this will help.

Friday, December 13, 2013

ExecuteOrDelayUntilScriptLoaded not executing

If at any point of time you are using ExecuteOrDelayUntilScriptLoaded in a page or specifically in a publishing page and finding it not working, there is a strong chance that you need to replace this function with other function called SP.SOD.executeFunc.

In SharePoint 2013, the correct way to execute function after script is loaded is to use SP.SOD class and not ExecuteOrDelayUntilScriptLoaded.

If its ExecuteOrDelayUntilScriptLoaded({functionname}, "sp.js");

then replace it with

SP.SOD.executeFunc('sp.js', 'SP.ClientContext', {functionname});

This will also come handy specially when a user who has read / view only access the site where sp.js refuses to load when ExecuteOrDelayUntilScriptLoaded is used.

Sunday, October 13, 2013

Enable Sign in as Different User Option in SharePoint 2013

Hello,

In this post we are going to see how to enable the sign in as different user option in SharePoint 2013. Till SharePoint 2010 this option was by default available but in SharePoint 2013 for some reason this has been not visible by default.

so if you want this option to be available then you need to add following line of code to the welcome.ascx which is located at :\Program Files\Common Files\microsoft shared\Web ServerExtensions\15\TEMPLATE\CONTROLTEMPLATES.

Add this to the welcome.ascx file. But a note to consider, please take the backup of the welcome.ascx file before you attempt this step.

<SharePoint:MenuItemTemplate runat="server" ID="ID_LoginAsDifferentUser" Text="<%$Resources:wss,personalactions_loginasdifferentuser%>" Description="<%$Resources:wss,personalactions_loginasdifferentuserdescription%>" MenuGroupId="100" Sequence="100" UseShortId="true" />

And then you should have the sign in as different user option available.


Sunday, September 1, 2013

Promoted Links in SharePoint 2013

In this post we are going to see one of the new features in SP 2013 which is promoted links. Promoted links are new concept through which you can promote your links on various pages. The classic example would be the one that you see default on the page like below.


When you hover over a image it shows you a nice animation and description about that image - link. When you click on that link it takes you to the page where URL is defined where to navigate.


You do not need to anything special here to have that mouse hover effect. SP 2013 now comes with a brand new template called promoted links as a list template.

So let us create one list with the template promoted links and see what all fields are available which makes promoted links one of the cool features.

Click on add an app from gear icon. Remember now every list and library is called app in SP 2013 love it or not.

You will find promoted links template. Click on the template to create one.


Give name.


You will find two views created default. One where you can see a list with fields and values and other as a actual tile interface which looks like the first image which we have in this post.


As you can see you have various options to set. You can also set the launch behaviour while creating list item. I have it for Bing, Google and for Yahoo. After adding values into the list items and going to the tiles page give us a look like what we wanted.


As you can see you do not have to do any other settings. All the effect like displaying text in animated format when you hover the mouse is taken care by SharePoint itself.

I hope this helps. 

Thursday, August 15, 2013

Get Installed languages in SharePoint

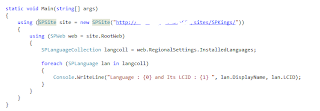
In this post we are going to see how we can get all the installed languages for the site in SharePoint. This is especially useful when you have various language packs installed in the site.

I am going to create a simple console application. The code will also runs the same in SharePoint WSP solutions as well.

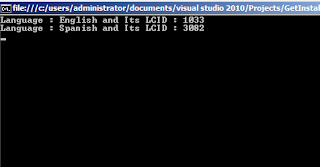
Here is a simple code in console application and the result when you run that.


If in your language settings you only have English selected, you would get only one language. so Its not about how many languages are available, it's about how many languages you have selected and allowed to be selected by user from the menu option.

I also would like to show you how you can get the same using PowerShell.

Open up SharePoint management shell and write down these steps. You are good to go.


I hope this helps.

Tuesday, August 13, 2013

Managed Metadata for localization

In this post we are going to see how managed metadata term store can be useful while considering localization in the form of values shown in the list and library item if the field type is of managed metadata.

To see this first we are going to create a managed term store data in English and then we are going to create the same term values in Spanish values.

open up your site and go to site settings and locate term store management under site administration.

Best way to test this is import the sample file that comes default.

Click on managed metadata and then click on new group. and give name CountryTS


Keep English as the selected language from language option in menu Now click on the CountryTS group and click on add term set give name Countries. Click on countries and click on add new term and add these three countries.


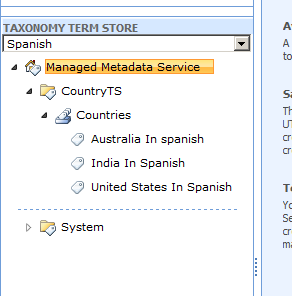
Now Change the language to Spanish


To test we will just change the text and add Spanish at the end. So after changing it would look something like this.


Now in any of the list go to the list settings. Click on create column and add the field with the name countries. Type should be managed metadata and then select countries from the term store list.


Add couple of entires.


Now it should be like this


Now change the language from English to Spanish


and see the result


As you can see that it automatically changes the text based on the language selected from menu and it automatically pick up corresponding values from term store.


I hope this helps.

Monday, August 12, 2013

InfoPath forms for list views

In this post we are going to see how we can design different InfoPath forms for different views for SharePoint list.

We will consider one list and we will customize the list in InfoPath form. Many times we may have a requirement of showing different InfoPath form when you are viewing an item than when you are inserting or editing an item. Usually on view form you do not need any validation controls to be a prt of form when the form is customized in InfoPath. 

When you are inserting an item or editing an existing item, you need a rules that may be applied to a textbox which shows and hides some error or validation messages.

We will take very simple scenario of one single line of text and one choice column in the list. We will customize that form in InfoPath. What we essentially want is we will give some instruction below the control on InfoPath form to indicate what is expected from user from that control input.

 This will be a plain text that we will write because we do not have a label control as such in InfoPath. We also do not want to have textbox control inserted as we are not working with any rules validation.

This example will clearly highlight how we can define different InfoPath form for various view.
I have a list with two columns. Default title and country with choice column.

Now I am going to click on customize this list in InfoPath from ribbon.


When it opens up, write down some instruction below title and country.


and then publish the form. Once published, open up the list and create couple of items in it.


Now observe that as we have written some instruction below the controls, it appears when we insert or edit the item.

Now let's view an item.


As you can see that this experience is not what we require. Why would user be shown the same instruction when user is just viewing an item.

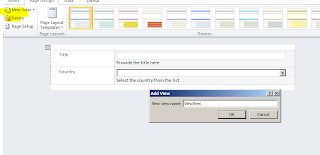
What we have to do first is create a replica of the entire edit form first and create a new view for the list in InfoPath.

So click on new view and give view a name.


Copy everything from edit item view of InfoPath and paste it on the new view that we just created. Remove the instruction this time.


Publish the form.

Now click on the form web parts option from ribbon


Now click on Item Display form option

Once you click on it, you will get this on the page


Now edit the web part and select the view to view item.


Click apply, ok and then stop editing.

Now click on any of the item in the list to view it.


and see the difference.

I hope this helps. 

Sunday, August 11, 2013

Get selected list / document items from SharePoint Ribbon

In this post we are going to see how we can get selected list / document items from our customized ribbon control.

We may have a requirement to process multiple selected items and then take user to another page for further processing or process the items on another page and then show some messages to the user based on the processing statuses.

If you have not gone through the series of customizing Ribbon from SharePoint Kings, I would recommend you reading the entire series first and then continue reading from here on.

We are going to take an example of document library.

First open up the project and add the empty element file to the project.

Pay proper attention to what we are doing in this element file. 

<?xml version="1.0" encoding="utf-8"?> <Elements > <CustomAction Id="NewItemCustomization" Location="CommandUI.Ribbon" RegistrationId="101" RegistrationType="List" Title="New Item Customization"> <CommandUIExtension> <CommandUIDefinitions> <CommandUIDefinition Location="Ribbon.Documents.Manage.Controls._children"> <Button Id="ListItemButton" Image16by16="/_layouts/images/CustomImages/Select16.png" Image32by32="/_layouts/images/CustomImages/Select32.png" Command="ListItemCommand" Description="Process Selected List Items" LabelText="Process List Items" TemplateAlias="o2" Sequence="81"/> </CommandUIDefinition> </CommandUIDefinitions> <CommandUIHandlers> <CommandUIHandler Command="ListItemCommand" CommandAction="[removed]avascript: function dialogCallback(dialogResult, returnValue){ SP.UI.Notify.addNotification(returnValue); SP.UI.ModalDialog.RefreshPage(SP.UI.DialogResult.OK); } var selectedItems = SP.ListOperation.Selection.getSelectedItems(); var selectedItemIds = ''; var selectedItemIndex; for (selectedItemIndex in selectedItems){ selectedItemIds += '|' + selectedItems[selectedItemIndex].id; } var dialogOptions = { url: '/sites/SharePointSite/_layouts/MetadataSiteColumn/ProcessSelectedDocuments.aspx?selectedItems=' +selectedItemIds +'&ListId=' +SP.ListOperation.Selection.getSelectedList(), title: 'Set Document Prefix', allowMaximize: false, showClose: false, width:500, height:400, dialogReturnValueCallback: dialogCallback }; SP.UI.ModalDialog.showModalDialog(dialogOptions);" /> </CommandUIHandlers> </CommandUIExtension> </CustomAction> </Elements>


First we are targeting our customization to the manage group in the document selection under documents tab. Hence we have taken up Ribbon.Documents.Manage.Controls._children as location.

Next we have defined the button with 16 by 16 image and the image is placed under the layouts folder. We have chosen the default alias for template and a sequence number.


This will give us a result like this.


The important action here is what happens when the button is clicked.

We have define the entire JavaScript inside the element file itself.

In that first we have defined one function.

function dialogCallback(dialogResult, returnValue){
          SP.UI.Notify.addNotification(returnValue);
          SP.UI.ModalDialog.RefreshPage(SP.UI.DialogResult.OK);
        }

This will make sure that when we get a result back from the application page which we will built shortly we display a message as a part of notification as well as we refresh the parent page.

then we take the selected documents. The procedure is same also for the list items. We need to use SP.ListOperations.Selection and then call getSelectedItems() to get all the selected items.

Once we get the items we need to separate them by some separator.  So in this example, we have taken pipeline character. We will then process this items and split them in application page code.

var selectedItems = SP.ListOperation.Selection.getSelectedItems();
        var selectedItemIds = '';
        var selectedItemIndex;
        for (selectedItemIndex in selectedItems){
          selectedItemIds += '|' + selectedItems[selectedItemIndex].id;
        }

Then we are actually opening up an application page and pass on the selecteditems string that we built in prior function. we are also registering the dialogue call back function which is the first function in our code which will refresh the parent page and shows a message as a part of notification.

another point to observe we also get the list name from another method called getSelectedList.

   var dialogOptions = {
          url: '/sites/SharePointSite/_layouts/MetadataSiteColumn/ProcessSelectedDocuments.aspx?selectedItems='
          +selectedItemIds +'&ListId=' +SP.ListOperation.Selection.getSelectedList(),
          title: 'Set Document Prefix',
          allowMaximize: false,
          showClose: false,
          width:500,
          height:400,
          dialogReturnValueCallback: dialogCallback
        };

So far so good. Time to create one application page. Right click your project and then add application page as new item.

So in application page code behind, we will first take a List object of type list items and then we will add to this object our list items that we get from query string. We will bind them to a classic datalist control of asp.net. But we will make sure that we do it in inputformsection.

In another Input form section we then have one textbox on the application page. What we are planning to do is we will ask user to enter document prefix and then we will process our documents and add a prefix to them.

We will have button section and a button which will does this processing of adding prefix to the documents.
Finally we will have a method which will do a magic trick of adding a method called ExecuteOrDelayUntilScriptLoaded to the additional page head of master page and register the method which will close the application page with commonModalDialogClose method.

Here is the class code

public partial class ProcessSelectedDocuments : LayoutsPageBase { List<SPListItem> _selectedListItems = new List<SPListItem>(); protected override void OnLoad(EventArgs e) { // Get all the selected documents. string ListGUID = Request.QueryString["ListId"]; SPList selectedDocumentLibrary = SPContext.Current.Web.Lists[new Guid( ListGUID )]; string[] selectedItems = Request.QueryString["selectedItems"].ToString().Split('|'); for (int index = 1; index < selectedItems.Length; index++) { _selectedListItems.Add( selectedDocumentLibrary.GetItemById( int.Parse(selectedItems[index])) ); } // Bind to the repeater. SelectedDocumentsDataList.DataSource = _selectedListItems; SelectedDocumentsDataList.DataBind(); } protected void OnClickSetPrefixButton(object sender, EventArgs e) { foreach (SPListItem listItem in _selectedListItems) { listItem["Name"] = DocumentPrefixTextBox.Text + " " + listItem.File.Name; listItem.Update(); } CloseDialogOnSuccess(); } private void CloseDialogOnSuccess() { ContentPlaceHolder pageHead = this.Master.FindControl("PlaceHolderAdditionalPageHead") as ContentPlaceHolder; if (pageHead != null) pageHead.Controls.Add( new LiteralControl("[removed]ExecuteOrDelayUntilScriptLoaded(closeDialog,'sp.js');function closeDialog(){ SP.UI.ModalDialog.commonModalDialogClose(SP.UI.DialogResult.OK, 'Prefix assigned to selected documents.');}[removed]")); } }

 and here is the application page aspx

 <%@ Assembly Name="$SharePoint.Project.AssemblyFullName$" %> <%@ Import Namespace="Microsoft.SharePoint.ApplicationPages" %> <%@ Register Tagprefix="SharePoint" Namespace="Microsoft.SharePoint.WebControls" Assembly="Microsoft.SharePoint, Version=14.0.0.0, Culture=neutral, PublicKeyToken=71e9bce111e9429c" %> <%@ Register Tagprefix="Utilities" Namespace="Microsoft.SharePoint.Utilities" Assembly="Microsoft.SharePoint, Version=14.0.0.0, Culture=neutral, PublicKeyToken=71e9bce111e9429c" %> <%@ Register Tagprefix="asp" Namespace="System.Web.UI" Assembly="System.Web.Extensions, Version=3.5.0.0, Culture=neutral, PublicKeyToken=31bf3856ad364e35" %> <%@ Import Namespace="Microsoft.SharePoint" %> <%@ Assembly Name="Microsoft.Web.CommandUI, Version=14.0.0.0, Culture=neutral, PublicKeyToken=71e9bce111e9429c" %> <%@ Page Language="C#" AutoEventWireup="true" CodeBehind="ProcessSelectedDocuments.aspx.cs" Inherits="MetadataSiteColumn.Layouts.MetadataSiteColumn.ProcessSelectedDocuments" DynamicMasterPageFile="~masterurl/default.master" %> <%@ Register TagPrefix="wssuc" TagName="InputFormSection" Src="~/_controltemplates/InputFormSection.ascx" %> <%@ Register TagPrefix="wssuc" TagName="InputFormControl" src="~/_controltemplates/InputFormControl.ascx" %> <%@ Register TagPrefix="wssuc" TagName="ButtonSection" Src="~/_controltemplates/ButtonSection.ascx" %> <asp:Content ID="PageHead" ContentPlaceHolderID="PlaceHolderAdditionalPageHead" runat="server"> </asp:Content> <asp:Content ID="Main" ContentPlaceHolderID="PlaceHolderMain" runat="server"> <table border="0" cellspacing="0" cellpadding="0" width="100%"> <tr> <td> <wssuc:InputFormSection runat="server" Title="Selected Documents" Description="The following documents have been selected to have the specified prefix added to their titles."> <Template_InputFormControls> <tr> <td> <asp:DataList ID="SelectedDocumentsDataList" runat="server" RepeatColumns="2" CellPadding="2" CellSpacing="5"> <ItemTemplate><li><%# DataBinder.Eval&#40;Container.DataItem, "File.Name"&#41;.ToString()%></li></ItemTemplate> </asp:DataList> </td> </tr> </Template_InputFormControls> </wssuc:InputFormSection> <wssuc:InputFormSection runat="server" Title="Document Prefix" Description="Prefix to add to the selected document titles."> <Template_InputFormControls> <wssuc:InputFormControl LabelText="Prefix to add to the selected documents:" runat="server"> <Template_control> <asp:TextBox ID="DocumentPrefixTextBox" runat="server" /> </Template_control> </wssuc:InputFormControl> </Template_InputFormControls> </wssuc:InputFormSection> <wssuc:ButtonSection runat="server" ShowStandardCancelButton="FALSE" TopButtons="TRUE"> <Template_Buttons> <asp:Button ID="SetPrefixButton" class="ms-ButtonHeightWidth" runat="server" Text="Set Prefix"> <asp:Button ID="CancelButton" class="ms-ButtonHeightWidth" runat="server" Text="Cancel"> </Template_Buttons> </wssuc:ButtonSection> </td> </tr> </table> </asp:Content> <asp:Content ID="PageTitle" ContentPlaceHolderID="PlaceHolderPageTitle" runat="server"> Application Page </asp:Content> <asp:Content ID="PageTitleInTitleArea" ContentPlaceHolderID="PlaceHolderPageTitleInTitleArea" runat="server" > My Application Page </asp:Content>

Time to deploy the application and test it.

Once the solution is deployed, open up a document library. Select couple of documents as shown in image below.


Click on process list items button.

It will show up the selected documents name and a textbox to enter the text that will be appended as a prefix.

I entered test and click on ok on model dialog application page. The model application page closes and a notification is shown on parent page and finally prefix gets applied.

I hope this helps.

Friday, August 9, 2013

Localize site columns, features and web parts

In this post we are going to see how we can localize site columns as well as features.
First let us focus on the site columns.

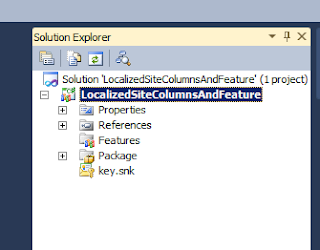
Create empty SharePoint project.


Now right click on project and click on add mapped folder and add resource folder.


Now again click on add new item by right clicking on resource folder and select resource file.


Add these two values


Now add one more resource file for Spanish language. add es-es to the file name as shown in the image below and add below entries.


Now it's time to create empty element where we would be adding the site columns.
Right click on project and add empty element.

Add this to the empty element.


Build and deploy the solution

One thing to consider here is that you need to have language packs installed on the server.
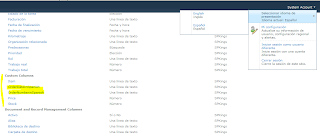
Go to the site settings and site columns. Right now we are with English language.


Change the language to Spanish


As you can see that column title gets converted to the Spanish language.

We already have a feature with us which has site columns element file. Our sole purpose is just to show how features can also be localized. Now right click the feature and click on add feature resource.


Select Spanish from long list of languages.

And add these texts


and then add this to the web part properties


When you have set the language to English, this is what you get


Switch language to Spanish.


Let us add one web part. After that open the same LocalizedSiteColumn.resx under resource folder and add this.


now open the Spanish resource file and add this


Now open the web part file and change the title and description to point it to resource file.

This will also localize the web parts. I hope this helps.

Wednesday, July 24, 2013

SharePointKings.com is SharePointKings.blogspot.in


Dear SharePointKings Readers,

Due to some technical problems with www.SharePointKings.com, we are shifted to http://sharepointkings.blogspot.in/

Keep reading and visiting http://sharepointkings.blogspot.in/ 

We apologize for inconvenience caused.

Thank you,
SharePointKings team

Friday, July 12, 2013

Search From Recycle bin


In this post we are going to see how we can search from recycle bin. Now out of the box there is no way to search an item from recycle bin and restore it.

The problem is when we have a lot of items in the recycle bin we need to page through and then find that item and then restore it.

Well there is a PowerShell that can come to rescue.

Here are simple steps to perform in PowerShell to find and restore the item.

$spSite= Get-SPSite $site

$web = $spSite.OpenWeb()

$files = $web.RecycleBin | ?{$_.Title -match “tst”}

foreach ($file in $files) 
{
Write-Host “Found $($file.Title)”
$web.RecycleBin.Restore($file.ID)
Write-Host “Restored $($file.Title)”
}

The script is pretty self explanatory. Get the site and then web object. Then take the recycle bin. It is first stage recycle bin. You can also take the second stage recycle bin from site object as well.

Then just search for item from recycle bin with title property. The above code returns all the items from recycle bin which has a tst as a match and then calls restore method to restore it to their respective locations.

If you know the exact name of an item, you can write that and that specific item will be restored. See the advantage, you do not need to search from pages by paging through them if you have huge amount of items residing in recycle bin.

I hope this helps.


Share your SharePoint Experiences with us...
As good as the SharePointKings is, we want to make it even better. One of our most valuable sources of input for our Blog Posts comes from ever enthusiastic Visitors/Readers. We welcome every Visitor/Reader to contribute their experiences with SharePoint. It may be in the form of a code stub, snippet, any tips and trick or any crazy thing you have tried with SharePoint.
Send your Articles to sharepointkings@gmail.com with your Profile Summary. We will Post them. The idea is to act as a bridge between you Readers!!!

If anyone would like to have their advertisement posted on this blog, please send us the requirement details to sharepointkings@gmail.com