Friday, January 30, 2009

Content Type in MOSS

Hi All,

Today we are going to take a very basic and simple way to create a Content Types.

First we will understand what these content types are.

Content Types in MOSS can be treated as a base class with must inherit attributes.

Content Types can be created and then used at sites and sub sites on the list and document library level.

Many items can be treated as content types. For example:

Document Template
Workflows
Columns
Information Management Policies

There are many built in content types already there in moss. Some of them are Blank Document, Announcements and many more if you go to site settings and site content types, there you can see many built in content types available.

They can be simply seen as reusable component. Once created can be used later by just referring them.

Let’s take an example for creating columns and menu item content type to understand further.

First go to Site settings -> site content types under gallery and click on Create to create new content type.


As you can see we have created one content type named Projects and it is as Item for the List.

Now what we need to do is add columns in that content types.

So click ok and go to add from new site columns.

Create Columns: Like this


Now we are done with the content types. Now we need to create one list and add this content type to that list.

So go ahead and create a custom list. Give name Projects List.

Now go to List Settings and advance settings and then change on allow management of content type to True.


Doing this will enable one more section called Content Types in List Settings Screen.

Now go to Add from existing site content type and find out the projects and add it. As you can see the category is Project Management that we gave while creating the content type.


Click on Item content type and delete this content type as we do not want that.

Now go to Project List and click on New.


And once you click on Project, see what comes.


So without adding columns to the Project List, we have added columns with the help of content types as our content type has columns in it.

That’s it.

Wednesday, January 28, 2009

Limitation and Upper boundaries of SharePoint 2007

Hi all,
I was very curious to know the limitation upper boundaries of SharePoint 2007 in standard environment. Then I came across nice Microsoft very informative blog here is a link Click here


Site object

Guidelines for acceptable performance

Notes

Scope of impact when performance degrades

Site collection

50,000 per Web application

Total farm throughput degrades as the number of site collections increases.

Farm

Web site

250,000 per site collection

You can create a very large total number of Web sites by nesting the subsites. For example, 100 sites, each with 1000 subsites, is 100,000 Web sites. The maximum recommended number of sites and subsites is 125 sites with 2,000 subsites each, for a total of 250,000 sites.

Site collection

Subsite

2,000 per Web site

The interface for enumerating subsites of a given Web site does not perform well as the number of subsites surpasses 2,000.

Site view

Document

5 million per library

You can create very large document libraries by nesting folders, using standard views and site hierarchy. This value may vary depending on how documents and folders are organized, and by the type and size of documents stored.

Library

Item

2,000 per view

Testing indicates a reduction in performance beyond two thousand items. Using indexing on a flat folder view can improve performance.

List view

Document file size

50MB (2GB max*)

File save performance is proportional to the size of the file. The default maximum is 50 MB. This maximum is enforced by the system, but you can change it to any value up to 2 GB.

Library, file save performance

List

2,000 per Web site

Testing indicates a reduction in list view performance beyond two thousand entries.

List view

Field type

256 per list

This is not a hard limit, but you might experience list view performance degradation as the number of field types in a list increases.

List view

Column

2,000 per document library

4,096 per list

This is not a hard limit, but you might experience library and list view performance degradation as the number of columns in a document library or list increases.

Library and list view

Web Part

50 per page

This figure is an estimate based on simple Web Parts. The complexity of the Web Parts dictates how many Web Parts can be used on a page before performance is affected.

Page

Tuesday, January 27, 2009

Receiving / enabling emails in the list or library

Hello All,

Today I am going to discuss something about the receiving emails in the list. Before that let me discuss some of the points.

You can receive the emails in one of the following lists.
(1) Document Library
(2) Announcement
(3) Calendar
(4) Discussion
(5) Blog

But before enabling email support in the list, you need to enable incoming email support in the central administration. Under operations->Incoming mail settings.

We will go for enabling for document library.

So first go and check for the incoming email options in central administration. Then only you can see incoming mail settings options under communication section for the document library.

Go to the incoming email settings.

Select allow this document library to receive emails.

Specify the email address for this document library. If anyone sends mail to this email address, mail will be coming down to this document library.

Keep save all attachments in rootfolder and at last keep Accept e-mail messages from any sender options selected.

I also want to give more highlight on one important email handler class. Once you have the document library enabled with the email receiver, then there is one class which you can use and override its method.

The class is SPEmailEventReceiver and you need to override its EmailReceived method. When email is received by the list and event handler is attached to the list. Here is a code which extracts the subject and body from the email and adds the item to the list.

public class EmailHandler: SPEmailEventReceiver
{
public override void EmailReceived(
SPList objList,
SPEmailMessage objMessage,
string strReceiverData)
{
SPListItem objListItem = objList.Items.Add();
objListItem["Title"] = objMessage.Headers["Subject"];
objListItem["Body"] = objMessage.HtmlBody;
objListItem.Update();
}
}


That’s it. Enjoy email receiving.

Thursday, January 8, 2009

Understanding Workflow Tracking Service - Part 3

Hi All,

Here i am back with tracking series for workflow.

Before continue here, i would recommend to go and read previous two parts.

Understanding Workflow Tracking Service - Part 1

Understanding Workflow Tracking Service - Part 2

Ok, by taking the same database and tables and workflow in our hand, run the workflow once again so that we have two ActivityInstances in table and we have two workflowinstances in our database.

Then after running the workflow, just validate again by firing the query in our “WorkflowTracing”database .

Select * from ActivityInstance

Select * from WorkflowInstance

So that you get a result similer to this.


As I have also described you that one tool which we can use to track the tracking service is the WorkflowMonitor tool. But here first we will explore two classes that will be used to extract the information from tracking database.

Ok, let’s write a code inside our tracker console application. But before doing this, do not forget to sign the assembly as strong name otherwise you will not get the Activity and workflow Events. After signing your assembly with strong name only execute this code.

Go to your program.cs and after waitHandle.WaitOne(); write the following code.

#region "Fetch the ActivityEvents"

SqlTrackingQuery objQuery = new SqlTrackingQuery(strConnection);
SqlTrackingWorkflowInstance objInstance = null;

objQuery.TryGetWorkflow(instance.InstanceId, out objInstance);

if (objInstance != null)
{
foreach (ActivityTrackingRecord objRecord in objInstance.ActivityEvents)
{
Console.WriteLine(" {0} :: {1} :: {2} ", objRecord.ExecutionStatus,
objRecord.EventDateTime, objRecord.QualifiedName);
}

Console.Read();
}

#endregion

Here as you can see we have first taken the SqlTrackingQuery object and initialized with the tracking services and then we got the SqlTrackingTrackingWorkflowInstance and then once we have it , we got the ActivityEvents and then iterate through its collection and accessed different properties. You can try and explore more and more properties for the same. For example only I have used three of them and displayed them on console.

See figure below.


Same way write down the below code next to the ActivityEvents iterations in the same way. This is for the WorkflowEvents to track.

#region "Fetch the ActivityEvents"

SqlTrackingQuery objQuery = new SqlTrackingQuery(strConnection);
SqlTrackingWorkflowInstance objInstance = null;

objQuery.TryGetWorkflow(instance.InstanceId, out objInstance);

if (objInstance != null)
{
foreach (WorkflowTrackingRecord objRecord in objInstance.WorkflowEvents)
{
Console.WriteLine(" {0} :: {1} ",
objRecord.EventDateTime, objRecord.EventOrder);
}

Console.Read();
}

#endregion

This way we have fetched the built in events that are trapped automatically by Workflow Tracking service but what if we want to track our own custom events to the database.

Because many a times we want to capture our own tracing, like we can say CodeActivity1 has started. Code activity1 is in process, this step done and code activity ended, this was the user, this happened. Anything that we want to track we can track it if we write our own messages.

Let’s have a look on them.

Activity supports a method called TraceData. It has two overloaded method, one takes the object as a parameter and other takes string as an input for key and an object as a value to store.

So modify our BeforeDelay and AfterDelay activity like this and then run the program again.


Once you are done with the execution of the program, open the database and look for UserEvent table, you will find your own entries that you just did in above code.


This is one way to get the tracked workflow events and activity events from the database. Once you have the values you can define your custom application to display those values.

Next we will see the Workflow Monitor tool to see how this same process can also be seen in using this Monitor tool.

I will continue this series in my next article.

Monday, January 5, 2009

Understanding Workflow Tracking Service - Part 2

Hi All,

If you are here first time I would recommend you to go and read part 1 before proceeding here.

Understanding Workflow Tracking Service - Part 1

Understanding Workflow Tracking Service - Part 3

Let’s continue our series of workflow tracking service.

Ok, once you are done with the basic understanding, let’s create necessary steps for this.

For workflow tracking service to be incorporated, we first need to create one separate database for workflow tracking. This database will contain necessary tables, views, stored procedures and function required for the tracking service. We are given built in SQL script that will create this database for us.

To start with, go to your database server and connect it with your credentials of Window Authentication or Forms Authentication.

Create a database and name it “WorkflowTracking”. Once you are done with this step and if you explore the database node in server explorer, you will see newly database that we have just created.

Now it’s time to find out scripts that are required for this. Typically it should be in your Windows Directory.

C:\WINDOWS\Microsoft.NET\Framework\v3.0\Windows Workflow Foundation\SQL\EN

If you have different Windows Directory, change it accordingly.

There you will find, Tracking_Schema.sql. Drag and drop in your SQL Server management studio or SQL Express. Be sure to use WorkflowTracking database only, else if you run the script, it will create all these stored procedures, tables in your default database and it will be overhead to remove them from it. So be sure to have WorkflowTracking database in use.

You can write use WorkflowTracking command at the top of the script before you run this.

Once you are done with running the script, you will see tables, stored procedures and functions created there.


Repeat the same steps for Tracking_Logic.sql. (Do not forget to use WorkflowTracking database at the top of the script before running it).

Now we have setup our database for tracking service. All we need to do now is create the Workflow and add the Tracking service in it and bind it with the database so that we can track the activities and much more.

Ok, open the Visual Studio and create a simple Sequential workflow Console Application and name it “TrackedWorkflow”.

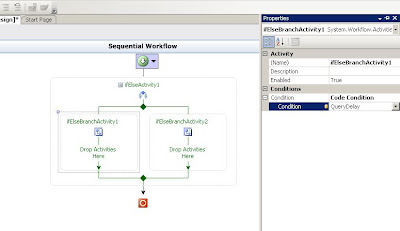
Drag IfElseActivity inside that and click left side IfElseActivity1 and set its property according to the figure shown below.


Now drag code activity from toolbox and place it in the First IfElseActivity1 that is Left branch.


Keep Adding the Delay Activity, set its interval to 10 seconds and then again code activity name it as AfterDelayActivity.


Write down the respective code in respective code activity methods

Console.WriteLine("Before Delay Activity....");and

Console.WriteLine("After Delay Activity....");

Write down the Code in that shown in figure below.


Add Application Configuration File in your console Workflow Application and add a reference of Systm.configuration.

Add ConnectionString in app.config File for WorkflowTracking database with your server credentials.

And then in Program.cs add SQLTrackingService to WorkflowRuntime like shown in figure below.

Remember to add reference to System.Workflow.Runtime and System.Workflow.Runtime.Tracking Library.


And then just see the magic, execute your workflow and then open your database and execute Select Query on ActivityInstance table. See you will get the result. Without writing code, we have made the database entry.


Ok, that’s it for this part. Now in next part, we will continue our exploration on tracking service and we will explore the SQLTrackingQuery to gain the knowledge on how to retrieve the information from these activities and workflow related tables and also how to track User Specific actions in the same tables.

All these in next part.


Share your SharePoint Experiences with us...
As good as the SharePointKings is, we want to make it even better. One of our most valuable sources of input for our Blog Posts comes from ever enthusiastic Visitors/Readers. We welcome every Visitor/Reader to contribute their experiences with SharePoint. It may be in the form of a code stub, snippet, any tips and trick or any crazy thing you have tried with SharePoint.
Send your Articles to sharepointkings@gmail.com with your Profile Summary. We will Post them. The idea is to act as a bridge between you Readers!!!

If anyone would like to have their advertisement posted on this blog, please send us the requirement details to sharepointkings@gmail.com