Thursday, February 25, 2010

Taking list item back up with attachments

Hi All,

Sometimes we require taking back up of list items along with attachments. Definitely there is an option to export to excel, however that doesn’t copy attachment with it and hence it is a drawback only if you want attachment with list item as well, else export to excel is really a cool functionality.

Coming back to the point, so what do we do to get the attachment as well? Well, the answer to this question lies in the same menu and that option is Open with Access.

So go ahead with your list items that you want to back up. Open the Actions menu and click on open with Access.


Specify a new location for your database and also chose whether you want to be connected with SharePoint list so that any changes can be reflected here and also vice versa, or just you want to have a copy of it which is export the data.


That’s it. You have just taken a back up of your list items with attachments.

Tuesday, February 23, 2010

Set audience targeting programmatically

Hi All,

Today I am going to explain you about audience targeting. However I am going to share in terms of programming aspects. Because we all know that we can create our audience in central administration and then simple apply them on list items or document library items or on web parts on pages.

However we will see it this time how to do the same using code.

I assume that you have already created audience named “Sales” and “Finance”. I am not going in deep discussion explaining you each and every class and methods used in it. You may query me your doubts and I will be keen to reply you back.

using (SPWeb objsite = (SPWeb)properties.Feature.Parent)
{
using (SPLimitedWebPartManager wpm
= objsite.GetLimitedWebPartManager("default.aspx", PersonalizationScope.Shared))
{
AudienceManager am = new AudienceManager(ServerContext.Current);

wpm.WebParts[0].AuthorizationFilter
= string.Format("{0};;;;", am.GetAudience("Sales").AudienceID);

wpm.SaveChanges(wpm.WebParts[0]);
}
}


We first take our web context and then take out the default.aspx web parts. We use webpartmanager to deal with them. Then take out Audience manager class with the context, and then interesting part comes. Authorizationfilter takes argument in such way that we have to pass ;;;; in it after getting the audience target ID. Get the webpart that you want and pass its Title let’s say in wpm.WebParts[0].AuthorizationFilter line. I’ve used 0 just to get the first webpart and show you the demo.

Here we want to target sales people, so we have passed Sales and get the ID of it and finally call up the savechanges method of webpartmanager object.

As simple as that.

Hummm…What about Finance people. Well there you go, you can set multiple audience in one go.

Just change the line to.

wpm.WebParts[0].AuthorizationFilter
= string.Format("{0},{1};;;;", am.GetAudience("Sales").AudienceID, am.GetAudience("Finance").AudienceID);

Your job is done.

Monday, February 22, 2010

System.IO.FileNotFound exception in SharePoint 2010

Hi All,

Just came to know about very basic stuff in SharePoint 2010. Let’s say you are creating one simple console application in VS 2010 that just displays your site name.

using System;
using Microsoft.SharePoint;
using System.Text;

namespace ConsoleApplication1
{
class Program
{
static void Main(string[] args)
{
using (SPSite objSiteColl = new SPSite("http://myurl"))
{
Console.WriteLine("Title of the site is : {0}", objSiteColl.RootWeb.Title);
}

Console.ReadLine();
}
}
}


And you run the code, you get System.IO.FileNotFound exception saying that web application is not found, verify that you have typed the correct URL. So what do we do now? We go back and check the URL,hum…URL is perfect, nothing wrong about this. So small program and still not able to run it?

Well, answer lies in VS 2010 because by default build property is set to x86 and SharePoint does not work on x86 platform. As we all know that now MS wants everyone to move on 64 bit PCs. (Another money eating machine), so go to project properties, go to build tab and change the platform target to x64 and try now.

There you go; I think your error might have gone now. What say?

Saturday, February 20, 2010

Backup and Restore SharePoint site collection from one Farm to another Farm using STSADM commands

Scenario: I have server called “ABC” where there is site collection called http://abc.com and I want to backup this site collection and restore it to new SharePoint farm “XYZ” http://xyz.com
Source Server:
Server Name: ABC
Site Collection URL: http://abc.com
Site Owner: ABC/administrator
Take backup using following command:
STSADM.EXE –o backup –URL http://abc.com -filename “backup_abc.bak” –overwrite
Help URL for backup: http://technet.microsoft.com/en-us/library/cc263441.aspx
Now to restore it to destination SharePoint farm
Destination Server:
Server Name: XYZ
Site Collection URL: http://xyz.com
Site Owner: XYZ/administrator
Create blank Web Application from Central Administration
Now restore using STSADM command
STSADM.EXE –o restore –URL http://xyz.com -filename “backup_abc.bak” –restoremethod New –newdatabaseserver “DATABASE_SERVER_NAME”
Change the site collection owner of this newly restored site
More details for restore is here
http://technet.microsoft.com/en-us/library/cc262087.aspx
Hope this will help you, let us know your comments on it

SharePointKings Team.

Friday, February 19, 2010

SharePoint Solution (.wsp) smartsolutionupgrade STSADM

Hi All,
Yesterday,I came across one nice feature from "Trentacular SharePoint 2007 Features" CodePlex, here is a link http://trentacularfeatures.codeplex.com/

Actually, I have created custom site definition and it has some custom site pages, I have created SharePoint Solution package (.wsp) file to deploy it.
Now I have created 10 sites from this site definition after few days I need to change in few SharePoint features and custom site pages. Now I wanted to upgrade this changes on already existing 10 sites.
When I upgrade command using stsadm -o upgreadesolutions it upgrade the solution but to get effect of that upgraded solution to existing 10 sites i need to deactivate features of site pages and activate it. that thing i wanted to automate. I do not want to loop through each site and deactivate feature and activate it.

I got above nice solution that does smart upgrade it make inventory of features installed on your .wsp file and which site it is activated. It will upgrade solutions
deactivate features and activate it again and your task is done :)

Really really nice features we should use it for smartupgradation

Let us know your comments on it.

It has following features

smartexecjobdefs stsadm command

An stsadm command that kicks of one-time scheduled jobs and monitors for their completion before returning control
smartsolutionupgrade stsadm command
An stsadm command that performs Solution upgrades in a smart manner
Usage
stsadm -o smartsolutionupgrade [ -filename ] [ -filenamelist ]
Actions performed

1. Accepts as input either a single Solution filename or a filename of a text file containing a list of Solutions to be upgraded
2. Extracts and parses the Solution manifest file from each existing Solution to be upgraded in order to determine the Features that will be affected by the upgrade
3. Inventories the deployment states of the existing Solutions
4. Inventories the activation states of the affected Features at all scopes within the SharePoint Farm
5. Deactivates all affected Features
6. Retracts each of the existing Solutions and deletes them from the Solution store
7. Adds the updated Solution to the Solution store
8. Deploys each of the upgraded Solutions according to their previous deployment state
9. Activates all affected Features according to their previous activation state


Regards,
SharePointKings Team

CHM file issue in SharePoint

Hi All,

One week ago at home when I was reading some nice CHM file, I thought of putting it on my SharePoint site. I uploaded my chm file in one document library.

Wooh….when I opened it from document library I could not see the content on right frame. I again uploaded the same file; again it gave me the same result. When I open it on my machine and view it, it works really fine. However when I click on CHM file and open it, I can’t view any information on right frame. I wonder what the problem is.

Then I bing the information and I find out that it is the known issue to MS. Even you put CHM file o network share and try to open directly from network share location, then the same problem persists. You will not be able to see the content on right frame.

So bottom line is, whenever you click CHM file from document library, Save it on your local machine and then open it instead of opening the file directly. If you want it from network share, copy it from network share to your local machine and then view it.

Following are some blogs that has details regarding this.

http://www.ureader.com/message/1346380.aspx

http://social.msdn.microsoft.com/Forums/en-US/sharepointecm/thread/547d5ac8-5c32-4fb2-a3e3-86acb88e778b

http://support.microsoft.com/kb/902225

Hope this helps.

Thursday, February 18, 2010

Finally the result is out.

Hi All,

We would like to thank each one who contributed in voting for the polling question. Following is the result of voting. So bottom line is people have liked the way Microsoft has moved to 64 bit.


Thank you all.

How to reply on discussion thread programmatically – Part 2

Hi All,

I am back with more details on discussion thread reply programmatically. In part 1, we simply went through how we can create discussion list and create simple reply.

This post will tell you more details regarding it.

Let us start with replying individual thread reply. First you need to loop through the subjects or best it to query discussion list with the help of SPQuery on subject field, so that you get the SPListItem object in your hand to play with.

using (SPSite objSite = new SPSite("{site URL}"))
{
SPWeb objWeb = objSite.OpenWeb("Web Name");

objWeb.AllowUnsafeUpdates = true;

SPList objList = objWeb.Lists["{discussion list name}"];

//remember objList.Folders will return you all discussion subjects. objList .ItemCount will return you all discussion along with their replies, objList .Items.count will return only replies. So now we will loop through all subjects,for demo I have also three discussion threads in my list. In real scenario, query the list and get SPListItem object.
foreach (SPListItem lstsubject in objList.Folders )
{

strSubject = lstsubject.Name;

if(strSubject.Contains(“test subject to reply”))
{
SPListItem parentitem = objList.GetItemById(lstsubject.ID); //Get //the SPListItem for that discussion subject thread.

//Create reply to that subject.

SPListItem reply = SPUtility.CreateNewDiscussionReply(parentitem);

reply["Body"] = "Yippi…This is my reply programmatically";
reply.Update();
}
}
objWeb.AllowUnsafeUpdates = false;
}


Hope this will help you a bit. In my part 3, I will explain bit more about how to go ahead and reply individual thread inside perticular subject.

Wednesday, February 17, 2010

Copying users from user profile to site users

Hi All,

One fine day I woke up and thought of doing some small code on user profile. Then I decided to copy all users from user profile to one site. Just for knowledge purpose and it worked. So I am going to show the steps to achieve this in this post.

Keep in mind that I’ve done it on my server only and I developed Windows Application to achieve this.

First, taken an object for your web in which you want to copy users.

You will need these references of assemblies.

using System;
using System.Windows.Forms;
using Microsoft.Office.Server.UserProfiles;
using Microsoft.Office.Server;
using Microsoft.SharePoint;

and thenwriten down the following code. Just make sure that you have administrative rights to perform this operation.

SPSite objSite = new SPSite("{site URL}");
//Then obtain server context,
ServerContext svrContext = ServerContext.GetContext(objSite);
//Take User profile object
UserProfile myProfile = null;
UserProfileManager profileManager = new UserProfileManager(svrContext);
//Open the web.
SPWeb web = objSite.OpenWeb();

web.AllowUnsafeUpdates = true;

//Navigate through each user profile in profile manager
//and then add the users to the site with its login name.

foreach (UserProfile userprofile in profileManager)
{
if (profileManager.UserExists(userprofile.MultiloginAccounts[0]))
{
web.SiteUsers.Add(userprofile.MultiloginAccounts[0], "", "", "");
}


}


web.Update();

web.AllowUnsafeUpdates = false;


After performing this operation, just wait for some time. This is because initially you may see users Account name as DomainName\UserName, However after some time, These user names will be converted to the Actual user names.(the one that we see after welcome {user name} on top right corner).

Hope this will help.

Tuesday, February 16, 2010

How to reply on discussion thread programmatically – Part 1

Hi All,

We all know how to create discussion list programmatically, however question comes how to reply individual discussion thread programmatically.

Well, before starting, just would like to tell you that in this post, I am going to cover very basic idea about discussion list objects and some tips. However in next part 2, I am going to cover in detail about replies and individual threads of discussion list.

This is how you create the discussion list programmatically and its discussion topic in it.

Create Discussion list programmatically and add thread programmatically

Let’s say you have now your topic in your hand and then we need to take out that topic as SPListItem object.

SPListItem reply = SPUtility.CreateNewDiscussionReply({SPListItem Topic Object});
reply["Body"] = "Yeh!!This is reply from code.";
reply.Update();

So this is a reply to a thread created programmatically. Watch out for next part as it explains in depth details about discussion list coding stuff.

Monday, February 15, 2010

Create New document link in ListView Web part

Hi All,

We all know that in document library we have an option where in we can click on New menu item and click on document and we are presented with nice blank document to type in. Same way we can have our templates defined and can be made available in the new menu.

However ever wondered when you place list view web part of that document library on any page, you get an option of “Add new document” but when you click on that link, it takes you to a page where you can upload the document that you’ve created. See below screenshot.


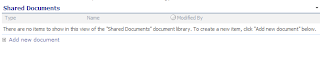
Now this is not what we want according to Create New document means. We should be presented with blank document, which New menu does.

So we need to do some magic here and creates some more link under list view web part. We should ultimately give a link by which use is presented with blank document, not the upload page option.

So here is a trick to do this.

Go to modify this web part and in Toolbar Type select No toolbar. This will turn off the Add New document link.

However for now, select Full Toobar and go to source view of the page and search for “createNewDocumentWithProgID”. For me it was something like this. All you have to search for is from createNewDocumentWithProgID to false.

createNewDocumentWithProgID('https:\u002f\u002fxxxxxxxxxxxx\u002fteams\u002fpds1\u002fpss\u002fxxxxxxxx\u002fShared Documents\u002fForms\u002ftemplate.doc', 'https:\u002f\u002fintranet.eclipsnet.com\u002fteams\u002fpds1\u002fpss\u002fxxxxxxt\u002fShared Documents', 'SharePoint.OpenDocuments', false)

Now turn off the toolbar (Select No toolbar) and add content editor web part below the document library list view web part. Click on open toolpane, click on Crome Type as None. Click on Source editor and then add the following content.

<IMG alt="" src=" /_layouts/images/rect.gif">&nbsp;<A onclick="XYZ”;return false;" href="#">Create a New document</A>

Replace XYZ with the searched text for createNewDocumentWithProgID till false and there you go. Check for yourself. This is a great fun.

Friday, February 12, 2010

Interesting clue about SharePoint Field Internal Name

Hi All,

Just came across to an interesting clued about SharePoint field internal name. We all know that SharePoint replaces space character in field with _x0020_ character and it is because XML element cannot have space in it I guess.

So simplest way to deal with this is to use two static methods.

1) System.XML.XmlConvert.EncodeName() to encode
2) System.XML.XmlConvert.DecodeName() to decode

Hope this will help somebody someday.

Customize SharePoint error page

Hi All,

Ever wondered about SharePoint error page? Well, I do wonder, why? Because I see two different error pages depending upon operations that I perform.

Sometimes you may require customizing the error page to give some messages as well. To do so, all you need to go is to inetpub folder.

There are two error pages.
1) Error.aspx – This is under LAYOUTS folder.
2) ERROR.htm – This is under LAYOUTS\1033.

Why are there two different error pages? You can get an answer to this question if you have observed two methods of deletion in SharePoint.

1) Click on a list item, you’ll see DispForm.aspx and there you can see an option to delete the item in toolbar. –Takes you to the error.aspx in case of any error.

2) You can select the dropdown menu from item and delete the item from there. – Takes you to an ERROR.htm in case of any error.

This is what I wanted to express in this post and you need to modify these two error pages if you wish to change anything in error page because we never know how user deletes an item.

Hope you like this trip.

Thursday, February 11, 2010

How to copy outlook calendar appointments to SharePoint calendar

Hi All,

We all know there is a way we can synchronize SharePoint calendar with outlook and then work from outlook or from SharePoint and changes get synchronized automatically.

However, if you already have outlook calendar and want to sync the calendar with SharePoint calendar, then follow this approach.

Following is the approach for outlook 2007.

1) Create one calendar in SharePoint site and connect it with outlook.
2) Open your source outlook calendar, click on that calendar.
3) Open view menu – >Current View-> All appointments.
4) Hit Ctrl+A button to select all appointments.
5) Simple drag all appointments to the respective destination calendar in outlook. (Destination calendar will be the one that we synchronized in step2)

Just make sure that person who is synchronizing the calendar should have appropriate permission to write in the calendar.

That’s it. Your job is done.

How to copy large SharePoint List data

Hi All,

I came across to a situation where in if you have a data in list which exceeds 500 MB then you cannot save it as a template. This is the limitation of list template. So question here is how to copy that list along with the data. This post is the answer to this query.

First all you need to do is create one view with all columns of the list in it. Export the list in spreadsheet. Save the spread sheet. Now go ahead and Click on Create in site Settings menu under your site. Select Import Spreadsheet under custom list. Give the name of the list, Click on Browse and select that saved spread sheet.

It will pop up one dialogue asking you for entering range. Select appropriate range type and give range and then finally click on Import.

It will automatically creates a list and give column names as Column1, column2 etc. All we have to do is modify the column names and types of field to our choice.

That’s it. Your job is done.

Wednesday, February 10, 2010

Enhancement / Addition in WSS 3.0 compared to WSS 2.0

Hi all,

Although a topic which is so old I guess, however many times people generally ask about the difference or should say new enhancements and additions in WSS 3.0 versions as compared to WSS 2.0.So in this article, I thought of sharing with you most important changes in WSS 3.0 compared to WSS 2.0.

Item security – Now you can set item level permissions in document library or list. You can also set the permissions on folder level as well.

RSS support – you can now view all updates of list or library by using RSS.

Tree View support – You can now view tree view of your site’s content and sub site and its content.

Survey – You can now have additional conditional branching and page breaks.

People and Group type – You can now use people and group field type to select any people or group.

Master Page – now the look and feel is controlled by master page.

Send to link – You can now send a link of document or send document to other locations.

Email receives – Libraries can now receive emails.New site templates – You can now use wikis and blogs site templates as well.

Link security – To show up a link, user at least should have read permission.

Gantt chart support – You can now create Gantt chart for any type of list based on start date and stop date.


Undelete – Now you can recover deleted list and library items.


Enhanced bread crumb – you can see the last visited page before the current one at the top of the page.


Workflow enhancements – Now any list or library can have one or more workflow associated with it.

Hope this is useful information, specially for interview. :)


Share your SharePoint Experiences with us...
As good as the SharePointKings is, we want to make it even better. One of our most valuable sources of input for our Blog Posts comes from ever enthusiastic Visitors/Readers. We welcome every Visitor/Reader to contribute their experiences with SharePoint. It may be in the form of a code stub, snippet, any tips and trick or any crazy thing you have tried with SharePoint.
Send your Articles to sharepointkings@gmail.com with your Profile Summary. We will Post them. The idea is to act as a bridge between you Readers!!!

If anyone would like to have their advertisement posted on this blog, please send us the requirement details to sharepointkings@gmail.com