Thursday, June 30, 2011

Send an email to group of multiple people from designer

SharePoint designer really helps us to simplify a basic need to sending an email with formatting options and by checking conditions.

However when it comes to sending an email to multiple people from list item, then comes the problem. If you have defined a column which is multiuser selection or even a group selection in people picker, that column does not show up in the list of the To in SharePoint designer.

Take an example, I have an assigned to column as a multiple people and group picker.


So if you go to a SharePoint designer and open the send email option and check out workflow lookup field and try to find out this Assigned to column, it does not show up there.


So we cannot send an email to people picker field if we have that field as multi user and group picker.

I have couple of workarounds for this. I will explain both of them. But I would recommend going with second option.

First we need to understand that if you assign hard core values in to TO email section, it sends an email. I mean try to use different users email address and couple of SharePoint Groups or even active directory distribution lists. It sends an email.

So problem is not that SharePoint Designer cannot send an email, the problem is it does not recognize the field which has multi select user or group in it. We have to somehow find a way to tackle this.

So the first option, change your multiple people and group picker to have a single selection and user only. Open workflow designer, change the To field to have a look up to that Assigned to field. Save the workflow. Come back to the list and now again change AssignedTo filed to the multi user and group filed.

So now onwards even if you select different users and groups, it will send an email.

The big problem with this approach is that if you are trying to do this with existing list which already has data in it, then you will run into a problem of losing other users defined in the people picker column. Because when you change multi select to a single user selection, only first user is preserved, rest all will be discarded. So that can be a big loss and almost no one would want this.

This approach works when you are starting fresh with the new list.

So what is the best way? Well, the best way is to use this second option.

In your workflow, define one variable. Call it EMailList and should be of type String.


Ignore other variables, I used them for other reason.

So now in an action assign Assigned to field to this EMailList variable and then use this variable as a workflow look up by taking workflow items.


And you are done. See, how easy that was. Wasn’t it? I know you all will go for second option. But to present ideas that I have is what SharePoint Kings is all about. Isn’t it?

Wednesday, June 29, 2011

Tuesday, June 28, 2011

Delete List Item using web service

We might need this when you want to remove any list item from the list but from remote location, from other client.

Well, here is a simple way to do it. I am just taking an example of client server application button click. Code remains same where ever you want to use it.

Take the web service reference into your project from the SharePoint site.


protected void Button1_Click(object sender, EventArgs e)
{
Lists.Lists ListReference = new Lists.Lists();

ListReference.Credentials = System.Net.CredentialCache.DefaultCredentials;

ListReference.Url = "site_url/_vti_bin/Lists.asmx";

try
{

System.Xml.XmlDocument xmlDoc = new System.Xml.XmlDocument();
System.Xml.XmlElement elBatch = xmlDoc.CreateElement("Batch");

elBatch.SetAttribute("OnError", "Continue");
elBatch.SetAttribute("ListVersion", "1");

string strBatch = "<Method ID='1' Cmd='Delete'>" +
"<Field Name='ID'>" + "4" + "</Field></Method>";

elBatch.InnerXml = strBatch;
ListReference.UpdateListItems("List Name", elBatch);


}
catch (Exception ex)
{
Response.Write(ex.Message);

}
}


All we need to do is include the ID in the query. In our case, we are deleting item with the ID 4. ID is the item ID that you want to delete from the list.

Read Remove all survey response from web service for some interesting stuff.

Monday, June 27, 2011

Ribbon customization - Part 9

We have seen in previous posts (Part 1 to Part 8)about adding tabs, groups and controls. Now we are going to add tab again. You might ask, okay so what is new to this? Because we have already done this. Well this is a new type of tab and called contextual tab. Tab comes alive only when specific actions being performed.

To give you an example, when you select any picture in MS Word, then picture tab comes alive. Normally that tab is not visible until you select any picture in the word file. Taking example in SharePoint, if you edit the page, then only several new tabs becomes available. When you select list item, then only view item and edit item buttons become enable.

So we are also going to add contextual tab which becomes visible when a specific web part is selected. The advantage of creating contextual tab as a web part is because we get a flexibility to add tab on a specific page. If your requirement is not to have that tab in the entire site level and at a specific level, then we can have tab created as a web part and then let our web part performs a task of registering the XML to the page and render the tab when web part is selected.

Now when we develop a contextual tab and take web part as an approach, we need to register the page component and add it to the page manager so that page manager allows us to render a tab. Page component is ECMA script that interacts with the ribbon. It allows us to write commands of ribbon and actions that takes place when that command triggers in the page component.

To understand more about page component, I would recommend reading this article from MSDN. I have taken this link only for the reference for building this sample for you.

Coming back to our example, let’s add blank SharePoint project by opening visual studio 2010.

While creating project, select deploy as a farm solution option. Add the Microsoft.Web.CommandUI reference. It must be under 14/ISAPI directory.

We will define two strings, one for the Tab and Group and the other for custom group template.

Then we will use one string variable that will register our page component which is actually an ECMA script.

Then we will use one function which will register our tab and template that we have defined in XML.

Our class would be implementing IWebPartPageComponentProvider interface and hence we will implement one more method which is WebPartContextualInfo. This interface will tell SharePoint which tab to visible when this web part is selected.

Then we have to create page component which will register the script part.

Well this is bit complex at the initial phase, but when practiced, then it becomes easy. This is the script which helps us to do further customizations as well. For example, if you want to have a drop down as controls in the group tab and if you want to dynamically populate the drop down, then this is the file which you need to modify.

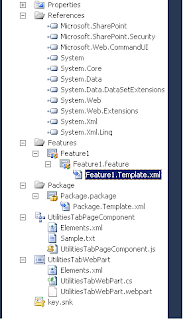
I have written down the entire project details below. Your project layout should look something like this


And below is the entire code for the web part and following is the script for the js file. I have taken this example from this page, so I recommend you go through that link to understand it in more details. I have given this example to make things clear that what all parts we need to change to suit it to our need.


namespace SharePoint2010Practice.UtilitiesTabWebPart

{
[ToolboxItemAttribute(false)]
public class UtilitiesTabWebPart : WebPart, IWebPartPageComponentProvider
{
private string contextualTab = @"
<ContextualGroup Color=""Yellow""
Command=""CustomContextualTab.EnableContextualGroup""
Id=""Ribbon.CustomContextualTabGroup""
Title=""SPKings Contextual Tab Group""
Sequence=""502""
ContextualGroupId=""CustomContextualTabGroup"">
<Tab
Id=""Ribbon.CustomTabExample""
Title=""Utilities""
Description=""Various utilities options available!""
Command=""CustomContextualTab.EnableCustomTab""
Sequence=""501"">
<Scaling
Id=""Ribbon.CustomTabExample.Scaling"">
<MaxSize
Id=""Ribbon.CustomTabExample.MaxSize""
GroupId=""Ribbon.CustomTabExample.CustomGroupExample""
Size=""OneLargeTwoMedium""/>
<Scale
Id=""Ribbon.CustomTabExample.Scaling.CustomTabScaling""
GroupId=""Ribbon.CustomTabExample.CustomGroupExample""
Size=""OneLargeTwoMedium"" />
</Scaling>
<Groups Id=""Ribbon.CustomTabExample.Groups"">
<Group
Id=""Ribbon.CustomTabExample.CustomGroupExample""
Description=""This is a custom group!""
Title=""Custom Group""
Command=""CustomContextualTab.EnableCustomGroup""
Sequence=""52""
Template=""Ribbon.Templates.CustomTemplateExample"">
<Controls
Id=""Ribbon.CustomTabExample.CustomGroupExample.Controls"">
<Button
Id=""SPKings.Ribbon.CustomTab.SearchGroup.SearchBingButton""
Command=""CustomContextualTab.SearchBing""
Sequence=""15""
Description=""Bing Search Engine""
Image16by16=""/_layouts/images/CustomImages/Bing-logo.jpg""
Image32by32=""/_layouts/images/CustomImages/bing.png""
LabelText=""Bing""
TemplateAlias=""cust1""/>
<Button
Id=""SPKings.Ribbon.CustomTab.SearchGroup.SearchGoogleButton""
Command=""CustomContextualTab.SearchGoogle""
Sequence=""17""
Image16by16=""/_layouts/images/CustomImages/google-logo.png""
Image32by32=""/_layouts/images/CustomImages/google_logo.jpg""
Description=""Google Search Engine""
LabelText=""Google""
TemplateAlias=""cust2""/>
</Controls>
</Group>
</Groups>
</Tab>
</ContextualGroup>";

private string contextualTabTemplate = @"
<GroupTemplate Id=""Ribbon.Templates.CustomTemplateExample"">
<Layout
Title=""OneLargeTwoMedium"" LayoutTitle=""OneLargeTwoMedium"">
<Section Alignment=""Top"" Type=""OneRow"">
<Row>
<ControlRef DisplayMode=""Large"" TemplateAlias=""cust1"" />
</Row>
</Section>
<Section Alignment=""Top"" Type=""OneRow"">
<Row>
<ControlRef DisplayMode=""Large"" TemplateAlias=""cust2"" />
</Row>
</Section>
</Layout>
</GroupTemplate>";


public string DelayScript
{
get
{
string webPartPageComponentId = SPRibbon.GetWebPartPageComponentId(this);
return @"
<script type=""text/javascript"">
//<![CDATA[

function _addCustomPageComponent()
{
var _customPageComponent = new UtilitiesTabWebPart.CustomPageComponent('" + webPartPageComponentId + @"');
SP.Ribbon.PageManager.get_instance().addPageComponent(_customPageComponent);
}

function _registerCustomPageComponent()
{
SP.SOD.registerSod(""UtilitiesTabPageComponent.js"", ""\/_layouts\/UtilitiesTabPageComponent.js"");
SP.SOD.executeFunc(""UtilitiesTabPageComponent.js"", ""UtilitiesTabWebPart.CustomPageComponent"", _addCustomPageComponent);
}
SP.SOD.executeOrDelayUntilScriptLoaded(_registerCustomPageComponent, ""sp.ribbon.js"");
//]]>
</script>";
}
}

private void AddContextualTab()
{

// Get the current instance of the ribbon on the page.
Microsoft.Web.CommandUI.Ribbon ribbon = SPRibbon.GetCurrent(this.Page);

// Prepare an XmlDocument object used to load the ribbon extensions.
XmlDocument ribbonExtensions = new XmlDocument();

// Load the contextual tab XML and register the ribbon extension.
ribbonExtensions.LoadXml(this.contextualTab);
ribbon.RegisterDataExtension(ribbonExtensions.FirstChild, "Ribbon.ContextualTabs._children");

// Load the custom templates and register the ribbon extension.
ribbonExtensions.LoadXml(this.contextualTabTemplate);
ribbon.RegisterDataExtension(ribbonExtensions.FirstChild, "Ribbon.Templates._children");


}


protected override void CreateChildControls()
{

}


public WebPartContextualInfo WebPartContextualInfo
{
get {

WebPartContextualInfo info = new WebPartContextualInfo();
WebPartRibbonContextualGroup contextualGroup = new WebPartRibbonContextualGroup();
WebPartRibbonTab ribbonTab = new WebPartRibbonTab();

// Create the contextual group object and initialize its values.
contextualGroup.Id = "Ribbon.CustomContextualTabGroup";
contextualGroup.Command = "CustomContextualTab.EnableContextualGroup";
contextualGroup.VisibilityContext = "CustomContextualTab.CustomVisibilityContext";

// Create the tab object and initialize its values.
ribbonTab.Id = "Ribbon.CustomTabExample";
ribbonTab.VisibilityContext = "CustomContextualTab.CustomVisibilityContext";

// Add the contextual group and tab to the WebPartContextualInfo.
info.ContextualGroups.Add(contextualGroup);
info.Tabs.Add(ribbonTab);
info.PageComponentId = SPRibbon.GetWebPartPageComponentId(this);

return info;

}
}

protected override void OnPreRender(EventArgs e)
{
base.OnPreRender(e);

this.AddContextualTab();

ClientScriptManager clientScript = this.Page.ClientScript;
clientScript.RegisterClientScriptBlock(this.GetType(), "UtilitiesTabWebPart", this.DelayScript);

}


}
}


and js file script


Type.registerNamespace('UtilitiesTabWebPart');

var _webPartPageComponentId;
SharePoint2010Practice.UtilitiesTabWebPart.CustomPageComponent = function SharePoint2010Practice.UtilitiesTabWebPart_CustomPageComponent(webPartPcId) {
this._webPartPageComponentId = webPartPcId;
SharePoint2010Practice.UtilitiesTabWebPart.CustomPageComponent.initializeBase(this);
}
UtilitiesTabWebPart.CustomPageComponent.prototype = {

init: function UtilitiesTabWebPart_CustomPageComponent$init() { },

getFocusedCommands: function UtilitiesTabWebPart_CustomPageComponent$getFocusedCommands() {
return ['CustomContextualTab.EnableCustomTab', 'CustomContextualTab.EnableCustomGroup',
'CustomContextualTab.SearchBing',
'CustomContextualTab.SearchGoogle'];
},

getGlobalCommands: function UtilitiesTabWebPart_CustomPageComponent$getGlobalCommands() {
return [];
},

isFocusable: function UtilitiesTabWebPart_CustomPageComponent$isFocusable() {
return true;
},

canHandleCommand: function UtilitiesTabWebPart_CustomPageComponent$canHandleCommand(commandId) {
// Contextual Tab commands
if ((commandId === 'CustomContextualTab.EnableCustomTab') ||
(commandId === 'CustomContextualTab.EnableCustomGroup') ||
(commandId === 'CustomContextualTab.SearchBing') ||
(commandId === 'CustomContextualTab.SearchGoogle')) {
return true;
}
},

handleCommand: function UtilitiesTabWebPart_CustomPageComponent$handleCommand(commandId, properties, sequence) {

if (commandId === 'CustomContextualTab.SearchBing') {
alert('Bing');
}
if (commandId === 'CustomContextualTab.SearchGoogle') {
alert('Google');
}
},

getId: function UtilitiesTabWebPart_CustomPageComponent$getId() {
return this._webPartPageComponentId;
}
}


UtilitiesTabWebPart.CustomPageComponent.registerClass('UtilitiesTabWebPart.CustomPageComponent', CUI.Page.PageComponent);
SP.SOD.notifyScriptLoadedAndExecuteWaitingJobs("UtilitiesTabPageComponent.js");


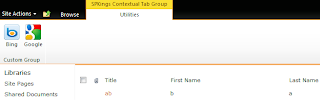
At the end, build the project and deploy. Open web part gallery, add this web part. Open a page where you would like to see this tab, add this new web part and then select that web part and see how the new tab becomes visible.


More to come on ribbon series. Stay tuned.

Wednesday, June 22, 2011

Hide Edit in SharePoint Designer option

Many times we do not want to allow users who even has permission to edit pages in Sharepoint designer edit or create new pages.

To make this change, you must be a site collection administrator. go to site settings and then site collection administration and then look for SharePoint designer settings and then uncheck the check box which says enable SharePoint Designer.


But keep in mind that, if you are a site collection admin, they you will still see that option.

Monday, June 20, 2011

Ribbon customization - Part 8

In this post, I am going to show you how to add fly out anchor in the ribbon control. Here is the complete XML and following is the output. But first if you have not gone through part 1 to part 7, I would recommend you reading them first and then continue reading from here.

All we need to change in the XML that we used in earlier post is the controls section. Here we will take flyout control and populates that controls with its own menu items. Flyout anchor has got Menu tag first, that contains menu section tag, which contains controls section.

In this XML, I have used built in templates like o1 and o2.

<?xml version="1.0" encoding="utf-8"?>
<Elements xmlns="http://schemas.microsoft.com/sharepoint/">
<CustomAction Id="SPKings.Ribbon.CustomTab"
Location="CommandUI.Ribbon.ListView"
RegistrationId="100" RegistrationType="List">
<CommandUIExtension>
<CommandUIDefinitions>
<CommandUIDefinition
Location="Ribbon.ListItem.Groups._children">

<Group
Id="SPKings.Ribbon.CustomTab.SearchGroup"
Description="Different Search Engines"
Title="Search Engines"
Sequence="52"
Template="SearchEnginesGroup">


<Controls Id="SPKings.Ribbon.CustomTab.SearchGroup.Controls">

<FlyoutAnchor Id="SPKings.Ribbon.CustomTab.SearchGroup.FlyoutAnchor"
Sequence="10"
Image16by16="/_layouts/images/CustomImages/Search16.png"
Image32by32="/_layouts/images/CustomImages/Search32.jpg"
LabelText="Search Providers"
TemplateAlias="Search"
ToolTipTitle="Search Engines"
ToolTipDescription="This flyout anchor allowes you the choose search engines">

<Menu Id="Ribbon.Library.Share.FlyoutAnchor.Menu">

<MenuSection Id="Ribbon.Library.Share.FlyoutAnchor.Menu.MenuSection" Sequence="10" DisplayMode="Menu16">

<Controls Id="Ribbon.Library.Share.FlyoutAnchor.Menu.MenuSection.Controls">

<Button

Id="Ribbon.Library.Share.FlyoutAnchor.Menu.MenuSection.GoogleButton"

Sequence="10"

Command="GoogleButtonCommand"

LabelText="Google"

Image16by16="/_layouts/images/CustomImages/google-logo.png"

TemplateAlias="o2"

/>

</Controls>

</MenuSection>


<MenuSection Id="Ribbon.Library.Share.FlyoutAnchor.Menu.MenuSection1" Sequence="20" DisplayMode="Menu16">

<Controls Id="Ribbon.Library.FlyoutAnchor.Menu.MenuSection1.Controls">
<Button Id="Ribbon.Library.FlyoutAnchor.Menu.MenuSection1.BingButton"

Sequence="10"

Command="BingButtonCommand"

LabelText="Bing"

Image16by16="/_layouts/images/CustomImages/Bing-logo.jpg"

TemplateAlias="o3"

/>

</Controls>

</MenuSection>

</Menu>


</FlyoutAnchor >

</Controls>

</Group>

</CommandUIDefinition>

<CommandUIDefinition
Location="Ribbon.Templates._children">

<GroupTemplate Id="SearchEnginesGroup">
<Layout Title="OneLarge" LayoutTitle="OneLarge">
<Section Alignment="Top" Type="OneRow">
<Row>
<ControlRef DisplayMode="Large" TemplateAlias="Search" />
</Row>
</Section>
</Layout>
</GroupTemplate>


</CommandUIDefinition>


<CommandUIDefinition Location="Ribbon.ListItem.Scaling._children">
<MaxSize Id="Ribbon.ListItem.Scaling.MaxSize" Sequence="35" GroupId="SPKings.Ribbon.CustomTab.SearchGroup" Size="OneLarge"/>
</CommandUIDefinition>

</CommandUIDefinitions>

<CommandUIHandlers>

<CommandUIHandler

Command="BingButtonCommand"

CommandAction="javascript:alert('Hi, you clicked Bing');" />

<CommandUIHandler

Command="GoogleButtonCommand"

CommandAction="javascript:alert('Hi, you clicked Google');" />


</CommandUIHandlers>

</CommandUIExtension>

</CustomAction>
</Elements>


And this is the output when you deploy this and activate as feature


Keep reading Part 9 for further exploration.

Friday, June 17, 2011

Hiding sign in as a different user option

sometimes we want to hide the option to allow user to log in with different user. We can have our custom master page applied to site and then we would like to place this in the web part in master page in 2010. or if you want that option not be available in certain page, then add content editor web part and use below code to hide it.


<script src="jquery-1.4.2.min.js" type="text/javascript"></script>

<script type="text/JavaScript">

jQuery(document).ready(function($) {

var objects = document.getElementsByTagName("ie:menuitem");

for (var i = 0; i < objects.length; i++) {

itm = objects[i];

if (('#' + itm.id).indexOf("LoginAsDifferentUser") != -1) {

$('#' + itm.id).remove();

}

}

})

</script>

You should be good to go.


Thursday, June 16, 2011

Ribbon customization - Part 7


In this post, we are going to cover a small change to our existing XML from the last part. If you have not gone through Part 1 to Part 6part 6, I recommend you read them first and then continue reading from here.

Let us talk more about tabs in the ribbon. We have seen how to create tab and add groups and controls to it. But what we have not discussed it, where all places you can add tab. You can add tab individually. This is what we have done. Below image shows adding individual tab in the ribbon.


Now what we are going to do is add this existing tab in the existing built in list tab. You will come to know when you make a small change in the XML that we took in our last post.

<CustomAction    Id="SPKings.Ribbon.CustomTab"
                   Location="CommandUI.Ribbon" Sequence="401" RegistrationId="100" RegistrationType="List" GroupId="ListContextualGroup">


<CommandUIDefinition
          Location="Ribbon.ListContextualGroup._children">

What we have done here is we have given the existing groupID as ListContextualGroup, that means we want to add our tab in the existing list tools contextual tab. And we have also changed the RegistraionID to 100 which is list not the library.

When changing the UIDefinition, we have mentioned that we want to add tab in the existing ListcontextualGroup.

And here is what we get after making these small two lines change.


As you can see our Utilities tab is now under existing list tools contextual tab. Keep reading Part-8 of this series.


Wednesday, June 15, 2011

Ribbon customization Part 6


Now let’s move on with the series and we will take the same example that we took in our last post which was part 5. If you have not gone through thePart-1 to Part-5, I would recommend you 
reading them first and then continue reading from here.

We are going to add one more group to our tab which is mail service and we are going to change layout of existing group which we used earlier to have three rows to occupy space for three search providers.

I am going to take the same example which I took in part 5; the only thing that I have added here is new group and new template. You can check it for yourself. I have added mail service group with one single row and two large size buttons. Rest everything is same and I have shown the output followed by the entire XML.

<?xml version="1.0" encoding="utf-8"?><Elements xmlns="http://schemas.microsoft.com/sharepoint/">  <CustomAction    Id="SPKings.Ribbon.CustomTab"                   Location="CommandUI.Ribbon" RegistrationType="List" RegistrationId="101">    <CommandUIExtension>      <CommandUIDefinitions>        <CommandUIDefinition          Location="Ribbon.Tabs._children">
          <Tab Id="SPKings.Ribbon.CustomTab"               Title="Utilities"               Description="Different Utilities comes here"               Sequence="1501">

            <Scaling Id="SPKings.Ribbon.CustomTab.Scaling">
              <MaxSize Id="SPKings.Ribbon.CustomTab.SearchGroup.MaxSize"                       GroupId="SPKings.Ribbon.CustomTab.SearchGroup"                       Size="ThreeMedium"/>
              <MaxSize Id="SPKings.Ribbon.CustomTab.MailGroup.MaxSize"                     GroupId="SPKings.Ribbon.CustomTab.MailGroup"                     Size="TwoLarge"/>
              <Scale Id="SPKings.Ribbon.CustomTab.SearchGroup.Scaling.CustomTabScaling"                     GroupId="SPKings.Ribbon.CustomTab.SearchGroup"                     Size="ThreeMedium" />
              <Scale Id="SPKings.Ribbon.CustomTab.SearchGroup.MailGroup.CustomTabScaling"                     GroupId="SPKings.Ribbon.CustomTab.MailGroup"                     Size="TwoLarge" />
            </Scaling>
            <Groups Id="SPKings.Ribbon.CustomTab.Groups">
              <Group                Id="SPKings.Ribbon.CustomTab.SearchGroup"                Description="Different Search Engines"                Title="Search Engines"                Sequence="52"                Template="SearchEnginesGroup">

                <Controls Id="SPKings.Ribbon.CustomTab.SearchGroup.Controls">
                  <Button                    Id="SPKings.Ribbon.CustomTab.SearchGroup.SearchBingButton"                    Sequence="15" Image16by16="/_layouts/images/CustomImages/Bing-logo.jpg"                    Image32by32="/_layouts/images/CustomImages/bing.png"                    Description="Click to see Bing message"                    Command="btnGoToBingCommand"                    LabelText="Bing"                    TemplateAlias="BingSearch" />
                  <Button                 Id="SPKings.Ribbon.CustomTab.SearchGroup.SearchGoogleButton"                 Sequence="15" Image16by16="/_layouts/images/CustomImages/google-logo.png"                 Image32by32="/_layouts/images/CustomImages/google_logo.jpg"                 Description="Click to see google message"                 Command="btnGoToGoogleCommand"                 LabelText="Google"                 TemplateAlias="GoogleSearch" />
                  <Button                 Id="SPKings.Ribbon.CustomTab.SearchGroup.SearchYahooButton"                 Sequence="15" Image16by16="/_layouts/images/CustomImages/yahoo.png"                 Image32by32="/_layouts/images/CustomImages/yahoo 32.png"                 Description="Click to see Yahoo message"                 Command="btnGoToYahooCommand"                 LabelText="Yahoo"                 TemplateAlias="YahooSearch" />                                  </Controls>
              </Group>
              <Group                Id="SPKings.Ribbon.CustomTab.MailGroup"                Description="Different Mail Services"                Title="Email services"                Sequence="54"                Template="MailServicesGroup">
                <Controls Id="SPKings.Ribbon.CustomTab.MailGroup.Controls">
                <Button                Id="SPKings.Ribbon.CustomTab.MailGroup.HotmailServiceButton"                Sequence="17" Image16by16="/_layouts/images/CustomImages/Hotmail16.bmp"                Image32by32="/_layouts/images/CustomImages/Hotmail32.bmp"                Description="Click to see Hotmail message"                Command="btnGoToHotmailCommand"                LabelText="Hotmail"                TemplateAlias="HotmailService" />
                  <Button              Id="SPKings.Ribbon.CustomTab.MailGroup.GmailServiceButton"              Sequence="17" Image16by16="/_layouts/images/CustomImages/gmail16.png"              Image32by32="/_layouts/images/CustomImages/gmail32.bmp"              Description="Click to see GMail message"              Command="btnGoToGMailCommand"              LabelText="GMail"              TemplateAlias="GMailService" />                                  </Controls >                              </Group >

            </Groups>          </Tab>        </CommandUIDefinition>
        <CommandUIDefinition          Location="Ribbon.Templates._children">
          <GroupTemplate Id="SearchEnginesGroup">            <Layout Title="ThreeMedium" LayoutTitle="ThreeMedium">              <Section Alignment="Top" Type="ThreeRow">                <Row>                  <ControlRef DisplayMode="Medium" TemplateAlias="BingSearch" />                </Row>                <Row>                  <ControlRef DisplayMode="Medium" TemplateAlias="GoogleSearch" />                </Row>                <Row>                  <ControlRef DisplayMode="Medium" TemplateAlias="YahooSearch" />                </Row>              </Section>            </Layout>          </GroupTemplate>

        </CommandUIDefinition>
        <CommandUIDefinition          Location="Ribbon.Templates._children">
          <GroupTemplate Id="MailServicesGroup">            <Layout Title="TwoLarge" LayoutTitle="TwoLarge">              <Section Alignment="Top" Type="OneRow">                <Row>                  <ControlRef DisplayMode="Large" TemplateAlias="HotmailService" />                                 <ControlRef DisplayMode="Large" TemplateAlias="GMailService" />                                                  </Row>              </Section>            </Layout>          </GroupTemplate>

        </CommandUIDefinition>
      </CommandUIDefinitions>
      <CommandUIHandlers>        <CommandUIHandler           Command="btnGoToBingCommand"           CommandAction="javascript: var BingID = SP.UI.Status.addStatus('This will take you to Bing search');           SP.UI.Status.setStatusPriColor(BingID, 'green');"></CommandUIHandler>                <CommandUIHandler   Command="btnGoToGoogleCommand"                                    CommandAction="javascript: var GoogleId = SP.UI.Status.addStatus('This will take you to Google search');           SP.UI.Status.setStatusPriColor(GoogleId, 'red');"></CommandUIHandler>
        <CommandUIHandler   Command="btnGoToYahooCommand"                                 CommandAction="javascript: var YahooID = SP.UI.Status.addStatus('This will take you to Yahoo search');           SP.UI.Status.setStatusPriColor(YahooID, 'blue');"></CommandUIHandler>
        <CommandUIHandler   Command="btnGoToGMailCommand"                               CommandAction="javascript: var GMailID = SP.UI.Status.addStatus('This will take you to GMail');           SP.UI.Status.setStatusPriColor(GMailID, 'blue');"></CommandUIHandler>
        <CommandUIHandler   Command="btnGoToHotmailCommand"                               CommandAction="javascript: var HotmailID = SP.UI.Status.addStatus('This will take you to Hotmail');           SP.UI.Status.setStatusPriColor(HotmailID, 'blue');"></CommandUIHandler>              </CommandUIHandlers >
    </CommandUIExtension>  </CustomAction></Elements>
and here is the output


Read further on Part 7


Tuesday, June 14, 2011

Ribbon customization Part 5

In this post, I am going to talk about how to add tab and then how to add groups and controls in it.

If you have not gone through Part 1 to Part 4, I recommend you reading them first and then continue reading this post.

First we will start with very basic example of how to add a simple tab and one group with one control. This will reduce the level of complexity and then we can dive into more examples.

So here is the example that I have used and following is the output of it. I am going to explain each important tag in detail. We have added one tab called Utilities and I have added one group for search with one button control for Bing search engine.

<blockquote><?xml version="1.0" encoding="utf-8"?>
<Elements xmlns="http://schemas.microsoft.com/sharepoint/">
<CustomAction Id="SPKings.Ribbon.CustomTab"
Location="CommandUI.Ribbon" RegistrationType="List" RegistrationId="101">
<CommandUIExtension>
<CommandUIDefinitions>
<CommandUIDefinition
Location="Ribbon.Tabs._children">

<Tab Id="SPKings.Ribbon.CustomTab"
Title="Utilities"
Description="Different Utilities comes here"
Sequence="501">


<Scaling Id="SPKings.Ribbon.CustomTab.Scaling">

<MaxSize Id="SPKings.Ribbon.CustomTab.SearchGroup.MaxSize"
GroupId="SPKings.Ribbon.CustomTab.SearchGroup"
Size="OneLarge"/>

<Scale Id="SPKings.Ribbon.CustomTab.SearchGroup.Scaling.CustomTabScaling"
GroupId="SPKings.Ribbon.CustomTab.SearchGroup"
Size="OneLarge" />

</Scaling>

<Groups Id="SPKings.Ribbon.CustomTab.Groups">

<Group
Id="SPKings.Ribbon.CustomTab.SearchGroup"
Description="Different Search Engines"
Title="Search Engines"
Sequence="52"
Template="SearchEnginesGroup">


<Controls Id="SPKings.Ribbon.CustomTab.SearchGroup.Controls">

<Button
Id="SPKings.Ribbon.CustomTab.SearchGroup.SearchBingButton"
Sequence="15" Image16by16="/_layouts/images/CustomImages/Bing-logo.jpg"
Image32by32="/_layouts/images/CustomImages/bing.png"
Description="Click to see Bing message"
Command="btnGoToBingCommand"
LabelText="Bing"
TemplateAlias="BingSearch" />

</Controls>

</Group>


</Groups>
</Tab>
</CommandUIDefinition>

<CommandUIDefinition
Location="Ribbon.Templates._children">

<GroupTemplate Id="SearchEnginesGroup">
<Layout Title="OneLarge" LayoutTitle="OneLarge">
<Section Alignment="Top" Type="OneRow">
<Row>
<ControlRef DisplayMode="Large" TemplateAlias="BingSearch" />
</Row>
</Section>
</Layout>
</GroupTemplate>


</CommandUIDefinition>

</CommandUIDefinitions>

<CommandUIHandlers>
<CommandUIHandler
Command="btnGoToBingCommand"
CommandAction="javascript: var statusId = SP.UI.Status.addStatus('This will take you to Bing search');
SP.UI.Status.setStatusPriColor(statusId, 'green');"></CommandUIHandler>

</CommandUIHandlers >

</CommandUIExtension>
</CustomAction>
</Elements></blockquote>


And here is what you get


Now, let’s understand important tags in above XML.

<CustomAction Id="SPKings.Ribbon.CustomTab"
Location="CommandUI.Ribbon" RegistrationType="List" RegistrationId="101">


We have defined that we want to add something in the ribbon which we have indicated with the help of CommandUI.Ribbon and we have mentioned that we want a new tab to be on the document library by using List registration type and ID.

<CommandUIDefinition
Location="Ribbon.Tabs._children">


Then we have shown that we want to add children in the tabs. That means we want to add one more tab in the existing list of tabs.

<Scaling Id="SPKings.Ribbon.CustomTab.Scaling">

<MaxSize Id="SPKings.Ribbon.CustomTab.SearchGroup.MaxSize"
GroupId="SPKings.Ribbon.CustomTab.SearchGroup"
Size="OneLarge"/>

<Scale Id="SPKings.Ribbon.CustomTab.SearchGroup.Scaling.CustomTabScaling"
GroupId="SPKings.Ribbon.CustomTab.SearchGroup"
Size="OneLarge" />

</Scaling>


Then we have defined scaling element. Scaling actually defines that how does a groups which are inside the tab scale based on the size of the window.

We have to make sure that we have to have N number of Maxsize and Scale element when we have N number of groups. As I have only one right now, I have one MaxSize and one Scale element. If you have three groups, then total will be six entries. Each MaxSize and Scale for each group.

Here we have mentioned in MaxSize and Scale that this refers to SearchGroup which we will have created in later part of XML. So this element is bound to that group. GroupID must be the same Id defined for the group.

<Group
Id="SPKings.Ribbon.CustomTab.SearchGroup"
Description="Different Search Engines"
Title="Search Engines"
Sequence="52"
Template="SearchEnginesGroup">


Now are adding groups to it. Here I have only one group, so it’s only one tag right now here we have given Id of the group, description, title and the sequence. These are self-explanatory part. Important attribute to note here is the template attribute. In earlier posts of this series, we used the built in template. Here we have defined our custom template. We can define our own layout and put controls inside that.

So we defined the layout later in xml. But as of now we need to give that template ID.

<Controls Id="SPKings.Ribbon.CustomTab.SearchGroup.Controls">

<Button
Id="SPKings.Ribbon.CustomTab.SearchGroup.SearchBingButton"
Sequence="15" Image16by16="/_layouts/images/CustomImages/Bing-logo.jpg"
Image32by32="/_layouts/images/CustomImages/bing.png"
Description="Click to see Bing message"
Command="btnGoToBingCommand"
LabelText="Bing"
TemplateAlias="BingSearch" />

</Controls>


Then in controls collection, we have defined one single button and set its attribute. Again how this button will render is based on the templatealias. That means when we define our custom layout we need to give alias to that template and mention here for the controls.

Till now we have added, controls into group, group into tabs. Now we need to define how they will appear. Hence we need to add templates to the ribbon now.

Declare another instance of UIDefinition. We have added now the template that we used earlier. We need to refer this template when using templateID given to the group. Now here what we want is because we have one single button, I would like to place it in a single row in a table. So just like how we use single TR element, in the same way I have defined one single table here its Section element and then single TR here its Row element and then referencing the button control here with the help of template alias. This means we want that button control to appear here. And we want that button to be displayed as a large control section.


<CommandUIHandlers>
<CommandUIHandler
Command="btnGoToBingCommand"
CommandAction="javascript: var statusId = SP.UI.Status.addStatus('This will take you to Bing search');
SP.UI.Status.setStatusPriColor(statusId, 'green');"></CommandUIHandler>

</CommandUIHandlers>

And after defining the template, we have defined the action that happens when button is clicked through the handlers. We have to give the command name which we mentioned in the button control and what happens when the button is clicked in the commandaction element.

Keep reading Part-6 to explore further.

Monday, June 13, 2011

Result is out

Finally the result is out

And I think people are okay with the Mango updates.


Share your SharePoint Experiences with us...
As good as the SharePointKings is, we want to make it even better. One of our most valuable sources of input for our Blog Posts comes from ever enthusiastic Visitors/Readers. We welcome every Visitor/Reader to contribute their experiences with SharePoint. It may be in the form of a code stub, snippet, any tips and trick or any crazy thing you have tried with SharePoint.
Send your Articles to sharepointkings@gmail.com with your Profile Summary. We will Post them. The idea is to act as a bridge between you Readers!!!

If anyone would like to have their advertisement posted on this blog, please send us the requirement details to sharepointkings@gmail.com