


Guys,
Now prepare yourself again for another set of MCTS exam for sharepoint 2010
This time also 4 exam but not like 2007 like 2 for wss and 2 for sharepoint.
All the exam this time will be for sharepoint 2010 with 4 part segregation
check out this links
70-667: TS: Microsoft SharePoint 2010, Configuring
70-668: PRO: Microsoft SharePoint 2010, Administrator
70-573: TS: Microsoft SharePoint 2010, Application Development
70-576: PRO: Designing and Developing Microsoft SharePoint 2010 Applications
now we will see who will crack this first.
P.S.: as per links about it shows
Published: July 12, 2010(In development)
no idea about this published date
Monday, June 28, 2010
Thursday, June 24, 2010
Difference between SharePoint Foundation 2010 and SharePoint server 2010
Hi All,
I just wanted to share a little information on SharePoint Foundation 2010 and SharePoint server 2010. Many people are confused about these two terms and do not know the difference between these two products.
Well let me tell you the basic difference between these two. Well actually we all know the basic difference between these two.
SharePoint Foundation 2010 is the other name of WSS 3.0. When I say other name, means this product is very similar to WSS 3.0 it is free downloadable and can be used in Server 2008 or Windows 7. It has also less number of features than SharePoint server 2010.
So it is the same story that what SharePoint server 2007 has is WSS 3.0 does not have. WSS 3.0 has less functionality and free as well and SharePoint 2007 has much more advanced features but a paid product.
Similar, SharePoint Foundation 2010 is a free download and has less feature than SharePoint Server 2010 which cost license and has much more advanced features like BCS, my site, enhanced BI, excel services and much more.
Friday, June 18, 2010
Finally the result is out
Hi All,
we asked if you have started using Windows 7 for SharePoint 2010 development.
19% saied yes, already started.
29% said, not yet, but they would love to.
12% said, we will never use it.
1% does not know about Windows 7.
2% don't know about SharePoint 2010.

we asked if you have started using Windows 7 for SharePoint 2010 development.
19% saied yes, already started.
29% said, not yet, but they would love to.
12% said, we will never use it.
1% does not know about Windows 7.
2% don't know about SharePoint 2010.

Tuesday, June 8, 2010
Advantages and limitations of Site definition and site template
Hi All,
This is really a simple post about advantages and limitation of site template and site definition. Although a little old topic. However, In learning, nothing is old. it is as new as today’s date.
Still many times same question being asked in the interview and we may not be able to answer properly on this question.
This post is the answer of that question.
Advantages of site template
• Data is stored in SQL server content database and so there is no need of synchronization.
• Custom templates are easy to create.
• Customization can be achieved from browser.
• Templates are easy to deploy.
• You can easily use SharePoint designer to make the changes on the site and then create the site template.
Advantages of site definition
• Data is stored on web server, so performance is better.
• You can customize list or document library at deep level.
• You can group your site definition under different tabs on site creation page.
• Defining new menu or performing specific action like sending an email, generating lookup values are possible through site definition.
Limitation of site template
• Less efficient in terms of large scale environment.
• All site templates appear under custom tab while creating site.
• If site template is based on site definition, then that site definition must be on web front server for custom template to work.
Limitation of site definition
• Requires developer skill.
• Editing site definition after deployment is difficult.
• Cannot apply SharePoint from site definition.
• (Sounds interesting, but yes) user cannot create two lists of the same type with different default content.
• Site definition must be deployed on each web server.
Monday, June 7, 2010
Creating custom field in SharePoint 2007 – Part 1
Hi All,
Many times the most common requirement is such that we have to build custom field in SharePoint and hence I though of sharing information on how we can create custom fields.
I am going to break this series of creating custom filed in to parts because there is so much fun in it to learn so many techniques while creating custom field.
Hence we are going to start with very basic text box control which will validate if the entered address starts with http or ftp or not.
Before diving more into coding part, first let me give you highlight on what all files are necessary for this.
1) Control ascx file - This is required for the field that we are going to develop; this will actually play a role while assigning field to the actual type (textbox, drop down etc).
2) Control xml file - This will define the type of the field and register to the SharePoint to make it understand that there is some field type that needs to be rendered at the time of creating field. We can define much more here. We will see them in upcoming series.
3) Control cs file – Coding related to the control which tells SharePoint about getting and setting the value of field and also to assign properties to the control in the code.
4) Field file – To validate the value entered in the field and throw the exception if validation fails. This will prevent item being added in the list. At the end, if we do not want any validation to happen, this file can return the value which is entered in the field.
Now let us start our journey of creating simple and basic text box custom field. Thank God I am not starting with Hello World.
Open Visual Studio and create a project with appropriate name to you. Now add one file and its extension should be .ascx. Make sure that you reference System.Web and Microsoft SharePoint assembly in the project.
Type in below code in that.
You can give your own ID to the rendering template and your own ID to textbox control.
Now add one more file. Call it as an xml file. And then type in the following code in it.
Now let me explain you each tag here. We will explore more and more tag in upcoming series. First the Type Name is the name that you want to give to this field. Type Display Name is the name of the field that will appear when you add the column to the list. Type Short Description as a name suggest is the description about this field. Parent Type is also an interesting value. We will see more on this in upcoming series. As of now we have taken it as Text. FieldTypeClass is the entire assembly reference with the field class name. We are going to add field class soon. SPKingsTextBoxField is the name of the field class in my project. Sortable true means you are allowing your end user to sort this column in list view web part and on AllItems and EditItems page. If this is false, they cannot sort this field. Filterable means filter can appear in that field column. If specified false, then you cannot filter on that column.
Change the appropriate references for your project assembly wherever it applies.
Add one more class and name it according to your choice. And paste the following code in it. I have demonstrated whole class file with namespace. This class is Control class for our custom field. Change your references accordingly. Make sure that your default template name should be equal to the rendering template id that you have in the ascx file. And your protected textbox ID should be equal to the textbox id that you gave in ascx file.
As you can see override Value method actually does the work of getting and setting the value of the field.
Now add one more class name it according to your choice. This is the field class for our custom field. And write down the following code. I have taken namespace and class of my project in this reference code. Change it to your own need.
As you can see, the only interesting part in this file as of now is GetValidateString method which handles the entered value in the field. Here we are getting the value by converting it to the string and then checking against the http and ftp, if not then we are throwing SPFieldValidationException which is basically throws the message at the time of clicking on OK button on the form.
Now this is it. All we need to do is copy respective files at respective locations. First build the project and sign it with strong key. Deploy that DLL to the GAC and then see its property. Take out the public key token and modify it in your XML field file.
Now copy this DLL to GAC (which you have just done), copy XML file to the 12 hive XML directory and copy ascx file to the CONTROLTEMPLATES folder under 12 hives. Reset the IIS.
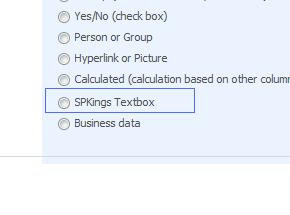
I have created one dummy list to show you the custom field in action. Create column, now when you click on create column, on the page where you land up, you will see one more field being added and which is SPKings TextBox in my case. Give field name WebSite and select SPKings TextBox field type and click on OK.
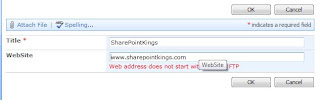
This will add WebSite column with our own field in the list. Go ahead and click on New to add the item in the list. Type in www.SharePointKings.com. And the moment after clicking OK button, our field validates the entered value with our own written logic and throws the exception with the message that we wrote in the code.
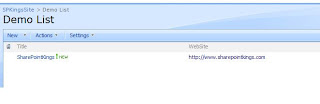
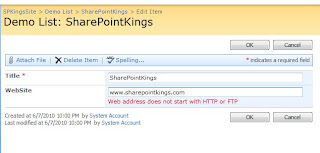
Now change the value to http://www.SharePointKings.com and click on OK. This time it passes the validation and value gets entered in the list. Open the same item for editing and see the value is in WebSite column. Try to modify that column again by removing http and click on OK, again it will validate the value and throws the exception.
So this is the end of my first part of this series. Hope that you have liked this post and look forward to read further interesting part. I will be back soon with part 2.
Many times the most common requirement is such that we have to build custom field in SharePoint and hence I though of sharing information on how we can create custom fields.
I am going to break this series of creating custom filed in to parts because there is so much fun in it to learn so many techniques while creating custom field.
Hence we are going to start with very basic text box control which will validate if the entered address starts with http or ftp or not.
Before diving more into coding part, first let me give you highlight on what all files are necessary for this.
1) Control ascx file - This is required for the field that we are going to develop; this will actually play a role while assigning field to the actual type (textbox, drop down etc).
2) Control xml file - This will define the type of the field and register to the SharePoint to make it understand that there is some field type that needs to be rendered at the time of creating field. We can define much more here. We will see them in upcoming series.
3) Control cs file – Coding related to the control which tells SharePoint about getting and setting the value of field and also to assign properties to the control in the code.
4) Field file – To validate the value entered in the field and throw the exception if validation fails. This will prevent item being added in the list. At the end, if we do not want any validation to happen, this file can return the value which is entered in the field.
Now let us start our journey of creating simple and basic text box custom field. Thank God I am not starting with Hello World.
Open Visual Studio and create a project with appropriate name to you. Now add one file and its extension should be .ascx. Make sure that you reference System.Web and Microsoft SharePoint assembly in the project.
Type in below code in that.
<%@Control Language="C#" Debug="true"%>
<%@Assembly Name="Microsoft.SharePoint, Version=12.0.0.0, Culture=neutral, PublicKeyToken=71e9bce111e9429c" %>
<%@Register TagPrefix="SharePoint" Assembly="Microsoft.SharePoint, Version=12.0.0.0, Culture=neutral, PublicKeyToken=71e9bce111e9429c" namespace="Microsoft.SharePoint.WebControls"%>
<SharePoint:RenderingTemplate ID="SPKingsTextbox" runat="server">
<Template>
<asp:TextBox ID="txtTextBox" runat="server" />
</Template>
</SharePoint:RenderingTemplate>
You can give your own ID to the rendering template and your own ID to textbox control.
Now add one more file. Call it as an xml file. And then type in the following code in it.
<?xml version="1.0" encoding="utf-8" ?>
<FieldTypes>
<FieldType>
<Field Name="TypeName">SPKings Textbox</Field>
<Field Name="TypeDisplayName">SPKings Textbox</Field>
<Field Name="TypeShortDescription">SPKings Textbox</Field>
<Field Name="ParentType">Text</Field>
<Field Name="FieldTypeClass">SharePointKings.CustomControls.SPKingsTextBoxField, SharePointKings.CustomControls, Version=1.0.0.0, Culture=neutral, PublicKeyToken=ed861ccbb4ad6887</Field>
<Field Name="Sortable">TRUE</Field>
<Field Name="Filterable">TRUE</Field>
</FieldType>
</FieldTypes>
Now let me explain you each tag here. We will explore more and more tag in upcoming series. First the Type Name is the name that you want to give to this field. Type Display Name is the name of the field that will appear when you add the column to the list. Type Short Description as a name suggest is the description about this field. Parent Type is also an interesting value. We will see more on this in upcoming series. As of now we have taken it as Text. FieldTypeClass is the entire assembly reference with the field class name. We are going to add field class soon. SPKingsTextBoxField is the name of the field class in my project. Sortable true means you are allowing your end user to sort this column in list view web part and on AllItems and EditItems page. If this is false, they cannot sort this field. Filterable means filter can appear in that field column. If specified false, then you cannot filter on that column.
Change the appropriate references for your project assembly wherever it applies.
Add one more class and name it according to your choice. And paste the following code in it. I have demonstrated whole class file with namespace. This class is Control class for our custom field. Change your references accordingly. Make sure that your default template name should be equal to the rendering template id that you have in the ascx file. And your protected textbox ID should be equal to the textbox id that you gave in ascx file.
using System;
using System.Collections.Generic;
using System.Text;
using System.Web;
using System.Web.UI.WebControls;
using Microsoft.SharePoint.WebControls;
namespace SharePointKings.CustomControls
{
public class SPKingsTextboxControl : BaseFieldControl
{
protected TextBox txtTextBox;
/// <summary>
/// setting template name
/// </summary>
protected override string DefaultTemplateName
{
get
{
return @"SPKingsTextbox";
}
}
/// <summary>
/// get set value
/// </summary>
public override object Value
{
get
{
EnsureChildControls();
return txtTextBox.Text.Trim();
}
set
{
EnsureChildControls();
txtTextBox.Text = (string)this.ItemFieldValue;
}
}
/// <summary>
/// create child control
/// </summary>
protected override void CreateChildControls()
{
if (Field == null) return;
base.CreateChildControls();
}
}
}
As you can see override Value method actually does the work of getting and setting the value of the field.
Now add one more class name it according to your choice. This is the field class for our custom field. And write down the following code. I have taken namespace and class of my project in this reference code. Change it to your own need.
using System;
using System.Collections.Generic;
using System.Text;
using Microsoft.SharePoint;
namespace SharePointKings.CustomControls
{
public class SPKingsTextBoxField: SPFieldText
{
#region Contstructors
public SPKingsTextBoxField(SPFieldCollection fields, string fieldName)
: base(fields, fieldName)
{
}
public SPKingsTextBoxField(SPFieldCollection fields, string typeName, string displayName)
: base(fields, typeName, displayName)
{
}
#endregion
public override string GetValidatedString(object value)
{
string strTxtValue = Convert.ToString(value).Trim();
if (!strTxtValue.ToUpper().StartsWith("HTTP") &&
!strTxtValue.ToUpper().StartsWith("FTP"))
{
throw new SPFieldValidationException("Web address does not start with HTTP or FTP");
}
return strTxtValue;
}
}
}
As you can see, the only interesting part in this file as of now is GetValidateString method which handles the entered value in the field. Here we are getting the value by converting it to the string and then checking against the http and ftp, if not then we are throwing SPFieldValidationException which is basically throws the message at the time of clicking on OK button on the form.
Now this is it. All we need to do is copy respective files at respective locations. First build the project and sign it with strong key. Deploy that DLL to the GAC and then see its property. Take out the public key token and modify it in your XML field file.
Now copy this DLL to GAC (which you have just done), copy XML file to the 12 hive XML directory and copy ascx file to the CONTROLTEMPLATES folder under 12 hives. Reset the IIS.
I have created one dummy list to show you the custom field in action. Create column, now when you click on create column, on the page where you land up, you will see one more field being added and which is SPKings TextBox in my case. Give field name WebSite and select SPKings TextBox field type and click on OK.

This will add WebSite column with our own field in the list. Go ahead and click on New to add the item in the list. Type in www.SharePointKings.com. And the moment after clicking OK button, our field validates the entered value with our own written logic and throws the exception with the message that we wrote in the code.

Now change the value to http://www.SharePointKings.com and click on OK. This time it passes the validation and value gets entered in the list. Open the same item for editing and see the value is in WebSite column. Try to modify that column again by removing http and click on OK, again it will validate the value and throws the exception.


So this is the end of my first part of this series. Hope that you have liked this post and look forward to read further interesting part. I will be back soon with part 2.
Subscribe to:
Posts (Atom)