Hi All,
We are going to discuss more on survey in this article. If you have not gone through the previous articles, I would suggest you to go through those articles first and then proceed for reading.
If you haven't gone through the previous articles of this series, i would highly recommend to read following articles before proceeding.
Creating and working with Survey in SharePoint - Part 1Creating and working with Survey in SharePoint - Part 2and
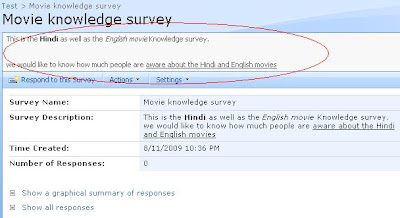
Creating and working with Survey in SharePoint - Part 4Creating and working with Survey in SharePoint - Part 5Now, that we have survey list already created and if you see the description of the survey on the overview.aspx, there is a difference in the survey description in the webpart and survey description below survey name. Check this out.
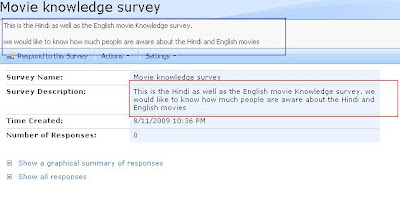
The difference is the line break. If you observe, survey description in the web part is written as it is without any line break however survey description under the name of survey breaks two separates sentences into two different lines because when we created the survey we gave it like that.
So in this article we will discuss two important things that will help you not only for the survey but also for any other list and any other document library as well.
Here we will remove the survey description below the name of the survey because we can already see the description in the web part and also we will include the HTML in the description now. It is very much similar to what we have learnt in previous articles just a class name change and that will do our job. Let us see in detail.
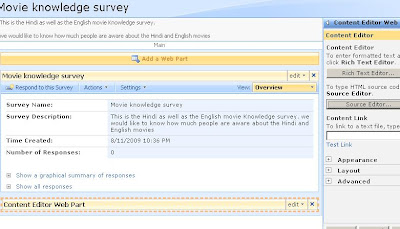
Ok, Edit the overview page and place the content editor web part below to the original web part.
Ok, first let us go and change the description of survey. Go to settings, survey settings, title and description and change the description to the following.
This is the startbold Hindi endbold as well as the startitalic English movie enditalic Knowledge survey. linebreak
we would like to know how much people are startunderline aware about the Hindi and English movies endunderline.
Ok, now go back to the overview view of the survey and observe the survey description.
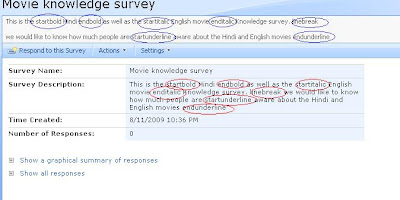
As you can see those words start appearing in the description, so we need to get rid of it and replace them with the actual HTML behavior and that is what we did in previous articles. So go ahead and modify the content editor web part and place the following code in that. Note one important line in the below code and that line is where we assign “ms-formbody’ class. Earlier we assigned “ms-formlabel” in previous articles to add HTML in questions.
<script language="JavaScript">
var ClassName;
ClassName = 'ms-formbody';
var elements = new Array();
var elements = document.getElementsByTagName('td');
for(var e=0;e<elements.length;e++)
{
if(elements[e].className == ClassName)
{
elements[e].innerHTML = elements[e].innerHTML.replace('linebreak','<br/>');
elements[e].innerHTML = elements[e].innerHTML.replace('startunderline','<u>');
elements[e].innerHTML = elements[e].innerHTML.replace('endunderline','</u>');
elements[e].innerHTML = elements[e].innerHTML.replace('startitalic','<i>');
elements[e].innerHTML = elements[e].innerHTML.replace('enditalic','</i>');
elements[e].innerHTML = elements[e].innerHTML.replace('startbold','<b>');
elements[e].innerHTML = elements[e].innerHTML.replace('endbold','</b>');
}
}
</script>
And there you go, see the effect of it.
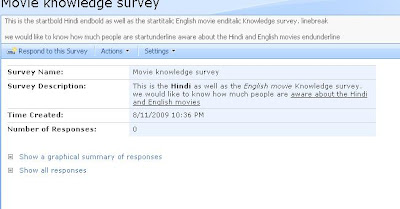
Ok, look good now. But there is a problem here, still look at the survey description above the web part. It still shows the words (startbold, endbold etc). They have not been replaced yet.
How to replace them? Ok, here is the answer. Just add one more content editor web part below the previous content editor web part and copy the same HTML content above, just make two changes. Change the class name and getElemtByID from TD to Div as this description is in the div tag, not in the TD tag.
ClassName = 'ms-listdescription'
var elements = document.getElementsByTagName('div');
and there you go, see the magic.
Actually for this specific survey type of list, we don’t need this to be here as on the same page, we can see the survey description in the web part. So let us go and remove the description of survey below the name of the survey from overview.aspx.
Modify the last content editor web part and paste the following code inside it.
<script language="JavaScript">
var ClassName;
ClassName = 'ms-listdescription';
var elements = new Array();
var elements = document.getElementsByTagName('div');
for(var e=0;e<elements.length;e++)
{
if(elements[e].className == ClassName)
{
elements[e].innerHTML = '';
}
}
</script>
And see the effect of above code. Survey description is gone.

Remember one very important point. You need to place this last content editor web part in every view page. We placed it only in overview.aspx. Just try and change the view to “All responses” and “Graphical summary”. Survey description will appear there, so just make sure that you place the last content editor web part on each view page separately as well.


