Wednesday, March 28, 2012

Export Visio diagram to SharePoint Designer workflow – Part 1


We saw how we can use Visio web access to display Visio diagram in the browser and even the client does not have Visio client then also they are able to view the diagram in the browser via Silverlight and that too with interactivity with the base list.

Read Visio services series.

There is one more advance feature available for Visio premium and that is the Visio diagram that can be exported to SharePoint Designer.

If we consider a business scenario, then drawing diagram is something that most of the people would love to do and as a business analyst knowing the requirement of a client for certain purpose can certainly draw a Visio diagram.

Once a diagram is ready, it can be handed over to the developer or site administrator which can take it forward to build a meaningful logic that actually works in SharePoint site.
So let’s dive into this series of creating Visio diagram and then exporting it to SharePoint Designer 2010 to make it functional.

Open up Visio premium 2010.

Click on flow chart diagram and then Microsoft SharePoint Workflow and select Metrics Unit and then click on create.


Workflow diagram consists of three groups. One is actions, the other is conditions and the last one is terminators

Any Visio diagram that needs to be converted to SharePoint Designer workflow must start with start indicator and end with stop terminator.

So let’s open up the last group and drag both start and stop terminators to the diagram.


Let’s start with setting a filed and then compare document field and drag it to the diagram. Set a field and compare document field can be found it under action and conditions group respectively.


We have now included the condition and hence always have yes or no logic associated with that. So we need to add two actions to the branch. First let us add do calculation action and send email action.


Now we need to specify which branch will get executed when condition evaluates to true and which when false.

First attach all the connectors between shapes and now select the upper connector with the condition and action and right click to get an option to set branching logic.


And then same way to the lower branch.


So at the end you should have something like this


Save the file. We are ready with our simple workflow and ready to take it to the SharePoint Designer.  Read Part-2 for further reading.

Monday, March 26, 2012

Tasks list Visio diagram


Tasks list in SharePoint 2010 has got one new feature. When we are on a tasks list you can now see that there is an option on ribbon bar with create Visio diagram.

This is a great new feature that allows exporting the tasks data to Visio diagram and having that task list connect with that to see the changes that happens in the tasks list.

If you have fix set of tasks that are assigned to individual person who performs those tasks, then you can have a better look at those tasks by using this Visio diagram than to look at row data in the tasks list.

Yes one important thing to consider here is you must have Visio client if you wish to use this functionality.

Here I have tasks list and several tasks assigned just to demonstrate you.


Here I have some data with assigned to and task priority and task statuses.

Now clicking on create vision diagram will get us Visio diagram. Once the diagram is created, then you can see that you can have a look at the diagram in different ways.

1)    Through status
2)    Through workload distribution
3)    Incompleted tasks assigned to
4)    Workflow status

These options give us better visualization than looking at row data.


Same way you can explore the remaining two options. It also gives you an option to include more fields in the diagram from tasks list if you wish to see them also in diagram.


This diagram is connected with tasks list. Any changes into the items which are mapped with tasks list will automatically reflected in this diagram each time you open, manually click on refresh or set auto refresh.

Thursday, March 22, 2012

Converting document format from browser


Conversion timer job allows us to convert one document to another. As we have seen in previous posts. If you have not gone through previous posts I would recommend you reading them first and then continue reading from here.

Open the document library in which you would like to convert a document format.
I have shared document which I have opened up. When you select a document to convert and then open up the ECB menu, point to the convert this document


And then it asks you to convert a document to aspx page (a webpage). It allows us to configure certain options at that time. Make sure that the publishing feature is activated at this time otherwise it won't allow us to convert the document to a web page.


Click on create and then wait for few minutes if you have selected an option or else after few minutes you can go to pages library and can see that the word document has been converted to the aspx page.


Now what we are trying to do is to use ribbon convert document functionality. However it seems that it is uncovered topic in many of the web sites and not sure as how to use it and how to configure output library etc. We are still working on it.


If you get a chance to work on this feature, do let us know and we would share it with your name mentioned in the post.

Monday, March 19, 2012

Document ID in SharePoint 2010


We all have heard a lot about document ID feature in SharePoint 2010 and wonder what this feature actually does.

Well let me tell you this, this is one of the welcome features from SharePoint 2010. If I have to tell you in a single line what this Document ID can help us with is that it can simply solve our problem with the document URL link.

When we turn on the feature Document ID which is at site collection level scoped feature every document uploaded in site collection gets document ID associated with it.

The advantage is even if you move a document from one location to another location throughout site collection, ID of document remains the same. This gives us an advantage over a broken link URLs for the documents.

Let’s say that you have uploaded a document in a document library called Projects Document. And then you have decided to move that document to some other library called Departmental Repository. So the document now does not reside in projects library but in departmental repository. If you have given a URL to many users to access your document and if they have the old link all they will get it page does not found because document actually does not exist now.

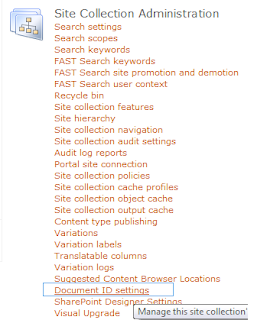
SharePoint 2010 has come up with a new URL associated with Document ID. So first think go ahead and activate Document ID feature and then from the site settings go to the Document ID settings.


You can then configure the document ID to start with certain characters and also if you would like to configure it for all existing documents inside the site.


Remember the there is a timer job called Document ID assignment job that does it. So it might take a while to generate Document ID for documents.


And there is one more service Document ID enable/disable job. This created a column called Document ID in library.


Once we have the Document ID then we can use this new URL to send to users.


Right click Document ID and go to properties. Check out the URL and use that URL in the browser URL and enter. You get the document.


{site URL}/_layouts/DocIdRedir.aspx?ID=DCMT2012-3-31

The advantage is even though document has been moved to any other library across site collection, user still would be able to get the document and as a result will not get broken link URL.

Because we had also enabled Document ID enable/disable job, we also have a field in document library called Document ID associated with each document and of course the ID field which is the base for auto generating Document ID


I hope you must have got the idea now that it's a welcome feature and really a useful when the link to document is broken.


Read more about how can you generate custom Document ID in SharePoint 2010.

Thursday, March 15, 2012

Document set Part – 5


If you have not gone through part-1 to part-4, I would recommend you reading them first and then continue reading from here on.

In this post, we are going to do the same stuff what we did in part-4. So open up SharePoint Designer 2010 and connect to the site.

Go to the list and libraries and find the Shared Documents. You may have a different library. I have document set in shared documents hence I have chosen shared documents.

Go to workflow and create a new workflow. I am showing this just to demonstrate the concept, the real scenario may vary and you need to use the conditions and workflow accordingly.


Now set a condition which is true and we will start the workflow on document set. We will first start with capturing the version.


Open up the actions menu and select capture the version of document set. Provide comments and major or minor version input. Save and publish the workflow. Go back to document set and run the workflow and see that we now have new version captured for the workflow.


Wednesday, March 14, 2012

Result is out

Finally the result is out

Many people rely on Windows Security Essentials.


Thursday, March 8, 2012

Document Library name and sub site name cannot be the same Issue

Hello


I faced an interesting technical blockage today. I wanted to create one sub site with name Report and I could not create it as it was throwing error saying this name already exist. I saw there was not sub site with this name. I being farm administrator, there was no any other issue of permission.


Then i realized and found that if your document library name is report and if you are trying to create sub site in the same site where this document library reside, then you cannot create sub site.


Of course because if its a lists, then we have /lists/ in URL but same is not the case with document library.
because what does SharePoint understand when you enter


http://{sitename}/Report


Is it a sub site of {sitename} or library which is in {sitename}?


Try it your self. you won't be able to create a sub site with the same name of any document library in the site.


If you give different URL then it works, but then your URL changes.


Should Microsoft consider having /DocLibs/ as a part of document library URL going forward because of this limitation? :) 


Not sure if its a bug or limitation. It seems a limitation. But yes, it has got meaning not to allow us to create a site with that way.


Tuesday, March 6, 2012

Document set Part – 4


If you have not gone through Part-1 to Part-3 I would recommend you reading them first and then continue reading from here on.

In this post, we are going to see versioning and workflow that runs on the document set rather than individual documents inside document set.

Again there is always a flexibility to run workflows on individual documents inside document set. Main advantage of running workflow over document set is we can run a single workflow in all the documents inside the document set and the same way we can have versioning on a single document set rather than handling versions on each document separately.

So let’s go ahead and check versioning and workflow both on a document set.

Remember that we will see these both functionalities from browser and also from SharePoint Designer 2010. First we will see them from browser. Versioning and document set workflow from SharePoint Designer 2010 will be covered in part-5.

When you are on document set welcome page go to document set tab, you will see capture version and version history. Let’s say you would like to save this document set along with all documents inside it as a one single version, you can click on save this version.


And then you would be able to capture the version. As you can see I also saved one version already so this has become second version and you can see all the documents in both the version.


One interesting thing to note here is if you see individual version number of documents, they indicate their own versions as well respectively. We did not modify any document individually hence here we can see as 1.0. If we had modified any individual document, then that change will be recorded and will be a part of document set version.

Now let’s go ahead and check workflow. Go to library settings and click on workflow.


Select document set content type and then select SharePoint 2010 collect feedback workflow.


In next scree, configure the approvers, and save it.

Now we have configured workflow on document set. Go back to the document set welcome page.


Click on start. And now as you can see task has been allocated and that is on the document set which means we are running a workflow for a document set.


Read Document Set Part-5 for further reading.

Friday, March 2, 2012

Document set Part – 3


If you have not gone through part-1 and part-2 of this series, I would recommend you reading them first and then continue from here on.

Now when we have document set added to a library, let’s make some changes to the document set. Go to the site settings and site content types inside gallery.


Click on document set settings. As of now we had allowed only documents to be a part of this document set. Document set is all about having different content types in it. Let’s go ahead and add few more content types to this document set.

Add audio, video and image content type to the document set. The moment we add these three content types, we can also set the default content for each of these content type.


Click on ok after this change.

You can also see now when you are on the document set welcome page a message which says content types have been added or removed from this document set. Click on update document set.


Now you’ll get more options when you would like to create new within document set.


Go back to site content types, and document set.

We can also add existing site columns or existing columns within the SharePoint to a document set. This will add these columns to a welcome page of Document Set.
Let’s add some of the columns to our document set.


Now when you go to the document set settings again from site content types and selecting document set, you can see now two columns that we added earlier. we can add them to the welcome page of the document set.

So add those columns to welcome page.


Go ahead and see the welcome page of the document set.


Edit the properties of the document set to include values for these two columns.


We also can customize the welcome page. When we are on document set settings page we can also see a link which says customize welcome page.


Click on the link and you will see document set welcome page opens for editing.


We can add web parts, remove web parts. This simply acts just like a normal web part page. I have removed the image web part and updated the content type and here is what we get.


Read Part-4 for further reading.


Share your SharePoint Experiences with us...
As good as the SharePointKings is, we want to make it even better. One of our most valuable sources of input for our Blog Posts comes from ever enthusiastic Visitors/Readers. We welcome every Visitor/Reader to contribute their experiences with SharePoint. It may be in the form of a code stub, snippet, any tips and trick or any crazy thing you have tried with SharePoint.
Send your Articles to sharepointkings@gmail.com with your Profile Summary. We will Post them. The idea is to act as a bridge between you Readers!!!

If anyone would like to have their advertisement posted on this blog, please send us the requirement details to sharepointkings@gmail.com