


Are you new to SharePoint development? Do you want to see how to create a custom web part?
Let me explain you from basic. Although there are many ways to create a web part but lets look at one way.
Following steps are involved in the creation of a custom web part:
1. Creation of Web Part project.
2. Creation of controls used in the web part.
3. Loading the control as web part.
4. Deploying the web part code in the SharePoint site.
5. Adding the web part on the site page.
Let’s understand each step with the help of an example.
Step 1: Open Visual Studio and create a new blank solution as shown in figure. 1.
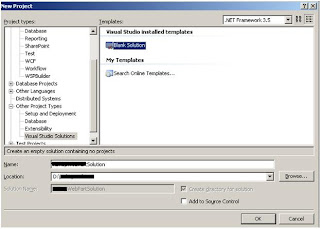
Figure.1
Step 2: Add a new project of type web application under the newly created solution as shown in the figure.2 below.
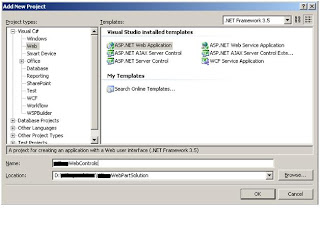
Figure.2
Delete the existing class from it. Add a new web user control in this project and give some appropriate name to it as shown in figure. 3
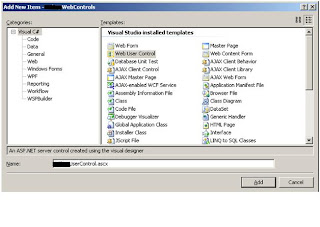
Figure .3
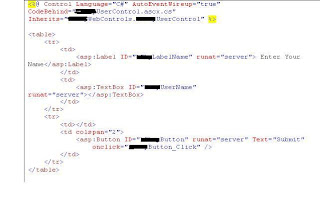
Code snippet for the user control and its code behind is given below:
using System;
using System.Collections;
using System.Configuration;
using System.Data;
using System.Linq;
using System.Web;
using System.Web.Security;
using System.Web.UI;
using System.Web.UI.HtmlControls;
using System.Web.UI.WebControls;
using System.Web.UI.WebControls.WebParts;
using System.Xml.Linq;
namespace MyWebControls
{
public partial class MyUserControl : System.Web.UI.UserControl
{
protected void Page_Load(object sender, EventArgs e)
{
}
protected void MyButton_Click(object sender, EventArgs e)
{
Response.Write("Good Morning " + txtUserName.Text);
}
}
}
Step 3: Create a new project under the solution of type class library as shown in figure.4 below.
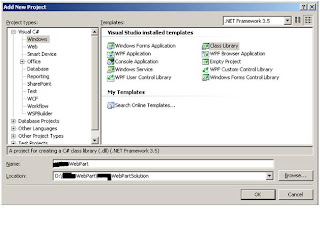
Figure. 4
Delete the default class and add a new class as shown in the figure.5
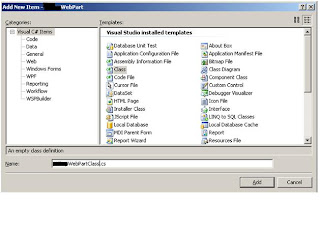
Figure .5
Add Reference of Windows SharePoint Services to this project as shown in the figure. 6 below.
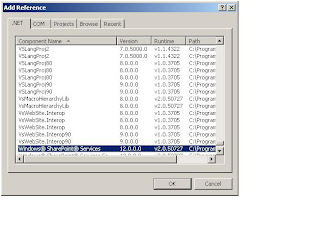
Figure.6
Code snippet is shown below:
Generate a new GUID.
using System;
using System.Collections.Generic;
using System.Linq;
using System.Text;
using System.Web.UI;
using System.Web.UI.WebControls.WebParts;
using System.Xml.Serialization;
using System.Runtime.InteropServices;
using Microsoft.SharePoint;
using Microsoft.SharePoint.WebControls;
using Microsoft.SharePoint.WebPartPages;
namespace MyWebPart
{
[Guid("52D7FA40-EF93-45ad-806E-9B77C782A93B")]
[System.Security.Permissions.PermissionSet(System.Security.Permissions.SecurityAction.Assert, Unrestricted = true)]
public class MyWebPartClass : System.Web.UI.WebControls.WebParts.WebPart
{
public MyWebPartClass()
{
this.ExportMode = WebPartExportMode.All;
}
string virtualpath = @"~/UserControls/MyUserControl.ascx";
protected override void CreateChildControls()
{
MyWebControls.MyUserControl objMyUserControl = (MyWebControls.MyUserControl)Page.LoadControl(virtualpath);
this.Controls.Add(objMyUserControl);
}
}
}
Step 4: Go to the properties of the web part project and select the build output path to the bin folder of the web application virtual directory. Before compiling add reference of the web part control project to it.
Add a safe control entry (below the safe control entries which are already present) to the web.config file of the web application which is present inside the virtual directory.

Change the trust level to Full as shown below.

Step 5:
Add Control to site:
Create a new folder within the virtual directory of the web application to store the user control. Give it a name such as UserControls.
Now go to Site Settings and click web parts as shown in the figure below
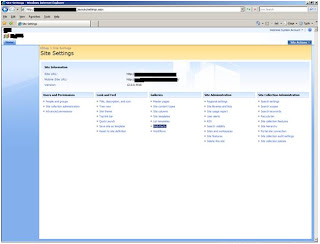
Figure.7
Click on New Web parts. Select the web part we deployed and click populate gallery.
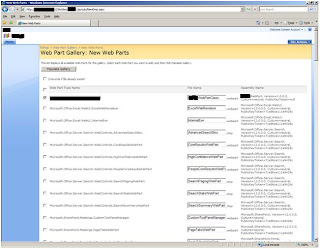
Figure.8
Go to the page on which you want to add the web part. Click the site settings àEdit Page as shown in the figure. 9 below.

Figure.9
Select the web part from the list of web parts. That’s it your web part is ready to play its role.

Figure.10

Figure.11
I hope this post will help many developers. If you still need more clarification please write to us at
1. Creation of Web Part project.
2. Creation of controls used in the web part.
3. Loading the control as web part.
4. Deploying the web part code in the SharePoint site.
5. Adding the web part on the site page.
Let’s understand each step with the help of an example.
Step 1: Open Visual Studio and create a new blank solution as shown in figure. 1.

Figure.1
Step 2: Add a new project of type web application under the newly created solution as shown in the figure.2 below.

Figure.2
Delete the existing class from it. Add a new web user control in this project and give some appropriate name to it as shown in figure. 3

Figure .3
Code snippet for the user control and its code behind is given below:

using System;
using System.Collections;
using System.Configuration;
using System.Data;
using System.Linq;
using System.Web;
using System.Web.Security;
using System.Web.UI;
using System.Web.UI.HtmlControls;
using System.Web.UI.WebControls;
using System.Web.UI.WebControls.WebParts;
using System.Xml.Linq;
namespace MyWebControls
{
public partial class MyUserControl : System.Web.UI.UserControl
{
protected void Page_Load(object sender, EventArgs e)
{
}
protected void MyButton_Click(object sender, EventArgs e)
{
Response.Write("Good Morning " + txtUserName.Text);
}
}
}
Step 3: Create a new project under the solution of type class library as shown in figure.4 below.

Figure. 4
Delete the default class and add a new class as shown in the figure.5

Figure .5
Add Reference of Windows SharePoint Services to this project as shown in the figure. 6 below.

Figure.6
Code snippet is shown below:
Generate a new GUID.
using System;
using System.Collections.Generic;
using System.Linq;
using System.Text;
using System.Web.UI;
using System.Web.UI.WebControls.WebParts;
using System.Xml.Serialization;
using System.Runtime.InteropServices;
using Microsoft.SharePoint;
using Microsoft.SharePoint.WebControls;
using Microsoft.SharePoint.WebPartPages;
namespace MyWebPart
{
[Guid("52D7FA40-EF93-45ad-806E-9B77C782A93B")]
[System.Security.Permissions.PermissionSet(System.Security.Permissions.SecurityAction.Assert, Unrestricted = true)]
public class MyWebPartClass : System.Web.UI.WebControls.WebParts.WebPart
{
public MyWebPartClass()
{
this.ExportMode = WebPartExportMode.All;
}
string virtualpath = @"~/UserControls/MyUserControl.ascx";
protected override void CreateChildControls()
{
MyWebControls.MyUserControl objMyUserControl = (MyWebControls.MyUserControl)Page.LoadControl(virtualpath);
this.Controls.Add(objMyUserControl);
}
}
}
Step 4: Go to the properties of the web part project and select the build output path to the bin folder of the web application virtual directory. Before compiling add reference of the web part control project to it.
Add a safe control entry (below the safe control entries which are already present) to the web.config file of the web application which is present inside the virtual directory.

Change the trust level to Full as shown below.

Step 5:
Add Control to site:
Create a new folder within the virtual directory of the web application to store the user control. Give it a name such as UserControls.
Now go to Site Settings and click web parts as shown in the figure below

Figure.7
Click on New Web parts. Select the web part we deployed and click populate gallery.

Figure.8
Go to the page on which you want to add the web part. Click the site settings àEdit Page as shown in the figure. 9 below.

Figure.9
Select the web part from the list of web parts. That’s it your web part is ready to play its role.

Figure.10

Figure.11
I hope this post will help many developers. If you still need more clarification please write to us at
5 comments:
Its helped me a lot
Thank you so much
sharepoint developer? Sell your webparts @ http://www.thesharepointmarket.com/submit-product/
Hi
I have a question, the article looks great but tell one thing how will you deploy your web user control in a sharepoint farm where you might have more than one front end web server and one application and DB server.
so in which web.config files (in sharepoint server farm) should be updated with safe control tags..?
you have to register safe control in all the front end server.
no need to for DB server.
Hi,
Thanks for the nice article on web part development.
This also will be helpful,
SharePoint Web Part Development Tutorial
Post a Comment