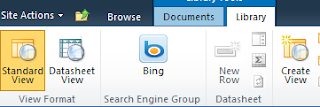
We will create a group called Search Engines and then we will add it to existing tab for document library.
Here is a link for getting an idea of where all you can customize and use tag to customize it.
Default Server Ribbon Customization Locations
So first I would like to write down the entire XML and then would like to walk you through each and every important tag inside this XML. So here is the XML that I am going to use and then follow is the outcome of it.
<?xml version="1.0" encoding="utf-8"?>
<Elements xmlns="http://schemas.microsoft.com/sharepoint/">
<CustomAction Id="SPKings.Ribbon.NewGroupInExistingTab"
Location="CommandUI.Ribbon">
<CommandUIExtension>
<CommandUIDefinitions>
<CommandUIDefinition
Location="Ribbon.Library.Scaling._children">
<MaxSize Id="SPKings.Ribbon.NewGroupInExistingTab.SearchGroup.MaxSize"
Sequence="15"
GroupId="SPKings.Ribbon.NewGroupInExistingTab.SearchGroup"
Size="LargeMedium" />
</CommandUIDefinition>
<CommandUIDefinition
Location="Ribbon.Library.Groups._children">
<Group
Id="SPKings.Ribbon.NewGroupInExistingTab.SearchGroup"
Sequence="15"
Description="Different Search Engines"
Title="Search Engine Group"
Template="Ribbon.Templates.Flexible2">
<Controls
Id="SPKings.Ribbon.NewGroupInExistingTab.SearchGroup.Controls">
<Button
Id="SPKings.Ribbon.NewGroupInExistingTab.SearchGroup.SearchBingButton"
Sequence="15" Image16by16="/_layouts/images/CustomImages/Bing-logo.jpg"
Image32by32="/_layouts/images/CustomImages/bing.png"
Description="Click to see Bing message"
LabelText="Bing"
TemplateAlias="o1" />
</Controls>
</Group>
</CommandUIDefinition>
</CommandUIDefinitions>
</CommandUIExtension>
</CustomAction>
</Elements>
And here is the output

<CustomAction Id="SPKings.Ribbon.NewGroupInExistingTab"
Location="CommandUI.Ribbon">
This line tells that we want to add something to the ribbon first and we have given the ID of our new custom action that we want to perform.
<CommandUIDefinition
Location="Ribbon.Library.Scaling._children">
This line tells that we want to define UI in such a way that we are going to add a new group in the ribbon of library. We have documents and library, two tabs for document library. So we are directly telling that we will add a new group in the Library tab of documents library. _children means adding child, one more element to it and scale ribbon accordingly on the screen.
<MaxSize Id="SPKings.Ribbon.NewGroupInExistingTab.SearchGroup.MaxSize"
Sequence="15"
GroupId="SPKings.Ribbon.NewGroupInExistingTab.SearchGroup"
Size="LargeMedium" />
There are different maxsize elements available in SharePoint and appropriate size needs to be mentioned. You can have a lookat CMDUI.xml file under global xml folder in 14 hive. I recommend you go through that entire XML in details which will guide you complete understanding on how tabs, groups and controls are laid out in entire ribbon architecture.
We have defined sequence 15, because by default sequence is in the multiple of 10. If you observe CMDUI, then you would come to know that where do you want to add the group, so based on that you can set the sequence number. Based on the sequence number, it will appear on the ribbon.
Next we have defined GroupID, which is the ID which we will mention while we define Group in a moment.
<CommandUIDefinition
Location="Ribbon.Library.Groups._children">
Now we want to add groups, so we have indicated that _children, means we will now add a group to ribbon.
<Group
Id="SPKings.Ribbon.NewGroupInExistingTab.SearchGroup"
Sequence="15"
Description="Different Search Engines"
Title="Search Engine Group"
Template="Ribbon.Templates.Flexible2">
We have given the GroupID which we mention in location attribute earlier. Again sequence is the same where you want to place it. Other attributes are self-explanatory.
Important part is the Template. There are many built in templates available in CMDUI.xml file. You can observe them carefully. This is the best suite for our example to use built in template. We can define our own as well. We are going to see that in upcoming posts for this series. As of now we are using the built in flexible2 template.
<Controls
Id="SPKings.Ribbon.NewGroupInExistingTab.SearchGroup.Controls">
<Button
Id="SPKings.Ribbon.NewGroupInExistingTab.SearchGroup.SearchBingButton"
Sequence="15" Image16by16="/_layouts/images/CustomImages/Bing-logo.jpg"
Image32by32="/_layouts/images/CustomImages/bing.png"
Description="Click to see Bing message"
LabelText="Bing"
TemplateAlias="o1" />
</Controls>
Now we are adding the controls to the group and we are adding button control to it. There are different controls that we can place inside the group. We are going to see them in upcoming posts. Label, DropDown, ToggleButton etc.
We have given ID of the button, again sequence, then images for different size. TemplateAlias is another important attribute that you have to mention. We are using the built in Alias. Again this alias has to match with Template. Alias has to be defined in the Template that we have used in. in our case that is Flexible2. Again go through CMDUI.xml to understand it more.
We are done with this example, and next we are going to see a big picture which is how to add entire Tab and then groups and then controls to it. we will see with multiple groups and multiple controls inside it which will get you an idea about how to lay out different controls in group defined by our custom HTML table in template defined by us and not using default templates.
Read Part 5 for further reading.


No comments:
Post a Comment