


Friday, May 27, 2011


Thursday, May 26, 2011
How to get group by HTML in SharePoint Listview
From quite some time, we are using Jquery and JavaScript to tweak the SharePoint data rendering methods below are the few examples
Sharepoint Custom so called KPI
Highlight SharePoint List rows conditionally
SharePoint calculated column and jQuery Highlight row
and the recent one Delete button in list view
Now almost every time our main concept is let SharePoint work their way and we will work our way without changing its basics.
So for that many a times we change the rendered HTML by SharePoint to meet client expectation.
But sometime we have loose against SharePoint but not now, we find the way to get HTML of the Grouped by data.
Let us explain quickly…
In listview web part if we use group by then SharePoint make Ajax call and on click of + it get’s the data to render. In normal (without group by view) its working normally but in group by view we are not getting HTML in view source.
As a result our above post fails to change HTML as desired.
But now way is there… for How to get group by HTML in SharePoint Listview
We got noticed when one of our readers point us to a wonder full article by Alexander Bautz
so first of all thanks to Alexander Bautz for his efforts
Now lets’ go to the code without wasting time.
Take jquery reference
Now lets us explain you how it works
The key thing to understand is the SharePoint function ExpGroupRenderData
While clicking on the + sign for group by SharePoint call web service from JavaScript to get the data and this function renders data after everything.
Now another problem is this function is called asynchronously. So when you check htmlToRender variable you will not get full data till the time isLoded is true
And when we tried in SharePoint 2010 it always show false so we had use set time out function which will called after each second.
Once isLoded is true then bingo we will get all the HTML and make our changes.
So sorry guys for not getting with full sample example because of time crunch but all the SP lover will get the idea what is happening and how much it’s useful. We will soon try to get working example for you.
Feel free to ask queries, we will happy to help (if possible).
Sharepoint Custom so called KPI
Highlight SharePoint List rows conditionally
SharePoint calculated column and jQuery Highlight row
and the recent one Delete button in list view
Now almost every time our main concept is let SharePoint work their way and we will work our way without changing its basics.
So for that many a times we change the rendered HTML by SharePoint to meet client expectation.
But sometime we have loose against SharePoint but not now, we find the way to get HTML of the Grouped by data.
Let us explain quickly…
In listview web part if we use group by then SharePoint make Ajax call and on click of + it get’s the data to render. In normal (without group by view) its working normally but in group by view we are not getting HTML in view source.
As a result our above post fails to change HTML as desired.
But now way is there… for How to get group by HTML in SharePoint Listview
We got noticed when one of our readers point us to a wonder full article by Alexander Bautz
so first of all thanks to Alexander Bautz for his efforts
Now lets’ go to the code without wasting time.
Take jquery reference
<script type="text/javascript">
$(document).ready(function(){
ChangeHTML();
});
function ChangeHTML()
{
//the code goes to change the HTML
//you get reference code by above links
}
function ExpGroupRenderData(htmlToRender, groupName, isLoaded) {
if(isLoaded == 'false')
{
setTimeout(ExpGroupRenderData,1000);
}
else
{
ChangeHTML();
}
}
</script>
Now lets us explain you how it works
The key thing to understand is the SharePoint function ExpGroupRenderData
While clicking on the + sign for group by SharePoint call web service from JavaScript to get the data and this function renders data after everything.
Now another problem is this function is called asynchronously. So when you check htmlToRender variable you will not get full data till the time isLoded is true
And when we tried in SharePoint 2010 it always show false so we had use set time out function which will called after each second.
Once isLoded is true then bingo we will get all the HTML and make our changes.
So sorry guys for not getting with full sample example because of time crunch but all the SP lover will get the idea what is happening and how much it’s useful. We will soon try to get working example for you.
Feel free to ask queries, we will happy to help (if possible).
Include image in SharePoint survey
How about coming up with some questions which have some images in it? And someone ask you is this possible in SharePoint survey. Well, you say I need some time to think. And yes, because out of the box, there is no option to include images in the survey which I sometime believes lack of functionality.
I also strongly believe that there are lots of third party solutions that can be deployed in SharePoint for customized survey which SharePoint survey does not provide, but I believe survey needs a lot of improvement. There has to be an expiration date, there should be a way to include images in the questions; just name a few. SharePoint 2010 has also not improved as far as survey is concern.
However we can do some little magic around survey page with the content editor web part and some magic in writing a question and then jumbling with JavaScript will get us the image in the question.
So let’s deep dive into this and explore how we can include image in the SharePoint survey.
Let’s ask one question. Question should be Do you think this picture is real?
And what we want is after this question we want to show one image down below this question. So that people come to know that we are talking about this image.
To do this, we need to make some modification to the question.
Add question something like this
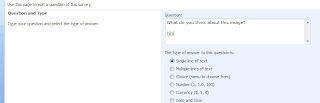
Notice one jjjj at the end of the question. This is unneccesary word in the question. But this is very necessary word for us. Because we will change this jjjj word with image with the help of content editor web part.
Upload your images that you want to display in question in some image library because we need to take reference to that library.
Now add content editor web part below survey.
And write down following script
If you observe, what we have done is we loop through all TD inside class ms-formlabel. And then we find ffff and then we replace it with image path. Check out the view source to get more idea. And of course you can reach us for any query.
And here is the output.

See, it’s fun. Isn’t it? We can now include images in the questions.
Okay, so what next? We will go one step further. Let’s add image as an option. Now this is a real fun. And you will find almost no examples for this. I tried finding and end up with no option. So I tried venturing and solving this.
It’s all about looping through classes with the page from javascript using content editor web part. We need to locate the place where we can replace certain string with the image tag.
So let’s start this example by asking question that which is your favorite flower? And we want user to select one of the options. So our answer should be of type choice.
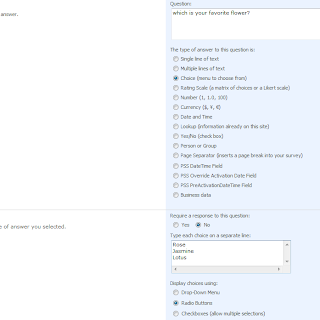
And this will be the page for the survey
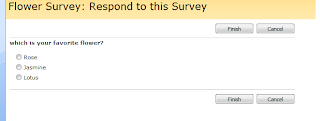
What we are we going to do is that we will loop through the class. Now carefully observe the JavaScript been generated by the browser.
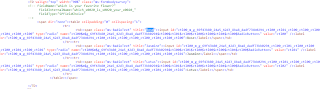
We are interested with this area of JavaScript. We first need to get a reference of class ms-formbodysurvey, then we will take every td tag inside it and then from that we will find every label inside that and then inside that we will replace those flower names with image path.
And here is a way to do it. Have a content editor web part on the survey page.
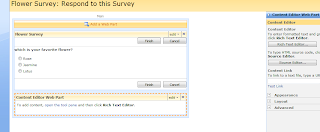
And write down the following script.
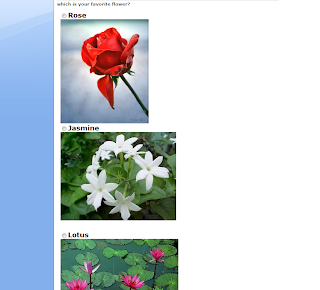
And you should be good to go. Bingo we have done our job. Following is the output. Happy imagine.
I also strongly believe that there are lots of third party solutions that can be deployed in SharePoint for customized survey which SharePoint survey does not provide, but I believe survey needs a lot of improvement. There has to be an expiration date, there should be a way to include images in the questions; just name a few. SharePoint 2010 has also not improved as far as survey is concern.
However we can do some little magic around survey page with the content editor web part and some magic in writing a question and then jumbling with JavaScript will get us the image in the question.
So let’s deep dive into this and explore how we can include image in the SharePoint survey.
Let’s ask one question. Question should be Do you think this picture is real?
And what we want is after this question we want to show one image down below this question. So that people come to know that we are talking about this image.
To do this, we need to make some modification to the question.
Add question something like this

Notice one jjjj at the end of the question. This is unneccesary word in the question. But this is very necessary word for us. Because we will change this jjjj word with image with the help of content editor web part.
Upload your images that you want to display in question in some image library because we need to take reference to that library.
Now add content editor web part below survey.
And write down following script
<script language="JavaScript">
var className;
className = 'ms-formlabel';
var elements = new Array();
var elements = document.getElementsByTagName('td');
for (var e = 0; e < elements.length; e++)
{
if (elements[e].className == className)
{
elements[e].innerHTML = elements[e].innerHTML.replace('jjjjj','<img src="{image path}"></img>');
}
}
</script>
If you observe, what we have done is we loop through all TD inside class ms-formlabel. And then we find ffff and then we replace it with image path. Check out the view source to get more idea. And of course you can reach us for any query.
And here is the output.

See, it’s fun. Isn’t it? We can now include images in the questions.
Okay, so what next? We will go one step further. Let’s add image as an option. Now this is a real fun. And you will find almost no examples for this. I tried finding and end up with no option. So I tried venturing and solving this.
It’s all about looping through classes with the page from javascript using content editor web part. We need to locate the place where we can replace certain string with the image tag.
So let’s start this example by asking question that which is your favorite flower? And we want user to select one of the options. So our answer should be of type choice.

And this will be the page for the survey

What we are we going to do is that we will loop through the class. Now carefully observe the JavaScript been generated by the browser.

We are interested with this area of JavaScript. We first need to get a reference of class ms-formbodysurvey, then we will take every td tag inside it and then from that we will find every label inside that and then inside that we will replace those flower names with image path.
And here is a way to do it. Have a content editor web part on the survey page.

And write down the following script.
<script language="JavaScript">
var className;
className = 'ms-formbodysurvey';
var elements = new Array();
var elements = document.getElementsByTagName('td');
for (var e = 0; e < elements.length; e++)
{
if (elements[e].className == className)
{
var inputs = elements[e].getElementsByTagName('label');
for (var e1 = 0; e1 < inputs.length; e1++)
{
inputs[e1].innerHTML = inputs[e1].innerHTML.replace('Lotus','<b><font size="4">Lotus</font></b><br/><img src="{img path}"></img><br/><br/><br/>');
inputs[e1].innerHTML = inputs[e1].innerHTML.replace('Jasmine','<b><font size="4">Jasmine</font></b><br/><img src="{img path}"></img><br/><br/><br/>');
inputs[e1].innerHTML = inputs[e1].innerHTML.replace('Rose','<b><font size="4">Rose</font></b><br/><img src="{img path}"></img>');
}
}
}
</script>
And you should be good to go. Bingo we have done our job. Following is the output. Happy imagine.

Tuesday, May 24, 2011
Ribbon customization - Part 1
From this post, I am going to start on the series of customizing ribbon. And for this, we will start with understanding the ribbon architecture and the basics of ribbon.
We all know CustomActions feature element which helps us putting different functionalities at various places in SharePoint. We can use this to enable different options on different menu places.
Same CustomActions is used to enable customize the ribbon through the features. In ribbon architecture, first comes the Ribbon, then comes the Tab, then comes the Group and then comes the controls within the group.
Individual controls inside the group can be disabled or enabled. They cannot be hidden or shown.
But yes, individual Tab can be hidden and shown. If you like to see this, then go to document library, then go to documents tab without selecting any document. You would see all options disabled not hidden. Once you select any document, then they become enable.

These are called context sensitive controls and tabs. We will cover each one of these in details as we progress through the series.
There are built in controls that you can use inside group. You cannot use custom controls inside it. List of controls permitted inside group are button, Checkbox, Color Picker, Combo Box, Dropdown, Textbox, Toggle Button, split button, spinner, fly out anchor.
It is the java scripts which is performed on the client side when any of the controls is being clicked or actions performed on any of the controls inside it. So we will also investigate more in JavaScript as well in coming series.
Below is an example of ribbon. (Covered with green rectangle)

Below is an example of Tabs. (Covered with green rectangle)

Below is an example of Groups (Covered with green rectangle)

And inside Groups we have the respective controls.
Continue reading Part2
We all know CustomActions feature element which helps us putting different functionalities at various places in SharePoint. We can use this to enable different options on different menu places.
Same CustomActions is used to enable customize the ribbon through the features. In ribbon architecture, first comes the Ribbon, then comes the Tab, then comes the Group and then comes the controls within the group.
Individual controls inside the group can be disabled or enabled. They cannot be hidden or shown.
But yes, individual Tab can be hidden and shown. If you like to see this, then go to document library, then go to documents tab without selecting any document. You would see all options disabled not hidden. Once you select any document, then they become enable.

These are called context sensitive controls and tabs. We will cover each one of these in details as we progress through the series.
There are built in controls that you can use inside group. You cannot use custom controls inside it. List of controls permitted inside group are button, Checkbox, Color Picker, Combo Box, Dropdown, Textbox, Toggle Button, split button, spinner, fly out anchor.
It is the java scripts which is performed on the client side when any of the controls is being clicked or actions performed on any of the controls inside it. So we will also investigate more in JavaScript as well in coming series.
Below is an example of ribbon. (Covered with green rectangle)

Below is an example of Tabs. (Covered with green rectangle)

Below is an example of Groups (Covered with green rectangle)

And inside Groups we have the respective controls.
Continue reading Part2
Friday, May 20, 2011
Word automation services – Part 2
Here we are with part 2 of word automation service. If you have not gone through the Part 1, then I would recommend you reading part 1 first and then return to this post for further reading.
We now know about the fantastic feature called word automation service. Now it’s not just that you can do it with the help of code.
If you are a server administrator, then again PowerShell is here to help you out with this. PowerShell is undoubtedly one of the best enhancements that have come with SharePoint 2010 which gives more power than traditional stsadm command for sure.
So open up the Start menu - >Administrative Toos -> Windows PowerShell Module.
We are using the same library that we have used in Part 1.
Now start writing following commands one after the other and see the magic. Again remember you need to wait for some time depends on the source file format and destination file format to get the output.
PowerShell also provides you way to check the status of the process the same way we checked with the code in part 1.
First we need to take the proxy reference of the word automation service. But yes, make sure that word automation service should be running.


Now we will take the reference of the site

Now we need to set the input and output folder. It means source library path and destination library path. I am going to have it both at the same place.

Now we will take the reference of conversion job we created in first step, set up the user token under which the job will run, output format and should we override the file if already there or not.

Now then once we configure all these, it’s time to start the job to convert.
So your overall code would look something like this

At the same time, we can query the conversion status as well.

As you can see it shows the status, you can keep checking the status. After process started, it will be number of documents in progress and at the end if you query, it will be number of documents completed.
Default time is 15 minutes. You need to wait till 15 minutes, but if you do not want to wait till 15 minute then you can force job to run.

and Here is the output. If you have multiple files, it will automatically take all files and convert them to PDF.

We now know about the fantastic feature called word automation service. Now it’s not just that you can do it with the help of code.
If you are a server administrator, then again PowerShell is here to help you out with this. PowerShell is undoubtedly one of the best enhancements that have come with SharePoint 2010 which gives more power than traditional stsadm command for sure.
So open up the Start menu - >Administrative Toos -> Windows PowerShell Module.
We are using the same library that we have used in Part 1.
Now start writing following commands one after the other and see the magic. Again remember you need to wait for some time depends on the source file format and destination file format to get the output.
PowerShell also provides you way to check the status of the process the same way we checked with the code in part 1.
First we need to take the proxy reference of the word automation service. But yes, make sure that word automation service should be running.


Now we will take the reference of the site

Now we need to set the input and output folder. It means source library path and destination library path. I am going to have it both at the same place.

Now we will take the reference of conversion job we created in first step, set up the user token under which the job will run, output format and should we override the file if already there or not.

Now then once we configure all these, it’s time to start the job to convert.
So your overall code would look something like this

At the same time, we can query the conversion status as well.

As you can see it shows the status, you can keep checking the status. After process started, it will be number of documents in progress and at the end if you query, it will be number of documents completed.
Default time is 15 minutes. You need to wait till 15 minutes, but if you do not want to wait till 15 minute then you can force job to run.

and Here is the output. If you have multiple files, it will automatically take all files and convert them to PDF.

Thursday, May 19, 2011
Delete Drop off library Part – 3
Here we are with part 3. If you have not gone through part 1 and Part 2, I would recommend you reading part 1 and Part 2 then come back here for further reading.
Here is one more way to allow drop off library to be deleted. In this post, we are going to see how we can achieve this with the help of SharePoint Manager 2010 which is a free download available from CodePlex. The same functionality is also available for MOSS 2007. Check out here.
Open up SharePoint manager 2010.
When you first open up the SharePoint manager, you would see something like this.
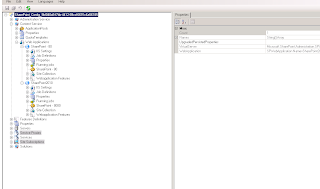
Expand your site web application, site collection and then your web node. You would be able to see all lists and libraries inside the web along with all properties. This tool is simply awesome. It not only allows you to view all properties but also allows you to modify and save the changes as well.
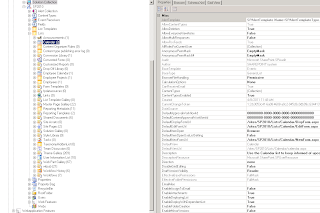
When you select drop off library, you will see AllowDeletion property in propoertypane, select it to true. Save the changes and you should be good to go.
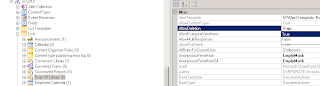
Here is one more way to allow drop off library to be deleted. In this post, we are going to see how we can achieve this with the help of SharePoint Manager 2010 which is a free download available from CodePlex. The same functionality is also available for MOSS 2007. Check out here.
Open up SharePoint manager 2010.
When you first open up the SharePoint manager, you would see something like this.

Expand your site web application, site collection and then your web node. You would be able to see all lists and libraries inside the web along with all properties. This tool is simply awesome. It not only allows you to view all properties but also allows you to modify and save the changes as well.

When you select drop off library, you will see AllowDeletion property in propoertypane, select it to true. Save the changes and you should be good to go.

Wednesday, May 18, 2011
Read only view problem
I noticed when i wanted to bulk update value of one field and when i went ahead, changed the normal standard view to the data sheet view to modify values i could not modify values. it showed me that this view is read only.
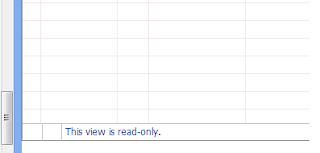
now what does this mean that the view is read only? Well, after some search i came to know that if the list has a content approval turned on, you will not be able to modify the values in datasheet view. the view turns into read only mode.
So go to the list settings -> General settings->Versioning settings and turn off the content approval. come back to the list, make changes the way you want and then again turn on the list content approval.
Hope this helps.

now what does this mean that the view is read only? Well, after some search i came to know that if the list has a content approval turned on, you will not be able to modify the values in datasheet view. the view turns into read only mode.
So go to the list settings -> General settings->Versioning settings and turn off the content approval. come back to the list, make changes the way you want and then again turn on the list content approval.
Hope this helps.
Tuesday, May 17, 2011
Delete button in list view
Hi, we all know that list view is the best way to show the data to use without wasting of time.
It gives all the basic required functionality but as always client ask few simple things which SharePoint is not providing by default.
And for that silly thing we have to create custom webpart or custom listview
We already shown you few ways to show how you can change your listview HTML by JQuery and JavaScript like
http://www.sharepointkings.com/2010/04/sharepoint-custom-so-called-kpi.html
http://www.sharepointkings.com/2008/12/highlight-sharepoint-list-rows.html
http://www.sharepointkings.com/2009/04/sharepoint-calculated-column-and-jquery.html
All jquery stuff http://www.sharepointkings.com/search/label/JQuery
Recently we got requirement that client needs delete button link in SharePoint list view
Now edit button is available but delete button is not available in default view.

So finally we are went the same way as we always used: change the Listview HTML in JavaScript
We created a text field “Delete” and put some below text inside that field
Note: calculated column is not supporting ID. So we can use event handler or SPDesigner workflow to fill this field.
Now what we had done is on DeleteItem function we called web service from JavaScript using SPServices jQuery and delete the item and then just reload the thepage.
That’s it
Here is the function which called on page load to change text field to div field.
we have to put this JavaScript on the same page of list view.
Hope fully you will get the idea how its working.
It gives all the basic required functionality but as always client ask few simple things which SharePoint is not providing by default.
And for that silly thing we have to create custom webpart or custom listview
We already shown you few ways to show how you can change your listview HTML by JQuery and JavaScript like
http://www.sharepointkings.com/2010/04/sharepoint-custom-so-called-kpi.html
http://www.sharepointkings.com/2008/12/highlight-sharepoint-list-rows.html
http://www.sharepointkings.com/2009/04/sharepoint-calculated-column-and-jquery.html
All jquery stuff http://www.sharepointkings.com/search/label/JQuery
Recently we got requirement that client needs delete button link in SharePoint list view
Now edit button is available but delete button is not available in default view.

So finally we are went the same way as we always used: change the Listview HTML in JavaScript
We created a text field “Delete” and put some below text inside that field
<div><a href='#' onclick='javascript:DeleteItem(2);'><img alt='delete' src='/_layouts/images/delitem.gif' style='border:0px;' /></a></div>
where 2 will be listitem ID
Note: calculated column is not supporting ID. So we can use event handler or SPDesigner workflow to fill this field.
Now what we had done is on DeleteItem function we called web service from JavaScript using SPServices jQuery and delete the item and then just reload the thepage.
That’s it
Here is the function which called on page load to change text field to div field.
we have to put this JavaScript on the same page of list view.
$(document).ready(function(){
$(".ms-vb2:contains('<div')").each(function(){
var tempDIV = document.createElement ("div");
tempDIV.style.cursor = "pointer";
tempDIV.innerHTML = $(this).text();
$(this).text("");
$(this).append(tempDIV);
});
});
function DeleteItem(cID)
{try{
var cnf = confirm("Are you sure you want to send the item(s) to the site Recycle Bin?");
//this is default message that sharepoint gives.
if(cnf)
{
$().SPServices({
operation: 'UpdateListItems',
listName: ‘your list name’,
batchCmd: 'Delete',
ID: cID,
completefunc: function (xData, Status) {
location.reload(true)
}
});
}
}catch(ex){alert(ex);} }</script>
Hope fully you will get the idea how its working.
Delete Drop off library Part – 2
Here we are with part 2. If you have not gone through part 1, I would recommend you reading part 1 and then come back here for further reading.
As we know that by default there is no option to delete a drop off library and we saw in part 1 one way to enable the delete this library settings under permissions and management.
With the help of PowerShell script we can achieve this as well.
All you need to do is go to administrative tool -> PowerShell modules and type in following commands.
And you are good to go. You will be able to see delete this library option under permissions and management.
Read Part3 for further reading
As we know that by default there is no option to delete a drop off library and we saw in part 1 one way to enable the delete this library settings under permissions and management.
With the help of PowerShell script we can achieve this as well.
All you need to do is go to administrative tool -> PowerShell modules and type in following commands.
$objWeb = Get-SPWeb –Identit http://ServerName
$objDocLib = $objWeb.GetList("http://ServerName/sites/sitename/DropOffLibrary");
$objDocLib.AllowDeletion = "True";
$objDocLib.Update();
And you are good to go. You will be able to see delete this library option under permissions and management.
Read Part3 for further reading
Monday, May 16, 2011
Delete Drop off library Part – 1
Drop off library which is a part of content organizer in SharePoint 2010 is one of the cool new features been added to SharePoint 2010.
If you want to know more about drop off library, you can read it here.
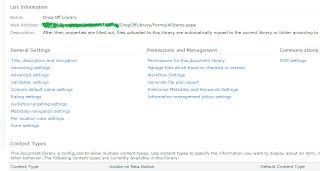
Now the interesting this is, if you go to drop off library settings, you will not see the delete option by default.
This is the default settings, may be because drop off library is an important feature and there can be multiple rules might have been set on it.
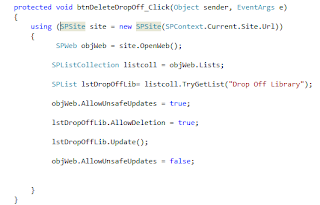
However, if we want to remove this library then there are three ways. I am going to convert them in one by one part. In this part, we are going to see how we can enable deleting library from server object model.
First let’s have a look at the screen shot of drop off library settings.
Now write below code wherever appropriate.
And here is the result
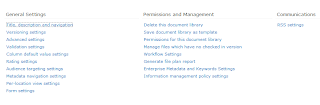
Read more in Part 2.
If you want to know more about drop off library, you can read it here.
Now the interesting this is, if you go to drop off library settings, you will not see the delete option by default.
This is the default settings, may be because drop off library is an important feature and there can be multiple rules might have been set on it.
However, if we want to remove this library then there are three ways. I am going to convert them in one by one part. In this part, we are going to see how we can enable deleting library from server object model.
First let’s have a look at the screen shot of drop off library settings.

Now write below code wherever appropriate.

And here is the result

Read more in Part 2.
Subscribe to:
Posts (Atom)