


If you want to give separate permission to a folder inside a document library then do the following:
Go to the site settings --> advance settings.
Create a new Permission level and choose permissions which are not available previously with other permission levels.
After doing it go to the folder and choose 'Manage Permissions'.
Add the users you want to give access to . Edit Permissions of the selected users. Select the permission level just created.
Remove all the other users whom you do not want to give access to the folder.
Saturday, May 31, 2008
How to restore site using content db only
To restore a site on the same or different machine using the content db backup follow the steps given below:
- Create a new Web application on the destination server.
- Go to central admin --> content database . Click on the new web app content db.
- Remove the content db.
- Go to SQL server mgmt studio and create a new db with the same name as the content db backup you are having.
- After creation right click restore. Choose the backup file location. From the options tab choose 'overwrite'.
- Restore this db backup.
- Go to central admin --> content database again and select ' add a content db ' to the web application.
- specify the name of the restored db.
- Done
How to transfer site content DB from C drive to Other drive
Many a times we face an issue that c drive is out of space especially b'coz our site content db is on c drive and we continue to add large size documents and media files etc. In order to get rid of this we can transfer the db to some other drive say d drive with more space. Here is how you can do it:
Go to SQL server management studio and right click on the content db.
As chances are that this db is currently in use hence first take it offline.
It will take some time to take it offline. Once done right click detach the db.
Now go to the location on the c drive program files sql server folder and find the db files. Cut the files from there and paste in a new folder on d drive.
Again go to mgmt studio and attach the db from the new location.
Done
How to find the Internal name of a field of a list?
Many times while coding (especially in event handlers) we need the internal names of the fields of the list. A simple way to find out the internal names is given below:
Go to list settings and then click on the column (field) name from the page.
It will navigate to the column details page with the information like the data type name etc.
To find out the internal name go to the address bar and press 'End' which will take you to the end of the address url.
the last word is the internal name of the field.
Friday, May 30, 2008
How to use custom redirection page in SharePoint for custom navigation?
The requirement:
Create a page in SharePoint which will redirect you to specific location based on inputs.
All we need to reach at our custom page
For that you can use many ways like...
From Hyper link from quick launch.
From Edit Control Block.
From FormToolbar in List Add/Edit/Display mode and all that.
Click here to know how to do that.
What we need to do is that create a new ASPX page which will execute our custom code.
How to create a new aspx page in SharePoint with feature?
Here is a sample:
I will name this feature as “CustomRedirection”.
Here is the content of elements.xml
The Module element works same as Module element in Onet.xml.
This element useful for using files like webpart or custom page.
So this feature includes our CustomRedirection.aspx as part of site page.
Over here we are putting “Ghostable” page (physical aspx) with these feature.
how aspx looks like?
Here is the content of CustomRedirection .aspx page
You can find it out that in this page what we had done is that adding Microsoft.SharePoint assembly and our custom assembly, which contain code we want to executes) then one asp:content with id “ PageTitleInTitleArea” and contentplaceholderid as “PlaceHolderMain”. This content is used by master page.
Now question is
how our custom code executes when this page accessed?
You can see page derivatives in that we are specifying MasterPageFile and we are inheriting our own class (Inherits=" MyCustomCode. CustomRedirection"). So when this page called our custom code in class CustomRedirection.cs will call.
Note: Put your custom assembly as safe control in web.config.
And once we have our execution in code, we are the king.
We can do anything we want. like…
Fetch URL and check which Item from which list is clicked, redirect to its related page like sub site, related list, look up list, do some operation like creating sub site, creating multiple records anything according to your business requirement and then redirect back to same page or anywhere you want.
Here is a part snippet from my CustomRedirection.aspx
Summary
1) Create an aspx page from feature and embed in the site.
2) Use page to place content.
3) Use page as middle way for seamless navigation.
Source page -> customeredirection page -> destination page.
4) Use page as a place where you can execute your code and comes back at your place again or you can go ahead.
5) Any many more way that may be I had not discovered yet.
We are using this feature mostly in custom navigation where we know source but don’t know the destination but we need to find destination with custom business logic and then redirect it.
Create a page in SharePoint which will redirect you to specific location based on inputs.
All we need to reach at our custom page
For that you can use many ways like...
From Hyper link from quick launch.
From Edit Control Block.
From FormToolbar in List Add/Edit/Display mode and all that.
Click here to know how to do that.
What we need to do is that create a new ASPX page which will execute our custom code.
How to create a new aspx page in SharePoint with feature?
Here is a sample:
I will name this feature as “CustomRedirection”.
Here is the content of elements.xml
<Elements xmlns="http://schemas.microsoft.com/sharepoint/">
<Module Name=" CustomRedirection" Path="" Url="">
<File Url=" CustomRedirection.aspx" Type="Ghostable" IgnoreIfAlreadyExists="FALSE" />
</Module>
</Elements>
The Module element works same as Module element in Onet.xml.
This element useful for using files like webpart or custom page.
So this feature includes our CustomRedirection.aspx as part of site page.
Over here we are putting “Ghostable” page (physical aspx) with these feature.
how aspx looks like?
Here is the content of CustomRedirection .aspx page
<%@ Assembly Name="Microsoft.SharePoint, Version=12.0.0.0, Culture=neutral, PublicKeyToken=71e9bce111e9429c" %>
<%@ Assembly Name=" MyCustomCode, Version=1.0.0.0, Culture=neutral, PublicKeyToken=3f3cc8bff1d91557" %>
<%@ Page Language="C#" MasterPageFile="~masterurl\default.master"
Inherits=" MyCustomCode. CustomRedirection "
EnableViewState="true" EnableSessionState="True" EnableViewStateMac="false" %>
<asp:Content ID="PageTitleInTitleArea" runat="server" contentplaceholderid="PlaceHolderMain" >
Test
</asp:Content>
You can find it out that in this page what we had done is that adding Microsoft.SharePoint assembly and our custom assembly, which contain code we want to executes) then one asp:content with id “ PageTitleInTitleArea” and contentplaceholderid as “PlaceHolderMain”. This content is used by master page.
Now question is
how our custom code executes when this page accessed?
You can see page derivatives in that we are specifying MasterPageFile and we are inheriting our own class (Inherits=" MyCustomCode. CustomRedirection"). So when this page called our custom code in class CustomRedirection.cs will call.
Note: Put your custom assembly as safe control in web.config.
And once we have our execution in code, we are the king.
We can do anything we want. like…
Fetch URL and check which Item from which list is clicked, redirect to its related page like sub site, related list, look up list, do some operation like creating sub site, creating multiple records anything according to your business requirement and then redirect back to same page or anywhere you want.
Here is a part snippet from my CustomRedirection.aspx
if (Request.QueryString["FROM"] == "ECB")
{
// find List id and Item id from URL
// use that data find item from list
// do manipulation according business logic
SPUtility.Redirect(strWebURL, SPRedirectFlags.Default, httpContxt);
}
Summary
1) Create an aspx page from feature and embed in the site.
2) Use page to place content.
3) Use page as middle way for seamless navigation.
Source page -> customeredirection page -> destination page.
4) Use page as a place where you can execute your code and comes back at your place again or you can go ahead.
5) Any many more way that may be I had not discovered yet.
We are using this feature mostly in custom navigation where we know source but don’t know the destination but we need to find destination with custom business logic and then redirect it.
SharePoint 2007 Maximum Limitations
Hi All,
Following is a list of names and other parameters with the maximum allowable size on each.
Entity Max Permissible Size
Site Name 128 characters
Site URL 255 characters
Display name 128 characters
Connection string 384 characters
Email address 128 characters
Version numbers 064 characters
Virtual Server Friendly Name 064 characters
SQL Database Name 123 characters
SQL Database Column 128 characters
SQL Database Table Name 128 characters
SQL Role Name 128 characters
Server Name 128 characters
Windows User Name 300 characters
Windows Password 300 characters
Dependencies per object 032 objects
Zone enumeration value 004 zones
Default SQL command timeout 300 seconds
Number of simultaneous
workflows that can be run* 015
It looks like the 15 limit Harsh mentions might actually be the WorkflowEventDeliveryThrottle, which is 15 by default. This throttle can be modified (see below) - try setting it to a very low number, and you should see that workflow activation slows dramatically.
SPWebService spWebService = SPFarm.Local.Services.GetValue<SPWebService>();
spWebService.WorkflowEventDeliveryThrottle = 20; // default is 15
spWebService.Update();
For more information: Click Here
Common Coding practice when using SharePoint Object Model
Hi All,
There is a very good article on common coding practice when using SharePoint Object Model
It takes care of how we can use SPSite and SPWeb objects. How and when to dispose them. also shows how concurrency issues can be taken care and what happens if not taken care. It also mentions about memory load depending on users logged in and hitting the code at the same time.
May other things regarding using cache and also several points from which you come to know that proper disposing of objects are not being done in coding.
a very nice article to go through.
Go through article
Thank you
Using SPUtility class methods
Hi All,
Many times I wonder about SPUtility class, it’s having really very handy and useful methods to explore.
Here I would like to share certain methods that I come across which can really reduce your work of coding a lot. Because not knowing these methods can cause you lot of work. So better to know them at very first glance.
SPUtility.GetGenericSetupPath("template\\features”);
This will return you C:\Program Files\Common Files\Microsoft Shared\web server extensions\12\TEMPLATE\FEATURES
Think what all things that you have done to make this kind of thing happen( Place tag in web.config, make constant or some stuff like this).
string fullName;
string returnvalue = SPUtility.GetAccountName(fullName);
This will return AccountName as string.
Then here is one more interesting method:
public static void GetFullNameandEmailfromLogin (
SPWeb web,
string login,
out string displayName,
out string email
)
which will return you Name in displayname paramter as you can see its mentioned as out and from login it will return email as out paramter.
Other Method is GetFullNameFromLogin which returns fullname from login name.
string returnValue = SPUtility.GetFullNameFromLogin(site, loginName)
Other method is GetLoginNameFromEmail which takes email and outputs login name
string returnvalue = SPUtility.GetLoginNameFromEmail(site, email)
But its an obsolete method. so you can use this new method :
SPUtility.GuessLoginNameFromEmail with same parameters and same output.
but i wonder rest of methods start with Get, why this methd starts with Guess?????????? Is it developer's Mistake?? Or else i really wanted to know logic behind this. Let me know if anyone come across to this.
String input;
String folderUrl;
String returnValue;
returnValue = SPUtility.ConvertHtmlLinkToWikiLink(input, folderUrl)
Same way we have :
returnValue = SPUtility.ConvertWikiLinkToHtmlLink(input, folderUrl)
Are some of the handy methods to try with.
Thank you
How to use SPUtility.TransferToErrorPage and SPUtility.TransferToSuccessPage?
Hi All,
I would like to sharean interesting think about SPUtility.TransferToErrorPage and SPUtility.TransferToSuccessPage.
Let’s take an example. Let us assume that we are working on webpart or any workflow aspx page and we want to navigate to Success Page of sharepoint Or Error Page of sharepoint.
Now if you use following:
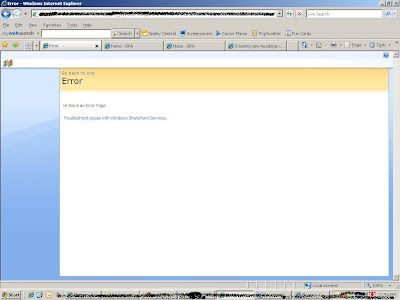
SPUtility.TransferToErrorPage("Hi this is an Error Page", "this is link", "{your_url}");
All you can see is this :
Click on the image to view in large scale.
Here observe that "Hi this is an Error Page" is the only option that set there, there is nothing related to the "this is link" and "your_url"
I wonder why, so i went down to MSDN to find out this :
Click Here
But :( didnt find anything helpful as there is no help given. Only thing given is paramters information.
So i digged in that and thought of a String.Format option just like we replaced {0},{1} with paramters passed (Remember Good old console application days !!!)
So i changed the code to :
SPUtility.TransferToErrorPage("Hi this is an Error Page {0}, {1}", "click here to Go to Top site", "{your_url}");
And it Worked. Here is a snapshot which depicts this :
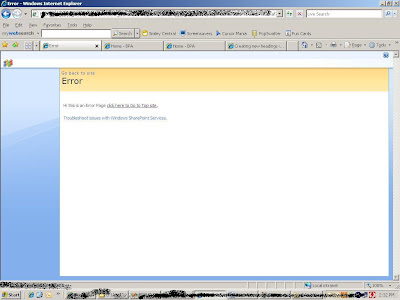
That's it. Your job is done.
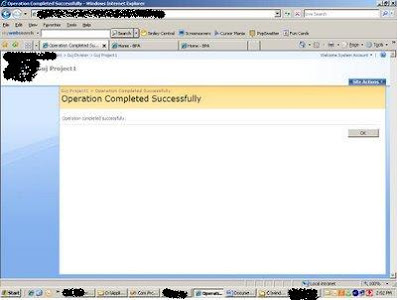
But i wonder how SPUtility.TransferToSuccessPage works. It workes fine for its own sake. It will redirect to Following Page :
But here i find hole.
Even if you use simple single overloaded mthod,
SPUtility.TransferToSuccessPage("Hi this is an Sucess Page");
Then also the above results come.
and second overloaded method :
SPUtility.TransferToSuccessPage("Hi this is an Sucess Page {0},{1}", "{url}", "This is Link","{url}");
SPUtility.TransferToSuccessPage("Hi this is an Sucess Page {0},{1},{2}", "{url}", "This is Link","{url}");
don't work fine except it navigates to same above figure , but not having any meaning of other paramters.
If you do come accorss, let me know also.
I would like to sharean interesting think about SPUtility.TransferToErrorPage and SPUtility.TransferToSuccessPage.
Let’s take an example. Let us assume that we are working on webpart or any workflow aspx page and we want to navigate to Success Page of sharepoint Or Error Page of sharepoint.
Now if you use following:
SPUtility.TransferToErrorPage("Hi this is an Error Page", "this is link", "{your_url}");
All you can see is this :

Click on the image to view in large scale.
Here observe that "Hi this is an Error Page" is the only option that set there, there is nothing related to the "this is link" and "your_url"
I wonder why, so i went down to MSDN to find out this :
Click Here
But :( didnt find anything helpful as there is no help given. Only thing given is paramters information.
So i digged in that and thought of a String.Format option just like we replaced {0},{1} with paramters passed (Remember Good old console application days !!!)
So i changed the code to :
SPUtility.TransferToErrorPage("Hi this is an Error Page {0}, {1}", "click here to Go to Top site", "{your_url}");
And it Worked. Here is a snapshot which depicts this :

That's it. Your job is done.
But i wonder how SPUtility.TransferToSuccessPage works. It workes fine for its own sake. It will redirect to Following Page :

But here i find hole.
Even if you use simple single overloaded mthod,
SPUtility.TransferToSuccessPage("Hi this is an Sucess Page");
Then also the above results come.
and second overloaded method :
SPUtility.TransferToSuccessPage("Hi this is an Sucess Page {0},{1}", "{url}", "This is Link","{url}");
SPUtility.TransferToSuccessPage("Hi this is an Sucess Page {0},{1},{2}", "{url}", "This is Link","{url}");
don't work fine except it navigates to same above figure , but not having any meaning of other paramters.
If you do come accorss, let me know also.
Sending mail using SPUtility.SendEmail method
Hi All,
There are many ways to send an email from code. One of the way is to use SPUtility class.
Here is a brief introduction of this method:
The SPUtility.SendEmail method enables you to send an email from the context of a SharePoint Web (SPWeb) object. The SMTP settings associated with the SPWeb object are used to send the email. The method returns a boolean value that represents whether the email was sent successfully.
There are four overloaded methods that support different parameter lists. Two of the overloaded methods support StringDictionary objects that are used to specify the message headers (such as the To, Cc, and Subject fields), while the other two overloaded methods enable you to pass the To and Subject fields as simple String objects.
Usage Scenario
You can use the SPUtility.SendEmail method to send emails for a variety of different scenarios, such as building a Web-based form to enable a user to send an email from a SharePoint application without requiring them to start their email client application, or incorporating email notifications as part of a business process or workflow in a SharePoint site.
The following code samples show how to use the SPUtility.SendEmail method.
That's it. Your job is done.
But I think the good option is to use one more method before using SendMail is that check if the mail server is properly configuerd for Web Application or not. this can be done by usign SPUtility.IsEmailServerSet method which returns true if server is configuerd with SMTP mail settings.
For making Due diligence, i removed Outbound SMTP Server from Outgoing e-mail settings in Operations from central administration and come to know that it just works fine.
If you dont have that configuerd the condition will be false and mail will not be sent.
For more reference : Click Here
Thank you
There are many ways to send an email from code. One of the way is to use SPUtility class.
Here is a brief introduction of this method:
The SPUtility.SendEmail method enables you to send an email from the context of a SharePoint Web (SPWeb) object. The SMTP settings associated with the SPWeb object are used to send the email. The method returns a boolean value that represents whether the email was sent successfully.
There are four overloaded methods that support different parameter lists. Two of the overloaded methods support StringDictionary objects that are used to specify the message headers (such as the To, Cc, and Subject fields), while the other two overloaded methods enable you to pass the To and Subject fields as simple String objects.
Usage Scenario
You can use the SPUtility.SendEmail method to send emails for a variety of different scenarios, such as building a Web-based form to enable a user to send an email from a SharePoint application without requiring them to start their email client application, or incorporating email notifications as part of a business process or workflow in a SharePoint site.
The following code samples show how to use the SPUtility.SendEmail method.
try
{
SPWeb thisWeb = SPControl.GetContextWeb(Context);
if (SPUtility.IsEmailServerSet(thisWeb ))
{
string toField = "someone@microsoft.com";
string subject = "Test Message";
string body = "Message sent from SharePoint";
bool success = SPUtility.SendEmail(thisWeb,true, true, toField, subject, body);
}
}
catch (Exception ex)
{
// handle exception
}
That's it. Your job is done.
But I think the good option is to use one more method before using SendMail is that check if the mail server is properly configuerd for Web Application or not. this can be done by usign SPUtility.IsEmailServerSet method which returns true if server is configuerd with SMTP mail settings.
For making Due diligence, i removed Outbound SMTP Server from Outgoing e-mail settings in Operations from central administration and come to know that it just works fine.
If you dont have that configuerd the condition will be false and mail will not be sent.
For more reference : Click Here
Thank you
XML CDATA and PCDATA Sections
Hi All,
I would like to bring a point on table about CDADA and PCDATA sections in XML Document.
PCDATA - Parsed Character Data
XML parsers normally parse all the text in an XML document.
When an XML element is parsed, the text between the XML tags is also parsed:
<message>This text is also parsed</message>
The parser does this because XML elements can contain other elements, as in this example, where the <name> element contains two other elements (first and last):
<name><first>Bill</first><last>Gates</last></name>
Parsed Character Data (PCDATA) is a term used about text data that will be parsed by the XML parser.
CDATA - (Unparsed) Character Data
The term CDATA is used about text data that should not be parsed by the XML parser.
Characters like "<" and "&" are illegal in XML elements.
"<" will generate an error because the parser interprets it as the start of a new element.
"&" will generate an error because the parser interprets it as the start of an character entity.
Some text, like JavaScript code, contains a lot of "<" or "&" characters. To avoid errors script code can be defined as CDATA.
Everything inside a CDATA section is ignored by the parser.
A CDATA section starts with "<![CDATA[" and ends with "]]>":
<script>
<![CDATA[
function GreaterThan(a)
{
if (a > 50) then
{
return 1;
}
else
{
return 0;
}
}
]]>
</script>
In the example above, everything inside the CDATA section is ignored by the parser.
Notes on CDATA sections:
A CDATA section cannot contain the string "]]>". Nested CDATA sections are not allowed.
The "]]>" that marks the end of the CDATA section cannot contain spaces or line breaks.
Lets have a simple scenario why we need this or where this can be useful.
Lets say you are developing a page or control for a list and you have some handy static logic that you want to fix in that.
Lets take an simple example saying that the value you pass in textbox can not greater than 50.
So what we can do is that use CDATA secion in XML with any tag. All you need to do is write you entire javascript in XML tag in CDATA secion. Fetch that node in Code using XMLDocument or any other XML class method.
and use Server side registration for client script. here your script will be coming from XML, so whenever you want to change the script, all you have to do is just change the XML and you are done with that.
I hope that sounds good and you got a good idea about how to use CDATA secion and use it for futire use.
Click here to refer more about XML
Thursday, May 29, 2008
How to write a code that uses other web application?
Hi All,
Sometimes we may require to access some other web application in our code. But there must be several check to be done before writing this code.
The account in which application pool is configuerd for current web application must have database permission for other database of second web application's application pool.
Once you make sure this, then you can start working with cross-web application code access.
Thank you
Removing workflow instance from List Item
Hi All,
May times we want to terminate the workflow from list Item.
Here is a way you can accomplish this :
Let's say you are working with the workflow and workflow is attached with the list. So change in the list item triggers the workflow, then the following code will remove the workflow instance on that Item.
That's it. Your job is done.
Thank you
May times we want to terminate the workflow from list Item.
Here is a way you can accomplish this :
Let's say you are working with the workflow and workflow is attached with the list. So change in the list item triggers the workflow, then the following code will remove the workflow instance on that Item.
workflowProperties.Site.WorkflowManager.RemoveWorkflowFromListItem(workflowProperties.Workflow);
That's it. Your job is done.
Thank you
SharePoint Spin Wheel “Operation in Progress”
Using Custom programming within SharePoint always takes time to execute and create a issue with impatient client. Client always think that we have not done a good job with coding so it will take a long time. Some time if some long operation is going on like creation of site or something like that then 3rd person thinks like process is hang up.
So what we need to do is that do some indication screen like “In progress”.
And the exciting news is SharePoint is providing built in function for “Operation in Progress” spinning wheel and object is called as “SPLongOperation”.
You can use this object in various places like creating a custom SharePoint site, setting up properties, creating a Project in Different server, calling a web services, updating/adding multiple items in SharePoint…. Etc.
Check the following snippet which is used in webpart.
How it works?
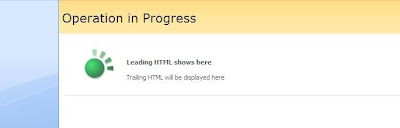
SPLongOperation has LeadingHTML properties which Shows message in Bold and TrailingHTML property shoes second a little large message.
Begin () method starts spinning wheel at a time on the same page.
You can find in debug mode that after execution of that line wheel appear on the screen.
All the code execute under wheel until you call End() function.
The End() method will take URL as parameter and will redirect to your desired page.
Special thanks to Brian Caauwe for his post which guide me to solve my headache.
So what we need to do is that do some indication screen like “In progress”.

And the exciting news is SharePoint is providing built in function for “Operation in Progress” spinning wheel and object is called as “SPLongOperation”.
You can use this object in various places like creating a custom SharePoint site, setting up properties, creating a Project in Different server, calling a web services, updating/adding multiple items in SharePoint…. Etc.
Check the following snippet which is used in webpart.
void Button1_Click(object sender, EventArgs e)
{
SPLongOperation longoperation = new SPLongOperation(this.Page)
longoperation.LeadingHTML = "Leading HTML shows here";
longoperation.TrailingHTML = "Trailing HTML will be displayed here";
longoperation.Begin();
// Code which will take time…
longoperation.End(strURL);
}
How it works?
SPLongOperation has LeadingHTML properties which Shows message in Bold and TrailingHTML property shoes second a little large message.
Begin () method starts spinning wheel at a time on the same page.
You can find in debug mode that after execution of that line wheel appear on the screen.
All the code execute under wheel until you call End() function.
The End() method will take URL as parameter and will redirect to your desired page.
Special thanks to Brian Caauwe for his post which guide me to solve my headache.
U2U Lovers - Good news!!!
Hi All,
I come to know that now famous U2U CAML Query builder tool has launched a web version of it and surprise --- it can be installed as a feature!!!!
Please check this out :
DownLoad U2UCAMLQuery builder
About How to install this: Click Here
Thank you
I come to know that now famous U2U CAML Query builder tool has launched a web version of it and surprise --- it can be installed as a feature!!!!
Please check this out :
DownLoad U2UCAMLQuery builder
About How to install this: Click Here
Thank you
Adding site column to the list at any site level
Hi All,
May times we require to add columns defined at root web level to any site at child level.
Here is a simple way to accomplish this :
Make one function like this :
That's it. Your job is done.
Thank you
May times we require to add columns defined at root web level to any site at child level.
Here is a simple way to accomplish this :
Make one function like this :
private void AddSiteColumnToList(string sitePath, string listName, string columnName)
{
using (SPSite site = new SPSite(sitePath))
{
using (SPWeb web = site.OpenWeb())
{
using (SPWeb root = site.RootWeb)
{
//Take the site column from the root web
SPField fld = root.Fields[columnName];
//get the list from the site
SPList list = web.Lists[listName];
//add the column
list.Fields.Add(fld);
//update the list
list.Update();
}
}
}
That's it. Your job is done.
Thank you
Changing name of column in List or document library issue
Hi All,
There are certain things that really takes our attention. One of them is following:
1) you can change the name of Title column in list but internal name will remain Title itself. So even you chanaged name of Title to lets say Name, then also Name column will be refered as Title only.
2) The same is also true for other fields, lets say i have added one more field named "Address", then once you add the field in the list of document library and if you change the name to Address1, then also field Name will remain Address itself rarger than Address1.
This is something to keep in mind while developing.
Thank you
Wednesday, May 28, 2008
How to Modify the web.config file in SharePoint using SPWebConfigModification?
Hi All,
there is one very interesting class that can be used to modify web application's web.config class.
SPWebConfigModification is the class that can be used to accomplish this kind of work.
The SPWebApplication class has a SPWebConfigModifications collection property that contains all the modifications (SPWebConfigModification objects) made to this web application's web.config file. This is also where we can add new modifications and have them applied to the web.config – or remove them.
Here is a small example which demonstrate you the functionality.
Here is a sample of what the web.config..
<configuration>
<system.web>
<customErrors mode="On">
<system.web>
<configuration>
Here is a sample example which does this task of changing the attribute to a value of "Off".
That's it. Your job is done.
This is seriously something which is very interesting. As i will find some more methods and more details, i will sure put my knowledge regarding this.
there is one very interesting class that can be used to modify web application's web.config class.
SPWebConfigModification is the class that can be used to accomplish this kind of work.
The SPWebApplication class has a SPWebConfigModifications collection property that contains all the modifications (SPWebConfigModification objects) made to this web application's web.config file. This is also where we can add new modifications and have them applied to the web.config – or remove them.
Here is a small example which demonstrate you the functionality.
Here is a sample of what the web.config..
<configuration>
<system.web>
<customErrors mode="On">
<system.web>
<configuration>
Here is a sample example which does this task of changing the attribute to a value of "Off".
private void SimpleSample()
{
// Get an instance of my local web application
SPWebApplication webApp = new SPSite("http://localhost").WebApplication;
// Create my new modification to set the mode attibute to "Off".
// Example:
SPWebConfigModification modification = new SPWebConfigModification("mode", "system.web/customErrors");
modification.Owner = "SimpleSampleUniqueOwnerValue";
modification.Sequence = 0;
modification.Type = PWebConfigModification.SPWebConfigModificationType.EnsureAttribute;
modification.Value = "Off";
// Add my new web.config modification.
webApp.WebConfigModifications.Add(modification);
// Save web.config changes.
webApp.Farm.Services.GetValue().ApplyWebConfigModifications();
// Serialize the web application state and propagate changes across the farm.
webApp.Update();
}
That's it. Your job is done.
This is seriously something which is very interesting. As i will find some more methods and more details, i will sure put my knowledge regarding this.
How to set custom master page as default master page with site definition in Moss and WSS 3.0?
Changing a default master page for our custom need is not at all good idea and creating a custom master page and use it as default master page is a headache.
Here is the way to create and use your custom master page with site definition.
Go to “C:\Program Files\Common Files\Microsoft Shared\web server extensions\12\TEMPLATE\GLOBAL” where you can find default master page (default.master).
Copy that default.master and pest it with customdefault.master or your own custom name.
(Note: while copying default.master please take care that you must not have already modified It. Use a fresh copy)
Put your custom master page at same location as default.master.
Now go to “12\TEMPLATE\GLOBAL\XML” open “ONET.xml”
At the last you will find module tag which provision “default.master” same way add your entry for custom.master.
This code will automatically put your custom masterpage into the masterpage gallery when a new site is created.
Now open your onet.xml file from 12/template/SiteTemplates
Change the default masterpage to the new one.
Find <Configuration> tag
Add MasterUrl attribute like MasterUrl=”_catalogs/masterpage/customdefault.master” and if you already have this tag change it with your custom master page.
So it will look like
Now the new site created with this definition have this master page as default master page. Click here for more info.
What about already existing site?
For that you need to put master page manually and change master page url for each wab
Here is the code snippet (only for setting master page url of the web):
Note: use this snippet carefully. If you run this snippet and you do not have Master page in Master page gallery for that web you will get master or page not found error.
This kind of snippet you will find in Inside WSS 3.0 book
Here is the way to create and use your custom master page with site definition.
Go to “C:\Program Files\Common Files\Microsoft Shared\web server extensions\12\TEMPLATE\GLOBAL” where you can find default master page (default.master).
Copy that default.master and pest it with customdefault.master or your own custom name.
(Note: while copying default.master please take care that you must not have already modified It. Use a fresh copy)
Put your custom master page at same location as default.master.
Now go to “12\TEMPLATE\GLOBAL\XML” open “ONET.xml”
At the last you will find module tag which provision “default.master” same way add your entry for custom.master.
<Modules>
<Module Name="DefaultMasterPage" List="116" Url="_catalogs/masterpage" RootWebOnly="FALSE">
<File Url=" customdefault.master" Type="GhostableInLibrary" IgnoreIfAlreadyExists="TRUE" />
<File Url="default.master" Type="GhostableInLibrary" IgnoreIfAlreadyExists="TRUE" />
</Module>
</Modules>
This code will automatically put your custom masterpage into the masterpage gallery when a new site is created.
Now open your onet.xml file from 12/template/SiteTemplates
Change the default masterpage to the new one.
Find <Configuration> tag
Add MasterUrl attribute like MasterUrl=”_catalogs/masterpage/customdefault.master” and if you already have this tag change it with your custom master page.
So it will look like
<Configuration ID="0" Name="YOUR NAME" MasterUrl="_catalogs/masterpage/customdefault.master">
Now the new site created with this definition have this master page as default master page. Click here for more info.
What about already existing site?
For that you need to put master page manually and change master page url for each wab
Here is the code snippet (only for setting master page url of the web):
Note: use this snippet carefully. If you run this snippet and you do not have Master page in Master page gallery for that web you will get master or page not found error.
SPSite spsite = new SPSite("Your site name");
foreach (SPWeb Myweb in spsite.AllWebs)
{
string masterurl = Myweb.ServerRelativeUrl;
if (!masterurl.EndsWith(@"/"))
masterurl = masterurl + @"/";
Myweb.MasterUrl = masterurl + "_catalogs/masterpage/customdefault.master";
Myweb.Update();
}
This kind of snippet you will find in Inside WSS 3.0 book
Extended properties in Tasks and Workflow History List
Hi All,
When you add any column to the Tasks list and also to the Workflow history list, that time you can add values in that column with the help of extendedproperties not with the properties.
Basically what happens is when you add column, you should be able to access values and assign values as Properties. But here you have to use extendedproperties collection.
In bottom line, what happens is if any of the key name does not match with existing column, it gets written in SPListItem.Properties according to this article .
But what i have noticed is that SPWorkflowTaskProperties.ExtendedProperties does not corelate with SPWorkflowTaskProperties.Properties because if you are adding field then you should be able to access it with SPWorkflowTaskProperties.Properties, but that is not the case, you have to use ExtendedProperties.
I am not sure about this being bug or not. But this was the case happened with me. So i thought this is something to share with all.
Thank you
How to know if user is a member of specific group?
Hi All,
Sometimes we may require to know if current logged-in user is a member of any specific group or not?
Here is a simple way to accomplish this. But just make sure that user under which the code is running is having sufficient rights to access the groups in web.
Becuase make sure that the code that runs under ElevatedPrivileges will be running under system account and you will never be able to take the current user in that code.
if ( web.Groups["Group_Name"].ContainsCurrentUser )
{
// code implementation
}
This condition simple checks if the user is in specific group or not.
That's it. Your job is done.
Tuesday, May 27, 2008
Calling MOSS web services through code
Hi All,
There are many way to code. One way is to use Sharepoint object model, Other way is to use web services to communicate with server and code it.
Here is a way how we can use web services to accomplish our tasks.
Before we start looking in this, let me give you highlights of where these web services are located and later we will see that how these can be used.
All Web services are inside "_vti_bin"
WSS Web Services Web Reference
Administration Service http:///_vti_adm/admin.asmx
Alerts Service http:///_vti_bin/alerts.asmx
Document Workspace Service http:///_vti_bin/dws.asmx
Forms Service http:///_vti_bin/forms.asmx
Imaging Service http:///_vti_bin/imaging.asmx
List Data Retrieval Service http:// /_vti_bin/dspsts.asmx
Lists Service http:///_ vti_bin/lists.asmx
Meetings Service http:/// _vti_bin/meetings.asmx
Permissions Service http:// /_vti_bin/permissions.asmx
Site Data Service http:///_vti_bin/sitedata.asmx
Site Service http:///_vti_bin/sites.asmx
Users and Groups Service http:///_vti_bin/usergroup.asmx
Versions Service http:///_vti_bin/versions.asmx
Views Service http:///_vti_bin/views.asmx
Web Part Pages Service http:// /_vti_bin/webpartpages.asmx
Webs Service http:///_vti_bin/webs.asmx
The SharePoint web services only accept calls from existing SharePoint users and do also enforce access security. Import the System.Net namespace into your project and then use the NetworkCredential class to set the user credential to use for the web service call. Here is a code snippet:
public static XmlNode VersionsGetVersions(string SharePointHost, string UserName, string Password, string Domain, string FileName)
{
// proxy object to call the Versions web service
Versions.Versions VersionsService = new Versions.Versions();
// the user credentials to use
VersionsService.Credentials = new NetworkCredential(UserName, Password, Domain);
VersionsService.Url = SharePointHost + "_vti_bin/Versions.asmx";
// gets the file versions
XmlNode Result = VersionsService.GetVersions(FileName);
// dispose the web service object
VersionsService.Dispose();
return Result;
}
If the user does not exist in SharePoint or does not have the permission to perform the operation then a WebException is thrown by SharePoint. The returned HTTP status is 401, which means unauthorized request
That's it. your job is done.
Writing and debugging event handlers for Project Server 2007
Hi All,
There are many scenarios where we are required to write an event handlers for Project Server.
Here is a good link for that. Click Here
There are many scenarios where we are required to write an event handlers for Project Server.
Here is a good link for that. Click Here
Building escalation workflow in Visual Studio
Hi All,
There is a good link for demontrating how to create escalation workflow in visual studio 2005 with video streaming.
check this out : Click Here
There is a good link for demontrating how to create escalation workflow in visual studio 2005 with video streaming.
check this out : Click Here
MOSS capabilities with different browsers
Hi All,
Ever wonder about MOSS capabilities with different browsers?
Well then, check this out : Click Here
Ever wonder about MOSS capabilities with different browsers?
Well then, check this out : Click Here
How to Disable the Default Out-of-Box site definitions in SharePoint 2007?
Hi All,
May times we are required to create a site from site templates.
But there are certain scenarios where you do not want creators to create any site that are based on default site definitions. You forcefully make user create site from your own site definition.
Here is a way how you can remove built-in site definitions.
But before doing this make sure that you take backup of the following files that you are going to change or remove.
We will work with this path:
C:\Program Files\Common Files\Microsoft Shared\web server extensions\12\TEMPLATE\1033\XML\
WEBTEMP.XML - This will remove Collaboration and Meeting sites and tabs
WEBTEMPSPS.XML - This will remove templates for the Publishing Tab
WEBTEMPSRCH.XML - This will remove Search Templates
WEBTEMPOFFILE.XML - This will remove Records Center
WEBTEMPBDR.en-us.XML - This will remove Document Center
Change 'Hidden = False' with 'Hidden = True' for the definition you would like to hide.
Site creators are now forced to create new sites based on one of the template that you have customized for them
Deploying MOSS 2007 to Windows Server 2008
Hi All,
For those of you who are interested in deploying MOSS 2007 to Windows Server 2008 remember that a Windows Server 2008 deployment requires SP1. Unfortunately this means that you have to create a slip stream deployment yourself since one has not yet been released. I came across a nice little blog entry by Ben Curry that provides instructions for doing so and I thought I would pass it along.
For more information : Click Here
How to get to the WebPart Maintenance Page?
If you want a quick and easy way to get to the WebPart Maintenance Page simple append the following to the URL for any page: "?content=1". So for instance if you are at the default page your URL will look like this: http://portal.demo.com/pages/default.aspx. If you need to open the WebPart Maintenance page at this location you would add the above to the end of the URL as follows: http://portal.demo.com/pages/default.aspx?contents=1. This will open the WebPart Maintenance page for this location.
For more information : Click Here
For more information : Click Here
How to get logged in User in Web Part?
Hi All,
May times we need to know the name of the user who is logged in currently in your site in web part code.
Here is a simple way you can accomplish this :
WindowsPrincipal p = Thread.CurrentPrincipal as WindowsPrincipal;
string strLoggedInUser = p.Identity.Name;
Use WindowPrincipal class to get the Name. This will return you Domain_Name/UserName combination.
How to create and add view dynamically though code in a list?
Hi All,
May times we need to create view dynamically and then add that created view to the List.
Here is a simple way to accomplish this task.
First make a StringCollection object.
System.Collections.Specialized.StringCollection viewFields = new System.Collections.Specialized.StringCollection();
then add Fields from list in the StringCollection object.
For example you want to create a new view with this 4 fields from list then,
viewFields.Add("LinkTitle");
viewFields.Add("Project_x0020_Type");
viewFields.Add("Job_x0020_Number");
viewFields.Add("Legacy_x0020_Job_x0020_Number");
String strQuery = "{Your CAML Query}";
This Query is for fetching all records where Title column is not blank. you can customize this query accordig to your requirement.
objTaskList.Views.Add("ViewName", viewFields, strQuery, 10000, false, true);
//to make just crteated view as default view
objTaskList.Views["ViewName"].DefaultView = true;
objTaskList.Update();
That's it. your job is done.
How to change default view of any list?
Hi All,
May times we need to make our own view and want to make that view as default view. So here we need to change AllItems View to your own created view.
Here is a simple way to do this.
SPWeb objWeb = {current_web};
SPList objTaskList = objWeb.Lists["Tasks"];
objWeb.AllowUnsafeUpdates = true;
objTaskList.Views["MyViewName"].DefaultView = true;
objTaskList.Update();
objWeb.AllowUnsafeUpdates = false;
That's it. Now you have your vreated view as default view.
Saturday, May 24, 2008
How to get List Data in DataTable form
If you want to fetch the data from a custom list in the form of DataTable then use the following code snippet:
SPSite site = new SPSite(SPContext.Current.Site.Url); // To get the current site
SPList list = site.OpenWeb().Lists["ListName"]; //Getting instance of the list
DataTable dtList = list.Items.GetDataTable(); // Get list data in datatable
SPSite site = new SPSite(SPContext.Current.Site.Url); // To get the current site
SPList list = site.OpenWeb().Lists["ListName"]; //Getting instance of the list
DataTable dtList = list.Items.GetDataTable(); // Get list data in datatable
How to Debug a code from SharePoint site?
Most of the times we face the problem while developing that how to debug the code written to create a web part or event handler. Here is the solution for it:
- Refresh your site once and then in Visual Studio Press ALT + D + P
- Make sure that the debugging mode is 'Managed Code' and not the native which is default value.
- You will see there will be a process by the name w3wp.exe . Select it and press attach.
- Now raise the event through the sharepoint site.
Friday, May 23, 2008
How to edit list forms like NewForm.aspx, EditForm.aspx and DispForm.aspx in MOSS?
Most common question among SharePoint customization is that
If we need to edit New/Edit/Display Form of list most of the time we are using SharePoint designer.
But here is the one nice trick to achieve this functionality.
Just add “&ToolPaneView=2” at the end of the URL and refresh the page.
So that you’re URL will be like this.
You can see add webpart tool pan beside this web part.
And that will take you to this type of page.
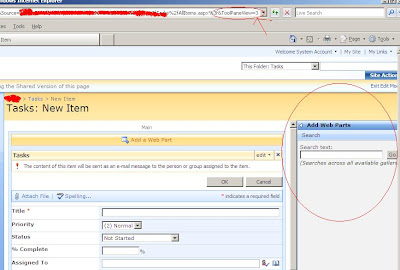
This will allow you to search webpart across all available galleries
Cheers once again...
“Why Edit Page option is not available in list forms like NewForm.aspx, EditForm.aspx and DispForm.aspx?”
If we need to edit New/Edit/Display Form of list most of the time we are using SharePoint designer.
But here is the one nice trick to achieve this functionality.
Just add “&ToolPaneView=2” at the end of the URL and refresh the page.
So that you’re URL will be like this.
http://sharepointkings/... /Lists/Demo/NewForm.aspx?RootFolder...&Source=…&ToolPaneView=2
http://sharepointkings/... /Lists/Demo/EditForm.aspx?RootFolder...&Source=…&ToolPaneView=2
http://sharepointkings/... /Lists/Demo/DispForm.aspx?RootFolder...&Source=…&ToolPaneView=2
You can see add webpart tool pan beside this web part.

Just add or remove your webpart and your work is done.
cheers
Below contents are Update as on 22/07/08
There is one more parameter with the same name just pass the value 3 with that.
So that you’re URL will be like this.
http://sharepointkings/... /Lists/Demo/NewForm.aspx?RootFolder...&Source=…&ToolPaneView=3
And that will take you to this type of page.

This will allow you to search webpart across all available galleries
Cheers once again...
Thursday, May 22, 2008
How to get igoogle and Google Talk on a Sharepoint Page

To get Google Talk on a Sharepoint Page:
Google Talk can now be added to your blog as a gadget.
Drag a ContentEditorWebpart on your SharePoint Page.
Click on the "Source Editor" button in the Toop Pane on the right side.
Past the following HTML stuff in the Source Editor dialog box:
<iframe width="234" frameborder="0" src="http://talkgadget.google.com/talkgadget/client?fid=gtalk0&relay=http%3A%2F%2Fwww.google.com%2Fig%2Fifpc_relay" height="350"></iframe>
The Google Talk Gadget lets you send instant messages, transfer files, make voice calls (to other Google Talk users) and leave voicemail messages. If you paste a Picasa Web Album or YouTube URL into a chat session, the gadget gives you an instant preview of the photos and videos.
To get any page say igoogle on a Sharepoint Page:
Drag a ContentEditorWebpart on your SharePoint Page.
Click on the "Source Editor" button in the Toop Pane on the right side.
Past the following HTML stuff in the Source Editor dialog box:
<iframe width="1000" height="500" frameborder="0" src="http://www.google.com/ig?referrer=ign" width="500" height="300"></iframe>
Below Image shows both implementations:
Try out the stuff here it self:
"Thoda Aur Wish Karo"
Wednesday, May 21, 2008
How to Implement Live Chat in Sharepoint
This feature of the Windows Live Messenger application enables you to actually add a web-based messenger to your site or blog.
Check out http://settings.messenger.live.com/applications/websettings.aspx to create one for yourself.
I will explain in brief.
Here http://settings.messenger.live.com/applications/WebSettings.aspx
you will see a setting for "Show your Messenger Status on the Web"
The checkbox "Allow websites to see your Messenger status and send you messages"
will allow any one to message you from the gadget.
You can place the gadget on any web page by copying the html code.
To get the HTML code click here
http://settings.messenger.live.com/applications/CreateHtml.aspx
At the bottom you will find these instructions.
"Copy the HTML and paste it into your webpage"
Open your sharepoint page in browser.
Drag and Place a ContentEditorWebPart there.
In it's Source Editor, Past the HTML Code that you have copied.
That's It. Dude now people can catch you and chat with you.
They from the Gadget and you from your MSN Messenger.

For Further Queries Begin a conversation with the "Kings" ;)
Chat Here
How to remove workflow from List Item
Hi All,
There is a way how we can remove workflow from List Item.
Sometimes we may require to remove workflow from list item. Even to terminate sometime we require to remove workflow. There are certain stage where we are not able to terminate the workflow, there other option is that we remove the workflow from item.
So here is the way we can accomplish this task:
Let us assume that we have workflow attached to a list level. And we trigger the workflow on every update of the Item.
And in our workflow somewhere we require to remove the current workflow if certain action is taken.
So, When you are working with workflow, then it is on Item level.
so writing following code will remove workflow from Item.
But also make sure that whereever you are referring workflow instance Id, you will lost that link, so take care of that also, because now as workflow is removed, you dont have the workflow instance id.
That's it. Your job is done.
There is a way how we can remove workflow from List Item.
Sometimes we may require to remove workflow from list item. Even to terminate sometime we require to remove workflow. There are certain stage where we are not able to terminate the workflow, there other option is that we remove the workflow from item.
So here is the way we can accomplish this task:
Let us assume that we have workflow attached to a list level. And we trigger the workflow on every update of the Item.
And in our workflow somewhere we require to remove the current workflow if certain action is taken.
So, When you are working with workflow, then it is on Item level.
so writing following code will remove workflow from Item.
workflowProperties.Site.WorkflowManager.RemoveWorkflowFromListItem(workflowProperties.Workflow);
But also make sure that whereever you are referring workflow instance Id, you will lost that link, so take care of that also, because now as workflow is removed, you dont have the workflow instance id.
That's it. Your job is done.
Tuesday, May 20, 2008
How to hide a column of SharePoint list in different mode (Add / Edit / Display Mode)?
Most of the time we have requirement like that this field should be shown only in new mode or it should not be shown only in Edit mode not in new mode.
in simple word every one is asking the same question
"How to hide a column of SharePoint list in different mode (Add / Edit / Display Mode)?"
We can hide it in view by not to show in grid view but what to do if you do not want to see that field in Dispforms.aspx?
Here is the way how to do that.
Check the code snippet first
This SPField has following properties.
All the properties shows their setting meaning by their name.
Just set the properties you want and uodate field and list.
See the magic.
Another problem is after hiding column how to set its data?
In event handler / item handler you can use
You will get your result.
Only thing to keep in mind that
If column is hidden then u cannot retrieve its value.
Some time it will show error
If you get these error there is only two scenarios is there.
1) If you have any custom field then it was not properly installed.
2) If you have do not have the field with that name and you are assigning value to it.
Just do a due diligence and check this two scenarios and your error might be solved.
in simple word every one is asking the same question
"How to hide a column of SharePoint list in different mode (Add / Edit / Display Mode)?"
We can hide it in view by not to show in grid view but what to do if you do not want to see that field in Dispforms.aspx?
Here is the way how to do that.
Check the code snippet first
SPSite objSite = SPContext.Current.Site;
SPWeb objWeb = objSite.OpenWeb();
SPList objList = objWeb.Lists[“Name of the list”];
SPField objField = objList.Fields[“Name of the column”];
This SPField has following properties.
objField.ShowInDisplayForm //show in display mode(dispform.aspx)
objField.ShowInEditForm //show in edit mode(editform.aspx)
objField.ShowInListSettings //show in list setting page of list where u can set order or remove that field.
objField.ShowInNewForm //show in new form (newform.aspx)
objField.ShowInVersionHistory // displayed in the page for viewing list item versions. objField.ShowInViewForms //show in grid view
All the properties shows their setting meaning by their name.
Just set the properties you want and uodate field and list.
objField.Update();
objList.Update();
See the magic.
Another problem is after hiding column how to set its data?
In event handler / item handler you can use
properties.AfterProperties[“Internal name of that column”] = “assign text”;
You will get your result.
Only thing to keep in mind that
If column is hidden then u cannot retrieve its value.
Some time it will show error
“One or more field types are not installed properly. Go to the list settings page to delete these fields.”
If you get these error there is only two scenarios is there.
1) If you have any custom field then it was not properly installed.
2) If you have do not have the field with that name and you are assigning value to it.
Just do a due diligence and check this two scenarios and your error might be solved.
SharePoint Sites on the internet
SharePoint Sites on the internet.
There is always a question deep inside any novice in SharePoint development. The question “Any live SharePoint sites on the internet?”
Here are some samples, production sites out there that we can look at and learn from.
Follow the links and see what wonders SharePoint can do to your organization.
http://live.sharepointcommunity.de/templates/default.aspx
www.wssdemo.com
http://www.sharepointshow.com/default.aspx
registration pages for www.mindsharp.com
http://beta.hedkandi.com/Pages/default.aspx
http://new.culminisconnections.com/default.aspx
http://www.wssdemo.com/default.aspx
http://www.alphamosaik.com/Pages/default.aspx
New! Ofgem - http://www.ofgem.gov.uk - built by Parity
Plymouth Hospitals NHS Trust - http://www.plymouthhospitals.nhs.uk - built by ContentAndCode
The Body Shop - http://www.wise-woman.net/ - built by ContentAndCode
Fifteen - http://www.fifteen.net/ - built by ContentAndCode
LloydsTSB - www.shareview.co.uk - built by Conchango
Corgi - www.trustcorgi.com - built by ArtemisCorp
Ministry of Sound - www.hedkandi.com - built by cScape
Do post if you get more.
A quick way to remove a Web Part which is crashing your Web page/web part page maintenance page
If you are building a web part and is crashing the webpage, here is a quick way to remove it and get the rest of the page working.
Add contents=1 at the end of the url.
For example, if the page url is http://sharepointkings/test1/default.aspx then change it to http://sharepointkings/test1/default.aspx?contents=1.
See the url in the below image:
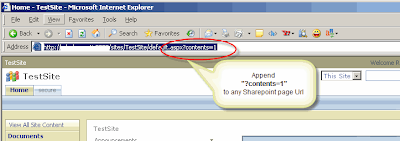
This will bring up the web part page maintenance page and lists all the webparts that are used in that page and provides way to delete selected web parts , switch view or reset.
See the below image showing the web part page maintenance page.
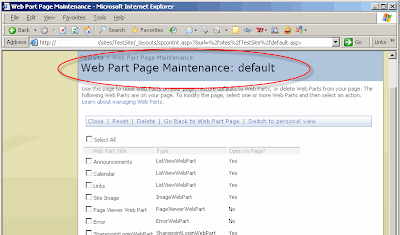

How to add Content Type through Feature?
Hi all,
Here is the way how to create a Content type through feature.
Steps:
1) Create a feature (I hope you know how to create a feature or go to this MSDN link.)
2) In element.xml add following xml tag
<ContentType
ID="0x010100BC4AA99D05D3488e95993BA063E6F6A2"
Name="Name of Content Type"
FeatureId="{E282F40C-1ECD-47d7-9E6A-BD3FBDA8500C}"
Description="Description of Content Type"
Group="Your Own Group"
Version="1">
<DocumentTemplate TargetName="your template.doc" />
</ContentType>
<Module Name="Name of Content Type"
SetupPath="Features\Feature_ContentTypes" Path=""
Url="_cts/Name of Content Type">
<File Url="your template.doc" />
</Module>
3) Explanation of this tag,
ID = new generated content type ID [0x010100<NEW GUID without hyphen>]
FeatureId = feature id used in feature.xml
Group = your group name if group exist then it will create a new group in content type.
DocumentTemplate = name of your document/excel template
4) Module will relate your template to content type.
Name = name of your content type. Same as content type name.
SetupPath = relative path for physical template as we are putting our template in feature folder.
Path= no need to give as we are using SetupPath.
Url = all the content type template wil be saved in _cts folder. You can see this folder in sharepoint designer only. After “_cts/<Name of content type>” shold be same as Module name and ContentType name.
File Url = this will be name of document.
All done.
Only need to install the feature and activate the feature.
You can refer How to add document library with folders and content types through feature/site definition.
AutoCleanupDays in Workflow
Hi All,
the problem with the workflow history is that you will lost your histor details after 60 days. 60 days is the period when you will lose your workflow history. its a built in mechanism of 60 days.
There can be multiple way of getting rid of this problem.
I would like to share two ways of doing it.
First is through code, Here is a way:
Assuming that objWorkflowAssociation is an object of type SPWorkflowAssociation, then
SPWorkflowAssociation objWorkflowAssociation;
objWorkflowAssociation.AutoCleanupDays = 9999;
Will set the cleanupdays to 9999 days. so you are now in relief to have your history till 9999 days instead of 60 days.
Second way :
Note the addition of an node in the following sample Element Manifest Xml:
<Elements ...>
<Workflow ...>
<metaData ...>
<AutoCleanUpDays>9999</AutoCleanupDays>
</MetaData>
</Workflow>
</Elements>
but Make sure that this might now work with built in workflows, but sure for your own created workflows.
That's it. That's two way we can accomplish this task.
Monday, May 19, 2008
Missing Completed Workflows History
Hi All,
Many times we require to have the history for the workflows which are completed.
The problem is once workflow is completed you don't find any way to check the history for it.
Actually when you are working with workflow, there is LogHistoryActivity which we can use to keep track of all actions that are performed through code.
But the problem is there's no way to find out the previous workflow history.
All you can do it make one more list which is having same number of fields and same type of fields in it just like workflowHistory list.
Fetch all data in eventhandler ItemAdded event of workflowHistory list and there in the code you add all datas that you want to enter into your own list. this way you can have these data of your change always in your list.
Hiding webpart and its properties through programming
Hi All,
There is a way how we can manage webparts placed at different page levels like "AllItems.aspx" , "default.aspx" etc.
To manipulate these webparts placed on pages you first need to make SPLimitedWebPartManager object and initialize it with calling GetLimitedWebPartManager of current site.
Once you have object of webpartmanager then you can use foreach loop to navigate to each webparts on that page and set several properties of it and finally call savechanges method of webpartmanager class and update the web.
Here is the way we can accomplish this task.
Microsoft.SharePoint.WebPartPages.SPLimitedWebPartManager mgr = null;
spWeb1.AllowUnsafeUpdates = true;
spWeb1.GetLimitedWebPartManager(
"default.aspx",
System.Web.UI.WebControls.WebParts.PersonalizationScope.Shared);
foreach (System.Web.UI.WebControls.WebParts.WebPart myWebPart in mgr.WebParts)
{
if (myWebPart.Title == "MyWebPart")
{
myWebPart.AllowEdit = false; //don't allow edit
myWebPart.AllowClose = false; // don't allow close
}
if (myWebPart.Title == "MySecondWebPart")
{
myWebPart.Hidden = true; //don't show webpart
}
}
mgr.SaveChanges(myWebPart);
spWeb1.Update();
spWeb1.AllowUnsafeUpdates = false;
That's it. your job is done.
Checking User rights at web and list level
Hi All,
There is a way how we can check if user is having specific rights on web as well as on list or not.
Here is a way how we can accomplish this task.
if (objWeb.DoesUserHavePermissions(SPBasePermissions.ViewFormPages) ||
objWeb.DoesUserHavePermissions(SPBasePermissions.ViewPages))
{
//Code implementation
}
Here, for example we check on web level, assuming objWeb is your web object. Rest permissions can also be checked by checking different SPBasePermissions base.
Same way we can also check for SPList object.
Here is the sample for it.
if(objWeb.Lists["Tasks"].DoesUserHavePermissions(SPBasePermissions.ViewFormPages))
{
//Code implementation
}
we are checking permissions on Tasks List, that can be replaced by any list name that you want to check.
Activating an installed feature through programming
Hi All,
Assuming that we have installed a feature but based on our requirement, we require to activate the feature, then we can accomplish this dynamically by code.
Here is the way we can accomplish this task.
Lets assume that spCurrentWeb is a web on which you want to activate the feature. you must be knowing features GUID.
spCurrentWeb.Features will return you all features installed at that site level and the you just add it to the feature collection to activate it.
spCurrentWeb.AllowUnsafeUpdates = true;
SPFeatureCollection featureCollect = spCurrentWeb.Features;
featureCollect.Add({"feature GUID"}, true);
spCurrentWeb.Update();
spCurrentWeb.AllowUnsafeUpdates = false;
That's it. you job is done. As soon as this feature is added to feature collection it will automatically activate if user has sufficient rights for it.
How to work with extended properties in Tasks List
Hi All,
workflow tasks lists is built in list which works tightly with Create Task, update Task and complete Task activity of workflow foundation. Setting several properties to these activites assignes task to user, update tasks of user and also removes tasks from user task list.
These all actions are taken care automatically.
Several times you still require that columns are not enough for your information in tasks list, you may require to store some additional data in that list. you can ofcourse create column through front end or from code, but assigning values to that columns (fields) is not stright forward process.
When you are adding your own fields in pre-defined list then these fields are actually called "Extended Properties", so you need to take care while assigning the values to these fields.
Here is the way you can accomplish this task.
Here is a create task bolck, But Comments and instructions are two more columns added. Values for these columns can be inserted as shown above.
For more information : Click Here
workflow tasks lists is built in list which works tightly with Create Task, update Task and complete Task activity of workflow foundation. Setting several properties to these activites assignes task to user, update tasks of user and also removes tasks from user task list.
These all actions are taken care automatically.
Several times you still require that columns are not enough for your information in tasks list, you may require to store some additional data in that list. you can ofcourse create column through front end or from code, but assigning values to that columns (fields) is not stright forward process.
When you are adding your own fields in pre-defined list then these fields are actually called "Extended Properties", so you need to take care while assigning the values to these fields.
Here is the way you can accomplish this task.
private void createTask(object sender, EventArgs e)
{
taskID = Guid.NewGuid();
taskProps.Title = "Demo Task";
taskProps.AssignedTo = assignee;
taskProps.Description = instructions;
taskProps.ExtendedProperties["comments"] = comments;
taskProps.ExtendedProperties["instructions"] = instructions;
}
Here is a create task bolck, But Comments and instructions are two more columns added. Values for these columns can be inserted as shown above.
For more information : Click Here
Adding Fields to List dynamically
Many times we requires to add a field in List. there are many alternative ways to add fields into a list. One of them is to add field dynamically through coding.
Here is a way how you can add field in list.
Assuming that tasks is a list object (SPlist) of your web and you want to add a field called "ApprovalStauts", then following line will add the field in list.
tasks.Fields.Add("ApprovalStauts", SPFieldType.Text, false);
tasks.Update()
Second parameter determines what type of field it is, i have supplied it ias simple text only that is equals to single line textbox,
Last parameter determines if the field that you are adding is required field or not. Here i supplied false, meaning its not required field.
and then just call tasks.Update() method to take effect. Just make sure that user has enough rights to add fields and also allowunsafeupdate is true on web level of that list.
Friday, May 16, 2008
Adding predefined list to site dynamically using SPListTemplateType
Many times we need to add predefined lists like Tasks List, WorkflowHistory List to our site using Code.
So here is the way we can accomplish this.
objClientsWeb.AllowUnsafeUpdates = true;
objClientsWeb.Lists.Add ( "{ListName}", "{Listdiscription}" ,SPListTemplateType.Tasks);
objClientsWeb.Lists.Add ( "{ListName}", "{Listdiscription}" ,SPListTemplateType.WorkflowHistory);
objClientsWeb.AllowUnsafeUpdates = false;
That's it your job is done.
Just Check user is having sufficient rights to add list to site.
Attaching event handlers to List and document library dynamically
Many times in code we requires to attach event handlers to list or to document library.
Here is the way we can accomplish this.
Method is same for both Document Library as well as List, just for safety point of view, i have caste List into Document Library to indicate that its a document library which is in tern actually a list.
Assuming i have SummaryReport as Document Lib and objClientsWeb is Web in which i have this Document Lib.
SPDocumentLibrary lstDataSummaryReport =
(SPDocumentLibrary)objClientsWeb.Lists["summaryReport"];
Check if same event handler is attached to it, just for precausion we check if there is no event handler is attached to it or not.
if (lstDataSummaryReport.EventReceivers.Count == 0)
{
objClientsWeb.AllowUnsafeUpdates = true;
string strAssembly = "{Project Assembly Name}, Version=1.0.0.0, Culture=neutral, PublicKeyToken={public key token of that project}";;
lstDataSummaryReport.EventReceivers.Add(SPEventReceiverType.ItemAdded, strAssembly,
"{classname}");
lstDataSummaryReport.Update();
objClientsWeb.AllowUnsafeUpdates = false;
}
Make sure of allowunsafeupdate on web is properly managed. Also make sure that User under which code is running must have rights to update this list. otherwise run the code in
SPSecurity.RunWithElevatedPrivileges(
delegate()
{
//Code
});
Which will run under System Account which is having all rights on web
Understanding What STSADM Does
Sure, STSADM extracts the CAB file and installs the Web part—but how precisely does it do that? The answer is that it depends. It depends on whether you use the global install or not.
Basically, STSADM does three things:
Copies the DLL files—If you're doing a non-global install the Assemblies are copied to the /bin directory of the IIS virtual server (Web site).If there's an associated PDB file it is copied to the /bin directory too. If you're installing globally then the DLL files are registered in the GAC rather than copied to the /bin directory. This, by the way, means that you won't be able to debug your application. You'll have to manually copy the PDB file into the GAC to make debugging work.
Safe Controls—If there are safe control entries in the assembly tags of the manifest.xml file they are added to the web.config. These will contain the assembly's strong name, if there is one.
The DWP files are copied to the /wpcatalog directory. If the DWP references an assembly with a strong name the DWP file will be renamed to the name of the assembly with an underscore followed by the version number, followed by another underscore, followed by the public key token, followed by yet another underscore, and finally the original DWP name.
For more information: Click Here
Why Deploy with STSADM?
Why Deploy with STSADM?
Before getting too deeply involved in fixing STSADM Web part deployments, it's important to understand what STSADM is and why it's a good platform for troubleshooting Web part deployment.
STSADM is a 'utility knife' type of tool that ships as a part of Windows SharePoint Services. It does a wide range of things from site creation to Web part pack installation. If you have SharePoint Services, you already have this utility; it is typically found in C:\Program Files\Common Files\Microsoft Shared\Web Server Extensions\60\Bin.
Alternative tools such as WPPackager just add additional complexity to the process by wrapping the installation in a Windows Installer file. Worse, these tools don't really gain you anything. At their core they're still using the same installation process by running STSADM or calling the Windows SharePoint Services object model calls that roughly equate to the STSADM options.
But whether you choose to download one of these tools or stick with the somewhat plain but very functional STSADM, learning how STSADM deploys Web parts is very valuable.
For more information : Click Here
BreakRoleInheritance throws Exception
Calling BreakRoleInheritance on a list throws exception if the method's CopyRoleAssignments parameter is set to false. Exception thrown is "The security validation for this page is invalid."
you can try folowwing option:
User true as the parameter and remove all permissions later in code.
you can try folowwing option:
User true as the parameter and remove all permissions later in code.
Play Video into a SharePoint Page
Hi All,
There is one more way to accomplish the same functionality.
Here is the way.
(1) Add content editor webpart.
(2) Click on modify shaerd webpart.
(3) Copy and paste the following content
(4)<div id="Player"> </div>
<script type="text/javascript">
function getParameter(szName)
{
// Get value out of supplied parameter
var szUrl = window.location.search;
szUrl = szUrl.toLowerCase();
szName = szName.toLowerCase();
var szValue = "";
var nBegin = szUrl.indexOf(szName);
if (nBegin != -1)
{
szValue = szUrl.substring(nBegin + (szName.length + 1));
}
var nEnd = szValue.indexOf("&");
if (szValue != "" && nEnd != -1)
{
szValue = szValue.substring(0, nEnd);
}
return szValue;
}
function wmpCreate(url) {
var str = "";
var agt = navigator.userAgent.toLowerCase();
var is_ie = (agt.indexOf("msie") != -1);
if (is_ie) {
// create the WMP for IE
str = '<object id="contentPlayer" classid="CLSID:6BF52A52-394A-11d3-B153-00C04F79FAA6" width="800" height="640">';
} else {
// create it for FF.
str = '<object id="contentPlayer" type="application/x-ms-wmp" data="'+url+'" width="800" height="640">';
}
str += '<param name="url" value=""/>';
str += '<param name="uiMode" value="full">';
str += '<param name="autoStart" value="-1" />';
str += '<param name="stretchToFit" value="-1" />';
str += '<param name="windowlessVideo" value="0" />';
str += '<param name="enabled" value="-1" />';
str += '<param name="enableContextMenu" value="-1" />';
str += '<param name="fullScreen" value="0" />';
str += '</object>';
return str;
}
function videoCreate() {
document.getElementById('Player').innerHTML = wmpCreate();
var wmp = document.getElementById('contentPlayer');
wmp.URL = getParameter("url");
wmp.controls.play();
}
_spBodyOnLoadFunctionNames.push("videoCreate");
</script>
(5)If you feel its too big for page to fit in, then modify Width and Height in this line :
str = '<object id="contentPlayer" type="application/x-ms-wmp" data="'+url+'" width="800" height="640">';
(6)Save your media files in some document library and use its url as parameter on page where you have placed this webpart. This webpart will fetch the parameter as "url" and its value and play in media player.
Enjoy watching movie and songs on your sharepoint site!!!!
Above Code - Updated on 26-Jun-09
Requirment: To Display a Video stored in a Document Library.
Solution: Create a Document Library Eg. Sample001
Upload a video file
Eg: “MediaPlayerSample.avi”
Just add a content editor web part
Edit the webpart, use the below HTML in the “Source Editor…”
Note: in the above HTML code, the only parameter to set is the "animationatStart".
Click on the Below image, and see the parameter VALUE.

There is one more way to accomplish the same functionality.
Here is the way.
(1) Add content editor webpart.
(2) Click on modify shaerd webpart.
(3) Copy and paste the following content
(4)<div id="Player"> </div>
<script type="text/javascript">
function getParameter(szName)
{
// Get value out of supplied parameter
var szUrl = window.location.search;
szUrl = szUrl.toLowerCase();
szName = szName.toLowerCase();
var szValue = "";
var nBegin = szUrl.indexOf(szName);
if (nBegin != -1)
{
szValue = szUrl.substring(nBegin + (szName.length + 1));
}
var nEnd = szValue.indexOf("&");
if (szValue != "" && nEnd != -1)
{
szValue = szValue.substring(0, nEnd);
}
return szValue;
}
function wmpCreate(url) {
var str = "";
var agt = navigator.userAgent.toLowerCase();
var is_ie = (agt.indexOf("msie") != -1);
if (is_ie) {
// create the WMP for IE
str = '<object id="contentPlayer" classid="CLSID:6BF52A52-394A-11d3-B153-00C04F79FAA6" width="800" height="640">';
} else {
// create it for FF.
str = '<object id="contentPlayer" type="application/x-ms-wmp" data="'+url+'" width="800" height="640">';
}
str += '<param name="url" value=""/>';
str += '<param name="uiMode" value="full">';
str += '<param name="autoStart" value="-1" />';
str += '<param name="stretchToFit" value="-1" />';
str += '<param name="windowlessVideo" value="0" />';
str += '<param name="enabled" value="-1" />';
str += '<param name="enableContextMenu" value="-1" />';
str += '<param name="fullScreen" value="0" />';
str += '</object>';
return str;
}
function videoCreate() {
document.getElementById('Player').innerHTML = wmpCreate();
var wmp = document.getElementById('contentPlayer');
wmp.URL = getParameter("url");
wmp.controls.play();
}
_spBodyOnLoadFunctionNames.push("videoCreate");
</script>
(5)If you feel its too big for page to fit in, then modify Width and Height in this line :
str = '<object id="contentPlayer" type="application/x-ms-wmp" data="'+url+'" width="800" height="640">';
(6)Save your media files in some document library and use its url as parameter on page where you have placed this webpart. This webpart will fetch the parameter as "url" and its value and play in media player.
Enjoy watching movie and songs on your sharepoint site!!!!
Above Code - Updated on 26-Jun-09
Requirment: To Display a Video stored in a Document Library.
Solution: Create a Document Library Eg. Sample001
Upload a video file
Eg: “MediaPlayerSample.avi”
Just add a content editor web part
Edit the webpart, use the below HTML in the “Source Editor…”

Note: in the above HTML code, the only parameter to set is the "animationatStart".
Click on the Below image, and see the parameter VALUE.

How to add document library with folders and content types through feature/site definition.
When creating custom features, definitions one of the things most clients
want is a document library included in the Site Template with a
pre-defined folder structure.
In this post I’m going to narrate how to provision document library with folders form a custom feature.
So here we go.
Open element.xml of your feature it should be something like this.
<Elements xmlns="http://schemas.microsoft.com/sharepoint/">
<ListInstance
FeatureId="00BFEA71-E717-4E80-AA17-D0C71B360101"
TemplateType="101"
Title="My Docs"
Url="My Docs"
Description=""
QuickLaunchUrl="My Docs/Forms/AllItems.aspx" />
</Elements>
Over here we are just creating an instance of a document library.
In SharePoint by default you will find a feature with forlder name “DocumentLibrary” in your 12/template/feature. So we do not need to create whole schema file just like custom list.
Description of each property
FeatureId --> Hardcode guid which refers SharePoint Document Library.
TemplateType --> 101 denotes that we want to create Document library. 100 for list and 115
for content type etc...
Title --> My Docs simple title of newly created List.
Url --> My Docs same as Title. You can use different if you want but same will be better to maintain and understand.
Description --> just description non mandatory.
QuickLaunchUrl --> My Docs/Forms/AllItems.aspx Just like/Forms/AllItems.aspx, use you used in url tab.
If you installed feature with this element TAG you will get Document library.
Now here we go for folder.
Add the following code just before the </Elements> tag:
<Module Path="First Folder" Url="My Docs \First Folder” />
Note : The Url in the above tag begins with the url of the list instance.
If you want to add sub folders to the above folder
<Module Path="First Folder" Url="My Docs \First Folder\sub folder of first folder” />
Note : The ListUrl in the above tag begins with the url of the list instance.
If you want to add content type to the folder then you need to add one more tag
<ContentTypeBinding ListUrl="My Docs" ContentTypeId="0x010110" />
Note : you already have a contentype installed with specific ContentTypeId.
My next Post will be: How to create/install Contentype from feature. Comming Soon.
You can create multiple document libraries from one feature.
Just add more than one List instance.
Here is one sample of my element.xml
<Elements xmlns="http://schemas.microsoft.com/sharepoint/">
<!-- Doc lib 1-->
<ListInstance
FeatureId="00BFEA71-E717-4E80-AA17-D0C71B360101"
TemplateType="101"
Title="My Docs"
Url="My Docs"
Description=""
QuickLaunchUrl="My
Docs/Forms/AllItems.aspx" />
<!-- required custom content type for this document library instance -->
<ContentTypeBinding ListUrl="My Docs"
ContentTypeId="0x010100A107D9F002764eea923263A0B3587210" />
<!-- Single folder no sub-folders -->
<Module Path="Administration" Url="My Docs/Administration" />
<!-- A Folder and associated sub-folders -->
<Module Path="Development" Url="My Docs/Development" />
<Module Path="Development" Url="My Docs/Development/Code Review" />
<Module Path="Development" Url="My Docs/Development/PreRequisite" />
<!-- Doc lib 2-->
<ListInstance
FeatureId="00BFEA71-E717-4E80-AA17-D0C71B360101"
TemplateType="101"
Title="Your Docs"
Url="Your Docs"
Description=""
QuickLaunchUrl="Your Docs/Forms/AllItems.aspx" />
<ContentTypeBinding ListUrl="Your Docs" ContentTypeId="0x010100D8B76062F25E42efB17D4CBF9747FB57" />
<Module Path="Business Analyst" Url="Your Docs/Business Analyst" />
<Module Path="Functional Analyst" Url="Your Docs/Functional Analyst" />
<Module Path="Functional Analyst" Url="Your Docs/Functional Analyst/Requirment" />
<Module Path="Functional Analyst" Url="Your Docs/Functional Analyst/change Request" />
</Elements>
and speacial thanks to "bobthebuilder" for make me under
stand all this functionality from his wonderful post @ SHAREPOINT.H@CK.
want is a document library included in the Site Template with a
pre-defined folder structure.
In this post I’m going to narrate how to provision document library with folders form a custom feature.
So here we go.
Open element.xml of your feature it should be something like this.
<Elements xmlns="http://schemas.microsoft.com/sharepoint/">
<ListInstance
FeatureId="00BFEA71-E717-4E80-AA17-D0C71B360101"
TemplateType="101"
Title="My Docs"
Url="My Docs"
Description=""
QuickLaunchUrl="My Docs/Forms/AllItems.aspx" />
</Elements>
Over here we are just creating an instance of a document library.
In SharePoint by default you will find a feature with forlder name “DocumentLibrary” in your 12/template/feature. So we do not need to create whole schema file just like custom list.
Creating a list instance with this GUID is same as creating a document library from Site Settings > Create > Document Library. |  |
Description of each property
TemplateType --> 101 denotes that we want to create Document library. 100 for list and 115
for content type etc...
Title --> My Docs simple title of newly created List.
Url --> My Docs same as Title. You can use different if you want but same will be better to maintain and understand.
Description --> just description non mandatory.
QuickLaunchUrl --> My Docs/Forms/AllItems.aspx Just like
If you installed feature with this element TAG you will get Document library.
Now here we go for folder.
Add the following code just before the </Elements> tag:
<Module Path="First Folder" Url="My Docs \First Folder” />
Note : The Url in the above tag begins with the url of the list instance.
If you want to add sub folders to the above folder
<Module Path="First Folder" Url="My Docs \First Folder\sub folder of first folder” />
Note : The ListUrl in the above tag begins with the url of the list instance.
If you want to add content type to the folder then you need to add one more tag
<ContentTypeBinding ListUrl="My Docs" ContentTypeId="0x010110" />
Note : you already have a contentype installed with specific ContentTypeId.
My next Post will be: How to create/install Contentype from feature. Comming Soon.
You can create multiple document libraries from one feature.
Just add more than one List instance.
Here is one sample of my element.xml
<Elements xmlns="http://schemas.microsoft.com/sharepoint/">
<!-- Doc lib 1-->
<ListInstance
FeatureId="00BFEA71-E717-4E80-AA17-D0C71B360101"
TemplateType="101"
Title="My Docs"
Url="My Docs"
Description=""
QuickLaunchUrl="My
Docs/Forms/AllItems.aspx" />
<!-- required custom content type for this document library instance -->
<ContentTypeBinding ListUrl="My Docs"
ContentTypeId="0x010100A107D9F002764eea923263A0B3587210" />
<!-- Single folder no sub-folders -->
<Module Path="Administration" Url="My Docs/Administration" />
<!-- A Folder and associated sub-folders -->
<Module Path="Development" Url="My Docs/Development" />
<Module Path="Development" Url="My Docs/Development/Code Review" />
<Module Path="Development" Url="My Docs/Development/PreRequisite" />
<!-- Doc lib 2-->
<ListInstance
FeatureId="00BFEA71-E717-4E80-AA17-D0C71B360101"
TemplateType="101"
Title="Your Docs"
Url="Your Docs"
Description=""
QuickLaunchUrl="Your Docs/Forms/AllItems.aspx" />
<ContentTypeBinding ListUrl="Your Docs" ContentTypeId="0x010100D8B76062F25E42efB17D4CBF9747FB57" />
<Module Path="Business Analyst" Url="Your Docs/Business Analyst" />
<Module Path="Functional Analyst" Url="Your Docs/Functional Analyst" />
<Module Path="Functional Analyst" Url="Your Docs/Functional Analyst/Requirment" />
<Module Path="Functional Analyst" Url="Your Docs/Functional Analyst/change Request" />
</Elements>
and speacial thanks to "bobthebuilder" for make me under
stand all this functionality from his wonderful post @ SHAREPOINT.H@CK.
What is Windows Workflow foundation?
Windows Workflow Foundation (WF) is a Microsoft technology for defining, executing, and managing workflows. This technology is part of .NET Framework 3.0 which is available natively in the Windows Vista operating system, and can be installed on the Windows XP SP2 and Windows Server 2003 operating systems. A new XML-based language XAML is commonly used for declaring the structure of a workflow. However, the workflow may also be expressed in code using any .NET-targeted language (VB.NET, C#, C++/CLI, etc.). WF provides .NET developers with the ability to separate the logic of their application from the underlying execution components thus providing a clearer, more manageable representation of the application. This approach lends credence to the growing process-driven application methodology which aims to separate an applications logical flow from it's executable components at an enterprise level. Workflows comprise 'activities'. Developers can write their own domain-specific activities and then use them in workflows. WF also provides a set of general-purpose 'activities' that cover several control flow constructs.
Windows Workflow Foundation is supported by a companion set of extensions to Visual Studio 2005. These extensions contain a visual workflow designer which allows users to design workflows, a visual debugger which enables the users to debug the workflow designed, and a project system which enables the user to compile their workflows inside Visual Studio 2005. In Visual Studio 2008 WWF functionality is included. The .NET Framework 3.0 "workflow runtime" provides common facilities for running and managing the workflows and can be hosted in any CLR application domain, be it a Windows Service, a Console, GUI or Web Application. The host can provide services like serialization for the runtime to use when needed. It can also hook up to workflow instance's events such as their becoming idle or stopping. WF workflows define interfaces with methods and events to communicate with the outside world. A host application typically sets up an environment before running a workflow, providing objects that implement those interfaces. When an object implementing such interfaces raises an event, the corresponding workflow is retrieved and the data passed on to it.
Methods on the interface may be used by the workflow to communicate with its host. Data can also be transferred from the host to the Workflow through dictionary objects that are passed to the Workflow when the Workflow is created.Similarly the Workflow can pass the results of the workflow to the Host application through a Dictionary Object. The WorkFlow foundation also allows the Workflow to update the Host application of the progress of the workflow. this is done by raising events in the Workflow to which the host application will subscribe. Using the WF foundation, two different types of Workflow can be created: Sequential Workflow (Typically Flow Chart based, progresses from one stage to next and does not step back) State-Machine Workflow (Progress from 'State' to 'State', these workflows are more complex and return to a previous point if required)
For more information : click here
Tuesday, May 13, 2008
Recycle Application Pools, not IIS
Recycle Application Pools, not IIS.
So many things in SharePoint require you to recycle the the W3WP.EXE process running SharePoint in order for certain changes to be picked up. So many people think this means recycling IIS by typing IISRESET. But it takes so long for IIS to recycle!
Did you know you don't have to recycle IIS most of the time, just the application pool your site is running within? Yup! For development purposes, I run all my SharePoint sites off the same app pool. I know, not the most secure, but each app pool consumes roughly 100MB of memory so why have a ton of them floating around in a virtual machine when memory is precious!
Instead of recycling IIS, I create a shortcut that I add to my Quick Launch that recycles the app pool all my sites run under. To do this, create a new shortcut on your desktop and enter the following target:
%windir%\system32\cscript.exe c:\windows\system32\iisapp.vbs /a "[Name of your App Pool]" /r
Then drag the shortcut onto your Quick Launch toolbar. Click it and watch how fast an app pool is recycled compared to IIS!
Example: The appication pool that I target is "BMWApp" (Without the quotes) then the above command will be:
%windir%\system32\cscript.exe c:\windows\system32\iisapp.vbs /a "BMWApp" /r
Monday, May 12, 2008
Moss 2007 "File not found" - error
When I hit any page under _layouts, I get a page which reads "File Not Found".
Error-
File Not Found. at System.Reflection.Assembly.nLoad(AssemblyName fileName, String codeBase, Boolean isStringized, Evidence assemblySecurity, Boolean throwOnFileNotFound, Assembly locationHint, StackCrawlMark& stackMark) # at System.Reflection.Assembly.InternalLoad(AssemblyName assemblyRef, Boolean stringized, Evidence assemblySecurity, StackCrawlMark& stackMark) # at System.Reflection.Assembly.Load .........
with this error everything is working fine in my moss. but all popup stops. llike date control popup,people picker popup and even site setting page "/_layouts/settings.aspx" is also gives this error.
I remember this error occur after web.config is being changed by IIS tool and it adds an attribute (xmlns) to the tag (because I have and requirement to increase request time out)
like :
The only thing solves this problem is by removing that extra attribute.
Error-
File Not Found. at System.Reflection.Assembly.nLoad(AssemblyName fileName, String codeBase, Boolean isStringized, Evidence assemblySecurity, Boolean throwOnFileNotFound, Assembly locationHint, StackCrawlMark& stackMark) # at System.Reflection.Assembly.InternalLoad(AssemblyName assemblyRef, Boolean stringized, Evidence assemblySecurity, StackCrawlMark& stackMark) # at System.Reflection.Assembly.Load .........
with this error everything is working fine in my moss. but all popup stops. llike date control popup,people picker popup and even site setting page "/_layouts/settings.aspx" is also gives this error.
I remember this error occur after web.config is being changed by IIS tool and it adds an attribute (xmlns) to the
like :
The only thing solves this problem is by removing that extra attribute.
Access denied when trying to get to shared services
Access denied when trying to get to shared services
"DO NOT call you SSP the same name as the AppPool you use for the SSP Admin Site.
The SSP actually uses its name to create an AppPool for use under the Office Search site.
If your SSP Admin AppPool is the same name then MOSS sets it to use the timer svc account.
If your hosting then call the SSP Admin AppPool 'Company - SSPAdmin' and the actual SSP 'Company - SSP'. This will stop MOSS clobbering the accounts."
Thursday, May 8, 2008
HttpContext in eventhandler
First off all, i would like to thank Adil Baig to show Developers (specifically in MOSS) like us that thing like this can be done in first place.
I often heard that HttpContext is null in event handler and we cannot use session and Request.QueryString.
Here is the solution.
With this Context you can find all the properties you want.
In SharePoint there is not any functionality for displaying our customized error page.
Like if for data validation in event/item handler we use
And validation message displayed in SharePoint error Page which looks error in application.
But with this Context you can use to redirect to any of your custom or any out of the box Page.
HttpContext is available only in synchronous event like ItemAdding and ItemUpdating.
More Info Click Here
I often heard that HttpContext is null in event handler and we cannot use session and Request.QueryString.
Here is the solution.
public class MyEventHandler: SPItemEventReceiver
{
HttpContext current;
public MyEventHandler()
{
current = HttpContext.Current;
}
public override void ItemAdding(SPItemEventProperties properties)
{
/// some thing went wrong so you need to cancel the event and redirect
}
With this Context you can find all the properties you want.
In SharePoint there is not any functionality for displaying our customized error page.
Like if for data validation in event/item handler we use
properties.ErrorMessage = “Opps... Not allowed”;
properties.Cancel = true;
And validation message displayed in SharePoint error Page which looks error in application.
But with this Context you can use to redirect to any of your custom or any out of the box Page.
SPUtility.Redirect(Url, SPRedirectFlags.Default, current);
HttpContext is available only in synchronous event like ItemAdding and ItemUpdating.
More Info Click Here
Removing MySite and MyLinks in Sharepoint (MOSS) 2007
Okay, this one took me a while to figure out, but nonetheless I found it and will share it.
In order to turn off or disable the MySite or MyLinks functionality you need to be an Sharepoint administrator.
Go to the Central Administration Web Page
Click on the link for Shared Services Administration
--If you have more than one SSP, select the one that is running the MySites functionality
Under "User Profiles and My Sites" click Personalization Services Permissions
Select the group you want to limit the functionality for. More than likely you will just have NTAuthority\Authenticated Users.
In the next screen you will see a list of checkboxes,
--To disable MySites uncheck "Create Personal Site"
--To disable MyLinks uncheck "Use Personal Features"
Hopefully this will save you a few cycles.
A Lookup to the sub sites
A question:
"I'm creating a WSS 3 site which will have a new subsite each time there is a planning application.
From the parent site I want to be able to enter documents and say which application it belongs to but I don't want the user to have to maintain a list of application names when they could just lookup to a list of all the Application subsites that have been created.
Does anyone know if that's possible?"
My Answer:
This is not possible out of the box (unless you use the SiteDirectory template, and create the application sites' there).
To code it, here are several options:
Either connect a workflow or an event handler to a list of applications, and the workflow\event handler can create the site for you.
Develop a custom field control that will load the list of sub sites for the user.
This should be more robust than option 1, since a workflow\event handler may fail to create the site and you will end up with a mess. however, custom field controls are not supported by office - so you will not be able to set the metadata on documents from within the office applications.
Develop a timer job that synchronizes the list of sites into a choice field as choices.
This will be robust, and will work in office - but will put a load on the server
RECOMMENDED: develop a feature for the application sites that will add the name of the site to a list when the feature is activated.
This will be better than option 1 because you can trigger it again if it fails, without re-creating the site. Also it will have much less load on the server than option 3, and better performance than option 2 since it will not have to check the sites every time someone wants to upload a document. Also - easy development.
Develop a BDC application (using a custom web service) to show the list of applications based on the existing sites.
This may be the second easiest option (after #4) - such a web service is easy to develop. But this will only work if you have MOSS license, as the BDC is not part of WSS.
Subscribe to:
Posts (Atom)