Showing posts with label Survey. Show all posts

Tuesday, November 1, 2011

Anonymous access in SharePoint 2010 Survey


Filling up survey form in SharePoint is one of the common tasks that we perform. However when we want to capture a feedback in terms of survey but we would not like to know the name of a person who responded to survey then anonymous survey comes into the picture.

We directly cannot create a SharePoint 2010 anonymous survey. First we need to configure the site to have an anonymous site and then we can configure survey list to allow anonymous access.

First we need to make a setting in central administration. Go to Manage web applications->Select your specific web app->Click on zone type Default->then check the enable anonymous access.

Here are these steps shown as screen shots.


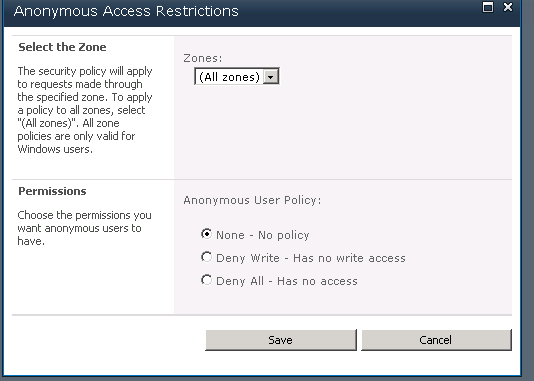
Now select anonymous policy from the ribbon and select None.


Now open your site to enable anonymous access. You can see this option only when you have set the anonymous option from the central administration.


You need to set where you would want to enable the anonymous access.


I’ve selected lists and library because we want to create an anonymous survey.

Open your survey list where you want to configure anonymous survey. First step that needs to be performed is to break the inheritance from the parent site. Without this step, we cannot configure anonymous survey.

Go to list settings and then permissions for a list and then click on anonymous access. This model page allows you to configure the action that anonymous user can perform. However you might see all options grayed out.


The reason behind this is strange, however these is a work around to this. Go to advance settings option of the list and then select read all responses.


Now again go back to the permission and then select anonymous access. You should be good to go for setting up the permissions.


Now the problem is we do not want other people to see other’s responses although created by field is always empty when we enable the anonymous survey, but still we do not want any person to read any other person’s response.

So go back to advance settings and now change from real all responses to read responses that were created by user.

And there you go, give link URL to respond to anyone and they should be able to respond to a survey. At the same time created by field will always be blank so that we never come to know who responded to survey.


As you can see I have three responses but who responded cannot be known.


Thursday, May 26, 2011

Include image in SharePoint survey

How about coming up with some questions which have some images in it? And someone ask you is this possible in SharePoint survey. Well, you say I need some time to think. And yes, because out of the box, there is no option to include images in the survey which I sometime believes lack of functionality.

I also strongly believe that there are lots of third party solutions that can be deployed in SharePoint for customized survey which SharePoint survey does not provide, but I believe survey needs a lot of improvement. There has to be an expiration date, there should be a way to include images in the questions; just name a few. SharePoint 2010 has also not improved as far as survey is concern.

However we can do some little magic around survey page with the content editor web part and some magic in writing a question and then jumbling with JavaScript will get us the image in the question.

So let’s deep dive into this and explore how we can include image in the SharePoint survey.

Let’s ask one question. Question should be Do you think this picture is real?

And what we want is after this question we want to show one image down below this question. So that people come to know that we are talking about this image.

To do this, we need to make some modification to the question.

Add question something like this


Notice one jjjj at the end of the question. This is unneccesary word in the question. But this is very necessary word for us. Because we will change this jjjj word with image with the help of content editor web part.

Upload your images that you want to display in question in some image library because we need to take reference to that library.

Now add content editor web part below survey.

And write down following script

<script language="JavaScript">

var className;
className = 'ms-formlabel';

var elements = new Array();
var elements = document.getElementsByTagName('td');
for (var e = 0; e < elements.length; e++)
{
if (elements[e].className == className)
{
elements[e].innerHTML = elements[e].innerHTML.replace('jjjjj','<img src="{image path}"></img>');

}

}

</script>


If you observe, what we have done is we loop through all TD inside class ms-formlabel. And then we find ffff and then we replace it with image path. Check out the view source to get more idea. And of course you can reach us for any query.

And here is the output.


See, it’s fun. Isn’t it? We can now include images in the questions.

Okay, so what next? We will go one step further. Let’s add image as an option. Now this is a real fun. And you will find almost no examples for this. I tried finding and end up with no option. So I tried venturing and solving this.

It’s all about looping through classes with the page from javascript using content editor web part. We need to locate the place where we can replace certain string with the image tag.

So let’s start this example by asking question that which is your favorite flower? And we want user to select one of the options. So our answer should be of type choice.


And this will be the page for the survey


What we are we going to do is that we will loop through the class. Now carefully observe the JavaScript been generated by the browser.


We are interested with this area of JavaScript. We first need to get a reference of class ms-formbodysurvey, then we will take every td tag inside it and then from that we will find every label inside that and then inside that we will replace those flower names with image path.

And here is a way to do it. Have a content editor web part on the survey page.


And write down the following script.

<script language="JavaScript">

var className;
className = 'ms-formbodysurvey';

var elements = new Array();
var elements = document.getElementsByTagName('td');


for (var e = 0; e < elements.length; e++)
{

if (elements[e].className == className)
{

var inputs = elements[e].getElementsByTagName('label');

for (var e1 = 0; e1 < inputs.length; e1++)
{


inputs[e1].innerHTML = inputs[e1].innerHTML.replace('Lotus','<b><font size="4">Lotus</font></b><br/><img src="{img path}"></img><br/><br/><br/>');


inputs[e1].innerHTML = inputs[e1].innerHTML.replace('Jasmine','<b><font size="4">Jasmine</font></b><br/><img src="{img path}"></img><br/><br/><br/>');

inputs[e1].innerHTML = inputs[e1].innerHTML.replace('Rose','<b><font size="4">Rose</font></b><br/><img src="{img path}"></img>');

}

}

}

</script>


And you should be good to go. Bingo we have done our job. Following is the output. Happy imagine.

Saturday, November 28, 2009

How SharePoint Works with Survey

Recently we are having requirement that how to access Survey List Programmatically in SharePoint.

First we think that there should be some object like SPSurvey just same as Document library list SPDocumentLibrary, but sadly that object is not there.

But rather than thinking long we can access Survey same as simple list as SPList only :)

Simple…

But what we found is somewhat new to everyone, at least for us.

SharePoint Survey is storing data in reverse manner as what we think.

Each question that we are entering for survey is created as column and all the answer stored as row value.

Let’s show you Example

Question of survey is : Do you like this?

Answer choice (in radio button or dropdown) are : Yes, No, Don’t know

So you will get SPList.Items.GetDatatable(); like below

So it’s a little confusing right.

But anyway that will help you whether you should take any task to work on Survey programmatically or not?

Sunday, September 6, 2009

Creating and working with Survey in SharePoint - Part 5

Hi All,

In this article we will discuss about how to hide the save button. You may wonder why we should hide the save button. We will hide the save button to avoid one big issue of the survey.

If you have not gone through the survey articles, I would recommend you to read them all first before you read further.

Creating and working with Survey in SharePoint - Part 1

Creating and working with Survey in SharePoint - Part 2

Creating and working with Survey in SharePoint - Part 3

Creating and working with Survey in SharePoint - Part 4

When you have any question that has branching, SharePoint automatically places the next question on the second page and gives you an option to save your response so that later you can edit it. If you have the long survey that has many branching questions, then SharePoint does this splitting of page between the questions. Here we have one big problem. When responder saves the response, you will see that number of response increases. If you have five responders and all five of them have saved the respond, not completed the respond, then first thing you will notice is you can see total number of responses as five, but when you will actually go to the survey and find out then you won’t see even a single response. So where are all those responses?

Well, answer to this question is really simple. Even though you have full rights on survey or even you are a site administrator or site collection administrator, nobody can see those responses except a person who has saved the response. Only he can see his saved response. So bottom line is check columns named “Completed” in “All Responses” view, you will find only those responses whose status is yes. If a person has saved response, he will see status as “no” in “Completed” column.

Now why we are talking about hiding the save button is because there can be a reason where in you want responders to respond the survey in specific days. If they don’t then you want to send mail to them one more time to indicate that look, you need to fill this. Now to know this that how many people have not responded to survey yet, is don’t allow to save the response so that you can have exact number of responses.

Ok, so let us go ahead and add the content editor web part in every page of your questions, so that save button doesn’t appear on each and every page of survey. So now responder has no choice but to fill in the survey at one go.

In content editor web part, place the following code.

<script language="JavaScript">
var ClassName;
ClassName = 'ms-toolbar';

var elements = new Array();

var elements = document.getElementsByTagName('td');

for(var e=0;e<elements.length;e++)
{
if(elements[e].className == ClassName)
{

elements[e].innerHTML = elements[e].innerHTML.replace('value=Save','value=Save style=visibility:hidden ');


}

}

</script>


Your job is done. Now see the effect of above code.


That's it.

Saturday, September 5, 2009

Creating and working with Survey in SharePoint - Part 4

Hi All,

Here I am going to discuss something interesting especially on overview.aspx of survey list. If you have not gone through the survey articles, I would recommend you to read them all first before you read further.

Creating and working with Survey in SharePoint - Part 1

Creating and working with Survey in SharePoint - Part 2

Creating and working with Survey in SharePoint - Part 3

and

Creating and working with Survey in SharePoint - Part 5


One question came in my mind. Why any responder of survey should care about knowing when survey was created and how many number of responses has come so far. If we have set the permission in advance settings of survey that user can only see their response, and then also responder can see how many responses have come so far.

If we do not want to allow any responder to see when survey was created and how many responses has come so far, then do one very easy thing. Just add one more content editor web part on the overview.aspx page of survey and copy and paste the below code and there you go, you have each and every option just like you have in normal survey web part on overview.aspx. The only difference is that here you cannot see number of responses and date created. Make sure that you hide the default web part on that page by modifying that web part and setting hidden to true under layout option. So simple…isn’t it.

Just make sure that you replace the {siteurl} for HREF in below code. Just place your site url there and you should be good to go.


<table class="ms-menutoolbar" cellpadding="2" cellspacing="0" border="0" id="ctl00_m_g_c84f415c_dba8_4240_b34d_263e596c7eed_ctl00_ctl00_toolBarTbl" width="100%" >
<tr> <td class="ms-toolbar" nowrap="true">
<div class="ms-buttoninactivehover" onmouseover="this.className='ms-buttonactivehover'" onmouseout="this.className='ms-buttoninactivehover'"><a id="ctl00_m_g_c84f415c_dba8_4240_b34d_263e596c7eed_ctl00_ctl00_toolBarTbl_RptControls_ctl00_diidIONewItem" accesskey="N" title="Respond to this Survey" onclick="javascript:NewItem('\u002fsites\u002fTest\u002fLists\u002fSharePoint\u002520site\u002520survey\u002fNewForm.aspx');return false;" href="javascript:__doPostBack('ctl00$m$g_c84f415c_dba8_4240_b34d_263e596c7eed$ctl00$ctl00$toolBarTbl$RptControls$ctl00$diidIONewItem','');"><img align='absmiddle' alt="Respond to this Survey" src="/_layouts/images/NewItem.gif" style='border-width:0px;'>&nbsp;Respond to this Survey</a></div>
</td>
<td class=ms-separator><img src='/_layouts/images/blank.gif' alt=''></td>
<td class="ms-toolbar" nowrap="true">


<span style="display:none"><menu type='ServerMenu' id="zz13_RptControls" largeIconMode="true"><ie:menuitem id="zz14_ExportToSpreadsheet" type="option" iconSrc="/_layouts/images/MenuSpreadsheet.gif" onMenuClick="javascript:EnsureSSImporter();javaScript:ExportList('\u002fsites\u002fTest\u002f_vti_bin\u002fowssvr.dll?CS=65001\u0026Using=_layouts\u002fquery.iqy\u0026List=\u00257BA1B0E302\u00252D497E\u00252D45B9\u00252D9994\u00252D9F0E0171A380\u00257D\u0026View=\u00257BC84F415C\u00252DDBA8\u00252D4240\u00252DB34D\u00252D263E596C7EED\u00257D\u0026RootFolder=\u00252Fsites\u00252FTest\u00252FLists\u00252FSharePoint\u002520site\u002520survey\u0026CacheControl=1')" text="Export to Spreadsheet" description="Analyze items with a spreadsheet application." menuGroupId="800"></ie:menuitem><ie:menuitem id="ctl00_m_g_c84f415c_dba8_4240_b34d_263e596c7eed_ctl00_ctl00_toolBarTbl_RptControls_ctl01_ctl00_ctl03" type="separator"></ie:menuitem><ie:menuitem id="zz15_ViewRSS" type="option" iconSrc="/_layouts/images/MenuRSS.gif" onMenuClick="window.location = '/sites/Test/_layouts/listfeed.aspx?List=%7BA1B0E302%2D497E%2D45B9%2D9994%2D9F0E0171A380%7D';" text="View RSS Feed" description="Syndicate items with an RSS reader." menuGroupId="800"></ie:menuitem><ie:menuitem id="zz16_SubscribeButton" type="option" iconSrc="/_layouts/images/MenuAlert.gif" onMenuClick="window.location = '/sites/Test/_layouts/SubNew.aspx?List=%7BA1B0E302%2D497E%2D45B9%2D9994%2D9F0E0171A380%7D&amp;Source=http%3A%2F%2Fsharepointkings%3A7777%2Fsites%2FTest%2FLists%2FSharePoint%2520site%2520survey%2Foverview%2Easpx';" text="Alert Me" description="Receive e-mail notifications when items change." menuGroupId="800"></ie:menuitem></menu></span><span title="Open Menu"><div id="zz17_ListActionsMenu_t" class="ms-menubuttoninactivehover" onmouseover="MMU_PopMenuIfShowing(this);MMU_EcbTableMouseOverOut(this, true)" hoverActive="ms-menubuttonactivehover" hoverInactive="ms-menubuttoninactivehover" onclick=" MMU_Open(byid('zz13_RptControls'), MMU_GetMenuFromClientId('zz17_ListActionsMenu'),event,false, null, 0);" foa="MMU_GetMenuFromClientId('zz17_ListActionsMenu')" oncontextmenu="this.click(); return false;" nowrap="nowrap"><a id="zz17_ListActionsMenu" accesskey="C" href="#" onclick="javascript:return false;" style="cursor:hand;white-space:nowrap;" onfocus="MMU_EcbLinkOnFocusBlur(byid('zz13_RptControls'), this, true);" onkeydown="MMU_EcbLinkOnKeyDown(byid('zz13_RptControls'), MMU_GetMenuFromClientId('zz17_ListActionsMenu'), event);" onclick=" MMU_Open(byid('zz13_RptControls'), MMU_GetMenuFromClientId('zz17_ListActionsMenu'),event,false, null, 0);" oncontextmenu="this.click(); return false;" menuTokenValues="MENUCLIENTID=zz17_ListActionsMenu,TEMPLATECLIENTID=zz13_RptControls" serverclientid="zz17_ListActionsMenu">Actions<img src="/_layouts/images/blank.gif" border="0" alt="Use SHIFT+ENTER to open the menu (new window)."/></a><img align="absbottom" src="/_layouts/images/menudark.gif" alt="" /></div></span>
</td>
<td class=ms-separator><img src='/_layouts/images/blank.gif' alt=''></td>
<td class="ms-toolbar" nowrap="true">


<span style="display:none"><menu type='ServerMenu' id="zz18_RptControls" largeIconMode="true"><ie:menuitem id="zz19_AddQuestions" type="option" onMenuClick="window.location = '/sites/Test/_layouts/qstNew.aspx?List=%7BA1B0E302%2D497E%2D45B9%2D9994%2D9F0E0171A380%7D&amp;Source=http%3A%2F%2Fsharepointkings%3A7777%2Fsites%2FTest%2FLists%2FSharePoint%2520site%2520survey%2Foverview%2Easpx';" text="Add Questions" description="Add an additional question to this survey." menuGroupId="100"></ie:menuitem><ie:menuitem id="zz20_ListSettings" type="option" iconSrc="/_layouts/images/MenuListSettings.gif" onMenuClick="window.location = '/sites/Test/_layouts/survedit.aspx?List=%7BA1B0E302%2D497E%2D45B9%2D9994%2D9F0E0171A380%7D';" text="Survey Settings" description="Manage questions and settings for this survey." menuGroupId="200"></ie:menuitem></menu></span><span title="Open Menu"><div id="zz21_ListSettingsMenu_t" class="ms-menubuttoninactivehover" onmouseover="MMU_PopMenuIfShowing(this);MMU_EcbTableMouseOverOut(this, true)" hoverActive="ms-menubuttonactivehover" hoverInactive="ms-menubuttoninactivehover" onclick=" MMU_Open(byid('zz18_RptControls'), MMU_GetMenuFromClientId('zz21_ListSettingsMenu'),event,false, null, 0);" foa="MMU_GetMenuFromClientId('zz21_ListSettingsMenu')" oncontextmenu="this.click(); return false;" nowrap="nowrap"><a id="zz21_ListSettingsMenu" accesskey="I" href="#" onclick="javascript:return false;" style="cursor:hand;white-space:nowrap;" onfocus="MMU_EcbLinkOnFocusBlur(byid('zz18_RptControls'), this, true);" onkeydown="MMU_EcbLinkOnKeyDown(byid('zz18_RptControls'), MMU_GetMenuFromClientId('zz21_ListSettingsMenu'), event);" onclick=" MMU_Open(byid('zz18_RptControls'), MMU_GetMenuFromClientId('zz21_ListSettingsMenu'),event,false, null, 0);" oncontextmenu="this.click(); return false;" menuTokenValues="MENUCLIENTID=zz21_ListSettingsMenu,TEMPLATECLIENTID=zz18_RptControls" serverclientid="zz21_ListSettingsMenu">Settings<img src="/_layouts/images/blank.gif" border="0" alt="Use SHIFT+ENTER to open the menu (new window)."/></a><img align="absbottom" src="/_layouts/images/menudark.gif" alt="" /></div></span>
</td>

<td width="99%" class="ms-toolbar" nowrap><IMG SRC="/_layouts/images/blank.gif" width=1 height=18 alt=""></td>


<td class="ms-toolbar" nowrap="true">

<table border=0 cellpadding=0 cellspacing=0 style='margin-right: 4px'>
<tr>
<td nowrap class="ms-toolbar" id="topPagingCellWPQ2">
<td>
</tr>
</table>

</td>
<td class=ms-separator> </td>
<td class="ms-toolbar" nowrap="true">

<table border=0 cellpadding=0 cellspacing=0 style='margin-right: 4px'>
<tr>
<td nowrap class="ms-listheaderlabel">View:&nbsp;</td>
<td id="ctl00_m_g_c84f415c_dba8_4240_b34d_263e596c7eed_ctl00_ctl00_toolBarTbl_RightRptControls_ctl01_ctl00_onetViewSelector" nowrap="nowrap" class="ms-viewselector" onmouseover="this.className='ms-viewselectorhover'" onmouseout="this.className='ms-viewselector'">
<span style="display:none"><menu type='ServerMenu' id="zz22_ViewSelectorMenu" CompactMode="true"><ie:menuitem id="zz23_DefaultView" type="option" onMenuClick="window.location = '/sites/Test/Lists/SharePoint site survey/overview.aspx';" text="Overview" menuGroupId="100"></ie:menuitem><ie:menuitem id="zz24_View1" type="option" onMenuClick="window.location = '/sites/Test/Lists/SharePoint site survey/AllItems.aspx';" text="All Responses" menuGroupId="300"></ie:menuitem><ie:menuitem id="zz25_View2" type="option" onMenuClick="window.location = '/sites/Test/Lists/SharePoint site survey/summary.aspx';" text="Graphical Summary" menuGroupId="300"></ie:menuitem></menu></span><span title="Open Menu"><div id="zz26_ViewSelectorMenu_t" class="ms-viewselector" onmouseover="MMU_PopMenuIfShowing(this);MMU_EcbTableMouseOverOut(this, true)" hoverActive="ms-viewselectorhover" hoverInactive="ms-viewselector" onclick=" MMU_Open(byid('zz22_ViewSelectorMenu'), MMU_GetMenuFromClientId('zz26_ViewSelectorMenu'),event,true, 'ctl00_m_g_c84f415c_dba8_4240_b34d_263e596c7eed_ctl00_ctl00_toolBarTbl_RightRptControls_ctl01_ctl00_onetViewSelector', 0);" foa="MMU_GetMenuFromClientId('zz26_ViewSelectorMenu')" oncontextmenu="this.click(); return false;" nowrap="nowrap"><a id="zz26_ViewSelectorMenu" accesskey="W" href="#" onclick="javascript:return false;" style="cursor:hand;white-space:nowrap;" onfocus="MMU_EcbLinkOnFocusBlur(byid('zz22_ViewSelectorMenu'), this, true);" onkeydown="MMU_EcbLinkOnKeyDown(byid('zz22_ViewSelectorMenu'), MMU_GetMenuFromClientId('zz26_ViewSelectorMenu'), event);" onclick=" MMU_Open(byid('zz22_ViewSelectorMenu'), MMU_GetMenuFromClientId('zz26_ViewSelectorMenu'),event,true, 'ctl00_m_g_c84f415c_dba8_4240_b34d_263e596c7eed_ctl00_ctl00_toolBarTbl_RightRptControls_ctl01_ctl00_onetViewSelector', 0);" oncontextmenu="this.click(); return false;" menuTokenValues="MENUCLIENTID=zz26_ViewSelectorMenu,TEMPLATECLIENTID=zz22_ViewSelectorMenu" serverclientid="zz26_ViewSelectorMenu">Overview<img src="/_layouts/images/blank.gif" border="0" alt="Use SHIFT+ENTER to open the menu (new window)."/></a><img align="absbottom" src="/_layouts/images/blank.gif" alt="" /></div></span>
</td>

</tr>
</table>

</td>

</tr>
</table>


<TABLE class="ms-summarystandardbody" cellpadding=0 cellspacing=0 width=600px style="margin: 10px;" border=0 rules=rows> <TR> <TD class="ms-formlabel" width=190px ID="overview01">Survey Name:</TD> <TD class="ms-formbody" >Movie knowledge survey</TD> </TR> <TR> <TD class="ms-formlabel" valign="top" ID="overview02">Survey Description:</TD> <TD class="ms-formbody">This is the startbold Hindi endbold as well as the startitalic English movie enditalic Knowledge survey. linebreak

we would like to know how much people are startunderline aware about the Hindi and English movies endunderline</TD> </TR> <TR> <TD><IMG SRC="/_layouts/images/blank.gif" width=1 height=1 alt=""></TD> </TR> </TABLE>
<TABLE border=0 style="margin: 0px 8px 0px 8px;">
<tr><td><img src="/_layouts/images/blank.gif" width=1 height=4 alt=""></td></tr>
<tr>
<td nowrap>
<img src="/_layouts/images/rect.gif" alt=""><span class=ms-toolbar>&nbsp;</span>
<a class="ms-toolbar" ACCESSKEY=R ID=diidSurveyResults HREF="{siteurl}/Lists/SharePoint site survey/summary.aspx"><!-- _locID_text="overview05" _locComment="{StringCategory=TXT}"-->Show a graphical summary of responses</a>
<span class=ms-toolbar>&nbsp;</span>
</td>
</tr>
<tr>
<td nowrap>
<img src="/_layouts/images/rect.gif" alt=""><span class=ms-toolbar>&nbsp;</span>
<a class="ms-toolbar" ACCESSKEY=U ID=diidResultsByUser HREF="{siteurl}Lists/SharePoint site survey/AllItems.aspx"><!-- _locID_text="overview06" _locComment="{StringCategory=TXT}"-->Show all responses</a>
<span class=ms-toolbar>&nbsp;</span>
</td>
</tr>
</TABLE>


And see the effect of the above code.


That's it.

Creating and working with Survey in SharePoint - Part 3

Hi All,

We are going to discuss more on survey in this article. If you have not gone through the previous articles, I would suggest you to go through those articles first and then proceed for reading.

If you haven't gone through the previous articles of this series, i would highly recommend to read following articles before proceeding.

Creating and working with Survey in SharePoint - Part 1

Creating and working with Survey in SharePoint - Part 2

and

Creating and working with Survey in SharePoint - Part 4

Creating and working with Survey in SharePoint - Part 5

Now, that we have survey list already created and if you see the description of the survey on the overview.aspx, there is a difference in the survey description in the webpart and survey description below survey name. Check this out.


The difference is the line break. If you observe, survey description in the web part is written as it is without any line break however survey description under the name of survey breaks two separates sentences into two different lines because when we created the survey we gave it like that.

So in this article we will discuss two important things that will help you not only for the survey but also for any other list and any other document library as well.

Here we will remove the survey description below the name of the survey because we can already see the description in the web part and also we will include the HTML in the description now. It is very much similar to what we have learnt in previous articles just a class name change and that will do our job. Let us see in detail.

Ok, Edit the overview page and place the content editor web part below to the original web part.


Ok, first let us go and change the description of survey. Go to settings, survey settings, title and description and change the description to the following.

This is the startbold Hindi endbold as well as the startitalic English movie enditalic Knowledge survey. linebreak


we would like to know how much people are startunderline aware about the Hindi and English movies endunderline.

Ok, now go back to the overview view of the survey and observe the survey description.


As you can see those words start appearing in the description, so we need to get rid of it and replace them with the actual HTML behavior and that is what we did in previous articles. So go ahead and modify the content editor web part and place the following code in that. Note one important line in the below code and that line is where we assign “ms-formbody’ class. Earlier we assigned “ms-formlabel” in previous articles to add HTML in questions.

<script language="JavaScript">
var ClassName;
ClassName = 'ms-formbody';

var elements = new Array();

var elements = document.getElementsByTagName('td');

for(var e=0;e<elements.length;e++)
{
if(elements[e].className == ClassName)
{
elements[e].innerHTML = elements[e].innerHTML.replace('linebreak','<br/>');

elements[e].innerHTML = elements[e].innerHTML.replace('startunderline','<u>');

elements[e].innerHTML = elements[e].innerHTML.replace('endunderline','</u>');

elements[e].innerHTML = elements[e].innerHTML.replace('startitalic','<i>');

elements[e].innerHTML = elements[e].innerHTML.replace('enditalic','</i>');

elements[e].innerHTML = elements[e].innerHTML.replace('startbold','<b>');

elements[e].innerHTML = elements[e].innerHTML.replace('endbold','</b>');

}

}

</script>


And there you go, see the effect of it.


Ok, look good now. But there is a problem here, still look at the survey description above the web part. It still shows the words (startbold, endbold etc). They have not been replaced yet.

How to replace them? Ok, here is the answer. Just add one more content editor web part below the previous content editor web part and copy the same HTML content above, just make two changes. Change the class name and getElemtByID from TD to Div as this description is in the div tag, not in the TD tag.

ClassName = 'ms-listdescription'
var elements = document.getElementsByTagName('div');


and there you go, see the magic.


Actually for this specific survey type of list, we don’t need this to be here as on the same page, we can see the survey description in the web part. So let us go and remove the description of survey below the name of the survey from overview.aspx.

Modify the last content editor web part and paste the following code inside it.

<script language="JavaScript">
var ClassName;
ClassName = 'ms-listdescription';

var elements = new Array();

var elements = document.getElementsByTagName('div');

for(var e=0;e<elements.length;e++)
{
if(elements[e].className == ClassName)
{

elements[e].innerHTML = '';
}

}

</script>


And see the effect of above code. Survey description is gone.


Remember one very important point. You need to place this last content editor web part in every view page. We placed it only in overview.aspx. Just try and change the view to “All responses” and “Graphical summary”. Survey description will appear there, so just make sure that you place the last content editor web part on each view page separately as well.

Sunday, August 30, 2009

Creating and working with Survey in SharePoint - Part 2

Hi All,

Here I am back with some more interesting stuff in survey list. In previous post we discussed about the advantages of survey list. But it is not true in every case. It has got many other limitations as well. Here in this article, we are going to discuss about one basic difficulty about survey.

I would first suggest you to read Creating and working with Survey in SharePoint - Part 1 of the series.

For further reading read Creating and working with Survey in SharePoint - Part 3

Creating and working with Survey in SharePoint - Part 4

Creating and working with Survey in SharePoint - Part 5

If you want to have some HTML in survey’s question, then we cannot insert that. Sometimes we may require making some font bold, something italic and we want to underline something. We need to increase the font size, we may require to add hyperlink in question, then we cannot do it.

So anyways we have to overcome this problem anyhow. So here is a way how you can insert HTML in the question of survey.

First make a note of one very important point, you have to repeat these steps for each and every page that you have for the survey. Means if you have branching question then you get more than one page to respond.

Before getting actually in to this, you first need to understand that how we will replace the normal text with HTML text.

Ok, let us go back to our first question. Open the question and add the following words before and after Department.


See the effect of this change on questions. We can clearly read startitalic and enditalic in first question.


We have added these words and we will replace this word with startitalic with <i> and enditalic </i> in content editor web part. You can use whatever word that you want, we only need to replace those words in the web apart. Let us see how we will do this now.

Go ahead and add one content editor web part below the questions. Edit the page and add the content editor web part.

Click on modify shared web part, click on source editor and write the code as shown in below.

<script language="JavaScript">
var ClassName;
ClassName = 'ms-formlabel';

var elements = new Array();

var elements = document.getElementsByTagName('td');

for(var e=0;e<elements.length;e++)
{
if(elements[e].className == ClassName)
{

elements[e].innerHTML = elements[e].innerHTML.replace('startitalic','<i>');

elements[e].innerHTML = elements[e].innerHTML.replace('enditalic','</i>');


}

}

</script>


Let us have a look on this above code. Here what we have done is that we have first taken out ms-formlable class as questions belong to this class in SharePoint architecture. We then take all ID because all questions are in TD tag and then we find our forcefully entered two words and replace them with proper HTML tag and there you go. See the effect of the above code.


Let us go ahead and change our third question. Make the following change in it.


Now again go ahead and change the existing editor web part with following addition with above code.

elements[e].innerHTML = elements[e].innerHTML.replace('linebreak','<br/>');

elements[e].innerHTML = elements[e].innerHTML.replace('startunderline','<u>');

elements[e].innerHTML = elements[e].innerHTML.replace('endunderline','</u>');


The effect of the above code is shown below. We have also broken question in two lines.


Now let us go and create hyperlink in the same question. Here is a trick to add hyperlink to the question. Let us say for example we want to have a hyperlink on “like” word and that should take to the Home page link and it should open in new page. In addition to this, it should be of bigger size than other words.

So here is a simple answer of the tuff question. Add just one more line to your content editor web part.

elements[e].innerHTML = elements[e].innerHTML.replace('like','<a href="/sites/Test/default.aspx" target="_blank" style ="font-size:14pt" >like</a>');


and see the effect of above code.


I hope that now you have the clear picture. All it takes is the knowledge of HTML and you can insert anything, almost anything with HTML in the questions.

I will soon come up with part 3. keep reading it.

Creating and working with Survey in SharePoint -Part 1

Hi All,

Today we will learn about SharePoint Survey list. A very useful and very interesting list with many advantage and bit of limitations as well. First let us understand the advantage.

Whenever you want to collect the responses from various people, across your organization about any event, any activity or any other thing, Survey is best suited list. It allows you to collect the responses in various ways. You can ask the questions and they can answer those questions and then result can be analyzed by taking it to the excel sheet or through graphical summary or by watching all responses at once.

You can have as many questions as you want and the format of their answers can also be of great varieties. For example, you may want to ask one question whose answer is simple text or multiple line of text with formatting. You can also have a question whose answer is choice (selection in terms of radio buttons, check boxes, drop downs). You can have question whose answer can be a date. We can have all these with built in survey list.

Another advantage of survey is that you can also add branching logic in it. That means, let us say, you have one question which depends upon the answer of some other question. To show or not to show a question depends upon the answer of previous question. This kind of branching can also be done in survey list.

So all and all at very basic level, if we would like to collect responses from people, survey is the best choice.

Let’s see the basic steps involved in the creating Survey List. Go to Create and select the Survey under tracking category. Give the name and description like shown below. Observe that you have one setting which says allow multi responses. If you want to collect multiple responses from individual person, then you should allow this else don’t allow this. This basically allows responder to respond to survey more than one time.
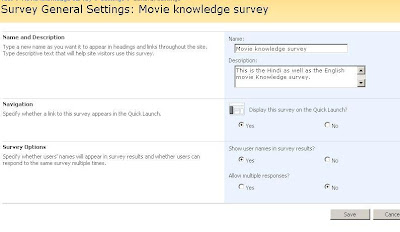


So we are going to create movie quiz. Once you are done with the creation of the survey list, we now need to add questions to add and have to decide what kind of answer each question has.

I know many people may not like this survey as it seems funny. But my main intension is to let you know how we can create it and what are the options available for answers and how branching can be done.

So go ahead and add the questions to it. Click on settings -> Add Question and add the first question. Click next question after creating each question.

1) Your Department -> Single line of text
2) Your Location -> Single line of text
3) What kind of movies do you like? -> Multiple lines of text and plain text.

Ok, now we are going to give user a choice. Either he can go for Hindi quiz or he can go for English quiz.

So go ahead and create one question, again by selecting settings->Add Question.

4) Which movie quiz would you like to give? -> Choice, Type: Radio button and add Hindi and English in the text box provided.

Now we actually want to branch the user directly to the questions of Hindi cinema and English Cinema depending on user’s choice. We cannot branch the question right now. That can be done after adding all questions and that will be done from the survey settings page. So now we will move ahead and add the Hindi cinema questions.

Go ahead and add question.

5) Rate yourself in Hindi Cinema.>Rating scale. Here we can define the sub questions and each question can have rating scales. So add following questions to it.
a. Old year movies (1950-1970)
b. Medium year movies (1971-2000)
c. Latest movies (2000-2009)


6) Add next question. Name the actor whose famous dialogue is “Kitne Aadmi the?” Choice, drop down and add following options. Jay, Gabbar, Veeru

7) Add next question. Name the upcoming movie of Akshay Kumar which is said to be captured under water. Single line of text.

8) Add next question. Rate yourself in English Movies.>Rating scale. Here we can define the sub questions and each question can have rating scales. So add following questions to it.
a. Old year movies (1950-1970)
b. Medium year movies (1971-2000)
c. Latest movies (2000-2009)


9) Add next question. Name the actor who was gifted God power in the movie "Bruce Almighty'. Single line of text.

10) Add next question. What was the version number mention in the latest movie of “Die Hard" series? Choice and options are 3.0, 4.0, and 3.5.

11) Last we will ask about the suggestion. Add question “Any suggestions that you want to give…” Multi lines of text.

If you want to have page break and then want to ask next question in next page, then add page separator and then add the next question so that this question will come on next page and not one the same page.

After adding these questions, your settings page should look something like this
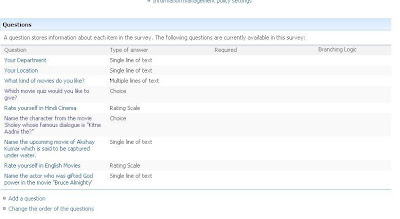


Now, open the main page of survey list. It should look like below image and it shows description of the survey, number of responses when it was created and click to see all responses and show a graphical summary.
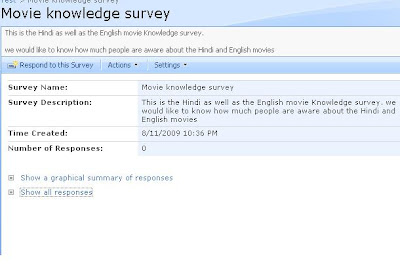


Ok, now go to survey settings and see that Branching logic column is empty as we have yet not defined any branching. We want to branch the question as per the question in which we asked that what movie quiz you would like to give. If user selects Hindi, then we want to jump to the Hindi questions without asking for English movie questions and if user selects English, we need to jump to the English movie questions without asking for Hindi movie questions.

So go ahead and click the question which asks for the selection of movie quiz and select like shown below. This defines that when user clicks on Hindi he will be redirected to the first Hindi question else he will be redirected to English question.
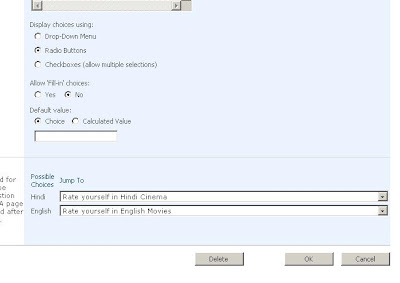


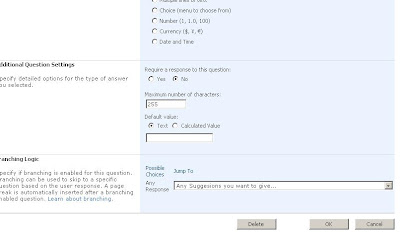
Add one more branching with the question which asks about Akshay Kumar’s upcoming movie and add branching logic as shown below. We need to add this branch because if user selects Hindi, then all questions of English movie will also come and we don’t want that so we will branch to the last question from this Akshay Kumar’s question so that no English questions asked. Here what we have done is whatever the response is, we will jump to the last question.


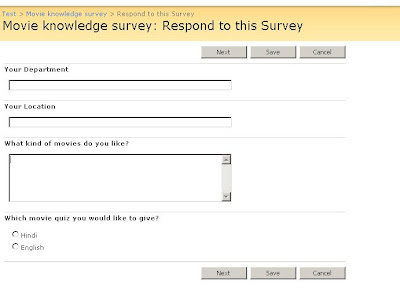
Now go back and click on respond to this survey. You will see that it asks only up to the question whose answer branches the next question.


Fill the details, select Hindi and click next, then as you can see you are presented with a screen where you get the Hindi movie questions and one interesting thing is save button in between. That means if you have very long survey and it has many branching logic, then you can save the survey and then continue at your own convenience at any time.
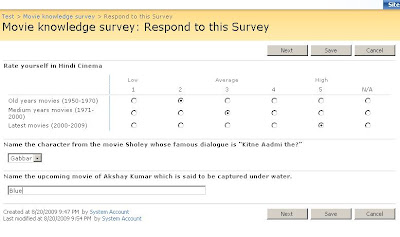


Click next and finally fills up the final text box and there you go, you are done with responding your first survey. If you observe the column Completed, you will find “yes” because we have completed the survey. If you would have saved it in between somewhere, you would have find it “No”, that means it is partially saved. You get “Yes” only when somebody fills the entire survey.

I will discuss bit deep about this in my coming articles of survey series. If you now click on respond to survey, you will get an error saying that you cannot give response for more than one time. If you have saved your survey, then you can click on the survey and complete that survey again.

One very important thing to note here is that person who creates the survey has to make sure that whether to allow user to see only his response or he can see everybody’s response. Same goes for editing options, should he allows to change other’s response or his own only. These settings are very important, if these options are set, then even user clicks on View all responses, he will be able to see only his response. Same is true in the case of graphical summary. He cannot see other responses from other people.

This is basically called Item level security. To set this on survey, go to Settings->Survey settings->advanced settings. Here you will find an option to set these properties. There you can also set to allow these responses to be a part of SharePoint search.

You can also export the result into excel as the option is available in the action menu.

Read Creating and working with Survey in SharePoint -Part-2

and

Creating and working with Survey in SharePoint - Part 3

Creating and working with Survey in SharePoint - Part 4

Creating and working with Survey in SharePoint - Part 5

for further interesting reading.

Tuesday, August 19, 2008

Adding survey list programmatically

Hi All,

We all know the surveys are really very important part of many companies. They take the decision based on the survey and only because of this reason MOSS has come up with this facility. We can create a survey from MOSS GUI.

There is also a way we can create a survey programmatically. I would like to demonstrate this.

Let’s develop a code which creates a survey list and also adds the question to it. I have added only one question. You can add any number of questions you want.

SPListTemplate objTemplate = currentWeb.ListTemplates["Survey"];

Guid objGuid = currentWeb.Lists.Add("ServeyFromCode", "survey", objTemplate);

SPList objSurvey = currentWeb.Lists["ServeyFromCode"];

//Let’s add user for the permission

SPMember objMember = currentWeb.Users[“Domain/UserName”];

objSurvey.Permissions.Add(objMember, SPRights.ManageLists);

StringCollection strQuestions = new StringCollection();

string strQuestion = "What should be the timing for the training?";

strQuestions.Add("10 AM - 12 AM");
strQuestions.Add("3 PM - 5 PM");
strQuestions.Add("7 PM - 9 PM");
strQuestions.Add(" 9PM - 11 PM");

objSurvey.Fields.Add(strQuestion, SPFieldType.Choice, true, false, strQuestions);

objSurvey.AllowMultiResponses = false;

objSurvey.Update();

Before you write this code please set AllowunsafeUpdates = true for list as well as for web and then after updating list please set it to false again.

When you add this, you will see one more list being added in your site and you can now use that survey


Share your SharePoint Experiences with us...
As good as the SharePointKings is, we want to make it even better. One of our most valuable sources of input for our Blog Posts comes from ever enthusiastic Visitors/Readers. We welcome every Visitor/Reader to contribute their experiences with SharePoint. It may be in the form of a code stub, snippet, any tips and trick or any crazy thing you have tried with SharePoint.
Send your Articles to sharepointkings@gmail.com with your Profile Summary. We will Post them. The idea is to act as a bridge between you Readers!!!

If anyone would like to have their advertisement posted on this blog, please send us the requirement details to sharepointkings@gmail.com