Showing posts with label JQuery. Show all posts

Thursday, May 26, 2011

How to get group by HTML in SharePoint Listview

From quite some time, we are using Jquery and JavaScript to tweak the SharePoint data rendering methods below are the few examples

Sharepoint Custom so called KPI

Highlight SharePoint List rows conditionally

SharePoint calculated column and jQuery Highlight row

and the recent one Delete button in list view

Now almost every time our main concept is let SharePoint work their way and we will work our way without changing its basics.

So for that many a times we change the rendered HTML by SharePoint to meet client expectation.

But sometime we have loose against SharePoint but not now, we find the way to get HTML of the Grouped by data.

Let us explain quickly…
In listview web part if we use group by then SharePoint make Ajax call and on click of + it get’s the data to render. In normal (without group by view) its working normally but in group by view we are not getting HTML in view source.

As a result our above post fails to change HTML as desired.

But now way is there… for How to get group by HTML in SharePoint Listview
We got noticed when one of our readers point us to a wonder full article by Alexander Bautz

so first of all thanks to Alexander Bautz for his efforts

Now lets’ go to the code without wasting time.

Take jquery reference

<script type="text/javascript">
$(document).ready(function(){
ChangeHTML();
});

function ChangeHTML()
{
//the code goes to change the HTML
//you get reference code by above links

}

function ExpGroupRenderData(htmlToRender, groupName, isLoaded) {

if(isLoaded == 'false')
{
setTimeout(ExpGroupRenderData,1000);
}
else
{
ChangeHTML();
}

}
</script>


Now lets us explain you how it works

The key thing to understand is the SharePoint function ExpGroupRenderData
While clicking on the + sign for group by SharePoint call web service from JavaScript to get the data and this function renders data after everything.

Now another problem is this function is called asynchronously. So when you check htmlToRender variable you will not get full data till the time isLoded is true
And when we tried in SharePoint 2010 it always show false so we had use set time out function which will called after each second.

Once isLoded is true then bingo we will get all the HTML and make our changes.
So sorry guys for not getting with full sample example because of time crunch but all the SP lover will get the idea what is happening and how much it’s useful. We will soon try to get working example for you.

Feel free to ask queries, we will happy to help (if possible).

Tuesday, May 17, 2011

Delete button in list view

Hi, we all know that list view is the best way to show the data to use without wasting of time.

It gives all the basic required functionality but as always client ask few simple things which SharePoint is not providing by default.

And for that silly thing we have to create custom webpart or custom listview

We already shown you few ways to show how you can change your listview HTML by JQuery and JavaScript like
http://www.sharepointkings.com/2010/04/sharepoint-custom-so-called-kpi.html
http://www.sharepointkings.com/2008/12/highlight-sharepoint-list-rows.html
http://www.sharepointkings.com/2009/04/sharepoint-calculated-column-and-jquery.html
All jquery stuff http://www.sharepointkings.com/search/label/JQuery

Recently we got requirement that client needs delete button link in SharePoint list view
Now edit button is available but delete button is not available in default view.

So finally we are went the same way as we always used: change the Listview HTML in JavaScript

We created a text field “Delete” and put some below text inside that field
<div><a href='#' onclick='javascript:DeleteItem(2);'><img alt='delete' src='/_layouts/images/delitem.gif' style='border:0px;' /></a></div>
where 2 will be listitem ID

Note: calculated column is not supporting ID. So we can use event handler or SPDesigner workflow to fill this field.

Now what we had done is on DeleteItem function we called web service from JavaScript using SPServices jQuery and delete the item and then just reload the thepage.

That’s it
Here is the function which called on page load to change text field to div field.

we have to put this JavaScript on the same page of list view.


$(document).ready(function(){
$(".ms-vb2:contains('<div')").each(function(){
var tempDIV = document.createElement ("div");
tempDIV.style.cursor = "pointer";
tempDIV.innerHTML = $(this).text();
$(this).text("");
$(this).append(tempDIV);

});
});

function DeleteItem(cID)
{try{
var cnf = confirm("Are you sure you want to send the item(s) to the site Recycle Bin?");
//this is default message that sharepoint gives.
if(cnf)
{
$().SPServices({
operation: 'UpdateListItems',
listName: ‘your list name’,
batchCmd: 'Delete',
ID: cID,
completefunc: function (xData, Status) {
location.reload(true)
}
});
}


}catch(ex){alert(ex);} }</script>


Hope fully you will get the idea how its working.

Tuesday, September 28, 2010

SharePoint Cascading drop downs using jQuery

Hi All,

How many times you require functionality where in based on the selection of parent drop down generates the values to the child drop down. Examples, selection of country fills the states drop down.

Well, of course there is a way like creating custom field which can definitely achieve this job. However this requires us to write down the code and .ascx custom fields and deploy on the server to get it to the action.

We can achieve the same with the help of jQuery. Yes, no files and no code. Without them we can achieve this. So why to wait? Let’s explore more in this.

Before we start the exam, you will need to fantastic jQuery from

jQuery 1.3.2.min.js

and SPServices jQuery from

SPServices jQuery

Once you download these two .js files, upload them to any of the document library where you have the permission over the site.

Now go ahead and create one list. I am calling it a CategoryType and adding two values in the list.


Now I am creating one more list and call it as a CategoryRelationList and create one column called Category which is a look up column to the CategoryType title column and add few items.


And now to put it in action, we will create one more list and we call it RequestForm and create two columns, Category look up to CategoryType list title column and Product look up column to the CategoryRelationList title column. This is the list where we will use the cascading drop down service from SPServices jquery library


Now here comes a good part. Now you have two ways to achieve this, the simplest which I believe is by using Content editor web part on both new form and edit form. Add content editor web part and add following lines to it. (Check your document library path in src attribute where you have kept two js files which we downloaded earlier)

<script language="javascript" type="text/javascript" src=" /Shared%20Documents/jquery-1.3.2.min.js"></script>

<script language="javascript" type="text/javascript" src=" /Shared%20Documents/jquery.SPServices-0.5.6.min.js"></script>
<script language="javascript" type="text/javascript">

$(document).ready(function() {
$().SPServices.SPCascadeDropdowns({
relationshipList: "CategoryRelationList",
relationshipListParentColumn: "Category",
relationshipListChildColumn: "Title",
parentColumn: "Category",
childColumn: "Product",
debug: true
});

});
</script>


OR the other way to achieve this is open SharePoint designer and then open site where this list is located, open NewForm.aspx, check out the form and find the following line.

<asp:Content ContentPlaceHolderId="PlaceHolderMain" runat="server">

Add the above script exactly below this. Save it and check in. This will also do the job for you. Do the same for edit form as well.

Now let me explain each parameter in the script.

relationshipList – This is the name of the list where we have kept the relationship.
relationshipListParentColumn – This is the parent column in the relationship list.
relationshipListChildColumn – This is the child column in the relationship list.
parentColumn – parent column in the list where we want to implement this.
childColumn – child column in the list where we want to implement this.

Now see it in action. Open the list and click on new and see the magic.


Hope that you have enjoyed this post. Keep giving the comments. we love them. :)

Friday, May 14, 2010

Required field using jQuery in Newform and EditForm

Hi All,

May times there are requirements like we need to define a field as a required field in SharePoint. Yes, you will say what is new with that? This is built in feature of SharePoint.

Ok, what if I say that field should be mandatory while updating list item but not while inserting the list item. What if I say if value of one drop down in xyz, abc field becomes mandatory?

Well, in scenarios like this we can use jQuery. Yes, jQuery is the answer to this question. Let us put this in to a real scenario.

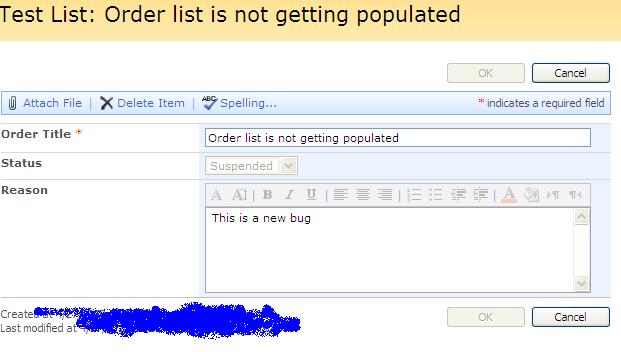
Ok, before getting into this, I would like to share some steps about this. First we need to handle the change event of drop down. Then we will check the value of the drop down, if the value is suspended, we will pop up one message saying that now because you have selected Suspend status, you must mention the reason for this and we will disable the button OK. We have to do this because there is no way we can stop user clicking ok button unless user writes the reason. Otherwise item will be updated which we do not want.

we also need to handle lost focus event of text area, and at the end we will count the number of characters in the text area. If total comes to zero, well then keep button disabled. If it is not zero and more than zero, then we will enable the button.

Or else we can ask user to select Status back to value which was earlier and enable the button.

Yes, this all steps are required. Try for yourself and you will realize that yes these all steps are required. It may look like some lengthy solution, But remember we did all this stuff right on browser. We never went to write down the code in event handler (this stuff really annoy the end user, as it takes to a different error page, or creating any custom field for this. This is what we wanted and this is the power of jQuery. Isn’t it.

Ok, let us see now in practical

First add the content editor web part above the New Form or Edit Form LVWP where ever you want to place the logic.

This is the layout of my editform.


Add the following code to the content editor web part. Do not forget to reference appropriate jquery file from your library.

<script type="text/javascript" src="{site URL}/Shared%20Documents/jquery-latest.js">
</script>


$(document).ready(function() {
//Below function makes sure that if the status is not suspended in edit mode, it disables the reason text //area
var text = $("select[title$='Status'] :selected").text();
if(text != "Suspended")
{
$("textarea[title$='Reason'] ").attr('disabled', true);

}


Below function makes sure that when the status drop down is changed to suspended status, reason textarea becomes enabling to write down the result and disabled the OK button unless user enters the reason. If suspend is not selected, again disable the reason field and enable the OK button.

$("select[title$='Status']").change(function()
{

var text = $("select[title$='Status'] :selected").text();

if(text == "Suspended")
{
alert('you must provide reason for suspending this order');
$("input[value$='OK']").attr('disabled', true);
$("textarea[title$='Reason'] ").attr('disabled', false);
}
else
{
$("input[value$='OK']").attr('disabled', false);
$("textarea[title$='Reason'] ").attr('disabled', true);
}

});


Finally below is the blur event of the reason field, which checks if anything is entered in reason field or not. If not keep the button OK disabled, or else if something is written enable the button.

$("textarea[title$='Reason']").blur(function()
{

var text = $("textarea[title$='Reason'] ").text();

if(text.length <= 0)
{
$("input[value$='OK']").attr('disabled', true);
}
else
{
$("input[value$='OK']").attr('disabled', false);
}


});

});

</script>


So here is the result of it.

See below image as status is not suspended I am not able to type in anything in reason field.


Below figure shows when I changed the status to Suspended, it pops up message and disabled the ok button after message is displayed.


After mentioning the reason, OK button enables.


That is it. You have just made required field validation without using any custom field or writing event handler.

Friday, April 30, 2010

Limit character length in multiline text box in SharePoint using jQuery

Hi All,

SharePoint really provides many of the features out of the boxes. I would say 75% of feature it provides out of the box; however there are some scenarios where these features cannot help us.

Let me give you a classic example. Recently I got a simple requirement. When we create multiline text box in SharePoint, unfortunately there is no option to limit the number of characters in that. It is available in single line of text field but not in multiline text.

Ok, what is the solution? Yes, we can create custom field and ready to go. Yes I agree. But this will take time to create custom field and deploy on the server which may administrator in the company does not give access easily to upload anything.

Hummm…..So what to do? Answer is use jQuery. JQuery is here to save you.

All you have to do is add content editor web part on the page, and just bind keypressed event of textbox and count the number of characters. That is it. So simple. If it exceeds certain number of characters, you popup some message and then do not allow to enter more character in that.

Sounds great. Isn’t it? I know, yes of course.

At least this is far better than developing custom field type and then installs it in server through WSP.

Make sure that you add content editor web part in New Form as well as Edit Form both.

Let us say I have reason filed as multiline textbox in the list and I want to limit number of characters in that 100. We do not want to allow any more character to type in.

So here is the jQuery that you write. If you know that jQuery syntax, then this is not difficult to understand. Text area is what we are looking for with title Reason as list field.


And there you go, try to add more characters in reason and see the result.


So, doesn’t it save your lot of time to write custom field for such a common requirement? Do share your thoughts

Wednesday, April 28, 2010

Toggle multiline text area in SharePoint using jQuery

Hi All,

Let us explore more in to area of jQuery with respect to SharePoint. When we want some field to not appear in the NewForm or EditForm or so we can make a use of jQuery to hide them.

When we want to toggle the visibility of any field on the form, we can achieve the same with the jQuery.

jQuery has helped a lot in the world of SharePoint.

I’ve created one test list and I have one column named status. There are four entries in that as you can see in below figure.


Now I want to toggle the Reason text area below that. So I’ve written the following code in jQuery. Just add content editor web part and write down the following code. You have to modify your HTML portion based on your field name. Just observe the view source and check the hierarchy level for span, td and tr for the field and accordingly make the change.


Note: One big change. make sure that you write == sign to compare instead of = sign. make this change while writing the code for above figure.

We are handling the change event of dropdown here; you can do the same stuff with checkbox, just make sure to change the change event function to click function. That is the only change required if you would like to go with checkbox.

When I select the drop down and change the value, I get to see text area also toggles.


And when I change the drop down value


You can also use hide () and show () function to get the desired field on the page and use these methods to perform your own functions as per the need.

Tuesday, April 27, 2010

Disable OK button in SharePoint using jQuery

Hi All,

It is really funny but today I come to know the real power of jquery. I know that jQuery is real cool dude in web world. However when I applied some stuff, it got my relief because it solved my two problems.

When you want to disable OK button in NewForm, Editform of list or document library in SharePoint, you can achieve this with the help of jQuery and it helps a lot. Let us say that you have some requirement like if status is suspended then nobody should be allowed to make any changes in the status field.

Let us add complexity to this. We have attached a workflow that triggers on update. Now the problem with SharePoint is even though nothing is updated, then also it triggers the workflow. So if you do not disable OK button and you go and click on edit item. And then when you do not update anything, click on OK. Boom...workflow triggers. Man…I don’t like this.

Here comes jQuery to save us. Disable the status and disable OK button. That will solve the purpose.

What do you need to do? Well, I have created dummy list to demonstrate this.

I have few fields and one of them is status. Statuses are New, In Progress, Archived and suspended.

When the status is suspended, I do not want to allow any of the users to change the status and also there is workflow attached to this list which triggers if we update any item. Workflow is attached from the SharePoint designer. Hence we are even not writing a code in event handler to check for the item has changed or not in ItemAdding event.

So write down this jQuery in content editor web part. Just add CEWP on top with appending &toolpaneview=2 to the URL.

Add following code to the content editor web part. If you observe we have taken reference of jquery from shared document. You can download the jQuery and then give href to the document library path. What we have done in this jQuery is simply finding all drop downs and then checking its value. If it’s suspended, then we are again checking button OK by its class and once found, we are disabling the button. Hummm…Easy ha? Yes it is.


And see the result.


Get ready for some more exciting stuff with jQuery.

Thursday, April 1, 2010

Sharepoint Custom so called KPI

Hay Guys,

In general KPI most of the time we are having simple requirement.

Like if Risk is high or status is incomplete then it should show in RED.
If Low then Green and Medium then orange.

Same functionality we had done for listview webpart which show Red/green/yellow icon based on status.

Here is the example
In our list we had a column called criticality with dropdown values

High
Low
Medium

Check the screenshot below


And check another one after what we had done.


So you can see it looks like KPI
This is similar like
http://www.sharepointkings.com/2008/12/highlight-sharepoint-list-rows.html
but everyone is asking regarding this KPI so we had done this.

Now, What we had done
It’s nothing just a trick of javascript/jquery
Here is the code

$(document).ready(function() {
var strURL = window.location.href;
if ((strURL.toUpperCase().indexOf("Lists/Risk%20Management".toUpperCase()) != -1) ||
(strURL.toUpperCase().indexOf("Lists/Risk Management".toUpperCase()) != -1)) {
//alert('pp');
$(".ms-vb2:contains('High')").each(function() {
var tempDIV = document.createElement("DIV");
tempDIV.style.cursor = "pointer";
tempDIV.innerHTML = "<img src='_LAYOUTS/SPKings/Images/Red.gif' />"; //$(this).text();
//alert($(this).html());
$(this).text("");
$(this).append(tempDIV);

});
$(".ms-vb2:contains('Low')").each(function() {
var tempDIV = document.createElement("DIV");
tempDIV.style.cursor = "pointer";
tempDIV.innerHTML = "<img src='_LAYOUTS/SPKings/Images/Green.gif' />"; //$(this).text();
//alert($(this).html());
$(this).text("");
$(this).append(tempDIV);

});
$(".ms-vb2:contains('Medium')").each(function() {
var tempDIV = document.createElement("DIV");
tempDIV.style.cursor = "pointer";
tempDIV.innerHTML = "<img src='_LAYOUTS/SPKings/Images/Amber.gif' />"; //$(this).text();
//alert($(this).html());
$(this).text("");
$(this).append(tempDIV);

});
$(".ms-vb2:contains('No Criticality')").each(function() {
var tempDIV = document.createElement("DIV");
tempDIV.style.cursor = "pointer";
tempDIV.innerHTML = "<img src='_LAYOUTS/SPKings/Images/NoData.gif' />"; //$(this).text();
//alert($(this).html());
$(this).text("");
$(this).append(tempDIV);

});
}

});


What we had done is we are checking URL
If it is out target list, then we apply javascript and as you can see we are finding High and replacing that with Red.gif.

Same way for other criticality also

You can use image from image library also. We had used images from layouts.

Don’t forget to include jquery.JS to make it work.

Guys, this is not recommended way for authentic KPI but for time being or for demo purpose where we are not having time and have to show a lot of thing this will act as icings on the cake. :)

Tuesday, April 21, 2009

SharePoint calculated column and jQuery Highlight row

Hi All,
Here I am writing new blog after long time I highly apologies to our all regular SharePointKings readers. I have explore what you can do by SharePoint calculated column and jQuery here is small practical stuff follow the instructions and do it yourself you will surely enjoy this work I am sure.
Sometimes you need to represent SharePoint List in terms of legend like in map. Say for example you have result list and you want to show those Student who got less than 35% marks Should Have “Red” Legend, those who got 100% marks with “Blue” Legend , those who got >65% with “Pink” Legend , those who got >70% with Yellow, marks > 60 with Green.

Follow the steps
1. Create Result SharePoint custom list.


2. Create column StudentName single line text.

3. Create Column Color with Calculated Column.


Copy and Paste following code in formula.
=IF((Marks*100)>=100,"#0000FF",IF((Marks*100)>=70,"#FFFF00",IF((Marks*100)>60,"#FF00FF",IF((Marks*100)>=35,"#00FF00","#FF0000"))))

4. Create another column called Display.


Copy and paste following formula
="<DIV style='border: 1px "&Color&" solid;background-color:"&Color&";color:#FFFFFF;'>"&Marks*100&"<DIV>"

5. Now your fields looks like this


6. Open new form and Add Student Name and Marks obtained by him.
7. Once you enter marks for student your SharePoint list looks like this


8. Edit Page

9. Add ContentEditor webpart.

10. Add Following Code in Source Editor

<script type="text/javascript">
if(typeof jQuery=="undefined"){
var jQPath="http://ajax.googleapis.com/ajax/libs/jquery/1.3.1/";
document.write("<script src='",jQPath,"jquery.min.js' type='text/javascript'><\/script>");
}
</script>

<script type="text/javascript">


$(document).ready(function(){
$(".ms-vb2:contains('<DIV')").each(function(){
var tempDIV = document.createElement ("DIV");
tempDIV.style.cursor = "pointer";
tempDIV.innerHTML = $(this).text();
$(this).text("");
$(this).append(tempDIV);

});
});
</script>

11. Click ok button
12. Now your result SharePoint list look like


Cool……………
It works now you can do many more things using jQuery and Calculated column.
For calculated column refer


do let us know your experience with this post.
Cheers,

Sunday, December 28, 2008

Highlight SharePoint List rows conditionally

Hi All,here is some JQuery Stuff that will help you to highlight rows of SharePoint List items based on some condition.


<script type="text/javascript">
if(typeof jQuery=="undefined"){
var jQPath="http://ajax.googleapis.com/ajax/libs/jquery/1.3.1/";
document.write("<script src='",jQPath,"jquery.min.js' type='text/javascript'><\/script>");
}
</script>
<script>

$(document).ready(function(){

$Text = $("td .ms-vb2:contains('Sales')");

$Text.parent().css("background-color", "green");

$Text =$("td .ms-vb2:contains('Account')");

$Text.parent().css("background-color", "orange");

});

</script>


above JQuery code will highlight if Column has 'Sales' then row will highlight with color green.if column has value Account then it will highlight with orange color.

Look at second Post http://www.sharepointkings.com/2009/04/sharepoint-calculated-column-and-jquery.html


Share your SharePoint Experiences with us...
As good as the SharePointKings is, we want to make it even better. One of our most valuable sources of input for our Blog Posts comes from ever enthusiastic Visitors/Readers. We welcome every Visitor/Reader to contribute their experiences with SharePoint. It may be in the form of a code stub, snippet, any tips and trick or any crazy thing you have tried with SharePoint.
Send your Articles to sharepointkings@gmail.com with your Profile Summary. We will Post them. The idea is to act as a bridge between you Readers!!!

If anyone would like to have their advertisement posted on this blog, please send us the requirement details to sharepointkings@gmail.com