


Hi All,
There is an interesting JavaScript that i found while using the javascript code in webpart or any aspx page that you are developing for moss or even in master page or anywhere when you require to write a code.
This variable _spUserId is useful to know the ID of the logged in user in javascript.
Just try to login to your site and then go to address bar and then write javascript
javascript:alert(_spUserId); and see what it gives you and try using different IDs.
From there only you will get an idea that it is returning the IDs of the logged in user.
That's it.
Tuesday, July 29, 2008
Thursday, July 24, 2008
Playing Video in List Items
Hi All,
One day I thought it would be nice if we have something in moss which allows me to upload the video and can share with others right away. Then I thought yes, it is also possible to play with media player having properties that fetch it from list and play it for you. Or other way is to use silver light web part that renders the contents of your video and you can see it.
I would like to thank CodePlex for all downloads and this wonderful idea.
But then also here comes one very interesting part. Interesting part is video. Yes the size of video. We all know that storing video will occupy much space on your disk and it also depends upon duration and format of video.
If you have enough space on your server to store then it is fine to use silver light web part or media player to render that video. But as soon as your videos grow then your server is in trouble. It will always take time to render and stream.
So I got an idea but I was not aware about how I can do it. The idea is I should have some utility at the time of inserting data in the list or document library where we can upload the video. It sounds interesting.
One more is my concern is that better that I upload my all videos on You Tube and let me use the embedding object as part of script so that my space problem also solves.
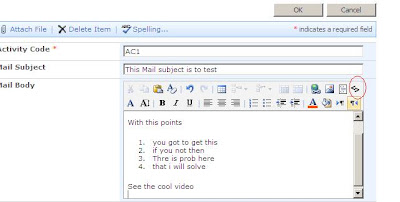
Let me tell you the scenario why I came across this kind of stuff. At the time of creating user interface for a new project, I was responsible to record the UI part of a page and then send it to client to see them. Same case if client is also developing something which involves steps to learn and process to explain they also record from any recording software and send back to us. I also used to so the same. But then I thought that it would be better that we upload the Video on You Tube and if I can find a way where I can insert it in the Rich Text Editor of MOSS then nothing like that.
It is all about enhancing Rich Text Editor because Moss rich Text Editor is yet a powerful utility but still lakes the video support. So I wanted to have something from which I can embed object (like You Tube gives us URL for embedding the videos) so that I can see all the videos right from my list or my document library without going to You Tube and finding the video and then playing.
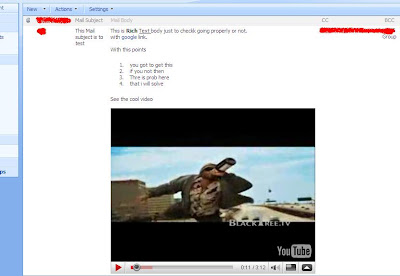
And this also works as you have all videos available in the List Items as well. So on allItems.aspx itself you can see your video streaming. No Space occupied and rendering is also fast.
How about “How Tos” series in the List. All information plus video in the Share point list, nothing better than this. Isn’t it.
So I searched something on Internet if I can found anything like this and I come across to a wonderful stuff and I got what I wanted.
Here when you will download the zip file and when you unzip the file, you will get two files .js and .gif. Just upload these two files on http://<site>/_catalogs/masterpage and then edit the master page in sub site or global default.master if you want to make this feature available in all your web apps.
<script type="text/javascript" src="/_catalogs/masterpage/erte.js"></script>
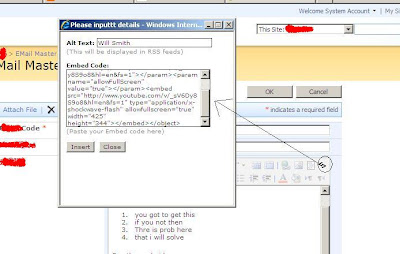
And there you go. Just open your site and just see now to your RichText Field. You Will find one more button. Click on that, it will ask you the alternate text and embed code. Embed the code like You tube gives you and just see. You are ready for your video streaming without occupying space on server and smooth video streaming. Only thing is you should have access to you Tube site.
This is not something limited to You Tube only, other stuffs can also be done with the help of this.
soon i an also coming up with part-2 of this series.
One day I thought it would be nice if we have something in moss which allows me to upload the video and can share with others right away. Then I thought yes, it is also possible to play with media player having properties that fetch it from list and play it for you. Or other way is to use silver light web part that renders the contents of your video and you can see it.
I would like to thank CodePlex for all downloads and this wonderful idea.
But then also here comes one very interesting part. Interesting part is video. Yes the size of video. We all know that storing video will occupy much space on your disk and it also depends upon duration and format of video.
If you have enough space on your server to store then it is fine to use silver light web part or media player to render that video. But as soon as your videos grow then your server is in trouble. It will always take time to render and stream.
So I got an idea but I was not aware about how I can do it. The idea is I should have some utility at the time of inserting data in the list or document library where we can upload the video. It sounds interesting.
One more is my concern is that better that I upload my all videos on You Tube and let me use the embedding object as part of script so that my space problem also solves.
Let me tell you the scenario why I came across this kind of stuff. At the time of creating user interface for a new project, I was responsible to record the UI part of a page and then send it to client to see them. Same case if client is also developing something which involves steps to learn and process to explain they also record from any recording software and send back to us. I also used to so the same. But then I thought that it would be better that we upload the Video on You Tube and if I can find a way where I can insert it in the Rich Text Editor of MOSS then nothing like that.
It is all about enhancing Rich Text Editor because Moss rich Text Editor is yet a powerful utility but still lakes the video support. So I wanted to have something from which I can embed object (like You Tube gives us URL for embedding the videos) so that I can see all the videos right from my list or my document library without going to You Tube and finding the video and then playing.
And this also works as you have all videos available in the List Items as well. So on allItems.aspx itself you can see your video streaming. No Space occupied and rendering is also fast.
How about “How Tos” series in the List. All information plus video in the Share point list, nothing better than this. Isn’t it.
So I searched something on Internet if I can found anything like this and I come across to a wonderful stuff and I got what I wanted.
Here when you will download the zip file and when you unzip the file, you will get two files .js and .gif. Just upload these two files on http://<site>/_catalogs/masterpage and then edit the master page in sub site or global default.master if you want to make this feature available in all your web apps.
<script type="text/javascript" src="/_catalogs/masterpage/erte.js"></script>
And there you go. Just open your site and just see now to your RichText Field. You Will find one more button. Click on that, it will ask you the alternate text and embed code. Embed the code like You tube gives you and just see. You are ready for your video streaming without occupying space on server and smooth video streaming. Only thing is you should have access to you Tube site.


This is not something limited to You Tube only, other stuffs can also be done with the help of this.
soon i an also coming up with part-2 of this series.
Tuesday, July 22, 2008
Removing single file upload menu from MOSS Toolbar
Hi All,
I am not too sure about the scenario that you may need. But just for a fun purpose i though if we have multiple file upload menu then what to do with single file upload menu, anyways you can upload the single file with multiple file upload menu.
I though let me hide that manu just for a fun purpose.
(1) Add content editor webpart on AllItems.aspx of your document library.
(3) Open Source editor
(4) Paste the following lines of code and see, your single upload will get disabled
<script type="text/javascript">
function GetElementByText(tagName, title)
{
var a = document.getElementsByTagName(tagName);
for (var i=0; i < a.length; i++)
{
if (a[i].text)
{
if (a[i].text === title)
{
return a[i];
}
}
}
return null;
}
if (window.onload)
{
var oLoad = window.onload;
window.onload = function bodyLoad()
{
oLoad();
var o = GetElementByText("ie:menuitem","Upload Document");
if (o)
{
o.disabled = true;
}
}
}
</script>
That's it. Your job is done.
Thanks for the wonderful idea shared at this link
Saturday, July 19, 2008
Custom membership provider using SharePoint Custom List
Hi,
SharePoint List Membership Provider.
Custom membership provider using SharePoint Custom List.
Here is Form Based Authentication using SharePoint custom list. Users profile is stored in Custom SharePoint List.
This utility is useful when you want you site users name, password and other user related information stored in Custom SharePoint List and you want Form Base Authentication (FBA) using this custom list. You can mange user from list.
click here to download Assembly and Configuration guide.
- solution contains sample userprofile.stp for List
- Configuration guide.
- source code will be provided on demand.
click here to download utility.
To get utility source code so you can modify according to your requrement write us from Email to SharePoint kings link with Subject "Custom Membership Provider" and your email ID.
Friday, July 18, 2008
Collapsible Panel extender CSS issue with Moss
Since I start implementing AJAX in moss, we are facing problem with most of the every control.
Asp.Net Ajax Controls is not easy to integrate with SharePoint.
In my previous post I solve problem with Tab Container with header display issue.
Now, here I’m explaining collapsible panel extender issue with SharePoint /Moss.
I am facing a problem that Collapsible Panel is not collapsing in SharePoint/Moss webpart.
By default it should hide the content area and on clicking on the header it should expand the content area.
But it is not working as easily like it is working in Simple Asp.Net application.
In my case collapsible panel is not hiding content, it just flicker and again come to the same position as it is in default position.
So from this behavior what I think is that if it is (same code) working in standard asp.net than there is not any problem in control but because it is rendering in SharePoint and because of SharePoint’s JavaScript/JS and its CSS it conflicting with something while rendering.
So first I start with CSS because defiantly it’s easy.
Now if you check your AjaxControlToolKit -- > sample website --> StyleSheet.css
You will find two css class under “/*CollapsiblePanel*/”
One is “.collapsePanel”
Other is “.collapsePanelHeader”
So I used it in my .ascx (sorry I forget to explain that I’m using user control for webpart)
By adding <style type="text/css" > </style> tag.
As we are not facing any problem in header so there is no need to touch that CSS.
So by trial and error I found one solution.
I have to add in the div of content panel
And have to set two properties of “CollapsiblePanelExtender”
Here is the working code
Asp.Net Ajax Controls is not easy to integrate with SharePoint.
In my previous post I solve problem with Tab Container with header display issue.
Now, here I’m explaining collapsible panel extender issue with SharePoint /Moss.
I am facing a problem that Collapsible Panel is not collapsing in SharePoint/Moss webpart.
By default it should hide the content area and on clicking on the header it should expand the content area.
But it is not working as easily like it is working in Simple Asp.Net application.
In my case collapsible panel is not hiding content, it just flicker and again come to the same position as it is in default position.
So from this behavior what I think is that if it is (same code) working in standard asp.net than there is not any problem in control but because it is rendering in SharePoint and because of SharePoint’s JavaScript/JS and its CSS it conflicting with something while rendering.
So first I start with CSS because defiantly it’s easy.
Now if you check your AjaxControlToolKit -- > sample website --> StyleSheet.css
You will find two css class under “/*CollapsiblePanel*/”
One is “.collapsePanel”
Other is “.collapsePanelHeader”
So I used it in my .ascx (sorry I forget to explain that I’m using user control for webpart)
By adding <style type="text/css" > </style> tag.
As we are not facing any problem in header so there is no need to touch that CSS.
So by trial and error I found one solution.
I have to add in the div of content panel
style="height:0px;position:absolute;”
And have to set two properties of “CollapsiblePanelExtender”
CollapsedSize="0"
ExpandedSize="700"
Here is the working code
<style type="text/css" >
/* IE theme – Backgrounds */
.collapsePanel {
background-color:white;
overflow:hidden;
/*height:0px;
position:absolute;*/
}
.collapsePanelHeader{
width:100%;
height:30px;
background-image: url(images/bg-menu-main.png);
background-repeat:repeat-x;
color:#FFF;
font-weight:bold;
}
</style>
<asp:Panel ID="Panelheader" runat="server" style="cursor:pointer;" >
<div id="div1" runat="server" >want to check its working or not ?</div>
</asp:Panel>
<br />
<asp:Panel id="Panelcontent" runat="server" >
<div id="div2" style="height:0px;position:absolute;" >
your data will go here
<br />
<br />
<br />
it's working ....
</div>
</asp:Panel>
<cc1:CollapsiblePanelExtender
ID="CPanelGeneralInformation"
runat="server"
TargetControlID="Panelcontent"
CollapseControlID="Panelheader"
ExpandControlID="Panelheader"
Collapsed="true"
SuppressPostBack="true"
AutoCollapse="false"
AutoExpand="false"
ScrollContents="false"
ExpandDirection="vertical"
CollapsedSize="0"
ExpandedSize="700"
>
</cc1:CollapsiblePanelExtender>
Cancel Button in MOSS ASPX , ASCX forms
Hi All,
One time i came across to a very good thing that we can have default cancel button that with without writing a code you can redirect to any source. (if not provided, default source)
This button is functional. By functional means it will handle redirection automatically.
Let's say, you would like to have a button Cancel (Sharepoint standard) and want that button to behave in same fashion as standard sharepoint cancel button does, then go for the below code :
<wssuc:ButtonSection runat="server">
<Template_Buttons>
<asp:PlaceHolder ID="PlaceHolder1" runat="server">
</asp:PlaceHolder>
</Template_Buttons>
</wssuc:ButtonSection>
No code on cancel button. it redirects automatically to source.
That's it. your job is done.
Thursday, July 17, 2008
SharePoint Column: Lookup (information already on this site)
Hi All,
This Post will discuss in detail about the options you have to set when using a Sharepoint Lookup Field. When you do a create Column in sharepoint you get it as
Lookup (information already on this site) on the Create column page.
To get a better understanding of the concept lets take up a scenario.
Scenario:
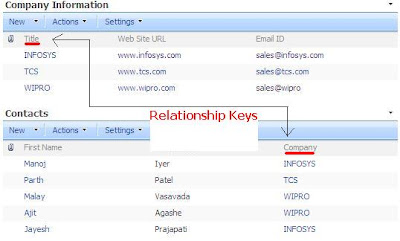
We have 2 lists
1) Company Information
2) Contacts
The relationship between then is established by using a Lookup column
“Company” in contacts
These 2 lists are placed on the Default.aspx (Home page) of the Site in the form of DataView web parts.
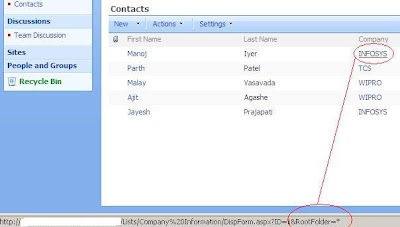
Refer the image as below:
What is the requirement?
Click on the “Company” Hyperlink It should take you to the DispForm.aspx of
the list item in "Company Information" List.
Click the “Close” Button of the DispForm.aspx it should bring you back to the Default.aspx (Home page) of the Site where we have the 2 DataView Lists.
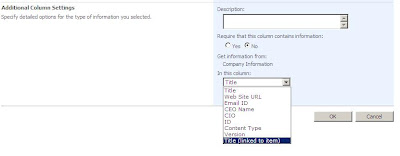
Here “Company” column is a Lookup (information already on this site) Field.
To achieve the above requirement it’s very important to set its
Additional Column Settings -> In this column value to:
“Title (linked to item)” and not to “Title”. Why??? Refer the reason below.
Reason:
If you set the Additional Column Settings -> In this column value to : “Title”
In a Lookup Column, then the Hyperlink column created will show a &Root Folder=* at the end of the Hyperlink URL. This will make the navigation to go to AllItems.aspx of the “Company Information” List on clicking “Close” button on the DispForm.aspx
If you set the Additional Column Settings -> In this column value to:
“Title (linked to item)”In a Lookup Column, then the Hyperlink column created will not show any such Root Folder parameter. This will make the navigation to go to Default.aspx (Home page) of the Site
on clicking “Close” button on the DispForm.aspx
Refer the Images for a clear understanding.
.JPG)

This Post will discuss in detail about the options you have to set when using a Sharepoint Lookup Field. When you do a create Column in sharepoint you get it as
Lookup (information already on this site) on the Create column page.
To get a better understanding of the concept lets take up a scenario.
Scenario:
We have 2 lists
1) Company Information
2) Contacts
The relationship between then is established by using a Lookup column
“Company” in contacts
These 2 lists are placed on the Default.aspx (Home page) of the Site in the form of DataView web parts.
Refer the image as below:

What is the requirement?
Click on the “Company” Hyperlink It should take you to the DispForm.aspx of
the list item in "Company Information" List.
Click the “Close” Button of the DispForm.aspx it should bring you back to the Default.aspx (Home page) of the Site where we have the 2 DataView Lists.
Here “Company” column is a Lookup (information already on this site) Field.
To achieve the above requirement it’s very important to set its
Additional Column Settings -> In this column value to:
“Title (linked to item)” and not to “Title”. Why??? Refer the reason below.
Reason:
If you set the Additional Column Settings -> In this column value to : “Title”
In a Lookup Column, then the Hyperlink column created will show a &Root Folder=* at the end of the Hyperlink URL. This will make the navigation to go to AllItems.aspx of the “Company Information” List on clicking “Close” button on the DispForm.aspx
If you set the Additional Column Settings -> In this column value to:
“Title (linked to item)”In a Lookup Column, then the Hyperlink column created will not show any such Root Folder parameter. This will make the navigation to go to Default.aspx (Home page) of the Site
on clicking “Close” button on the DispForm.aspx
Refer the Images for a clear understanding.

.JPG)

Tuesday, July 15, 2008
Show Quick launch bar in all pages in moss
Hi All,
May times we come across to a situation where you are updating a item in a list or document library Or you are Viewing the item and you want to quickly navigate to any list, then all you need is go back to default.aspx of yor site and then go from there.
so question is : how to show quick luanch bar in All pages in Moss site?
If we find a way where we can have that quick launch bar visible on eveypage, so that we can navigate to anywhere from anywhere.
So here is a trick to go for this :
(1)open your master page ( Better to create your own and attaching it with your site collection, otherwise it will affect whole farm setup)
And better to take the backup of even your master pages before doing anything in them.
(2) Search for the following content :
<div class="ms-quicklaunchouter">
<div class="ms-quickLaunch" style="width:100%">
<h3 class="ms-standardheader">
You will find these content in one contentplaceholder.
This tag is :
<asp:ContentPlaceHolder id="PlaceHolderLeftNavBar" runat="server">
</asp:ContentPlaceHolder>
So cut all the code inside this start tag and end tag and paste it outside of endtag of that contentplaceholder.
That's it. your job is done:
See the below figures after applying change :
Above figure : EditForm.aspx
Above figure : NewForm.aspx
Above figure : DispForm.aspx
Thanks for the wonderful idea by Sean
May times we come across to a situation where you are updating a item in a list or document library Or you are Viewing the item and you want to quickly navigate to any list, then all you need is go back to default.aspx of yor site and then go from there.
so question is : how to show quick luanch bar in All pages in Moss site?
If we find a way where we can have that quick launch bar visible on eveypage, so that we can navigate to anywhere from anywhere.
So here is a trick to go for this :
(1)open your master page ( Better to create your own and attaching it with your site collection, otherwise it will affect whole farm setup)
And better to take the backup of even your master pages before doing anything in them.
(2) Search for the following content :
<div class="ms-quicklaunchouter">
<div class="ms-quickLaunch" style="width:100%">
<h3 class="ms-standardheader">
You will find these content in one contentplaceholder.
This tag is :
<asp:ContentPlaceHolder id="PlaceHolderLeftNavBar" runat="server">
</asp:ContentPlaceHolder>
So cut all the code inside this start tag and end tag and paste it outside of endtag of that contentplaceholder.
That's it. your job is done:
See the below figures after applying change :

Above figure : EditForm.aspx

Above figure : NewForm.aspx

Above figure : DispForm.aspx
Thanks for the wonderful idea by Sean
Monday, July 14, 2008
How to get user created columns from a sharepoint list - Part 2
Hi All,
This is again regarding that earlier post of sharepoint user defined columns only. Lets continue the same scenario,but with different challenge.
In first post, we discussed about the getting only user defined columns and get rid of all the other columns returned by the sharepoint list.
Read Part-1 of the series
But the now there is some requirements like updating and making the batch process for all the user defined columns even if some columns are not visible in edit mode and visible in new mode, then we need to pickup only those columns
which are visible in New but not visible in Edit OR sometime visible in Edit and not visible in New.
Before getting in to this scenario, let's dive in to understanding of fields behavious for sharepoint list/ document Library.
When you create user defined columns in Sharepoint List and when you try to access it as fieldCollection and when you try to add record or even modify the record, all fields are visible. But if you access it by code and try to
check the ShowInNew,ShowInEdit property of each user defined field, it will show you 'null'.
Now understand that before you apply these properties to the fields, these all fields are null by default. Only after applying the attribute makes them change.
That means first by default null and then when you set the properties, it will set
it is. for example if i add the field called Country by default ShowInNew, ShowInEdit all will be null, but later if i decide that we want only those fields that are having visible in NewForm only OR visible in EdirForm only then
this is the approach to go for this. so if i set that Field.ShowInEdit = false Or ShowInNew = false (Where Field is Country) then if you see the ShowInEdit OR ShowInNew Property it will return you false, and then if you set it to true, it will return you true.
So bottom line is First by default for all user defined columns ShowInEdit, ShowInNew etc will return null by default,and then according to the properties set they will return false /true depending upon properties being set on them.
Here is a code to get all user defined fields (as shown in part-1, this is extension to it) plus only those fields that are having properties ShowInNewform and ShowInEditform set. So it return all the fields that are
visible in Newform only and/or visible in Editform only.
Example also demonstrate for ViewForm,DisplayForms as well.
Soon i am going to come up with one more utility that will be part-3 of the series.
This is again regarding that earlier post of sharepoint user defined columns only. Lets continue the same scenario,but with different challenge.
In first post, we discussed about the getting only user defined columns and get rid of all the other columns returned by the sharepoint list.
Read Part-1 of the series
But the now there is some requirements like updating and making the batch process for all the user defined columns even if some columns are not visible in edit mode and visible in new mode, then we need to pickup only those columns
which are visible in New but not visible in Edit OR sometime visible in Edit and not visible in New.
Before getting in to this scenario, let's dive in to understanding of fields behavious for sharepoint list/ document Library.
When you create user defined columns in Sharepoint List and when you try to access it as fieldCollection and when you try to add record or even modify the record, all fields are visible. But if you access it by code and try to
check the ShowInNew,ShowInEdit property of each user defined field, it will show you 'null'.
Now understand that before you apply these properties to the fields, these all fields are null by default. Only after applying the attribute makes them change.
That means first by default null and then when you set the properties, it will set
it is. for example if i add the field called Country by default ShowInNew, ShowInEdit all will be null, but later if i decide that we want only those fields that are having visible in NewForm only OR visible in EdirForm only then
this is the approach to go for this. so if i set that Field.ShowInEdit = false Or ShowInNew = false (Where Field is Country) then if you see the ShowInEdit OR ShowInNew Property it will return you false, and then if you set it to true, it will return you true.
So bottom line is First by default for all user defined columns ShowInEdit, ShowInNew etc will return null by default,and then according to the properties set they will return false /true depending upon properties being set on them.
Here is a code to get all user defined fields (as shown in part-1, this is extension to it) plus only those fields that are having properties ShowInNewform and ShowInEditform set. So it return all the fields that are
visible in Newform only and/or visible in Editform only.
Example also demonstrate for ViewForm,DisplayForms as well.
SPWeb objWeb = SPContext.Current.Web;
SPList objList = objWeb.Lists["Source List"];
ArrayList strListFields = new ArrayList();
ArrayList strDisplayFormFields = new ArrayList();
ArrayList strEditFormFields = new ArrayList();
ArrayList strNewFormFields = new ArrayList();
ArrayList strViewFormFields = new ArrayList();
for (int Cnt = 0; Cnt <= objList.Fields.Count - 1; Cnt++)
{
if (!objList.Fields[Cnt].Hidden && !objList.Fields[Cnt].ReadOnlyField &&
objList.Fields[Cnt].Type != SPFieldType.Attachments)
{
strListFields.Add(objList.Fields[Cnt].Title);
if (objList.Fields[Cnt].ShowInDisplayForm == true )
{
strDisplayFormFields.Add(objList.Fields[Cnt].Title);
}
if (objList.Fields[Cnt].ShowInEditForm == true)
{
strEditFormFields.Add(objList.Fields[Cnt].Title);
}
if (objList.Fields[Cnt].ShowInViewForms == true)
{
strViewFormFields.Add(objList.Fields[Cnt].Title);
}
if (objList.Fields[Cnt].ShowInNewForm == true)
{
strNewFormFields.Add(objList.Fields[Cnt].Title);
}
}
}
Soon i am going to come up with one more utility that will be part-3 of the series.
Friday, July 11, 2008
How to get user created columns from a sharepoint list - Part 1
Hi All,
This is all about doing something which is very useful and something very interesting stuff. Ever wondered you need only those columns or fields that are defined only by user. When you are trying to get the Fields collection of a list,
what you will get is list of all columns around 52 columns from a list or document library.
One more interesting post available Hiding columns in Sharepoint List in different mode(edit/new/display)
Go for reading on part2 for more stuff of fields in the list in different modes
Some or the other day, you need only those columns or fields that are only defined by user.
Let me give you a scenario:
Scenario 1 :
One time one of our friends come across to a requirement where he needs to update and migrate the data of sharepoint site from one system to other system.
He was having a requirement of running a timer job which runs at night at 12:00 and makes the copy of Sharepoint database to other system's database for the purpose of moving the data and backing up. Those data are used by some other web application then.
so challenge was the data that should go in that system's database was only those which are user created.that is Lets say you have 10 user defined field in the List and the same fields in the database table that can be used by some other system.
so the challenge was to extract only those fields that are User created not the default ones which is return back by sharepoint list fields which are almost 52 fields.
So first we thought of making the View so that we get only those fields that are in view not all, we can always add fields in that. but that will change the View and client will not agree on that change. So making or changing a view is not a solution.
so there must be some other work around for this.
So we though to make a small stub that will return us fields that are user created only not all the fields.
You must be thinking, why only hidden property does not work in this. why you need the combination of three different properties for this. Let me explain. By checking hidden only will not give you the perfect result as
Created,CreateBy,Modified,ModifiedBy and many more are not hidden, but these fields are also not part of Newform , Editform etc. So??? this alone will surely not work. But yes these fields are read only. so by adding one more attribute to the condition will still reduce returning columns. Now what about the last condition. Its about attachment,Attachment is not a field that we want, so it will also come in that list which we do not want. Its all different ball game. So we are checking type of the field.
one of the columns from the fieldcollection returned by list is Attachments and if you check the type of that field, it will return as Attachments, so here we are checking that and also excluding it.
And there you go, you have final list of only those columns that are user defined.
Isn't it great.!!!!
Wondering why its Part 1 ...well soon i am going to post a part-2 where i needed to enhance this soltion to other extent as i am going to share it with you all soon....
This is all about doing something which is very useful and something very interesting stuff. Ever wondered you need only those columns or fields that are defined only by user. When you are trying to get the Fields collection of a list,
what you will get is list of all columns around 52 columns from a list or document library.
One more interesting post available Hiding columns in Sharepoint List in different mode(edit/new/display)
Go for reading on part2 for more stuff of fields in the list in different modes
Some or the other day, you need only those columns or fields that are only defined by user.
Let me give you a scenario:
Scenario 1 :
One time one of our friends come across to a requirement where he needs to update and migrate the data of sharepoint site from one system to other system.
He was having a requirement of running a timer job which runs at night at 12:00 and makes the copy of Sharepoint database to other system's database for the purpose of moving the data and backing up. Those data are used by some other web application then.
so challenge was the data that should go in that system's database was only those which are user created.that is Lets say you have 10 user defined field in the List and the same fields in the database table that can be used by some other system.
so the challenge was to extract only those fields that are User created not the default ones which is return back by sharepoint list fields which are almost 52 fields.
So first we thought of making the View so that we get only those fields that are in view not all, we can always add fields in that. but that will change the View and client will not agree on that change. So making or changing a view is not a solution.
so there must be some other work around for this.
So we though to make a small stub that will return us fields that are user created only not all the fields.
ArrayList strNonHiddenFields = new ArrayList();
SPWeb objWeb = SPContext.Current.Web;
SPList objList = objWeb.Lists["Source List"];
for (int Cnt = 0; Cnt <= objList.Fields.Count - 1; Cnt++)
{
if (!objList.Fields[Cnt].Hidden && !objList.Fields[Cnt].ReadOnlyField &&
objList.Fields[Cnt].Type != SPFieldType.Attachments)
{
strNonHiddenFields.Add(objList.Fields[Cnt].Title);
}
}
You must be thinking, why only hidden property does not work in this. why you need the combination of three different properties for this. Let me explain. By checking hidden only will not give you the perfect result as
Created,CreateBy,Modified,ModifiedBy and many more are not hidden, but these fields are also not part of Newform , Editform etc. So??? this alone will surely not work. But yes these fields are read only. so by adding one more attribute to the condition will still reduce returning columns. Now what about the last condition. Its about attachment,Attachment is not a field that we want, so it will also come in that list which we do not want. Its all different ball game. So we are checking type of the field.
one of the columns from the fieldcollection returned by list is Attachments and if you check the type of that field, it will return as Attachments, so here we are checking that and also excluding it.
And there you go, you have final list of only those columns that are user defined.
Isn't it great.!!!!
Wondering why its Part 1 ...well soon i am going to post a part-2 where i needed to enhance this soltion to other extent as i am going to share it with you all soon....
Run SQL Queries and Fetch List Data from SharePoint Database (WSS_Content) Part-2
Hi All,
Here we are with Run SQL Queries and Fetch List Data from SharePoint Database (WSS_Content) Part-2
For those who are want a quick refrence of how to query Sharepoint content database
View Part-1 :
Problem Statement:
I have a List “Company Information”
I have a List “Contact”The relation between them is
“Company Information” List Item ID is Foreign Key in “Contacts” List.
I want to Show a web Part with data like:
Contact – x Belongs to Company – x
Relate the Problem and the Display of result with the above screen shots
Solution with SharePoint Object Model:
Fetch Each List Item from List “Company Information”
Get the Company ID
Fetch List Item from List “Contacts” where “Company ID” is present.
Append this information in a Data Grid and Display.
In short you will have to Loop throught the List,Compare and Display.
Solution with SQL Query on SharePoint internal Content Data base:
There are Two Lists in SharePoint internal Content Data Base
1) Lists 2) UserData
We have explained about this in Part -1.
For More information refer to this Post.
http://www.sharepointkings.com/2008/07/run-sql-queries-and-fetch-list-data.html
Write a SQL Select Query.
Run it and test it in as a New Quey in SQL Query Pan.
Take a Data Grid and Bind it with the SQL command.
Simple isn’t it !!!!
Core Logic:
Now how do you get it?
The TABLE: UserData stores all the Data (Contents of any List).
When you will query the Wss_Content data base
With a query like
You will initially go mad. But don’t freak out. Try to understand the relation ship.
When you want to get the data from multiple Lists,
You will have to apply a Self Join to the TABLE : UserData.
To understand more do a practical.
Create Two Lists as you see in the screen short
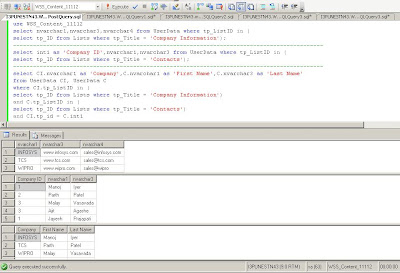
Copy the following queires and Run it on your Sharepoint wss_content database.
In this case the Sharepoint wss_content database is : WSS_Content_11112
use WSS_Content_11112
Refer below SQL Query Screep short:
Disclaimer
Running Direct queries on Sharepoint Database is not recommended by Microsoft.
Simply it's not for the faint of heart. Directly querying or modifying the database can place extra load on a server, or can expose information to users in a way that violates security policies or personal information management policies.
I highly recommend doing all testing in a non-production environment.
Here we are with Run SQL Queries and Fetch List Data from SharePoint Database (WSS_Content) Part-2
For those who are want a quick refrence of how to query Sharepoint content database
View Part-1 :


Problem Statement:
I have a List “Company Information”
I have a List “Contact”The relation between them is
“Company Information” List Item ID is Foreign Key in “Contacts” List.
I want to Show a web Part with data like:
Contact – x Belongs to Company – x
Relate the Problem and the Display of result with the above screen shots
Solution with SharePoint Object Model:
Fetch Each List Item from List “Company Information”
Get the Company ID
Fetch List Item from List “Contacts” where “Company ID” is present.
Append this information in a Data Grid and Display.
In short you will have to Loop throught the List,Compare and Display.
Solution with SQL Query on SharePoint internal Content Data base:
There are Two Lists in SharePoint internal Content Data Base
1) Lists 2) UserData
We have explained about this in Part -1.
For More information refer to this Post.
http://www.sharepointkings.com/2008/07/run-sql-queries-and-fetch-list-data.html
Write a SQL Select Query.
Run it and test it in as a New Quey in SQL Query Pan.
Take a Data Grid and Bind it with the SQL command.
Simple isn’t it !!!!
Core Logic:
Now how do you get it?
The TABLE: UserData stores all the Data (Contents of any List).
When you will query the Wss_Content data base
With a query like
Select * from UserData;
You will initially go mad. But don’t freak out. Try to understand the relation ship.
When you want to get the data from multiple Lists,
You will have to apply a Self Join to the TABLE : UserData.
To understand more do a practical.
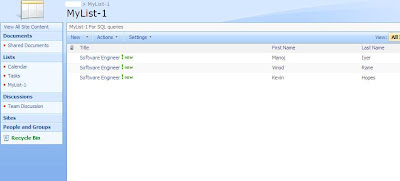
Create Two Lists as you see in the screen short
Copy the following queires and Run it on your Sharepoint wss_content database.
In this case the Sharepoint wss_content database is : WSS_Content_11112
use WSS_Content_11112
select nvarchar1,nvarchar3,nvarchar4 from UserData where tp_ListID in (
select tp_ID from Lists where tp_Title = 'Company Information');
select int1 as 'Company ID',nvarchar1,nvarchar3 from UserData where tp_ListID in (
select tp_ID from Lists where tp_Title = 'Contacts');
select CI.nvarchar1 as 'Company',C.nvarchar1 as 'First Name',C.nvarchar3 as 'Last Name'
from UserData CI, UserData C
where CI.tp_ListID in (
select tp_ID from Lists where tp_Title = 'Company Information')
and C.tp_ListID in (
select tp_ID from Lists where tp_Title = 'Contacts')
and CI.tp_id = C.int1
Refer below SQL Query Screep short:

Disclaimer
Running Direct queries on Sharepoint Database is not recommended by Microsoft.
Simply it's not for the faint of heart. Directly querying or modifying the database can place extra load on a server, or can expose information to users in a way that violates security policies or personal information management policies.
I highly recommend doing all testing in a non-production environment.
Thursday, July 10, 2008
STSADM Windows Application Utility
Hi All,
A Very Good news. We all know the power of STSADM command.
But now this command comes with more power as it becomes very easy to use this superb and powerful, strong command as now it comes with UI windows application.
This utility is developed as a windows application. It has a dropdown that displays all the STSADM options. Once a specific option is selected from the dropdown, it displays textboxes for various parameters.
Download : link
For more information Visit here
Enjoy STSADM
Adding data to List Choice column programatically
Hi All,
Although this might be a very simple post to blog but just for information i want to share it.
May times you require to add data into choice column of list.
Let's say you have 5 languages in the list choice column
you have C#, VB.NET, ASP.NET, JAVA, COBOL in the column and you want C# and JAVA to be selected, then here is a simple way to do it.
using(SpSite objsite = new SPSite("<your_site>");
{
using(SPWeb objWeb = objsite .OpenWeb())
{
SPList objList = objWeb.Lists["<your_list>"];
SPListItem objItem = objList .Items.Add();
objItem["Languages"] = ";#C#;#Java";
objItem .Update();
}
}
That's it. Very simple.
Wednesday, July 9, 2008
Ajax control toolkit Tab container header display issue with moss
Using Ajax is very complicated.
And when it comes with SharePoint than nothing worst like that.
Recently we are starting implementing ASP.NET AJAX with SharePoint.
And while implementing we came to know that we were wrong.
Its more challenging then what we are thinking.
Here I am explaining a problem with Ajax control toolkit’s Tab Container.
While implementing we came to know about this header display problem.

We are getting header text of the tab is only half. Other half is not displaying.
Than after googling we came to know that this is known issue.
But even after searching for 4 hours we are not getting the except problem solution for moss.
So I found that the same problem is in DNN(Dot Net Nuke) also.
and found an article how to solve it in DNN here
The only thing you have to do is that.
Add following style in you webpart.

I tried it in my webpart in MOSS.
And BINGO.
So enjoy the AJAX.
And when it comes with SharePoint than nothing worst like that.
Recently we are starting implementing ASP.NET AJAX with SharePoint.
And while implementing we came to know that we were wrong.
Its more challenging then what we are thinking.
Here I am explaining a problem with Ajax control toolkit’s Tab Container.
While implementing we came to know about this header display problem.

We are getting header text of the tab is only half. Other half is not displaying.
Than after googling we came to know that this is known issue.
But even after searching for 4 hours we are not getting the except problem solution for moss.
So I found that the same problem is in DNN(Dot Net Nuke) also.
and found an article how to solve it in DNN here
The only thing you have to do is that.
Add following style in you webpart.
<style type="text/css">
.ajax__tab_xp .ajax__tab_tab {
height: 21px;
}
</style>

I tried it in my webpart in MOSS.
And BINGO.
So enjoy the AJAX.
Open documents in new window
Hi All,
Let's take one scenario where your client does not have office installed and you also want to deal with document library.
Now we know that there is a settings in document library settings that if client do not have office installed at machine, then MOSS will automatically open document in the browser window. it automatically check for the availability of office at client side and if not found then opens it in same browser.
The settings for this is as follows :
(1) Go to your document library.
(2) Click on Settings-> document library settings
(3) Click on advanced settings
(4) Check for "Browser-enabled Documents" section and select Display as a Web page.
(5) Press OK.
Now you have set this option and if your client does not have office installed then MOSS will automatically open document in browser.
but but but.....notice that it opens in same browser...So if you want that document opens in new windows, not in the same browser then.....???
so Here is a trick to go for it :
But remember that this change will apply to all document libraries of all web applications. Because we are going to change the Global onet.xml. So be aware..
Here we go..
(1) Open C:\Program Files\Common Files\Microsoft Shared\web server extensions\12\TEMPLATE\GLOBAL\XML
(2)Open ONET.XML
(3)Search for this line <Else><HTML><![CDATA[<A onfocus="OnLink(this)" HREF="]]></HTML>
(4)Change it to <Else><HTML><![CDATA[<A onfocus="OnLink(this)" target="_new" HREF="]]></HTML>
(5)Find one more line : <Else><HTML><![CDATA[<A TABINDEX=-1 HREF="]]></HTML>
(6)Change it to <Else><HTML><![CDATA[<A TABINDEX=-1 target="_new" HREF="]]></HTML>
(7)Rest the IIS and just check.....
now all documents will open in new window..
Thanks to Jonathon for this wonderful idea..for more information visit here
Tuesday, July 8, 2008
Checked out issue in document Library
Hi All,
Once i dived in document library and i was exploring several things. Now let me come to a very interesting way i proceeded and found the issue.
Lets say you are working with document library.
Now there are three ways you can upload a document.
One is directly creating new document in library.
Second you upload file (single or multiple)
Third open in windows explorer
Now lets say you make one more column called Document Type as choice field and place three values. Appointment Letter , Resignation letter, Confirmation Letter. Keep that field as required field.
And now you have one more column in document library with one drop down having three choices.
Now Click on New document, you will find that Document Type as drop down in ribbon on Microsoft word when you open it.
And if you do not select the Document Type, it will prompt you to select it because its required field.
And when you select it and save it. that document will be check in and then saved it in document library.
Now go for second option.
Try to upload a document from Upload Menu option and upload document, there also it will ask you to select document type and then you will be able to check in the file.
But now go for third scenario.
Open in windows explorer and try to copy and paste the document or just drag a document to the explorer window of that document library. and guess what ,....you find document is checked-out and saved in document library and no other person will able to see except person who have placed the document.
This happened because you never specified required filed which is Document Type there while you are just dragging .
even if you try to check-in from ECB menu of that item, it will show Error displaying that you have to fill all the required columns. So all you need to do it open that document and select document type and then check in.
Is it a issue or feature!!!! i am not able to figure out....
Monday, July 7, 2008
Adding Site Meter in Sharepoint site
Hi All,
May times you may require to have site meter which says how many times site is been visited.
It is a kind of Application object in ASP.NET and calculating the total hits on home page (Default.aspx) lets say.
But there is one more easier way and in many varities you can display your site meter.
(1) All you need to do is just open the Sharepoint Designer.
(2) Select your site and page (default.aspx) (file->Open Site)
(3) Select your position in HTML page where you want to keep this site meter.
(4) Click on Insert menu, then select web component
(5) Select Hit Counter in component type
(6) Select the counter style from right hand side panel and press finish.
(7) You get option to reset the counter to 0 (zero) and also maximum digits for that.
(8) After specifying that just save the page, this will make page customized.
(9) Now just go back and check the page.
Hurrrrrrryyyyyyyyyy!!!!
Saturday, July 5, 2008
Truncate SQL Server Transaction Log
Many time you will face an issue while trying to add new user, column,list etc to a sharepoint site and the error displayed would be either 'Unexpected error' or some HResult error with a error code. If you investigate further by looking into the event viewer log, you will find that a SQL Server error has occured which states that the transaction log is full. If this is the case then follow the given below steps to truncate the transaction log.
- Open SQL Server Management Studio and locate the site content db.
- Select the db and right click to open the backup task.
- Select the Transaction Log to backup, go to options and select the radio button 'Truncate Log'.
- Start the backup.
- Done.Transaction Log is truncated.
Thursday, July 3, 2008
Run SQL Queries and Fetch List Data from SharePoint Database (WSS_Content) Part-1
Hi All,
Today is one of my happiest days with Sharepoint....Why??? read further....
We had a requirement where in we were required to prepare Lists with dependencies on each other.
This architecture resembled the traditional Normalized structure of Data Base.
Now for some reports we needed to extract data from multiple Lists based on these dependencies.
I wondered whether there was a way to extract data from the Sharepoint wss_content database?
I deep dived into it and found myself stuck as in sharepoint DataBase.
No 3NF form of normalization.
• Foreign keys (if any…) are never given the same column name as the primary key
• Encrypted Column Name
for instance tpID in one table (as a pk) can be tpListID in another table (as the foreign key)
• I personally find myself in a pool of doubts regarding referential integrity
But Guys…Don’t Feel Low….I have something for you.
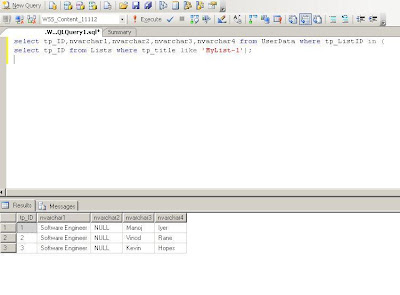
The information in a list is stored in the UserData table (which is an odd name for the table), and the lists themselves are stored in the Lists table. A list in the database has a GUID representation.
Have a look at this SQL Query Below:
select tp_ID,nvarchar1,nvarchar2,nvarchar3,nvarchar4 from UserData where tp_ListID in (
select tp_ID from Lists where tp_title like 'MyList-1');
So Query the Sharepoint DataBase Bindasssss!!!!!!
View Part-2
Disclaimer
Running Direct queries on Sharepoint Database is not recommended by Microsoft.
Simply it's not for the faint of heart. Directly querying or modifying the database can place extra load on a server, or can expose information to users in a way that violates security policies or personal information management policies.
I highly recommend doing all testing in a non-production environment.
Today is one of my happiest days with Sharepoint....Why??? read further....
We had a requirement where in we were required to prepare Lists with dependencies on each other.
This architecture resembled the traditional Normalized structure of Data Base.
Now for some reports we needed to extract data from multiple Lists based on these dependencies.
I wondered whether there was a way to extract data from the Sharepoint wss_content database?
I deep dived into it and found myself stuck as in sharepoint DataBase.
No 3NF form of normalization.
• Foreign keys (if any…) are never given the same column name as the primary key
• Encrypted Column Name
for instance tpID in one table (as a pk) can be tpListID in another table (as the foreign key)
• I personally find myself in a pool of doubts regarding referential integrity
But Guys…Don’t Feel Low….I have something for you.
The information in a list is stored in the UserData table (which is an odd name for the table), and the lists themselves are stored in the Lists table. A list in the database has a GUID representation.
Have a look at this SQL Query Below:
select tp_ID,nvarchar1,nvarchar2,nvarchar3,nvarchar4 from UserData where tp_ListID in (
select tp_ID from Lists where tp_title like 'MyList-1');
So Query the Sharepoint DataBase Bindasssss!!!!!!
View Part-2


Disclaimer
Running Direct queries on Sharepoint Database is not recommended by Microsoft.
Simply it's not for the faint of heart. Directly querying or modifying the database can place extra load on a server, or can expose information to users in a way that violates security policies or personal information management policies.
I highly recommend doing all testing in a non-production environment.
How to fill values (Data) Repeating Table in InfoPath?
Hi All,
Here is sample code to fill value in repeating table at runtime (Dynamically)
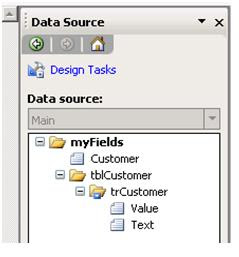
Suppose you have repeating table Name “tblCustomer” and has two column name “Text” and “value”
Here is code to fill value from database or from web service.
Repeating table structure in data source like this
Your comments are most welcome.
Here is sample code to fill value in repeating table at runtime (Dynamically)
Suppose you have repeating table Name “tblCustomer” and has two column name “Text” and “value”
Here is code to fill value from database or from web service.
Repeating table structure in data source like this

private void fillRepeatingTable(string table, string tr)
{
string value, Text;
value = string.Empty;
Text = string.Empty;
DataTable dt = null;
//this is method that Will return DataTable
dt = this.CustomerDataSource();
//cloumn name Value in Repeating Table
value = "//my:Value";
//column name Text in Repeating Table
Text = "//my:Text";
XPathNavigator root = this.MainDataSource.CreateNavigator();
XPathNavigator row = root.SelectSingleNode("//my:" + tr + "[1]", NamespaceManager);
// make a copy of the node by cloning it
XPathNavigator row1;
if (dt != null)
{
foreach (System.Data.DataRow dr in dt.Rows)
{
// set the new values of the row’s fields
row1 = row.Clone();
row1.SelectSingleNode(value, NamespaceManager).InnerXml =Convert.ToString(dr["Value"]);
row1.SelectSingleNode(Text, NamespaceManager).InnerXml = Convert.ToString(dr["Text"]).Replace("&", " "); ;
XPathNavigator parent = row1.SelectSingleNode("//my:" + table, NamespaceManager);
parent.AppendChild(row1);
}
row.DeleteSelf();
}
}
Your comments are most welcome.
Wednesday, July 2, 2008
Handling multiple check-in check-outs in document library
Hi All,
There is a way from which you can handle check-in, check-out for multiple documents at a time.
It's a simple process. Follow these steps :
(1) Go to Site settings.
(2) Under Site Administration Tab, find "Content and structure". Click on that link.
(3) On left side, you will find entire structure of the site. select your document library and then on right hand side you will see all documents gets listed there.
(4) Select all the documents that you want to check-in / check-out and then go to actions menu above on toolbar and select your option for check-in/check-out or even discard check-out.
That's it. your job is done.
Make STSADM command shortcut
Hi All,
Many times we require to directly access STSADM and do some stuff.
Follow the following steps :
(1) Open up the system properties window (Right Click My Computer > Properties)
(2) Click on the “Advanced” tab
(3) Click on the “Environment Variables”
(4) Click "Edit"
In the “Edit System Variable” window, in the “Variable value” field add a semicolon at the end as a separator and add the path to the SharePoint BIN folder:
C:\Program Files\Common Files\Microsoft Shared\web server extensions\12\BIN\
One important thing note that you will find may entries separated by ";" (semicolon) sign. you need to add this path after last path that is already mentioned there. Just add ; and then paste the above path.
(5) Keep pressing OK in all the windows. If you open up a command window and type stsadm you should be able to access it without having to go through the trouble of navigating to the SharePoint BIN folder.
That's it. Your job is done.
InfoPath Fill Drop-down List Box dynamically (Run time)
Hi All,
Some time you need to fill Drop-Down List Box of InfoPath runtime from database or webservice.
here is solution and demo code will help you to solve this purpose. this solution is best when you are trying to bind small amount of data to drop-down.
here I have taken Customer drop-down and it will fill runtime from Repeating table.

Fore More Subscribe www.SharePointKings.com
Some time you need to fill Drop-Down List Box of InfoPath runtime from database or webservice.
here is solution and demo code will help you to solve this purpose. this solution is best when you are trying to bind small amount of data to drop-down.
here I have taken Customer drop-down and it will fill runtime from Repeating table.

Here in image you can see we have Customer drop-down and below it one Repeating table.
- Open InfoPath.
- Click on design new template.
- drag dropdown on the InfoPath Form and give name "Customer"
- drag repeating table on InfoPath form.
- now go to the data source pane and rename the binding shown in the figure.

- Now, double click on customer Drop-down, In Data tab List box entry section select radio button “lookup value in the Form’s data source”.
- In Entries select “tblCustomer”
- Value : myValue , Text: myText.

- And then Hide Repeating table from Conditional Formation in Display tab.
- Download the Code (Click Here)
- Here is Main Code


private void fillDropDown(string table, string tr, string DropDownName)
{
string value, Text;
value = string.Empty;
Text = string.Empty;
DataTable dt = null;
//if you have more than one Dropdown you can use switch case
switch (DropDownName)
{
case "Customer":
//here you can use webservice to fill dropdown..
dt = this.CustomerDataSource();
value = "//my:Value";
Text = "//my:Text";
break;
}
XPathNavigator root = this.MainDataSource.CreateNavigator();
XPathNavigator row = root.SelectSingleNode("//my:" + tr + "[1]", NamespaceManager);
// make a copy of the node by cloning it
XPathNavigator row1;
if (dt != null)
{
foreach (System.Data.DataRow dr in dt.Rows)
{
// set the new values of the row’s fields
row1 = row.Clone();
row1.SelectSingleNode(value, NamespaceManager).InnerXml =Convert.ToString(dr["Value"]);
row1.SelectSingleNode(Text, NamespaceManager).InnerXml = Convert.ToString(dr["Text"]).Replace("&", " "); ;
XPathNavigator parent = row1.SelectSingleNode("//my:" + table, NamespaceManager);
parent.AppendChild(row1);
}
row.DeleteSelf();
}
}
Fore More Subscribe www.SharePointKings.com
Tuesday, July 1, 2008
Resolution for Error: The following file(s) have been blocked by the administrator
SharePoint Error: "The following file(s) have been blocked by the administrator"
Recently when I tried to upload a .mdb (Access Database) file in a Document Library I got this error
Resolution : You're unable to update the Access file because SharePoint by default blocks .MDB files.
Do the following:
1. Go to SharePoint Central Administrator.
2. Under the "Security Configuration" section, click "Manage Blocked File Types".
3. Find MDB.
4. Remove MDB from the list & click the "OK" button.
Recently when I tried to upload a .mdb (Access Database) file in a Document Library I got this error
The following file(s) have been blocked by the administrator: Project Documents/Applications/BATS.mdb at Microsoft.SharePoint.Library.SPRequestInternalClass.PutFile(String bstrUrl, String bstrWebRelativeUrl, Object varFile, PutFileOpt PutFileOpt, String bstrCreatedBy, String bstrModifiedBy, Int32 iCreatedByID, Int32 iModifiedByID, Object varTimeCreated, Object varTimeLastModified, Object varProperties, String bstrCheckinComment, UInt32& pdwVirusCheckStatus, String& pVirusCheckMessage)
at Microsoft.SharePoint.Library.SPRequest.PutFile(String bstrUrl, String bstrWebRelativeUrl, Object varFile, PutFileOpt PutFileOpt, String bstrCreatedBy, String bstrModifiedBy, Int32 iCreatedByID, Int32 iModifiedByID, Object varTimeCreated, Object varTimeLastModified, Object varProperties, String bstrCheckinComment, UInt32& pdwVirusCheckStatus, String& pVirusCheckMessage)
Resolution : You're unable to update the Access file because SharePoint by default blocks .MDB files.
Do the following:
1. Go to SharePoint Central Administrator.
2. Under the "Security Configuration" section, click "Manage Blocked File Types".
3. Find MDB.
4. Remove MDB from the list & click the "OK" button.

Microsoft Office SharePoint Server 2007 Automatic Backup process with Mail Alerts
Hi All,
We are Back with yet another Backup Utility.
We are here with a Utility to
Automate the Backup process with Mail Alerts Microsoft Office SharePoint Server 2007.
In a recent requirment we needed to create a Backup utility which intended to Back a Full Sharepoint Farm.
This was achieved by creating a Batch File which did it by using the STSADM commands.
But what if there is a Fault in the Backup System or How will the administratior be notified.
Again this backup utility has to be a Auto Backup. Which by default sharepoint doesnt Provide.
You can get the Auto Backup Batch File version here
http://www.sharepointkings.com/2008/06/automate-backup-process-by-using-batch.html
So by Programming with the Windows SharePoint Services Backup/Restore Object Model
we have created a Auto Backup Utility with Mail Alert Facility.
This is a Auto Backup Stub and Your reviews and your emails will be very userful
in improving this utility.
To get the Full Source code FREE!!!...FREE!!!
Download Source Code
Subscribe to:
Posts (Atom)