Showing posts with label Windows Workflow Foundation. Show all posts

Sunday, November 11, 2012

Special permissions in Workflow Create Task Activity


Many times we want to restrict a task item only to be edited by a person whom it is assigned to.

If a person has contribute access then by default there is no way that we can restrict them to update the task list item.

When you are working with create task activity and create a task, you can always create a special permission object and then assign it to the task properties.

createtaskProperties.AssignedTo = "domain\\user";
System.Collections.Specialized.HybridDictionary specialPermissions =
new System.Collections.Specialized.HybridDictionary();
specialPermissions.Add(createtaskProperties.AssignedTo,
SPRoleType.Contributor);
createTask1.SpecialPermissions = specialPermissions;

This is how you set permission on task list item to allow only assigned to person edit that task list item.

Monday, May 14, 2012

Workflow Event handlers in SharePoint 2010


In SharePoint 2010, we now have new receivers and one of them is workflow event receivers. We can handle different events with respect to the workflows that triggers in SharePoint.

You can handle multiple events with regards to the workflow. These are:

1)    When workflow is starting
2)    When workflow is started
3)    When workflow is completed
4)    When workflow is postponed

As name suggests you can trap different events of the workflow. 

These come handy if you have requirement to start series of workflow based on completion criteria from one workflow to another. If one workflow completes and then you want to start another workflow in chain, that can be done now by trapping these events.

This is only for list or library workflows and not for the site workflow.

Here is an example with code.

/// <summary>
    /// List Workflow Events
    /// </summary>
    public class EventReceiver1 : SPWorkflowEventReceiver
    {
       /// <summary>
       /// A workflow is starting.
       /// </summary>
       public override void WorkflowStarting(SPWorkflowEventProperties properties)
       {
           SPWeb Web = properties.ActivationProperties.List.ParentWeb;
           
           SPList lstTracking = Web.Lists["Track Different Events"];                 

           SPListItem item = lstTracking.Items.Add();

           item["Title"] = "Starting the workflow";

           item.Update();          

       }

       /// <summary>
       /// A workflow was started.
       /// </summary>
       public override void WorkflowStarted(SPWorkflowEventProperties properties)
       {
           using (SPSite site = new SPSite(properties.WebUrl))
           {
               using (SPWeb Web = site.OpenWeb())
               {

                   SPList lstTracking = Web.Lists["Track Different Events"];                

                   SPListItem item = lstTracking.Items.Add();

                   item["Title"] = "workflow has been started";

                   item.Update();
               }
           }
           
       }

       /// <summary>
       /// A workflow was completed.
       /// </summary>
       public override void WorkflowCompleted(SPWorkflowEventProperties properties)
       {
            using (SPSite site = new SPSite(properties.WebUrl))
            {
                using (SPWeb Web = site.OpenWeb())
                {
                    SPList lstTracking = Web.Lists["Track Different Events"];                   

                    SPListItem item = lstTracking.Items.Add();

                    item["Title"] = "workflow has been completed";

                    item.Update();
                   
                }
            }              

       }
    }

You can also handle several completion type enumerations in WorkflowCompleted method that helps you to execute certain code based on the completion criteria.


You can also check completion type enumerations in WorkflowCompleted method.


Friday, April 13, 2012

Custom Task form in workflow


In workflow we many times have a requirement to create custom task form four our business logic. Yes you must be telling that it was possible through creating custom content type which inherits from task content type and then associate that with workflow in an workflow xml file.

All true, but with SharePoint 2010 designer now we also can customize task form for any of the workflow.

We are going to see how we can customize it and also we are going to see what new actions are available for that process.

I have one list called Orders and we are going to associate a workflow and then in that we are going to have custom task form. So open SPD 2010, connect with the site and then go to workflow.

Create a workflow and attach it with a list called “Orders”. In your case it may be a different list than me.

Now we are going to add an action called start approval process.


Click on the first parameter in the action that we need to configure.


This allows us to configure the entire task handling process the way we want. Here we can handle when the task end, overall behavior of task process, individual should task item process etc.


As you can see you can also configure reassignments, change requests are allowed in the task or not.

If you look at the right panel in task editor, you will find fields. I have already added three fields to it just for a demonstration purpose. Do not go on the logic. But it will serve the purpose of customizing the task form.

Go ahead and add some fields to it. These fields will appear on the task form. You can also choose the existing field.


If you look at change the completion condition, change behavior of individual task and change overall task process closely, you will find a lot of conditions and actions inside them. This is the pre-built logic that follows approval process.

If you wish to make changes to any of these, feel free to do that and see how your workflow goes according to the change that you make.

I am going to add some logic to each task. We can add logic when task it created, expires, Pending, deleted or even completes.


You can also change the overall task process. For example, if in your requirement you have five approvers and if three out of five approves then you do not want to waste your time with two more approvers to approve or reject. You simply want to approve the item as majority of them have approved it. In this scenario, you can use overall task process.

If you go back to the workflow settings to edit the workflow, (one level above task editing page) where we had added start approval process on this item with approver.

Click on approver.


Here you can select any individual, active directory DL or SharePoint group or even field from the list or library.

You can also define to start the process as a sequence or in a parallel.


Let’s publish the workflow and then test the workflow. Make sure that you have selected start workflow when new item is added option from workflow settings page.

I’ve added an item to orders list and workflow has now started as you can see the status in in progress.


If I now open the task allocated to me, I would see three more fields in the task form.


Once you are done with all the task items, you will see outcome that is again governed by the workflow logic.


You can also customize the way task form looks like. Open the Approval Task Form.


You should have the InfoPath to perform the modification in a form.

Save it and publish it. Advantage it you are customizing task form only for your custom workflow and not globally.

Now then we have modified the workflow, let’s go ahead and add one more item in orders list to see this change.


If you would like to make any change in your conditions inside workflow, you can also get these additional fields that you’ve added on the form. We have external participant and reason in the list.


I hope you have liked this post. Do try different actions and conditions. Try out customizing task process, outcome. Let us know if you face any difficulty or query and I would be more than happy to answer them if I can. J

Tuesday, May 3, 2011

Send email to attendees from designer workflow

You may come across to a common scenario where in you may want to send an email to attendees in the calendar list. Or let’s say you have a manager name as a field and then you want a leave approval from them, so you select manager name in the field and submit the button, then you want mail to go to that manager or the attendee.

Many of us have doubt that if this is possible out of the box or not, but yes this is possible through SharePoint Designer. We are talking about the sending an email to one of the field data from the list item not to static email address.

Let’s say I have a calendar list and I have a manager name field in it. So open SharePoint designer 2007 or 2010, navigate to your site. Create a new workflow, based on your requirement, select list and then on new item created.

In condition to make it always true, compare ID field with the ID field and then in actions, select send an email.


Select Workflow lookup and then from current item, select field. In my case, its manager name.


So now onwards, if any item is created in the list, then mail will be triggered to the name mentioned in the manager name field.

Tuesday, July 27, 2010

Creating reminder workflow in SharePoint designer

Hi All,

One common requirement in workflow is reminder workflow. Reminder can be anything. It can be a birthday, anniversary or it can be an important meeting.

You might want to send a reminder email to attendees, or want to send a reminder email to team members about the birthdays or anniversaries.

Well let us design such a workflow which sends a reminder email to particular people about upcoming birthday before 14 days.

First open the site and create one calendar list. Call it a birthday calendar.

Create one calculated column of type date and time and select format as date and time. Name that column “reminder”.


Just mae sure that your start time and end time should not end with 12:00: AM, otherwise workflow will trigger, however mail will not be sent. My advice, keep Start time and end time with the time ending with 12:05 AM, should be fine or any other time than 12:00 AM.

Now open SharePoint Designer and we will create a workflow from here for the birthday calendar list.

Create a new workflow, attach it with the birthday calendar list and select automatically start the workflow, when the new item is created.

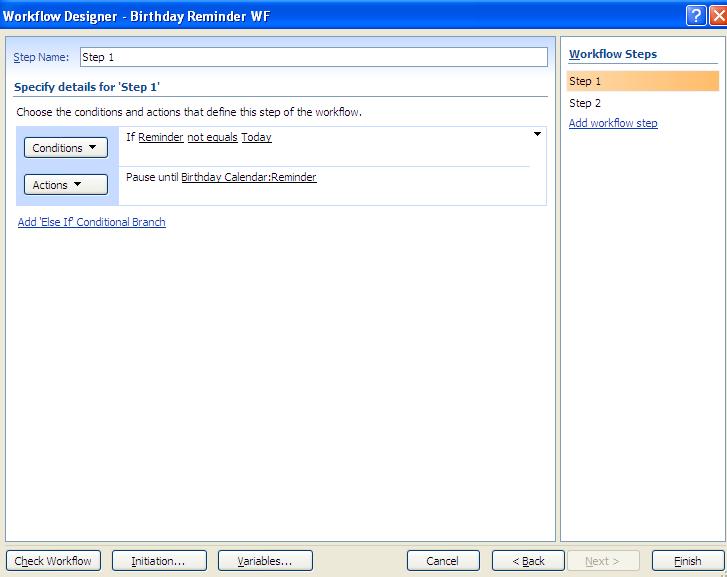
We need to divide this workflow into two steps. First step will check the date and time and pause the workflow for the time and second step will send an email to a person.

Step 1 condition will be


And step2 will be


Change the email address to a list of people whom you want to send an email. While sending an email, you can use the fields of the item and decorate the mail body according to your need.

To test this, click on create new item and enter start date 14 days after today’s date and see you should get an email in a moment.

There you go; you have set up the reminder workflow. However this is not a recursive workflow, that every year you get an email. This is a onetime workflow and needs to be recreated every year. We are working on making this recursive, so that it actually works as a service. Although the same can be achieved through SP timer definition for sure.

Thursday, May 27, 2010

Workflow comparison of SharePoint Designer and Visual studio

Hi All,

We all know that we can create workflows using SharePoint designer as well as visual studio. However there are so many differences between creating workflow in each of them.

Let us explore the difference between SPD workflow and VS workflow.

Tuesday, April 20, 2010

Adding custom activity to SharePoint designer Part – 1

Hi All,

This is one of the common questions being asked many times, that it is okay that we can develop some nice custom activity and then give it a try to use in different projects and also can give to other developer to work on it.

However what about to all designers who work in SharePoint designing team and know how to work with the workflow? Well, for them we have good news. You can create your own custom activity in the same way we saw in creating custom activities series. The fun part is you can modify the same activity and make that activity available for SharePoint designer.

Well before digging down in to exploring this stuff, let us spend some time understanding how SharePoint designer workflow actually works with activities and actions with SharePoint server.

All activities that you can see in SharePoint Designer come from one DLL named “Microsoft.SharePoint.WorkflowActions.dll”. There is one .ACTIONS file sitting under template folder that actually does the job for you.

This file is responsive for displaying all activities and also responsible for binding parameters to properties for the activities.

All we have to do is create a custom activity in the same way we have created earlier and then one more important stuff to do is create one .ACTIONS file so that SharePoint designer can understand that sentence written in .ACTIONS file and can display our activity in SPD. Also we need to add the assembly of custom activity to GAC by giving a strong name. Final step is to register that activity as AuthorizedType under web.config for the web application we are going to use it for.

We will cover all actions in part 2. Part 1 was more of informative about custom activity with SharePoint Designer.

Friday, April 16, 2010

Working with declarative workflows Part 3

Hi All,

Let us continue our experiment with declarative workflow. If you haven’t read part 1 and part 2, I recommend you read them and enjoy reading further.
Now then we know how to create basic declarative workflow; we will move ahead and create declarative workflow that can accept parameters.

Go ahead and add one more XML file and this time name is “ConditionalDeclarativeWorkflow.xml” and then immediately change its extension to .xoml.


Now add code behind fine and name it ConditionalDeclarativeWorkflow.xoml.cs.

And start adding following stuff and do observe each condition that we have associated with xoml.

public partial class ConditionalDeclarativeWorkflow : SequentialWorkflowActivity
{
private string _BirthDate = string.Empty;

public string BirthDate
{

get { return _BirthDate; }
set { _BirthDate = value; }

}

private void CheckValidBirthDate(object sender, ConditionalEventArgs e)
{
if(_BirthDate == string.Empty) e.Result=false;

try
{
if (Convert.ToDateTime(_BirthDate) > DateTime.Today)
{
e.Result = false;
}
else
{
e.Result = true;
}
}
catch (Exception ex)
{
e.Result = false;
}

}

private void CalculateAge(object sender, EventArgs e)
{
if (_BirthDate != string.Empty)
{
DateTime dtBirthDate = Convert.ToDateTime(_BirthDate);

System.TimeSpan diffResult = DateTime.Today - dtBirthDate;

double age = diffResult.Days / 365;

Console.WriteLine("
}

}


Now how we used WFC in our previous post, we will use the same way here also. Go ahead and open command prompt.

And generate the DLL in this way. This time we are going to give two parameters to wfc.exe, first definitely a xoml and the other xoml.cs file.


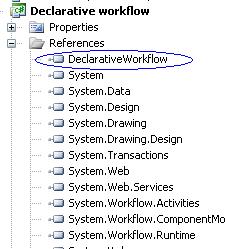
Now add newly generated DLL to the reference of console workflow application.

Our workflow accepts the parameter, hence we are going to declare parameters and then invoke workflow.

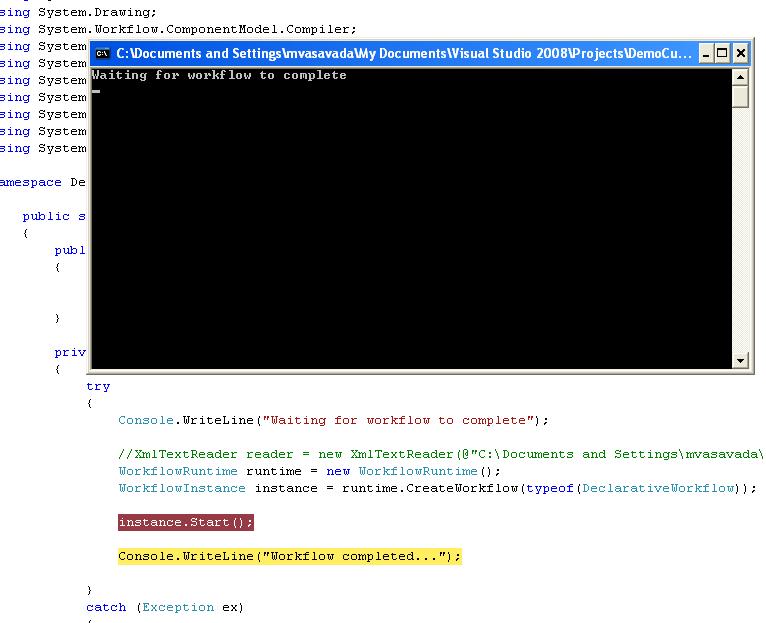
Console.WriteLine("Waiting for workflow to complete");

Dictionary parameters = new Dictionary();
parameters.Add("BirthDate","12/03/1982");


WorkflowRuntime runtime = new WorkflowRuntime();
WorkflowInstance instance = runtime.CreateWorkflow(typeof(ConditionalDeclarativeWorkflow), parameters);

instance.Start();

Console.WriteLine("Workflow completed...");

Console.ReadLine();


So we have given input and we got the result, now let’s pass incorrect birthdate.


That is it. Hope you will try more complex example.

Wednesday, April 14, 2010

Working with declarative workflows Part 2

Hi All,

Working with declarative workflows Part 1 was all about understanding the basics of declarative workflow. In this post, we will make our basics bit more strong by doing one more practical and almost the same stuff, but with little change.

Take the same example that we took in last Part 1. However before continuing further, let us explore one option that comes handy with workflow. Open “C:\Program Files\Microsoft SDKs\Windows\v6.0A\bin” folder. It may differ from OS to OS. So just make sure that you are under bin folder of Windows.

And observe one exe named “WFC.exe”. This is the command utility that will convert our declarative XML into DLL.


But hey why again DLL? So the answer is DLL execution is faster than XML execution. So you can also try this option after creating your workflow with declarative manner.

One other important note to understand is that when we will convert our declarative XML workflow using this utility, it will not work directly because this utility requires file which has xoml extension. So go ahead and open the declarativeworkflow.xml and rename it to declarativeworkflow.xoml.

Also observe one more change in declarativeworkflow.xoml this time. We need to add one more attribute and that is Class attribute. This is required because after compiling into the assembly, workflow utility will give this name to the generated DLL.

<SequentialWorkflowActivity x:Name = "Workflow1"
xmlns:x="http://schemas.microsoft.com/winfx/2006/xaml"
xmlns="http://schemas.microsoft.com/winfx/2006/xaml/workflow"
x:Class ="DeclarativeWorkflow">
<SequenceActivity x:Name="SequenceActivity1">
<DelayActivity TimeoutDuration="00:00:15" x:Name="DelayActivity1"></DelayActivity>
</SequenceActivity>
</SequentialWorkflowActivity>


Now open the command prompt and navigate to the directory till your project is. Infect navigate to the folder where we have this xoml file sitting.


And then just type in the path for WFC.exe and give our xoml file name as a parameter and hit enter and see the magic. You will see no error and no warning and will get DLL as in output.


Now go ahead and open your console workflow application and add the newly created DLL as reference.


And then run the workflow and see it in action.


Read Working with declarative workflows Part 3 for further reading.

Tuesday, April 13, 2010

Working with declarative workflows Part 1

Hi All,

We all know that we can create a great workflow using visual designer provided in visual studio as well as SharePoint designer. However there is one more way, we can create workflow. Yes the technique is called declarative workflow. Declarative workflow is all about writing XML code and then feeding this XML code to workflow runtime to execute the workflow.

Let me tell you why this can be a fun element while working in workflow. Let us say that you have defined many conditions in your workflow and you have created that workflow with Visual studio. Hence you compile that workflow and use the DLL to deploy and then use in application or in SharePoint. So you have to come back to designer, change your logic and again compile, get new DLL and deploy it to use it. This is bit overhead while working with designer. However designer workflows have their own advantages as well and there cannot be two ways on this. However we are talking about declarative workflow, so here is the advantage of using declarative workflow.

You can change your condition logic right away by just modifying the existing XML and then feeding the same to workflow runtime.

To work with XML based workflow, you only need at simples notepad and as advanced XML editor or visual studio itself.

One important part to note is whenever we work with declarative workflow; we have to use two namespaces in XML.

1) http://schemas.microsoft.com/winfx/2006/xaml
2) http://schemas.microsoft.com/winfx/2006/xaml/workflow

So let us do some particle on this.

Go ahead and create one console sequential workflow and immediately add new item and call it DeclarativeWorkflow.xml.

Open the file’s property and change its Copy to Output directory property to Copy If Newer.


And start adding following XML in that file. Moment you start typing the XMLNS attribute, it gives you an options of all namespace URIs.


Make sure that you write in proper caps. Even if you miss a single alphabet in capital letter or lower letter, you will not get an idea what is wrong with the workflow and you will receive an error while starting the workflow.

<SequentialWorkflowActivity x:Name = "Workflow1"
xmlns:x="http://schemas.microsoft.com/winfx/2006/xaml"
xmlns="http://schemas.microsoft.com/winfx/2006/xaml/workflow">
<SequenceActivity x:Name="SequenceActivity1">
<DelayActivity TimeoutDuration="00:00:15" x:Name="DelayActivity1"></DelayActivity>
</SequenceActivity>
</SequentialWorkflowActivity>


As you can notice, how we assign ID to the controls in ASP.Net, in the same way we have to assign the Name attribute to our activities in the XML.

Here we have defined very basic workflow with one single delay activity.

Now go ahead and add one code activity in designer surface and double click to generate handler for that and simply write down the following code in it.


And now run the application to see it in action.


Read Working with declarative workflows Part 2 for further reading.

Thursday, April 8, 2010

Creating custom activity in Workflow Part – 7

Hi All,

Let us continue exploring custom sequence activity and use it in real world. Take same sample code that we generated in Creating custom activity in Workflow Part – 6.

Now I am not going to write down the code here. I have created one dummy table in my database to demonstrate this example.

I am reading the parameter that is passed from client and then writing a code that will fetch the salary of an employee in GetEmployeeSalary code activity.

And then I am sending mail based on the condition. So what I am going to show you is final version of it. After writing a code in our custom sequence activity, I drag it again on console workflow application and then run it.

Set EmployeeId to the EmpoyeeID.


And then run the application.


And if I set to other employee then,


Hope that you have got a fair idea about how sequence custom activity works now.

Monday, April 5, 2010

Creating custom activity in Workflow Part – 6

Hi All,

Till now what we saw is creating a basic activity and play with it. Now in this post, we will move ahead and see how to achieve the same functionality of creating custom activity. However in this post we will create custom sequence activity instead of simple basic activity.

If you haven’t gone through the previous post, then I recommend reading Creating custom activity in Workflow Part – 1 first and then continue reading further.


Remember this is not a custom composite activity, this is custom sequence activity. Creating custom composite activity will take a lot of effort. We will put on those efforts in subsequent post.

First let us understand and create custom sequence activity. Add new workflow activity library project to your solution. Name it whatever you want but make sure you inherit the activity from sequence activity rather than activity.

Let me give you highlights of what are we going to do in this activity. We will have one code activity which will get the Employee ID as a parameter. Internally we will get the employee from the table and then we will have if else condition, checking for each employee’s performance rate. Based on performance rate, we will shoot mail to manager with different subject and body line in mail.

So go ahead and add one Code activity in the designer surface, then drag one if else activity on surface. And then drag code activity and place on left branch, drag one more code activity and put on right branch.

Give Name “GetEmployeeSalary” to the First Code Activity which is outside of If else condition. Give Name “SendMailForLowPerformance” to left code activity and give Name “SendMailForGoodPerformance” for right side code activity.

Double click on each code activity to generate its respective handlers. Still you will notice one red circle for not setting branching condition. So go ahead and add declarative rule based condition for left branch if else activity.

Before adding that, write down following code. You will automatically have handlers for code activities as we generated few steps ago.

using System;
using System.ComponentModel;
using System.ComponentModel.Design;
using System.Collections;
using System.Drawing;
using System.Workflow.ComponentModel.Compiler;
using System.Workflow.ComponentModel.Serialization;
using System.Workflow.ComponentModel;
using System.Workflow.ComponentModel.Design;
using System.Workflow.Runtime;
using System.Workflow.Activities;
using System.Workflow.Activities.Rules;

namespace Sequential_Custom_Activity
{
public partial class Activity1 : SequenceActivity
{
public Activity1()
{
InitializeComponent();
}

public static DependencyProperty EmployeeIDProperty = DependencyProperty.Register

("EmployeeID", typeof(string), typeof(Activity1));


public string EmployeeID
{
get
{
return Convert.ToString(base.GetValue(EmployeeIDProperty));
}
set
{
base.SetValue(EmployeeIDProperty, value);
}
}

double _PerformanceRate;

public double PerformanceRate
{
get
{
return _PerformanceRate;
}
set
{
_PerformanceRate = value;
}
}


private void GetEmployeeSalary_ExecuteCode(object sender, EventArgs e)
{

}

private void SendMailForLowPerformance_ExecuteCode(object sender, EventArgs e)
{

}

private void SendMailForGoodPerformance_ExecuteCode(object sender, EventArgs e)
{

}
}


Go ahead and add declarative condition as shown in figure below.


As of now we haven’t done anything fancy.

Build the project. You should not find any error. Now create new console application workflow. Add our custom activity DLL to the toolbox. Drag and drop the custom sequence activity to the console workflow application. So should find something like shown below. Note that you are not allowed to make any changes in any of the branching conditions or nor the code condition as they are indicated by lock symbol.


Now in next post, we will be adding code in these blocks and will make it work.

Wednesday, March 31, 2010

Using Workflow as web service Part – 2

Hi All,

If you haven’t read previous post, then I recommend you read Using Workflow as web service Part - 1 and then continue reading here.

Now in this post we will deep dive into real practical example where in we will create on workflow and then expose the workflow as web service and then we will consume that web service from one console application.

If you have gone through consuming web service in workflow post, you must have remembered that we created web service of calculating square root of given number and consumed it from our workflow. Well, we will do the same stuff here. However our workflow will act as web service here.

First let us create one project. Add project with type sequential workflow library. Name it as a SquareRootService.

Now right click the project and add new class. Name it ISquareRoot.cs.

Change the definition from class to interface.

Add following method definition.

double GetSquareRoot(double dblNumber);

Now drag WebserviceInput activity to the designer surface.

Bind the interfaceType property to the one that we create just now.


Set IsActivating property to true and MethodName to GetSquareRoot.


Select dblNumber proprty now, and click on … to bring the bind dialogue box and create new propoerty to bind it with dblNumber paramter of the input.


Now double click on InputRecieved method and generate it’s method.


Write down following code.

private void webServiceInputActivity1_InputReceived(object sender, EventArgs e)
{
double inputvalue = this.webServiceInputActivity1_dblNumber1;

webServiceOutputActivity1__ReturnValue_1 = (double)Math.Sqrt(inputvalue);


}


Go ahead and add one webserviceoutput activity. Bind it with InputActivity by giving inputactivityName to the webServiceInputActivity1. Set return value to the property


Now go ahead and right click on project and publish as a web service. This is really a cool feature that workflow provides. We need not to worry about anything. Just clicking on the button does the wonder.


Rename the newly generated file with SquareRootService.asmx

Now build that newly created web service.

Now add one console application for the test. And then add web reference; find web service in the solution.


Write down a very simple line to call a web service, which actually call our workflow.

static void Main(string[] args)
{

SquareRootService.Workflow1_WebService objService = new ConsoleWorkflowTest.SquareRootService.Workflow1_WebService();

double returnvalue = objService.GetSquareRoot(49);

Console.WriteLine("Square Root of 49 is : " + returnvalue.ToString());

Console.ReadLine();

}


And see the output.


That is it. Your job is done. Feel free to ask any query.

Monday, March 29, 2010

Using Workflow as web service Part - 1

Hi All,

In last post, we saw how we can use web service in our workflow. In other word, we saw how we can consume web service in our workflow. So now in this post, we will perform the reverse operation. We will see how our workflow acts as a web service and how other applications can use the workflow as a web service.

It is not simple as creating a web service and just taking a reference from other application. It is much more than this. However Visual studio and workflow give us the great command to convert the entire workflow in web service. How can we use this feature? Well, we will see it later in this post.

First let us understand what all things are required for exposing workflow as web service. We will be using WebServiceInput and WebServiceOutput activities.

We must have at least one Input and at least one output activity in the workflow. We cannot have input activity without associating output activity and we cannot have output activity without associating it with some input activity.

Let us go ahead and deep dive into webserviceinput activity.

For Webserviceinput activity you need to set some properties and handle one event. Properties are as follows.

1) Interface Type: Get or Set the Interface data type for which we are going to expose our methods as web methods.

2) Is Activating: At least one of the activities must have this property set to true. This indicates that by calling this method, use can start the workflow. You can have more than one activity which has this property set true. However, if this is the case, then all these activities can start the workflow.

3) MethodName: Name of the method that can be exported as web method.

Out of these three properties, Is Activating is default set to false. All above properties must have values assigned otherwise be ready for validation errors.

Let us go ahead and now understand webserviceoutput activity.

Webserviceoutput activity must be bind with any of the webserviceinput activity for which you want to return the output. You must assign InputActivity name to the webserviceoutputactivity, otherwise validation error will be thrown.

If method returns void, then no need to bind the return parameter to the webserviceoutput, else you need to bind the appropriate return parameter to the webserviceoutputactivity.

More than one webserviceoutputactivity can be associated with one webserviceinputactivity. Reason being, let us say, we have one if else condition and in that we are processing some activities. Or we have parallel activities going on and it can take any of the branch path, then for each path ends, we need to return some values. Hence for each path end can be bind to the single input activity.

There is one more activity that we have to use in the workflow if we want to expose the workflow as web service.

Webservicefalut activity is same as webserviceoutputactivity and must be bind with the webserviceinputactivity. Only difference is that webservicefaultactivity is binded to the field or parameter of type Exception and to be set in Fault parameter of this property. This will ensure that if anything goes wrong, we need to send the exception or proper message to the calling client method.

Read Using Workflow as web service Part – 2 for further reading.

Thursday, March 18, 2010

Creating custom activity in Workflow Part – 5

Hi All,

In previous parts, we saw how to deal with custom activities main validation logic, execution logic and some cosmetic tips. We will carry on some nice look and feel for the custom activity in this post as well.

If you haven’t gone through the previous post, then I recommend reading Creating custom activity in Workflow Part – 1 first and then continue reading further.

This post will show you the way we can implement an image associated with custom activity. When we drag and drop the custom activity on designer surface, we can attach PNG image of ideally 16 * 16 sizes.

We have to add ToolboxBitmap attribute to the CustomActivityDesigner class and the Custom Activity class with path to the 16 * 16 PNG picture.

If you apply ToolboxBitmap attribute to only Custom Activity class, then you will see the image on designer custom activity only. However, if you apply ToolboxBitmap attribute to CustomActivityDesigner class, then you will also find the image for custom activity in the toolbox as well.

Modify the classes as shown below.


And below is the result of applying attribute to both classes.


Now you will wonder I have given local path of my system. If you give this custom activity’s DLL to any other developer, how image will appear.

Well, answer to the question is very simple. No need to worry about image. Image is built as a part of embedded resource in assembly. So image will automatically be included with DLL.

I hope that you have liked this series of basic custom activity. Share with us your thoughts on this.

Read Creating custom activity in Workflow Part – 6 to explore more.


Share your SharePoint Experiences with us...
As good as the SharePointKings is, we want to make it even better. One of our most valuable sources of input for our Blog Posts comes from ever enthusiastic Visitors/Readers. We welcome every Visitor/Reader to contribute their experiences with SharePoint. It may be in the form of a code stub, snippet, any tips and trick or any crazy thing you have tried with SharePoint.
Send your Articles to sharepointkings@gmail.com with your Profile Summary. We will Post them. The idea is to act as a bridge between you Readers!!!

If anyone would like to have their advertisement posted on this blog, please send us the requirement details to sharepointkings@gmail.com