Thursday, March 28, 2013

Add web part page using PowerShell


Imagine a scenario where you need to create 100 web part pages with different templates. You would spend a lot of time creating those pages. One of the approaches can be having a PowerShell script which can create web part pages for templates that you want.

Here is a simple script that creates web part pages in a loop.

[xml]$xmlfile = Get-Content ConfigFile.xml 

foreach( $sitecoll in $xmlfile.Configuration.SiteCollection) 
{ $site = $sitecoll.name }

 $spSite= Get-SPSite $site 
$web = $spSite.OpenWeb() 
$layoutTemplate = 4 # Template code 
$web = $spSite.OpenWeb() 
$list = $web.GetList("/sites/SharePointSite/SitePages/")
 $i = 1
 while ($i -le 5)
 { Write-Host $pageTitle = "WebPartPage& + $i 

$xml = "<?xml version=""1.0"" encoding=""UTF-8""?&gt;

<Method ID=""0,NewWebPage""><SetList Scope=""Request"">" + $list.ID + "</SetList><SetVar Name=""Cmd"">NewWebPage</SetVar><SetVar Name=""ID"">New</SetVar><SetVar Name=""Type"">WebPartPage</SetVar><SetVar Name=""WebPartPageTemplate"">" + $layoutTemplate + "</SetVar><SetVar Name=""Overwrite"">true</SetVar><SetVar Name=""Title"">" + $pageTitle + "</SetVar></Method>"

 $result = $web.ProcessBatchData($xml)

 $i++ 

Write-Host -foregroundcolor Green $pageTitle 'created successfully' 

}

and when you run here is the output of the script and then final result


If you observe closely here we have specified layouttemplate, we have specified 4. This related to various templates like three column, four columns, headers the template that we select while creating web part page.

 Possible LayoutTemplate values are :

# 1 - Full Page, Vertical
# 2 - Header, Footer, 3 Columns
# 3 - Header, Left Column, Body
# 4 - Header, Right Column, Body
# 5 - Header, Footer, 2 Columns, 4 Rows
# 6 - Header, Footer, 4 Columns, Top Row
# 7 - Left Column, Header, Footer, Top Row, 3 Columns
# 8 - Right Column, Header, Footer, Top Row, 3 Columns


Thursday, March 21, 2013

Set custom task field value in Start Approval action in SharePoint Designer


In this post we are going to see how you can set custom field that is in the task list from the designer when you use Start Approval action.

First take any list into consideration. Open SharePoint Designer 2010, connect to the site. Click on list workflow, select that list and create a workflow, give a name and description. and add start approval process action to designer.


Set it like this.


Now click on Approval. This will take you to the form where you can customize the entire approval process.


We are interested in change the behaviour of single task.

But before moving into this, observe task form fields on right. We need to create one task form field in this. Click on new. If you already have site column defined, you can click on add from site columns.


as you can see it is set to optional.


Now click on change the behavior of single task.


Before you can access task field. Go ahead and publish the workflow.

go to tasks list and list settings. Observe that designer has created a field for you.


Coming back to the designer add set task field to value action.


You will get the WF name field here select WF Name


and set the value to Order WF. Go to the workflow settings screen and select start workflow on create and on edit.


Save and publish the workflow. Go to the orders list and add an item. You can see workflow has started.


Go to task list.


Now if you click on the task title, you can see the WF Name field is shown on the form


go back to designer and go to the customizing approval process.

From the task form fields, set from optional to hidden. Now save and publish the workflow.


Again click on task list item and see that field is not visible on the form now.


I hope this helps. 

Tuesday, March 19, 2013

Create Managed Metadata Site Column in SharePoint 2010


In this post we are going to see how we can create a site column that links with the managed meta data.

Creating a site column that holds a value from managed meta data term store is not directly available.

We first need to create a site field which is of type taxonomy and then we need to create one feature which is scoped at site level and in feature activation we access the taxonomy store and set the site column to required term set.

Go to site settings, under site administration click on term store management. I have following settings.


Now let's create one Visual studio project. Select blank project.

Now add SharePoint content type project item.


Choose item content type. This is a sample that I have.


Finally I have something like this.


Now add an event receiver to the site level feature.

What we are doing here is we are first taking reference of the field that we created. Then we take a term store in to the account and then locate the Microsoft group.

After that we take Web Technologies group and then associate this group to our site column.

public override void FeatureActivated(SPFeatureReceiverProperties properties)
        {
            SPSite site = properties.Feature.Parent as SPSite;

            Guid fieldId = new Guid("{B87F6D98-564F-43CA-B4A6-1539A3A3E7C2}");

            if (site.RootWeb.Fields.Contains(fieldId))
            {
                TaxonomySession session = new TaxonomySession(site);

                if (session.TermStores.Count != 0)
                {
                    var termStore = session.TermStores["Managed Metadata Service"];

                    foreach (Group grp in termStore.Groups)
                    {
                        if (grp.Name == "Microsoft")
                        {
                            var group = grp;

                            var termSet = group.TermSets["Web Technologies"];

                            TaxonomyField field = site.RootWeb.Fields[fieldId] as TaxonomyField;

                            field.SspId = termSet.TermStore.Id;
                            field.TermSetId = termSet.Id;
                            field.TargetTemplate = string.Empty;
                            field.AnchorId = Guid.Empty;
                            field.Update();

                            break;
                        }
                    }                 
                }
            } 
        }

Deploy the project.

To check this, go to a task list. go to the list settings and enable the management of content type. 

Once enabled, add from existing site content type and add the SPKings content type.

and there you go


I hope this helps.

Sunday, March 17, 2013

Set up and configure My Sites in SharePoint 2010


In this post, we are going to see how to set up my site in SharePoint 2010. to set up My Sites you need to follow some simple steps.

First it is recommended that you set up a dedicated web application for My site. After this you set up a dedicated site collection under the web application.

So let us go ahead and create one web application and under that create site collection to start with and then we will set up and configure My Site.

so here I have one dedicated site collection under dedicated web application. Make sure that while selecting site collection you select My Site Host as a site template under Enterprise category.


Now by keeping the central administration open, click on the application management, click on manage service application and then click on user profile service application.


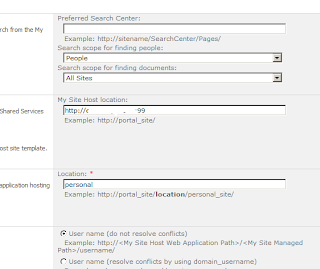
Under user profile service, click on set up My Sites.

In my Sites Host URL, enter the site collection URL that we have created for the My Site Host.

In Personal site location, enter personal. You can have this name chosen by yourself. I am keeping it personal.


Now again let us go back to the web applications screen. Click on the My Site web application, and click on manage paths.


In add a new path, enter the path that you would like to append to the URL. Also select the Wildcard including. Wildcard inclusion path is the path under which a separate site collection will be created for each user when they visit for the first time.

So type personal in the path text box and click on add path.


Now we need to enable the self service site creation for our web application.

Go to application management, manage web applications, select our web application. In security group, select self service site creation. Select on.


Now we are good to go with My Sites. Login with any user and then click on My Sites and you should see site getting created.


I hope this helps. 

Wednesday, March 13, 2013

Add managed property to advance search web part


If you are using advanced search web part and want to add your own custom property to the properties list, then you can do it very easily.

First you need to have managed property which is mapped with the crawled property. If you would like to know how to get crawled property and how to map the managed property with the crawled property, you can refer

Consider we have one advance search web part and a managed property with us. Go ahead and edit the advance search web part.


Prior adding our department property that we already have , let us see what all things that we can do with advance search web part.


If you remove all which is highlighted in above image, you can see that languages options go away from search.


We also have the document type


If you remove all which is highlighted in below image, you can see that excel and powerpoint document type option go away.


and here is what you get.


Now you should be able to get the results by specifying your custom property. I hope this helps.

Tuesday, March 12, 2013

Add mapped property to search refinement panel - Part 1


In this series I am going to show you how you can add custom property from document library or list to the search refinement panel.

Search refinement panel appears left hand side when you perform a search. If you observe closely, you get to see meta data associated with the result set that is returned from the search query.

 First create one web part page with at least three columns by selecting proper web part template. then edit the page and add the web part. Select search category and then add search refinement panel on the left web part zone and search core results web part on center web part zone.


Let's say you have a document library and you search for some word. you find the result in the search results but you would want bifurcate the result based on few meta data properties of the document library, then you need to modify the search refinement panel.

Before diving into this let us have one document library with some meta data properties.

Make sure that you have the values in the field for which you want to create mapped property. Otherwise search will ignore the field and will not generate crawled property. The process is first crawl the content so that you get crawled property generally starts with ows_fieldname and then create mapped property and then use mapped property in the search page.

Coming back to the document library, we have something like this in our hand.


Now go to the central administration. Click on application management. then click on manage service applications and click on search service application. then click on content sources. now full crawl the content source local sites which generally has all the web applications.


Let the full crawl complete.

Now click on the metadata property from the quick launch on the same page. then click on the crawled property.


now search with department which is our column in the document library.


click on ows_department to verify that this is the property that we are looking for. once you click on the property, you actually get to know that where this property has been created from. This way we can be ensure that this is the correct property. On our case we can see that it is from our document library.


Now come back to the screen and click on metadata property and then click on new managed property. Give a name ManagedDepartment , click on add mapping.


now search department , you will get the crawled property and then select ows_department and then click on ok.


Now we need to crawl one more time. Full crawled the content one more time.

Let the crawl complete.

Now come back to the search result web part page. edit the page and then edit the search refinement panel web part.


Make sure that the Use Default configuration is not checked. By default it is checked. If you do not unchecked this then even you do any customization it will not get into the account.

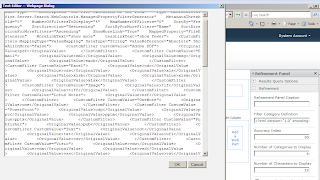
Click on filter category definition. this opens up a text editor where we need to add our custom department property. Add following entry between categories. Make a note that ShowCounts is set to Counts and most importantly threashold value is set to 0. If this is not set to 0 that means in the search result if the property is returned for that many number of times then only department will appear in the search refinement panel. Another attribute to note is the mapped property. this is the name of the managed property that we created earlier.


And this is the result of it. We now have department appearing in the refinement panel and that too with count.


I hope this helps. In next post of this series we will see some more interesting topic for searh refinement panel.


Share your SharePoint Experiences with us...
As good as the SharePointKings is, we want to make it even better. One of our most valuable sources of input for our Blog Posts comes from ever enthusiastic Visitors/Readers. We welcome every Visitor/Reader to contribute their experiences with SharePoint. It may be in the form of a code stub, snippet, any tips and trick or any crazy thing you have tried with SharePoint.
Send your Articles to sharepointkings@gmail.com with your Profile Summary. We will Post them. The idea is to act as a bridge between you Readers!!!

If anyone would like to have their advertisement posted on this blog, please send us the requirement details to sharepointkings@gmail.com