Friday, July 12, 2013

Search From Recycle bin


In this post we are going to see how we can search from recycle bin. Now out of the box there is no way to search an item from recycle bin and restore it.

The problem is when we have a lot of items in the recycle bin we need to page through and then find that item and then restore it.

Well there is a PowerShell that can come to rescue.

Here are simple steps to perform in PowerShell to find and restore the item.

$spSite= Get-SPSite $site

$web = $spSite.OpenWeb()

$files = $web.RecycleBin | ?{$_.Title -match “tst”}

foreach ($file in $files) 
{
Write-Host “Found $($file.Title)”
$web.RecycleBin.Restore($file.ID)
Write-Host “Restored $($file.Title)”
}

The script is pretty self explanatory. Get the site and then web object. Then take the recycle bin. It is first stage recycle bin. You can also take the second stage recycle bin from site object as well.

Then just search for item from recycle bin with title property. The above code returns all the items from recycle bin which has a tst as a match and then calls restore method to restore it to their respective locations.

If you know the exact name of an item, you can write that and that specific item will be restored. See the advantage, you do not need to search from pages by paging through them if you have huge amount of items residing in recycle bin.

I hope this helps.

Wednesday, July 10, 2013

Customize Access Denied Page


In this post we are going to see how we can customize the access denied page in SharePoint. Many times we wish we could display some other friendly message than the one displayed by default.


First we need to understand that this is a page under layouts folder.

So we also need to create an application page. Open a project and add an item. Select application page as an item to add.


Now go to the layouts folder under template in 14 hive.

Locate accessdenied.aspx


Open the file in notepad.

Copy the HTML from the accessdenied to our customaccessdenied page.


As of not to test that we are in a right path, build the project and deploy the solution to the SharePoint site.

Once deployed, check that it is deployed to layouts folder and then open the site and in URL type _layouts/customaccessdeniedpage.aspx


Change two contents like this and then we will deploy again to see that changes are reflected.


Deploy the solution and check the page again.


As you can see changes are reflected.

But now the question is how we can actually bind this page to Web Application so that on access denied error is taken to this page and not to the default access denied page.

Here is a powershell command for this. Execute this and check the access denied. You should be good to go.

 $site = get-spsite "site url"

$webApp = $site.WebApplication


$webapp.UpdateMappedPage(1, "/_layouts/CustomAccessDeniedPage.aspx")


$webapp.Update()


1 refers to the access denied page as per the enumeration defined in SPCustomPage. Same way there are enumerations also for the logout, sing in page etc.

If you want to roll back changes, then


$webapp.UpdateMappedPage(1, $null)


$webapp.Update()


Just remember that this settings can only be done at web application level and not to the site collection level.


Monday, July 8, 2013

Creating a flyout menu in SharePoint 2010


In this post we are going to see how we can create a fly out menu and add it to the site actions menu. Thing to note is I have shown this for site actions menu. It can simply be added to any other place like edit control block just by changing the appropriate text inside element file like location attribute.

First we need to create a class which inherits from control class -System.Web.UI.Controls.
Then we need to override the createchilecontrols method.

You can do this simply by adding class to the existing project and then inherit from control and then override the method. Here is a code that I have written. 

What we are doing is first we are instantiating a class SubMenuTemplate. That means this will be added as the main menu item that will appear under Site Actions.

Then we define MenuItemTemplate that will be the sub menu to the parent which is SubMenuTemplate in our case.

public class FlyoutMenu : Control
    {
        protected override void CreateChildControls()
        {
            SPWeb site = SPContext.Current.Web;

            SubMenuTemplate SubMenuTmplt = new SubMenuTemplate();
            SubMenuTmplt.ID = "CustomSubMenu";
            SubMenuTmplt.Text = "SPKings Menu Control";
            SubMenuTmplt.Description = "Custom Flyout Menu";
            SubMenuTmplt.MenuGroupId = 1;
            SubMenuTmplt.Sequence = 1;


            MenuItemTemplate MenuItemTmp1 = new MenuItemTemplate();
            MenuItemTmp1.ID = "FlyoutMenu1";
            MenuItemTmp1.Text = "SPKings Menu Item 1";
            MenuItemTmp1.Description = "This is customized fly out menu item 1";
            MenuItemTmp1.Sequence = 1;
            MenuItemTmp1.ClientOnClickNavigateUrl = site.Url ;
         
            // create fly out menu command 2
            MenuItemTemplate MenuItemTmp2 = new MenuItemTemplate();
            MenuItemTmp2.ID = "FlyoutMenu2";
            MenuItemTmp2.Text = "SPKings Menu Item 2";
            MenuItemTmp2.Description = "This is customized fly out menu item 1";
            MenuItemTmp2.Sequence = 2;
            MenuItemTmp2.ClientOnClickNavigateUrl = site.Url ;
           
            // add menu commands to Controls collection of fly out menu
            SubMenuTmplt.Controls.Add(MenuItemTmp1);
            SubMenuTmplt.Controls.Add(MenuItemTmp2);

            // add fly out menu to Controls collection of of menu control
            this.Controls.Add(SubMenuTmplt);

        }

Make a note that the ClientOnClickNavigateURL is only available to the MenuItemTemplates as they are the last node to be added and can be clicked to perform the actual action. As an example I have used site.URL. In real scenario you can have a web part page or application page set up where you would want user to go.

I have not set the images for the menu items. you can also set that as well by using ImgURL property of both SubMenuTemplate and MenuItemTemplate object.

Once we are done with writing this code, we need to make sure that we add this to the safe controls entry to the project.

Deploy after completing all above step and activate the feature. You should be good to go and should see the new menu available under the Site Action. If you want to change the position of menu being displayed, then just change the sequence property.


Thursday, July 4, 2013

Generate word document from list data from SharePoint Designer workflow


In this post I am going to show you how to generate word document in document library from SharePoint list item. 

Let's first see what all we will need.

We will first take list with metadata. We also need to have the same metadata with the same field type also in the document library. The number of fields do not matter but what matters is the type of field.

We will create a list item, we will have one workflow which will trigger and then create a document based on the metadata which we filled in list item. Document will have the content from the list item. 

We also need to create a document template which has fields from the document library. so when the workflow will trigger, it will set the metadata and based on it document fields gets replaced inside document.

I have one list called orders and here are the fields.


We need to create same fields with same type as site columns so that we can add them to the document content type.

Here are the site columns.


Now we have created custom document content type called orderdocument.


Now we will add previously created site columns to this content type.


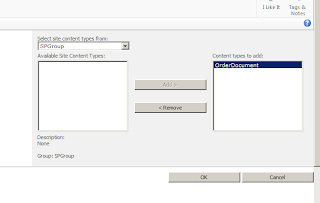
So now let's create document library called order documents and add the order document content type that we've created.


Before we move on to creating workflow we need to update our document template with the fields. so go to the library settings. Click on order document content type and you will see the content type screen.


Now click on advance settings. 


Click on edit template.

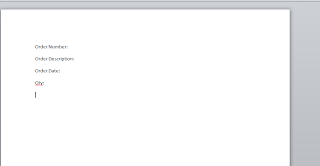
It will open up the blank word template.

Add these text to the document. 


Now click on the insert tab from ribbon and find insert document property.


All we have to do now is add respective property against respective label. In real business scenario you may have proper template and then we fill in values in that template.


Save the template.

We are now set writing a workflow on order list. Open up SharePoint designer and connect to the site. 

Click on list workflow and click on orders.


Give name to the workflow.

From actions select create a list item.


Click on this list and then select order document.

You will get this window


But you will see that the default content type is selected as document. Select the content type and click on modify and select order document content type.


Now click on add. Select Order Description and then set it to the order description of the list item. Repeat the same for all remaining list items.


you should have something like this.


Now publish the workflow.

Go ahead and add a new item now in orders list. As our workflow is attached to the orders list, it should execute and complete.

See below list item with workflow status as completed.


Now go to the Order documents library.


Click on the document to open it.


and there you go. Sometimes template needs to be in .docx format instead of .dotx. Not sure what is the reason. So try that yourself.


Share your SharePoint Experiences with us...
As good as the SharePointKings is, we want to make it even better. One of our most valuable sources of input for our Blog Posts comes from ever enthusiastic Visitors/Readers. We welcome every Visitor/Reader to contribute their experiences with SharePoint. It may be in the form of a code stub, snippet, any tips and trick or any crazy thing you have tried with SharePoint.
Send your Articles to sharepointkings@gmail.com with your Profile Summary. We will Post them. The idea is to act as a bridge between you Readers!!!

If anyone would like to have their advertisement posted on this blog, please send us the requirement details to sharepointkings@gmail.com