Thursday, January 3, 2013

What's new in SharePoint 2013


Here we are with new SharePoint 2013. With this edition comes lots of fun and also up to some level disappointment. Well, there are more fun than disappointment hence a good news.
First let us see what all new features of SharePoint 2013 and what all product family now we have.

First SharePoint 2013 is of course a next version of currently successfully running SharePoint 2010.

Just like SharePoint Foundation 2010 we also have SharePoint 2013 foundation which is again a free utility that can be downloaded if you have Windows Server 2008 R2 with SP1 or new Windows Server 2012.

we also have licensed SharePoint 2013 on premise version or the cloud version which is in office 365.

Covering everything about SharePoint 2013 would be very difficult in a single post. So we will divide the posts and will post them as separate posts.

It would only run on 64 bit machines and will require SQL Server 2008 R2 with SP1 or new SQL Server 2012.

Ideal RAM should be between 8 GB to 24 GB. (making hardware more expensive with each iteration)

Plus Microsoft has come up with new Visual Studio 2012 which is tightly integrated with SharePoint 2013. Visual Studio 2012 has a lot of new features eases the SharePoint 2013 development.

Of course we now also have SharePoint Designer 2013 as well as Office 2013 products.
So let's dive into the new features that has been introduced or enhanced from the previous version.

1) Everything is App

Now we need to think of almost everything as an App. Lists, Libraries, Calendar and even sites are apps. You can create an app and then publishes to the corporate app web application or to the Microsoft Store. Remember that when you create an app, you will work with client object model and not server object model. You can use ECAM script, HTML and jQuery to interact with SharePoint 2013. you can options to host your app either in SharePoint itself or on the cloud - provider hosted.

The advantage is Microsoft is going to have a dedicated store for SharePoint where developers from all around the world would be publishing their apps for SharePoint which then can be consumed by other developers based on contract/license.

Company developed apps can be hosted in internal app catelog. They enable you to use cross-platform standards, including HTML, REST, OData, JavaScript, and OAuth.

We already have few apps ready to go for SharePoint 2013 and here they are.

http://office.microsoft.com/en-us/store/apps-for-sharepoint-FX102804987.aspx

2) Create / Edit Master Pages

This is one of the biggest improvements over the last version.

You can simply create an HTML page with CSS and images and then convert this HTML page into the master page. Does that really make you read twice? Yes, you're right. We can now convert HTML into the fully functional master page. you also get a preview of new master page before applying.

3) Image duplicity

You can have all your images in a site and then can define the variants of those images that you would like to use. You can have one single image and can use this image in different way like with different height, width and even by cropping an image.

4) Windows 8 Style
You feel like you are using Windows 8 UI metro look as we have now tiles at most of the places.

5) Contemporary view for Mobile

We now have new contemporary view for mobile. This view is available in HTML 5 to those who uses Windows Phone 7.5 or above and IE 9 and above, iPhone 4 or above, Safari 4 or above and Android 4 or above.

We can also have full desktop view of SharePoint in smart phones.

6) Drag and Drop to library

Now we can upload the documents using drag and drop from the desktop. Files will be uploaded to the document library showing the progress bar.

7) New context menus

We now have more clear context menus for list items and documents.

8) Share the documents

Now we can select document and then share it with specific person / user with personalized message. After this email will be sent to the user so that user can access the document.

9) Social experience has improved

Now you can follow a document, list item and also users, posts etc. You can do a micro blogging.

There is a new community site available where you can define you ideas, team, contributors and can also give them ranks / raputations based on the answers that they give when someone post a question. You can create badges.

10) Preiew of Documents

Now in document library when you hove the mouse over the document, we get to see the preview of that document right there.

11) SkyDrive integration

You can synchronize your contents to your desktop with the SkyDrive.

12) BCS enhancements

Now it also suports oData. automatic generation via Visual Studio.

13) create an app for Office 2013

We can create an app specially for Office 2013 so that users using office 2013 can interact with SharePoint 2013 right from office. We can use new development tool called "Napa" along with Visual Studio 2012.

14) App event handlers and remote event handlers

apps have their own events that we can handle like when app is installed or deleted. Remote event handlers can work with the remote components of the app for SharePoint.

15) Translation service, PowerPoint automation service, enhanced excel service and enhanced access services.

With new PowerPoint automation service you can now convert ppt or pptx files to PDF and other open XML formats.

Translation Service is a new service application in SharePoint 2013 that provides translation of files and sites. When the Translation Service application processes a translation request, it forwards the request to a cloud-hosted machine translation service, where the actual translation work is performed.

The Machine Translation Service application processes translation requests asynchronously and synchronously. Asynchronous translation requests are processed when the translation timer job executes. The default interval of the translation timer job is 15 minutes; you can manage this setting in Central Administration or by using Windows PowerShell

There is a lot of things that can be talked about SharePoint 2013. We will cover them as an when we come across to them and share it.

Tuesday, January 1, 2013

Wishing all our readers a very happy new year


As we are now in the year 2013, here wishing all our readers a wonderful and a very happy new year.

Hope all of you have an energetic start of new year. With this note, we would like to mention that after a break we are going to be back soon in fact very soon with lots of new posts of SharePoint.

Without forgetting we also would like to mention that now as we are in 2013 so as our posts will also be of SharePoint 2013 along with continuing with SharePoint 2010.

Keep visiting SharePoint Kings as you always do visit. Thank you for your consistent support.

Sunday, November 11, 2012

Special permissions in Workflow Create Task Activity


Many times we want to restrict a task item only to be edited by a person whom it is assigned to.

If a person has contribute access then by default there is no way that we can restrict them to update the task list item.

When you are working with create task activity and create a task, you can always create a special permission object and then assign it to the task properties.

createtaskProperties.AssignedTo = "domain\\user";
System.Collections.Specialized.HybridDictionary specialPermissions =
new System.Collections.Specialized.HybridDictionary();
specialPermissions.Add(createtaskProperties.AssignedTo,
SPRoleType.Contributor);
createTask1.SpecialPermissions = specialPermissions;

This is how you set permission on task list item to allow only assigned to person edit that task list item.

Friday, September 7, 2012

Accessing items of external list

I was working with external list and was trying to access some of the items. But then i get to know that when you want to access the list items of external list, you cannot use ID field. You need to use BdcIdentity field to work with these items.

Another point that i noted after getting those items is that you have to iterate items by using SPListItemCollection and inside that SPFieldsCollection for that item to get values of the fields. you directly cannot get the value.

I hope this helps.

Wednesday, August 29, 2012

Error occurred in deployment step 'Recycle IIS Application''

I encountered this error when I was developing an application for one of the site collection. I gave site collection URL while selecting farm solution that I was creating.

Suddenly when deploying the application through Visual Studio 2010 I encountered this error and then I came to know that this error came in because a user under which I opened the Visual Studio did not have site collection administrative permission or at least site full access.

Once I gave permission, I was able to deploy it successfully. Silly!! but sometimes it is helpful tip. Isn't it?

Friday, August 3, 2012

Refresh parent page when model dialog page is opened

When you want to refresh the parent page when user clicks on OK button on dialog page that you open from the parent page then you can use SP.UI.ModalDialog.RefreshPage


Usually we write this code in dialogReturnCallBack function.


       dialogReturnValueCallback: function(dialogResult) 
        { 
          SP.UI.ModalDialog.RefreshPage(dialogResult) 
        }

Wednesday, July 11, 2012

Creating custom workflow action for SharePoint Designer 2010


Sometimes we may require creating a custom workflow action when default activity choices offered by designer do not suffice our need.

In this post, I am going to show you how to create a custom action for designer.

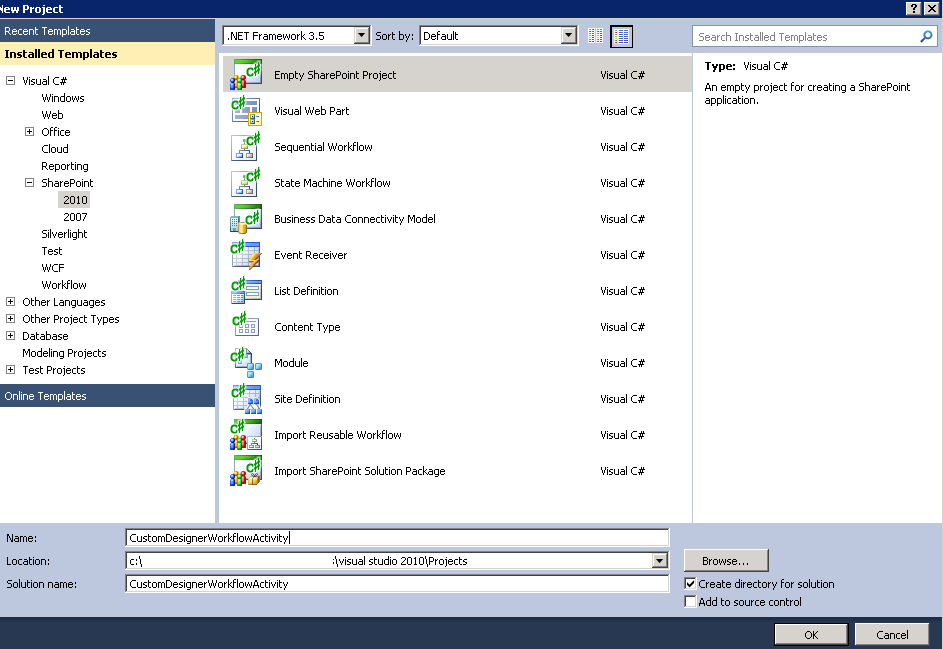
You would need Visual Studio for this. So open up VS studio and select Visual C# , empty project in SharePoint 2010.

Give it a name you want.


Deploy it as a farm solution.


Now go ahead and add one more project. This time select workflow – workflow activity library.


Now add two DLL references. Microsoft.SharePoint.dll and Microsoft.SharePoint.WorkflowActions.dll

Now we are going to create three properties which will act as parameters in our custom activity. One will be the site URL, other will be Web Name and the last will be the name of the contact list.

These properties are decorated with certain attributes and declared as dependency 
properties. So go ahead and add three dependency properties.

public static DependencyProperty SiteUrlProperty = DependencyProperty.Register("SiteUrl",

        typeof(string), typeof(CreateContactListType), new PropertyMetadata(""));
        [DescriptionAttribute("Url of site where contact list will be created")]
        [BrowsableAttribute(true)]
        [DesignerSerializationVisibilityAttribute(DesignerSerializationVisibility.Visible)]
        [ValidationOption(ValidationOption.Optional)]
        public string SiteUrl
        {
            get
            {
                return ((string)(base.GetValue(CreateContactListType.SiteUrlProperty)));
            }
            set
            {
                base.SetValue(CreateContactListType.SiteUrlProperty, value);
            }
        }


        public static DependencyProperty WebNameProperty = DependencyProperty.Register("WebName",

        typeof(string), typeof(CreateContactListType), new PropertyMetadata(""));
        [DescriptionAttribute("Name for Web")]
        [BrowsableAttribute(true)]
        [DesignerSerializationVisibilityAttribute(DesignerSerializationVisibility.Visible)]
        [ValidationOption(ValidationOption.Optional)]
        public string WebName
        {
            get
            {
                return ((string)(base.GetValue(CreateContactListType.WebNameProperty)));
            }
            set
            {
                base.SetValue(CreateContactListType.WebNameProperty, value);
            }
        }


        public static DependencyProperty ContactListNameProperty = DependencyProperty.Register("ContactListName",

typeof(string), typeof(CreateContactListType), new PropertyMetadata(""));
        [DescriptionAttribute("Name for contact list")]
        [BrowsableAttribute(true)]
        [DesignerSerializationVisibilityAttribute(DesignerSerializationVisibility.Visible)]
        [ValidationOption(ValidationOption.Optional)]
        public string ContactListName
        {
            get
            {
                return ((string)(base.GetValue(CreateContactListType.ContactListNameProperty)));
            }
            set
            {
                base.SetValue(CreateContactListType.ContactListNameProperty, value);
            }
        }


Now we need to write logic in Execute method as to what needs to be done when this activity executes.
So we are going to create a contact list in specified web with specified name. Remember return  closed as that means activity has successfully completed as a status.


protected override ActivityExecutionStatus Execute(ActivityExecutionContext executionContext)
        {
            CreateContactList();
            return ActivityExecutionStatus.Closed;
        }

   private void CreateContactList()
        {
            using (SPSite oSPSite = new SPSite(SiteUrl))
            {
                using (SPWeb oSPWeb = oSPSite.AllWebs[WebName])
                {
                    Guid ContactListID = oSPWeb.Lists.Add(ContactListName, ContactListName + " Created From Designer",
        SPListTemplateType.Contacts);

                    SPList contactList = oSPWeb.Lists[ContactListID];
                    contactList.OnQuickLaunch = true;
                    contactList.Update();
                }
            }
        }

We are done with writing our code. It’s time to register the project with strong name. Go ahead in property of this project and give it a strong name.

Now right click the CustomDesignerWorkflowActivity project and add SharePoint mapped folder.


Select Template-1033-Workflow


Now we need to add .actions file which is very important from Designer stand point.

Add new item in the workflow folder and give a name as DesignerCustomActualActivity.actions
This is the file which actually tells SharePoint to make this action available in Designer.

Now add this XML in that file.

<?xml version="1.0" encoding="utf-8" ?>
<WorkflowInfo>
  <Actions Sequential="then" Parallel="and">
    <Action Name="Create Contact List"
        ClassName="DesignerCustomActualActivity.CreateContactListType"
        Assembly="DesignerCustomActualActivity, Version=1.0.0.0,
           Culture=neutral, PublicKeyToken=5e36fcb66a91895d"
        AppliesTo="all"
        Category="SPKings Activity">
      <RuleDesigner Sentence="Contact List Name %1 in %2 within site %3.">
        
        <FieldBind Field="ContactListName" Text="Contact List Name"
           DesignerType="TextArea" Id="1"/>
        
        <FieldBind Field="WebName" Text="Web Name"
           DesignerType="TextArea" Id="2"/>
        
        <FieldBind Field="SiteUrl" Text="Url of base site" Id="3"
           DesignerType="TextArea"/>
      </RuleDesigner>
      <Parameters>
        
        <Parameter Name="ContactListName" Type="System.String, mscorlib"
      Direction="In" />


        <Parameter Name="WebName" Type="System.String, mscorlib"
      Direction="In" />


        <Parameter Name="SiteUrl" Type="System.String, mscorlib"
      Direction="In" />
        
      </Parameters>
    </Action>
  </Actions>
</WorkflowInfo>


If you observe closely, we have defined action in tag and inside it we registered our assembly and defined our own category. We can have the same name in category whenever we create our custom actions so that all our custom action comes under that category.


Then we set the rule designer and in that we have bounded our all three properties with their data type. Then we set the same three as parameters as input because we will be setting the properties.

Now we need to add these into the package. So double click on the package in the project and then click on advanced.


Now add assemblies. You can get this info from GAC If you deploy this application’s DLL in GAC, from there you can get public key token information and then register it here.

If you get an access denied while dragging DLL to assembly or not able to install even through gacutil, then deploy the solution, you will get that in assembly and from there you can get it.

Just a handy tip, there is one more way to get public key token if you do not want to deploy the DLL in GAC and then get the token. Read this post.


Now one more change left and that needs to be done in web.config file of web application. Open up the web.config file of your web application from wss\virtual directory folder and find a tag Authorized Type and add our custom assembly information as mentioned below.


Now build the application and then deploy the application. It’s time to test our custom action in action and to see if it has appeared in designer.

Open designer, connect with the site. Create workflow and click on actions. Here we are with our own custom action.


Click on the create contact list action and we get this. These come from the action file that we created.


Set up the parameters. Save and publish the workflow.

And set up a workflow to run on item adding. Add the item and see the list gets created in the web name you have mentioned in the designer. Execute method gets called when this action gets executed.


Monday, July 9, 2012

Result is out

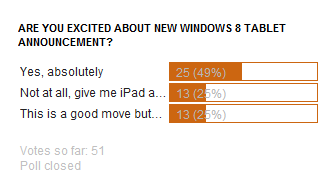
We now have the result out and it seems like people have a big hope on Windows 8 Tablet.


Thursday, July 5, 2012

Get Public key token in Visual Studio 2010


Now when I was developing a custom application for SharePoint and needed to assign it with strong name I assigned a strong name to my project. Now was the time to see the token generated for it. I went ahead and tried to drag that assembly to GAC but I got access denied.

Development machine is Windows Server 2008. Now I tried installing it using GACUTIL but I got the same result even being the administrator of the machine.

Challenge comes in when you want to know the public key token that has been generated for the project so that you can make modification in web.config file.

So here is a solution. We will create an external command that will get us the public key token of the project. So that when that command is clicked we get to see result in command window.

Follow these simple steps. Make sure about spacing and parameters shown here.

Go to Tools menu and then external tools.


Click Add button on which the dialog opens.

Set textbox values like this


Command text box value is

C:\Program Files (x86)\Microsoft SDKs\Windows\v7.0A\Bin\NETFX 4.0 Tools\sn.exe

Click on OK.

Now when you again click on Tools menu, you get to see our command.


Click on it and we will get the result in output window and from there you get to know the public key token.


I hope this will help while you are developing any custom component in SharePoint. 


Share your SharePoint Experiences with us...
As good as the SharePointKings is, we want to make it even better. One of our most valuable sources of input for our Blog Posts comes from ever enthusiastic Visitors/Readers. We welcome every Visitor/Reader to contribute their experiences with SharePoint. It may be in the form of a code stub, snippet, any tips and trick or any crazy thing you have tried with SharePoint.
Send your Articles to sharepointkings@gmail.com with your Profile Summary. We will Post them. The idea is to act as a bridge between you Readers!!!

If anyone would like to have their advertisement posted on this blog, please send us the requirement details to sharepointkings@gmail.com