Thursday, July 14, 2011

Client Object Model - Part 1

From this post, we are going to start new series for client object model. If you have not gone through previous post Client Object Model which describes you what client object model is all about, I would strongly encourage you to read that first and then come back and continue reading here.

We are going to star with managed client object model. Managed client object model works on the .Net CLR. That means any normal application that runs on the .Net CLR installed platform.

I am going to show you by taking windows application as an example and look into some of the very basic stuff to get the web properties.

First create a windows application project and take a reference of two DLLs that are needed to work with.

They are Microsoft.SharePoint.Client.dll and Microsoft.SharePoint.Client.Runtime.dll and you can find them 14/ISAPI folder.

public void LoadData()
{
string webUrl = "{site URL}"; //replace this with your site URL

ClientContext context = new ClientContext(webUrl);

Web web = context.Web;

context.Load(web);

context.ExecuteQuery();

this.lblWebTitle.Text = web.Title;

this.lblWebDescription.Text = web.Description;


}

private void button1_Click(object sender, EventArgs e)
{
LoadData();

}

As you can see there is very little difference between server object model and COM as far as classes are concern. SPWeb becomes Web, SPContext becomes ClientContext.

Do remember one thing, until and unless we call executequery method, nothing happens. As soon as executequery method is invoked, then managed client object model bundles up all requests together and then pass it to the server. There is no network traffic till then.


Overall approach with client object model is you bundle up all requests that you want to query to server (web properties, lists properties etc) and then call them at once by invoking executequery method.

We are going to see more and more examples with different approaches. Next is doing same with the help of Silverlight Client.

Tuesday, July 12, 2011

Client Object Model – SharePoint 2010 / SharePoint Foundation 2010

New client object model is introduced in SharePoint 2010 and Foundation 2010. Let us see what this new client model is all about and why has this been introduced.

Note: please consider term Client Object Model wherever I use COM word. It has nothing to do with COM windows component.

Earlier to 2010 environment, in 2007 if we want to access SharePoint data outside of server environment, we had only one choice and that was obvious a web service.

We had two options. A code that runs on the server which requires server API and a code that runs on a client which requires calling web services. Calling web services and fetching result and then manipulating that result was not that easy. There were so many different ways to iterate through results, different ways to query SharePoint from web services. These were never an easy job.

Intention of client object model helps developer to write a code which runs on the client and call server without using web services. So the main advantage is you no need to install SharePoint for development.


There are three different client object model in SharePoint 2010.
1) .Net managed client model - This is used via .Net CLR – you need to add Microsoft.SharePoint.Client.dll, Microsoft.SharePoint.Client.Runtime.dll for this. You can find them in 14 hives ISAPI folder.

2) Silverlight client – we can use SharePoint DLLs to be used in Silverlight applications which can be integrated to the SharePoint 2010. SharePoint 2010 provides a great ways to integrate Silverlight applications to the environment. You can deploy your applications as well as you can just upload your entire Silverlight application in document library and use it in SharePoint 2010. You need to add Microsoft.SharePoint.Client.Silverlight.dll and Microsoft.SharePoint.Client.Silverlight.Runtime.dll for this. You can find them in 14\TEMPLATE\LAYOUTS\ClientBin folder.

3) ECMA script client model – Now we have a flexibility to call SharePoint data from JavaScript as well. We can get a context of SharePoint objects now in JavaScript. You need to add SP.js file for this. You can find this in 14\TEMPLATE\LAYOUTS folder.

Other big advantage is that you no need to learn a complete new classes and objects. It’s just that there are some different names of classes now. Those names are not changed much. Example, SPContext has become ClientContext, SPSite has become Site, SPWeb has become Web, SPList has become List.

Small changes have been done and few different ways of creating list, list items, iterating through items, fetching data through query have been introduced in client object model. We are going to see as many examples as we can as we move along with the series.

The way COM works is it bundles all request made to the server in to a XML form and then passes to the server, processes them on the server and then return the JSON response. We have to read the JSON response and then process the result. We do not have to process actually, it’s just that it returns the response and we can use different techniques to read them. We are going to see them all as we proceed with this beautiful journey with COM.

Monday, July 11, 2011

Assign value to hyperlink or picture field from designer

Recently I came across to a requirement to automatically assign value to picture field. Now we know that when we define hyperlink or picture field in list when format URL as picture, we need to provide path and the alternate name to image.

I had to do the same thing but with the help of SharePoint designer. Based on some condition, I needed to assign value to the picture field. So here is a simple way we do this.

Declare one variable in your SharePoint designer workflow. I have used ImgURL as string.


Now, I have some conditions in my workflow, however idea is to show you how to assign image path to picture field.

All you have to do is store value in that variable. Use build dynamic string from action options.


Remember one thing, there is one space after comma and the second text.

That’s it. When you update or store value in that field via designer. Use this string variable as source to set value in that field.

Hope this helps.

Friday, July 8, 2011

Remove all survey response from web service

Well I ran into a trouble when I needed to remove all responses from survey. It is far easy to remove all items from the list when you have the permission to access the UI. However when it even comes to the survey responses, there is a big problem. There is no way to edit response in data sheet. Only way is to go to the content and structure in site settings, locate the survey list and then increase the limit to 1000 items and keep deleting in the bunch of 1000 items.

Again the problem is what if you have got more than 50,000 responses. You will end up spending hours removing 1000 items 50 times. This is definitely something which is not worth doing.

Read following posts and you will also come to know about some other stuff.

Delete List Item using web service


Remove all response from SharePoint survey

You can treat this post as continuation of above links.

In this post, I am going to show you a way to remove all responses from survey with the help of web service. Yes web service has come to a rescue as far as removing all responses from survey is concern.

I am writing one function and on button click I am calling that function. Take a list reference from the SharePoint URL interest of you and then start wiring up below code.


public static ArrayList GetListIDs(String ListName)
{
Lists.Lists ListReference = new Lists.Lists();
ListReference.Credentials = System.Net.CredentialCache.DefaultCredentials;
ListReference.Url =
"web site url/_vti_bin/Lists.asmx";

XmlDocument xmlDoc = new System.Xml.XmlDocument();

XmlNode ndViewFields =
xmlDoc.CreateNode(XmlNodeType.Element, "ViewFields", "");
ndViewFields.InnerXml = "<FieldRef Name='ID' />";

XmlNode ndListItems =
ListReference.GetListItems(ListName, null, null,
ndViewFields, "20000", null, null);

//convert String to XMLReader
XmlReaderSettings readersettings = new XmlReaderSettings();
readersettings.ConformanceLevel = ConformanceLevel.Fragment;
readersettings.IgnoreWhitespace = true;
readersettings.IgnoreComments = true;
XmlReader xmlreader =
XmlReader.Create(new StringReader(ndListItems.OuterXml), readersettings);

ArrayList lstID = new ArrayList();

while (xmlreader.Read())
{
if (xmlreader.Name == "z:row")
lstID.Add(xmlreader.GetAttribute("ows_ID").ToString());
}

return lstID;
}


Above function is used to get All IDs of items that are there in the survey. Remember 20000 is the item limit, increase this number as many items as you would like to return.


public static void DeleteItems(String ListName, ArrayList lstID)
{
try
{
Lists.Lists ListReference = new Lists.Lists();
ListReference.Credentials = System.Net.CredentialCache.DefaultCredentials;
ListReference.Timeout = 300000;
ListReference.Url =
" web site url/_vti_bin/Lists.asmx ";


string strBatch = "";

foreach (String ID in lstID)
{
strBatch += "<Method ID='1' Cmd='Delete'><Field Name='ID'>" + ID + "</Field></Method>";
}

XmlDocument xmlDoc = new System.Xml.XmlDocument();
XmlElement elBatch = xmlDoc.CreateElement("Batch");

elBatch.InnerXml = strBatch;

ListReference.UpdateListItems(ListName, elBatch);
}
catch (Exception ex)
{
throw ex;
}
}


And above code takes those IDs as a reference and deletes them from the list. The above code may not be the perfect way to do this job but it certainly better than one approach which is looping through 1 to 50000 items and delete one by one. Rather mentioned approach is better to construct a string and then pass that entire string as a one single batch to perform the operation.

Just take care that you need to increase the time out property based on the number of items that you have. Otherwise you may get a server timeout exception.

Hope this helps.

Thursday, July 7, 2011

Hide I Like It and Notes and Tags

If we have a requirement to hide social features from SharePoint 2010 or from windows foundation server which is I Like it and Notes and Tags options, then we can do so with the help of central administration.

Remember this feature is a farm level feature, so if you make a change, it is going to affect every web application that you’ve created and needs to be done on every server running SharePoint.


Now open central administration, go to System settings, Farm management, click on manage features


Deactivate social feature


Come back to any site in any web application, you will now not see I Like it and Tags and Notes option in the ribbon.


Now this is a farm level settings, but if you wish to hide and unhide based on individual users or groups or active directory groups, then also there is one way to do so.

Again go to central administration-> Application management ->service applications->manage service applications

Look for User profile service applications, click on the link.

Then under people, click on manage user permissions.


Now here, add individual users or Active Directory Group and select appropriate options for social features. If you want to enable it, keep the check box selected or else de select the check box to hide those features from specific users or groups.

Thursday, June 30, 2011

Send an email to group of multiple people from designer

SharePoint designer really helps us to simplify a basic need to sending an email with formatting options and by checking conditions.

However when it comes to sending an email to multiple people from list item, then comes the problem. If you have defined a column which is multiuser selection or even a group selection in people picker, that column does not show up in the list of the To in SharePoint designer.

Take an example, I have an assigned to column as a multiple people and group picker.


So if you go to a SharePoint designer and open the send email option and check out workflow lookup field and try to find out this Assigned to column, it does not show up there.


So we cannot send an email to people picker field if we have that field as multi user and group picker.

I have couple of workarounds for this. I will explain both of them. But I would recommend going with second option.

First we need to understand that if you assign hard core values in to TO email section, it sends an email. I mean try to use different users email address and couple of SharePoint Groups or even active directory distribution lists. It sends an email.

So problem is not that SharePoint Designer cannot send an email, the problem is it does not recognize the field which has multi select user or group in it. We have to somehow find a way to tackle this.

So the first option, change your multiple people and group picker to have a single selection and user only. Open workflow designer, change the To field to have a look up to that Assigned to field. Save the workflow. Come back to the list and now again change AssignedTo filed to the multi user and group filed.

So now onwards even if you select different users and groups, it will send an email.

The big problem with this approach is that if you are trying to do this with existing list which already has data in it, then you will run into a problem of losing other users defined in the people picker column. Because when you change multi select to a single user selection, only first user is preserved, rest all will be discarded. So that can be a big loss and almost no one would want this.

This approach works when you are starting fresh with the new list.

So what is the best way? Well, the best way is to use this second option.

In your workflow, define one variable. Call it EMailList and should be of type String.


Ignore other variables, I used them for other reason.

So now in an action assign Assigned to field to this EMailList variable and then use this variable as a workflow look up by taking workflow items.


And you are done. See, how easy that was. Wasn’t it? I know you all will go for second option. But to present ideas that I have is what SharePoint Kings is all about. Isn’t it?

Wednesday, June 29, 2011

Tuesday, June 28, 2011

Delete List Item using web service

We might need this when you want to remove any list item from the list but from remote location, from other client.

Well, here is a simple way to do it. I am just taking an example of client server application button click. Code remains same where ever you want to use it.

Take the web service reference into your project from the SharePoint site.


protected void Button1_Click(object sender, EventArgs e)
{
Lists.Lists ListReference = new Lists.Lists();

ListReference.Credentials = System.Net.CredentialCache.DefaultCredentials;

ListReference.Url = "site_url/_vti_bin/Lists.asmx";

try
{

System.Xml.XmlDocument xmlDoc = new System.Xml.XmlDocument();
System.Xml.XmlElement elBatch = xmlDoc.CreateElement("Batch");

elBatch.SetAttribute("OnError", "Continue");
elBatch.SetAttribute("ListVersion", "1");

string strBatch = "<Method ID='1' Cmd='Delete'>" +
"<Field Name='ID'>" + "4" + "</Field></Method>";

elBatch.InnerXml = strBatch;
ListReference.UpdateListItems("List Name", elBatch);


}
catch (Exception ex)
{
Response.Write(ex.Message);

}
}


All we need to do is include the ID in the query. In our case, we are deleting item with the ID 4. ID is the item ID that you want to delete from the list.

Read Remove all survey response from web service for some interesting stuff.

Monday, June 27, 2011

Ribbon customization - Part 9

We have seen in previous posts (Part 1 to Part 8)about adding tabs, groups and controls. Now we are going to add tab again. You might ask, okay so what is new to this? Because we have already done this. Well this is a new type of tab and called contextual tab. Tab comes alive only when specific actions being performed.

To give you an example, when you select any picture in MS Word, then picture tab comes alive. Normally that tab is not visible until you select any picture in the word file. Taking example in SharePoint, if you edit the page, then only several new tabs becomes available. When you select list item, then only view item and edit item buttons become enable.

So we are also going to add contextual tab which becomes visible when a specific web part is selected. The advantage of creating contextual tab as a web part is because we get a flexibility to add tab on a specific page. If your requirement is not to have that tab in the entire site level and at a specific level, then we can have tab created as a web part and then let our web part performs a task of registering the XML to the page and render the tab when web part is selected.

Now when we develop a contextual tab and take web part as an approach, we need to register the page component and add it to the page manager so that page manager allows us to render a tab. Page component is ECMA script that interacts with the ribbon. It allows us to write commands of ribbon and actions that takes place when that command triggers in the page component.

To understand more about page component, I would recommend reading this article from MSDN. I have taken this link only for the reference for building this sample for you.

Coming back to our example, let’s add blank SharePoint project by opening visual studio 2010.

While creating project, select deploy as a farm solution option. Add the Microsoft.Web.CommandUI reference. It must be under 14/ISAPI directory.

We will define two strings, one for the Tab and Group and the other for custom group template.

Then we will use one string variable that will register our page component which is actually an ECMA script.

Then we will use one function which will register our tab and template that we have defined in XML.

Our class would be implementing IWebPartPageComponentProvider interface and hence we will implement one more method which is WebPartContextualInfo. This interface will tell SharePoint which tab to visible when this web part is selected.

Then we have to create page component which will register the script part.

Well this is bit complex at the initial phase, but when practiced, then it becomes easy. This is the script which helps us to do further customizations as well. For example, if you want to have a drop down as controls in the group tab and if you want to dynamically populate the drop down, then this is the file which you need to modify.

I have written down the entire project details below. Your project layout should look something like this
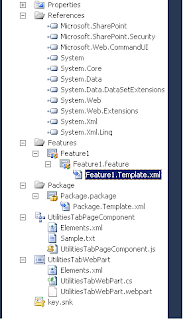


And below is the entire code for the web part and following is the script for the js file. I have taken this example from this page, so I recommend you go through that link to understand it in more details. I have given this example to make things clear that what all parts we need to change to suit it to our need.


namespace SharePoint2010Practice.UtilitiesTabWebPart

{
[ToolboxItemAttribute(false)]
public class UtilitiesTabWebPart : WebPart, IWebPartPageComponentProvider
{
private string contextualTab = @"
<ContextualGroup Color=""Yellow""
Command=""CustomContextualTab.EnableContextualGroup""
Id=""Ribbon.CustomContextualTabGroup""
Title=""SPKings Contextual Tab Group""
Sequence=""502""
ContextualGroupId=""CustomContextualTabGroup"">
<Tab
Id=""Ribbon.CustomTabExample""
Title=""Utilities""
Description=""Various utilities options available!""
Command=""CustomContextualTab.EnableCustomTab""
Sequence=""501"">
<Scaling
Id=""Ribbon.CustomTabExample.Scaling"">
<MaxSize
Id=""Ribbon.CustomTabExample.MaxSize""
GroupId=""Ribbon.CustomTabExample.CustomGroupExample""
Size=""OneLargeTwoMedium""/>
<Scale
Id=""Ribbon.CustomTabExample.Scaling.CustomTabScaling""
GroupId=""Ribbon.CustomTabExample.CustomGroupExample""
Size=""OneLargeTwoMedium"" />
</Scaling>
<Groups Id=""Ribbon.CustomTabExample.Groups"">
<Group
Id=""Ribbon.CustomTabExample.CustomGroupExample""
Description=""This is a custom group!""
Title=""Custom Group""
Command=""CustomContextualTab.EnableCustomGroup""
Sequence=""52""
Template=""Ribbon.Templates.CustomTemplateExample"">
<Controls
Id=""Ribbon.CustomTabExample.CustomGroupExample.Controls"">
<Button
Id=""SPKings.Ribbon.CustomTab.SearchGroup.SearchBingButton""
Command=""CustomContextualTab.SearchBing""
Sequence=""15""
Description=""Bing Search Engine""
Image16by16=""/_layouts/images/CustomImages/Bing-logo.jpg""
Image32by32=""/_layouts/images/CustomImages/bing.png""
LabelText=""Bing""
TemplateAlias=""cust1""/>
<Button
Id=""SPKings.Ribbon.CustomTab.SearchGroup.SearchGoogleButton""
Command=""CustomContextualTab.SearchGoogle""
Sequence=""17""
Image16by16=""/_layouts/images/CustomImages/google-logo.png""
Image32by32=""/_layouts/images/CustomImages/google_logo.jpg""
Description=""Google Search Engine""
LabelText=""Google""
TemplateAlias=""cust2""/>
</Controls>
</Group>
</Groups>
</Tab>
</ContextualGroup>";

private string contextualTabTemplate = @"
<GroupTemplate Id=""Ribbon.Templates.CustomTemplateExample"">
<Layout
Title=""OneLargeTwoMedium"" LayoutTitle=""OneLargeTwoMedium"">
<Section Alignment=""Top"" Type=""OneRow"">
<Row>
<ControlRef DisplayMode=""Large"" TemplateAlias=""cust1"" />
</Row>
</Section>
<Section Alignment=""Top"" Type=""OneRow"">
<Row>
<ControlRef DisplayMode=""Large"" TemplateAlias=""cust2"" />
</Row>
</Section>
</Layout>
</GroupTemplate>";


public string DelayScript
{
get
{
string webPartPageComponentId = SPRibbon.GetWebPartPageComponentId(this);
return @"
<script type=""text/javascript"">
//<![CDATA[

function _addCustomPageComponent()
{
var _customPageComponent = new UtilitiesTabWebPart.CustomPageComponent('" + webPartPageComponentId + @"');
SP.Ribbon.PageManager.get_instance().addPageComponent(_customPageComponent);
}

function _registerCustomPageComponent()
{
SP.SOD.registerSod(""UtilitiesTabPageComponent.js"", ""\/_layouts\/UtilitiesTabPageComponent.js"");
SP.SOD.executeFunc(""UtilitiesTabPageComponent.js"", ""UtilitiesTabWebPart.CustomPageComponent"", _addCustomPageComponent);
}
SP.SOD.executeOrDelayUntilScriptLoaded(_registerCustomPageComponent, ""sp.ribbon.js"");
//]]>
</script>";
}
}

private void AddContextualTab()
{

// Get the current instance of the ribbon on the page.
Microsoft.Web.CommandUI.Ribbon ribbon = SPRibbon.GetCurrent(this.Page);

// Prepare an XmlDocument object used to load the ribbon extensions.
XmlDocument ribbonExtensions = new XmlDocument();

// Load the contextual tab XML and register the ribbon extension.
ribbonExtensions.LoadXml(this.contextualTab);
ribbon.RegisterDataExtension(ribbonExtensions.FirstChild, "Ribbon.ContextualTabs._children");

// Load the custom templates and register the ribbon extension.
ribbonExtensions.LoadXml(this.contextualTabTemplate);
ribbon.RegisterDataExtension(ribbonExtensions.FirstChild, "Ribbon.Templates._children");


}


protected override void CreateChildControls()
{

}


public WebPartContextualInfo WebPartContextualInfo
{
get {

WebPartContextualInfo info = new WebPartContextualInfo();
WebPartRibbonContextualGroup contextualGroup = new WebPartRibbonContextualGroup();
WebPartRibbonTab ribbonTab = new WebPartRibbonTab();

// Create the contextual group object and initialize its values.
contextualGroup.Id = "Ribbon.CustomContextualTabGroup";
contextualGroup.Command = "CustomContextualTab.EnableContextualGroup";
contextualGroup.VisibilityContext = "CustomContextualTab.CustomVisibilityContext";

// Create the tab object and initialize its values.
ribbonTab.Id = "Ribbon.CustomTabExample";
ribbonTab.VisibilityContext = "CustomContextualTab.CustomVisibilityContext";

// Add the contextual group and tab to the WebPartContextualInfo.
info.ContextualGroups.Add(contextualGroup);
info.Tabs.Add(ribbonTab);
info.PageComponentId = SPRibbon.GetWebPartPageComponentId(this);

return info;

}
}

protected override void OnPreRender(EventArgs e)
{
base.OnPreRender(e);

this.AddContextualTab();

ClientScriptManager clientScript = this.Page.ClientScript;
clientScript.RegisterClientScriptBlock(this.GetType(), "UtilitiesTabWebPart", this.DelayScript);

}


}
}


and js file script


Type.registerNamespace('UtilitiesTabWebPart');

var _webPartPageComponentId;
SharePoint2010Practice.UtilitiesTabWebPart.CustomPageComponent = function SharePoint2010Practice.UtilitiesTabWebPart_CustomPageComponent(webPartPcId) {
this._webPartPageComponentId = webPartPcId;
SharePoint2010Practice.UtilitiesTabWebPart.CustomPageComponent.initializeBase(this);
}
UtilitiesTabWebPart.CustomPageComponent.prototype = {

init: function UtilitiesTabWebPart_CustomPageComponent$init() { },

getFocusedCommands: function UtilitiesTabWebPart_CustomPageComponent$getFocusedCommands() {
return ['CustomContextualTab.EnableCustomTab', 'CustomContextualTab.EnableCustomGroup',
'CustomContextualTab.SearchBing',
'CustomContextualTab.SearchGoogle'];
},

getGlobalCommands: function UtilitiesTabWebPart_CustomPageComponent$getGlobalCommands() {
return [];
},

isFocusable: function UtilitiesTabWebPart_CustomPageComponent$isFocusable() {
return true;
},

canHandleCommand: function UtilitiesTabWebPart_CustomPageComponent$canHandleCommand(commandId) {
// Contextual Tab commands
if ((commandId === 'CustomContextualTab.EnableCustomTab') ||
(commandId === 'CustomContextualTab.EnableCustomGroup') ||
(commandId === 'CustomContextualTab.SearchBing') ||
(commandId === 'CustomContextualTab.SearchGoogle')) {
return true;
}
},

handleCommand: function UtilitiesTabWebPart_CustomPageComponent$handleCommand(commandId, properties, sequence) {

if (commandId === 'CustomContextualTab.SearchBing') {
alert('Bing');
}
if (commandId === 'CustomContextualTab.SearchGoogle') {
alert('Google');
}
},

getId: function UtilitiesTabWebPart_CustomPageComponent$getId() {
return this._webPartPageComponentId;
}
}


UtilitiesTabWebPart.CustomPageComponent.registerClass('UtilitiesTabWebPart.CustomPageComponent', CUI.Page.PageComponent);
SP.SOD.notifyScriptLoadedAndExecuteWaitingJobs("UtilitiesTabPageComponent.js");


At the end, build the project and deploy. Open web part gallery, add this web part. Open a page where you would like to see this tab, add this new web part and then select that web part and see how the new tab becomes visible.
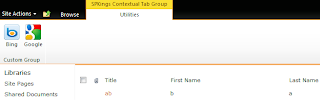


More to come on ribbon series. Stay tuned.

Wednesday, June 22, 2011

Hide Edit in SharePoint Designer option

Many times we do not want to allow users who even has permission to edit pages in Sharepoint designer edit or create new pages.

To make this change, you must be a site collection administrator. go to site settings and then site collection administration and then look for SharePoint designer settings and then uncheck the check box which says enable SharePoint Designer.


But keep in mind that, if you are a site collection admin, they you will still see that option.


Share your SharePoint Experiences with us...
As good as the SharePointKings is, we want to make it even better. One of our most valuable sources of input for our Blog Posts comes from ever enthusiastic Visitors/Readers. We welcome every Visitor/Reader to contribute their experiences with SharePoint. It may be in the form of a code stub, snippet, any tips and trick or any crazy thing you have tried with SharePoint.
Send your Articles to sharepointkings@gmail.com with your Profile Summary. We will Post them. The idea is to act as a bridge between you Readers!!!

If anyone would like to have their advertisement posted on this blog, please send us the requirement details to sharepointkings@gmail.com