Friday, February 25, 2011

Document Library File Type customization

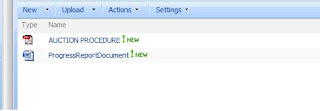
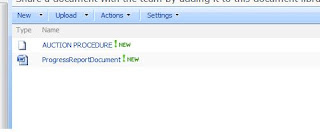
I never realized until I suddenly thought of one missing thing in document library file type. Look at the image below and see what the difference between two documents uploaded is. One being word and other being PDF.


Yes, the icons. For the word document, we have the icon type, however for the PDF document; we do not have the icon. And the same is true for many other file types which are not registered for the association in SharePoint.

In this post, I am going to show you how to achieve this stuff, so that when we upload any file type, we actually come to know by looking in to Type column that what file type are.

Please make a note that you should take a backup and copy of anything that you change which is built in.


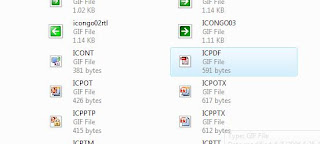
Open C:\Program Files\Common Files\microsoft shared\Web Server Extensions\12\TEMPLATE\IMAGES folder to see all icons used by SharePoint. Now all filetype icon has IC***.(gif|png|jpg) format and they are 16 *16 icons in size.


So first step that we will do is create one 16 * 16 icon of type PDF and save it to 12 hives IMAGES folder.


Now we need to make the associate that if the file’s extension is .pdf, then this image needs to be displayed in Type column of document library.

Open C:\Program Files\Common Files\microsoft shared\Web Server Extensions\12\TEMPLATE\XML

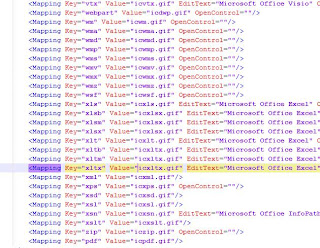
Open DOCICON.xml file and locate the end of Mapping keys and add mapping for pdf file type. You can find all built in association mappings for file type and icons here.


Reset the IIS and then check. You should be good to go.

Thursday, February 24, 2011

Copy attachment from one list to another list

This is really interesting stuff because this topic not only covers how to copy attachment(s) from one list to another but also shows parent child relationship between lists.

I had a list and also related sub list, the idea was very simple I had to have one more field in the list which has column called ParentID.

I had attached event handler to the parent list and in the handler I was fetching the assigned to group. So I had to get all users from that group and assign it to each individual, but I also need to track that these all entries are for particular item from parent.

So I wrote a simple handler and in item adding event I copied same list item to all users of Assignedto field from parent in the another list.

All went well, another requirement came in, and if parent is updated then all child items in another list also should be updated. Idea was very simple, but this is tricky. Why tricky? Because if by mistake it is assigned to incorrect group and have to be assigned to two groups at a time, then the best way to do is Get the item id in ItemUpdated event and then fetch all Parent ID from child list and delete all list items and then re insert.

You might think why not to update? Well, I leave up to you. Think about the scenario which I have mentioned above of updating with two or more groups at a time, there can be couple of individuals as well. You need to update all these data. At the end, you will say, yes deleting all list items and reinserting is better. If you feel, updating is better. Leave your comments. I would love to ask you questions. :)

Another requirement came. If item from parent gets deleted, all child items from another list should also be deleted. Again the scenario is very simple, In ItemDeleting event, get the ID of the list item, find all those ParentID items from the child list and then delete those list items from another child list.

Now the challenging part came in, if I add or update and attach multiple attachments, it should also get copied over another list items with Parent ID.

I have already written my code in ItemAdding. I went ahead and wrote a code for getting list item’s attachment. But wait, the main part is you can never have attachments of list item in ItemAdding event because Item has not actually been inserted to the list. So in ItemAdding you can never get attachments.

So the idea was to change the code from ItemAdding to ItemAdded. And guess what, yes I found the attachments there in Item Added event.

o here is a sample code which demonstrate you how to copy list item attachments to another list item.

spWeb.AllowUnsafeUpdates = true;

foreach (string AttachName in EventItem.Attachments)
{

SPFile oSpFile =
EventItem.ParentList.ParentWeb.GetFile(EventItem.Attachments.UrlPrefix + AttachName);
item.Attachments.Add(AttachName, oSpFile.OpenBinary());

}

item.Update();

spWeb.AllowUnsafeUpdates = false;

Where EventItem is source list item and item is destination list item.

So it is very simple to copy attachments from one list item to another list item in event handler.
Wednesday, February 23, 2011

SharePoint ULS Log reader

If you are wondering what ULS logging means, then let me explain you. We all know that from old traditional days where we used to write ASP.NET applications (we still write, but this is about SharePoint) we can capture the log from out code using event logs that is built in Windows.

With the SharePoint, things have changed as far as logging is concern, you can still use old style event log, and however there is one dedicated logging method available for SharePoint which is Log files in 12 hives. You can find Log under 12 hive structure folders.

Logging size and when to clear the log and rest of the stuff can be handled from central administration site. So that is the best way to log your entries with severity options so that you can trace your code execution.

If you are interested in knowing how to use this ULS (Universal logging service), then stay tuned to SharePointKings because we are soon going to post one simple yet informative post on how to use it and utilize it.

Well, this post is probably one step after you have recorded your logging and this is about viewing what you have logged in your code.

In codeplex, we have ULS reader / viewer wsp available which can be deployed in SharePoint and then can be viewed log file view on a page.

More on Codeplex WSS / MOSS Log File Reader

Tuesday, February 22, 2011

Customize List New, Edit and Display forms through Designer

Hi All,

We all know that when we create list and few columns we are all set to enter the data in to the list. However many times we get a feedback that can we get this field aligned here, or we just do not want this field to appear in New form, but this field should be present in the Edit form. We often get these requirements.

So the purpose of the post is to show you how to achieve this stuff in SharePoint. Well, the idea is not to touch the default pages of the lists to change anything. Just to give you an idea on this, we will create new page from SharePoint Designer and then utilize that page as a new item page for the list.

I am taking Issues list into the consideration. Any list can be customized like this and any page can be customized like this.

So let’s get started on this.


1) First open the SharePoint Designer.
2) Connect to the SharePoint site.
3) Click on File – New – ASPX Page
4) So go ahead and expand the lists Node.
5) Locate and expand Issues list.
6) You will find six pages that the Issues list has.

Now it is the time to tell the page that we need the layout like New Form of Issues list.

7) Save the ASPX page, your location should be Lists and then Issues.
8) So you will end up having one more aspx page in the Issues List.


9) Click on Insert-SharePoint Controls –Custom List Form


10) At the time of adding it, it asks you what type of form it is. Select New form. You can also select edit or disp based on what you are customizing.


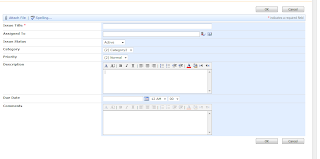
11) So you can see New form entry form been displayed to you on the page.


12) Now here you can customize everything that you want. If you do not want some fields, you can remove that specific from that table. You can make the change in the appearance. I have made these changes. I do not want related issues, so removing it. Change Title to Issue title.


13) Save the page.

14) Now all we need to do is we need to tell SharePoint Designer that attach this ASPX page as NewItem of the Issues list so that when user clicks on NewItem, they should get this page rather than NewItem.aspx which comes default.

15) Open catelogs and master pages node


16) Drag the default.master on the page to attach our custom aspx page to the master page. Save it.

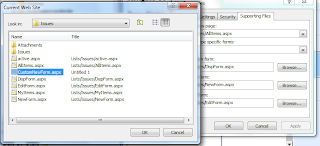
Right click Issues List. Click on properties and go to Supporting Files tab.


17) Browse NewItem Form, locate the CustomNewItem.aspx and click ok.


18) Click Apply, Ok. You are done.
Now open your site and locate the Issues list. Click on New and you should be good to go.


I hope you enjoyed this post and found very useful.

Monday, February 21, 2011

Interesting List definition issue

Hi All,

I was working on some list definition stuff and I created a list of type tasks from user interface. Now I went ahead and created the list definition schema from list definition generator tool. Well, it generated very well. What I had done in the list definition is that I have attached the event handler to that list. I had item added event attached to it. I deployed that list definition and I worked perfect.

The only problem I faced was when I created couple of more lists of type tasks from user interface, I ran into a problem. Well every time I add item to any of the list which was created as a type tasks. My event handler used to get triggered.

Now that’s interesting. I had to look for the solution but before that I had to look for the problem. I tried thinking couple of minutes and bingo I got the problem.

Well the problem was I created the list definition from the type of tasks, hence I t actually registered the event handler to the task type’s of list. So any list of type task has automatically attached handlers with that. Interesting right? Yes, but that was the case.

Now the solution part comes in to the picture. The solution is just give the unique integer ID to the ListType in schem.xml file and use that ID while registering in to the elementmenifest.xml file.

If you are registering the handler from the code by fetching the list name, then I think this issue should not come. However if you are going to take list definition route to have handlers attached to it when list gets created, then better to have new ID as mentioned above.

One more day, one more challenge and one more pleasure to solve it.

Friday, February 18, 2011

Result is out

Hi All,

Finally the result is out.

And I think people likes to use jQuery over Silverlight, However Silverlight has many many more rich features than jQuery..

Well, we will soon explore that as well.

Thursday, February 17, 2011

How to make My group task webpart from My task

Hi,

We all are using my task web part (superb out of the box web part)

but most of the time we are having requirement where a task is assign to a group then that task should also see in my task.

Because normally we are assigning a task to a group and any person from that group can take care of that task.

So here is a trick how to make my group task web part from my task web part

Thanks to Walid.Hammouda to for his answer on MSDN fourm


Here is the trick how we had achieve this.
1. Add content query web part on the page.
2. Edit that web part. In Query section select Source as task list (you can browse and select task list)
3. Set Additional Filter with “Assigned To” --> “is equal to” --> [Me]
4. Apply it

Now if you see that web part must looks like normal task web part.

Now export that web part.

Save it on your pc.

It should have .webpart extension.

Open it with notepad(or any editor)

Find “QueryOverride” property. (it must be blank) like this
<property name="QueryOverride" type="string" />

now add below query inside
<property name="QueryOverride" type="string" ></property>

here is the query

<Or>
<Eq>
<FieldRef Name="AssignedTo"/><Value Type="Integer"><UserID/></Value>
</Eq>
<Membership Type="CurrentUserGroups"><FieldRef Name="AssignedTo"/></Membership>
</Or>


Note: keep in mind that query shown above should be html encoded inside the property.

That’s it.

Now save it and upload it and add to your page.

Now check it should retrieve task assigned to your group also.

We cannot use same web part to other site because when we are exporting this web part it has reference of List guid and view guid so to deploy it you have to do this exercise again.

Tuesday, February 1, 2011

HTML Files do not open in browser in SP 2010

Hi All,

Well I was working on one simple jQuery stuff and though of putting it in a simple HTML page and though that I would redirect user to the HTML page to view it.

Well, when I did that, it asked me to save the file, not opened in browser. In MOSS 2007, this would be no problem at all because we can open the html file in browser in that version. But it seems that there is bit restriction in new version of SharePoint.

They have tightened up the security for people who have contribute permission. Smart people can inject some stuff from HTML pages in the SharePoint and can harm server. To avoid this possibility, now in SP 2010 we cannot simply open HTML files in browser.

Even if you try to use page viewer web part and try to point to HTML file. It will still ask you to save now render in the web part.

There is a way to this restriction and that is to change setting in Web Application for "Browser File Handling" from Strict (default) to Permissive from central administration.

This might help you.


Share your SharePoint Experiences with us...
As good as the SharePointKings is, we want to make it even better. One of our most valuable sources of input for our Blog Posts comes from ever enthusiastic Visitors/Readers. We welcome every Visitor/Reader to contribute their experiences with SharePoint. It may be in the form of a code stub, snippet, any tips and trick or any crazy thing you have tried with SharePoint.
Send your Articles to sharepointkings@gmail.com with your Profile Summary. We will Post them. The idea is to act as a bridge between you Readers!!!

If anyone would like to have their advertisement posted on this blog, please send us the requirement details to sharepointkings@gmail.com