Hi All,
When I was working with sending reminder workflow which I discussed in my earlier post, I faced one more problem. I needed to send a birth date as well in the mail.
Now I created that birth date column as date and time and kept format date only. I did not select date and time in format, hence I assumed that if I include this field in the mail. It should display only date. However it sends date but it also appends 12 : 00 AM along with that, which is not proper.
So what is the correct way? The answer is calculated column. Create one calculated column of type single line of text and give it appropriate name and use this formula =TEXT({your field},"mm/dd/yyyy"). Replace {your field} with the date column and you use this new calculated column instead of actual date column.
You should be good to go with getting mail with date only instead of date and 12:00 AM time.
SharePoint Kings,Technosavvy guys hunting SharePoint Challenges... SharePoint 2013, SharePoint 2010, MOSS 2007, Windows Workflow Foundation, Project Server and Other Related Technologies.
Friday, July 30, 2010
Tuesday, July 27, 2010
Creating reminder workflow in SharePoint designer
Hi All,
One common requirement in workflow is reminder workflow. Reminder can be anything. It can be a birthday, anniversary or it can be an important meeting.
You might want to send a reminder email to attendees, or want to send a reminder email to team members about the birthdays or anniversaries.
Well let us design such a workflow which sends a reminder email to particular people about upcoming birthday before 14 days.
First open the site and create one calendar list. Call it a birthday calendar.
Create one calculated column of type date and time and select format as date and time. Name that column “reminder”.
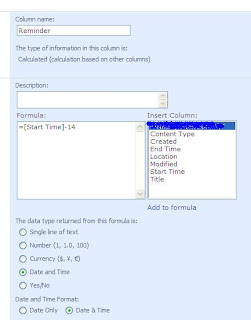
Just mae sure that your start time and end time should not end with 12:00: AM, otherwise workflow will trigger, however mail will not be sent. My advice, keep Start time and end time with the time ending with 12:05 AM, should be fine or any other time than 12:00 AM.
Now open SharePoint Designer and we will create a workflow from here for the birthday calendar list.
Create a new workflow, attach it with the birthday calendar list and select automatically start the workflow, when the new item is created.
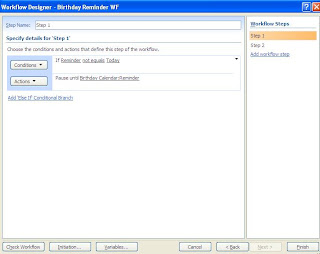
We need to divide this workflow into two steps. First step will check the date and time and pause the workflow for the time and second step will send an email to a person.
Step 1 condition will be
And step2 will be
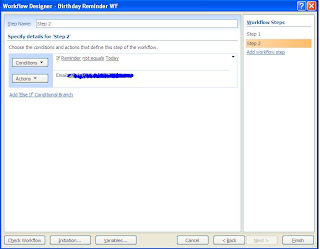
Change the email address to a list of people whom you want to send an email. While sending an email, you can use the fields of the item and decorate the mail body according to your need.
To test this, click on create new item and enter start date 14 days after today’s date and see you should get an email in a moment.
There you go; you have set up the reminder workflow. However this is not a recursive workflow, that every year you get an email. This is a onetime workflow and needs to be recreated every year. We are working on making this recursive, so that it actually works as a service. Although the same can be achieved through SP timer definition for sure.
One common requirement in workflow is reminder workflow. Reminder can be anything. It can be a birthday, anniversary or it can be an important meeting.
You might want to send a reminder email to attendees, or want to send a reminder email to team members about the birthdays or anniversaries.
Well let us design such a workflow which sends a reminder email to particular people about upcoming birthday before 14 days.
First open the site and create one calendar list. Call it a birthday calendar.
Create one calculated column of type date and time and select format as date and time. Name that column “reminder”.

Just mae sure that your start time and end time should not end with 12:00: AM, otherwise workflow will trigger, however mail will not be sent. My advice, keep Start time and end time with the time ending with 12:05 AM, should be fine or any other time than 12:00 AM.
Now open SharePoint Designer and we will create a workflow from here for the birthday calendar list.
Create a new workflow, attach it with the birthday calendar list and select automatically start the workflow, when the new item is created.
We need to divide this workflow into two steps. First step will check the date and time and pause the workflow for the time and second step will send an email to a person.
Step 1 condition will be

And step2 will be

Change the email address to a list of people whom you want to send an email. While sending an email, you can use the fields of the item and decorate the mail body according to your need.
To test this, click on create new item and enter start date 14 days after today’s date and see you should get an email in a moment.
There you go; you have set up the reminder workflow. However this is not a recursive workflow, that every year you get an email. This is a onetime workflow and needs to be recreated every year. We are working on making this recursive, so that it actually works as a service. Although the same can be achieved through SP timer definition for sure.
Monday, July 26, 2010
Publishing infrastructure feature - Access Denied
Hi All,
We all know about publishing infrastructure feature in SharePoint. Whenever we want to deal with publishing site with publishing pages, we need to activate this feature. Even when we want to add CQWP, at that time we need to activate this feature.
Well, it may happen that even you are the administrator of the site collection, and you are the one who installed the SharePoint and even logged in with those credentials, you get “Access Denied” while activating the infrastructure feature.
Well the reason is, your team site (if you are activating this feature from the top level team site) and central administration runs in different credentials as far as application pool is concern.
So you need to change some settings from IIS. Open the IIS and locate your site, before that right click on central administration web site and click on properties and go to Home directory and observe the application pool.
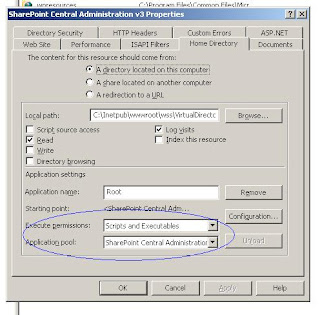
Now go to the team site web site, right click it, click on properties, go to home directory and you will see a same name application pool which is your site name. Change it to the one which is similar to central administration.
Then reset the IIS and there you go, you should be able to activate the publishing infrastructure feature.
We all know about publishing infrastructure feature in SharePoint. Whenever we want to deal with publishing site with publishing pages, we need to activate this feature. Even when we want to add CQWP, at that time we need to activate this feature.
Well, it may happen that even you are the administrator of the site collection, and you are the one who installed the SharePoint and even logged in with those credentials, you get “Access Denied” while activating the infrastructure feature.
Well the reason is, your team site (if you are activating this feature from the top level team site) and central administration runs in different credentials as far as application pool is concern.
So you need to change some settings from IIS. Open the IIS and locate your site, before that right click on central administration web site and click on properties and go to Home directory and observe the application pool.

Now go to the team site web site, right click it, click on properties, go to home directory and you will see a same name application pool which is your site name. Change it to the one which is similar to central administration.
Then reset the IIS and there you go, you should be able to activate the publishing infrastructure feature.
Thursday, July 22, 2010
Finally the result is out
Tuesday, July 20, 2010
Conditional Formatting using SharePoint Designer
Hi All,
We all know data view web part. Data view web part has a feature called conditional formatting. We can format the column of the view based on some condition.
We even can show or hide the data in column based on condition. Another point to note is condition need not be the same field on which you would like to apply conditional formatting.
I have created one sample list for demonstrating this feature. I have one simple list which has Item Code, Year and Month and Qty Ordered.

And we will make our conditional formatting on Qty Ordered based on some criteria.
Create one full vertical web part page and name it QtyOrdered.aspx.
Now open SharePoint Designer 2007 and open the site. Open the QtyOrdered.aspx page in designer.
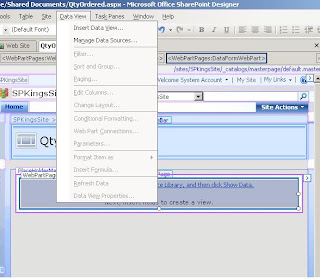
In Click to insert a web part keep your cursor and then click on Insert data view under Data View menu.
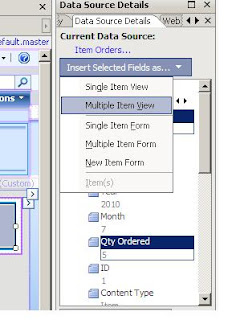
Click on Item Orders (List Name) and then Show Data. By holding the Ctrl Key, click on Item Code and Qty Ordered Column and then click on Insert select field as and then click multiple item view.
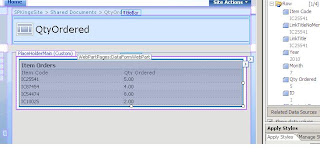
And you will have something like this
Now open the Images folder, I have three images in it. If you do not have any images with you, then download some good images or look in to 12 hives images folder and drag images to this images folder in SharePoint Designer.
Drag green.gif after Qty Order column value 5. And then provide alternate text as green arrow when asked.
Do the same for red.gif. Drag it to the side of green.gif and do the same, provide alternate text and click OK.
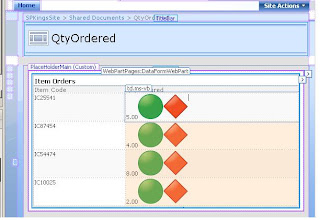
Right click red arrow and then click on conditional formatting. Click create (On right side top), Hide content. Observe that you can apply hiding, showing and formatting here. We want to hide on some criteria. We will create condition that if Qty Ordered is greater than 5, then show green else show red.
Apply following condition over red arrow.
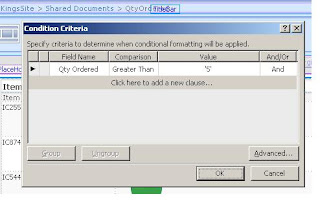
Do the same for Green Arrow, but this time with the reverse criteria.
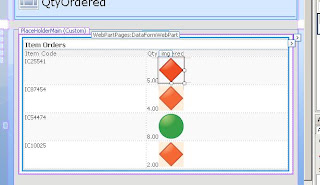
After you do this, you can see the effect of the conditions that we just defined.
Save the page, open your site; navigate to the library where you created the web part page. Click on that page and there you go. See the result.
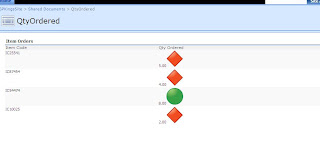
You can change the value, insert new data and see the result changing accordingly.
We all know data view web part. Data view web part has a feature called conditional formatting. We can format the column of the view based on some condition.
We even can show or hide the data in column based on condition. Another point to note is condition need not be the same field on which you would like to apply conditional formatting.
I have created one sample list for demonstrating this feature. I have one simple list which has Item Code, Year and Month and Qty Ordered.

And we will make our conditional formatting on Qty Ordered based on some criteria.
Create one full vertical web part page and name it QtyOrdered.aspx.
Now open SharePoint Designer 2007 and open the site. Open the QtyOrdered.aspx page in designer.
In Click to insert a web part keep your cursor and then click on Insert data view under Data View menu.

Click on Item Orders (List Name) and then Show Data. By holding the Ctrl Key, click on Item Code and Qty Ordered Column and then click on Insert select field as and then click multiple item view.

And you will have something like this

Now open the Images folder, I have three images in it. If you do not have any images with you, then download some good images or look in to 12 hives images folder and drag images to this images folder in SharePoint Designer.
Drag green.gif after Qty Order column value 5. And then provide alternate text as green arrow when asked.
Do the same for red.gif. Drag it to the side of green.gif and do the same, provide alternate text and click OK.

Right click red arrow and then click on conditional formatting. Click create (On right side top), Hide content. Observe that you can apply hiding, showing and formatting here. We want to hide on some criteria. We will create condition that if Qty Ordered is greater than 5, then show green else show red.
Apply following condition over red arrow.

Do the same for Green Arrow, but this time with the reverse criteria.

After you do this, you can see the effect of the conditions that we just defined.

Save the page, open your site; navigate to the library where you created the web part page. Click on that page and there you go. See the result.

You can change the value, insert new data and see the result changing accordingly.
Monday, July 19, 2010
Create an alert for specific view
Hi All,
While creating an alert in the list, we often see one option which says we can create an alert for some specific views. This is obvious because there are so many people might work on that list and everybody is not interested in everybody’s task.
Hence we opt of creating alert for specific views. However when you see the view options while creating an alert, you do not see all views that are there for the list.
Criteria for a view to appear in alert selection list are:
1) That view should be a public view.
2) It must have where clause.
3) It should not have content approval.
4) It cannot be a hidden view.
If view fits in to above criteria, then that view will appear in the selection list while creating alert.
Wednesday, July 14, 2010
The remote server returned an error: (409) Conflict in SharePoint
Hi All,
I was trying to upload document in document library through SharePoint webservice.I was getting error "The remote server returned an error: (409) Conflict" when it try to create folder in SharePoint document library.Finally I found that the error was just because was "FolderName" has some special characters "@" so SharePoint refuse to create that folder through web service.
Hope it will help you.
Friday, July 9, 2010
How to impersonate user identity in WSS
Hi All,
There are some situations where in we need to change the executing code identity. Whenever code runs in WSS and in SharePoint, code actually executes in the logged in user’s identity. However this is not true in terms of workflow or the event handler where user does not play any identity role.
In these cases it is the system account that is considered as logged in user and all tasks are performed on that credential.
If we want to change the logged in user identity and make the code run on some other user’s identity at that time we can impersonate the identity of logged in user.
For example, in event handler or in workflow you want to change the user’s identity for executing code, you can do so with the help of SPUserToken class.
All we need to do is first take a reference of SPUser by getting user from SiteUsers method, and then pass the user token while initiating SPSite object. Once you do this, your code will run under specified user.
Before showing up the example, I would like to note here is that this process is different than RunWithElevatedPrivileges because this change of user token does not change the windows logged in user identity, it’s the User identity with respect to the WSS that changes. And the other important point to bring out here is that to perform the above mentioned code, your code first must run under RunWithElevatedPrivileges to user SPUserToken and change user.
That is it. you have just changed the User token while executing the code.
There are some situations where in we need to change the executing code identity. Whenever code runs in WSS and in SharePoint, code actually executes in the logged in user’s identity. However this is not true in terms of workflow or the event handler where user does not play any identity role.
In these cases it is the system account that is considered as logged in user and all tasks are performed on that credential.
If we want to change the logged in user identity and make the code run on some other user’s identity at that time we can impersonate the identity of logged in user.
For example, in event handler or in workflow you want to change the user’s identity for executing code, you can do so with the help of SPUserToken class.
All we need to do is first take a reference of SPUser by getting user from SiteUsers method, and then pass the user token while initiating SPSite object. Once you do this, your code will run under specified user.
Before showing up the example, I would like to note here is that this process is different than RunWithElevatedPrivileges because this change of user token does not change the windows logged in user identity, it’s the User identity with respect to the WSS that changes. And the other important point to bring out here is that to perform the above mentioned code, your code first must run under RunWithElevatedPrivileges to user SPUserToken and change user.
SPSite objSite = SPContext.Current.Site;
SPWeb objWeb = SPContext.Current.Web;
SPUser objUser = objWeb.SiteUsers[@"domain\user"];
SPUserToken usertoken = objUser.UserToken;
using (SPSite SiteColl =
new SPSite(objSite.ID, usertoken)) {
using (SPWeb web =
SiteColl.OpenWeb(objWeb.ID)) {
}
}
That is it. you have just changed the User token while executing the code.
Monday, July 5, 2010
Finally the result is out
Hi All,
Finally the result is out and here it is.
Q. Do you think Google online doc is giving very stiff competition to MS Office 2010?
We gave four options to chose from.
1)Yes, MS has to work more now on their Office suite.
2)No, Google cannot beat Microsoft in Office space.
3)Both are equal in their own advantages
4)I prefer Open office than MS and Google products.
Looks like people believe that Google has to work more in the field of Office to beat MS.

Subscribe to:
Comments (Atom)
Share your SharePoint Experiences with us...
As good as the SharePointKings is, we want to make it even better. One of our most valuable sources of input for our Blog Posts comes from ever enthusiastic Visitors/Readers. We welcome every Visitor/Reader to contribute their experiences with SharePoint. It may be in the form of a code stub, snippet, any tips and trick or any crazy thing you have tried with SharePoint.
Send your Articles to sharepointkings@gmail.com with your Profile Summary. We will Post them. The idea is to act as a bridge between you Readers!!!
If anyone would like to have their advertisement posted on this blog, please send us the requirement details to sharepointkings@gmail.com


