Friday, April 30, 2010

Limit character length in multiline text box in SharePoint using jQuery

Hi All,

SharePoint really provides many of the features out of the boxes. I would say 75% of feature it provides out of the box; however there are some scenarios where these features cannot help us.

Let me give you a classic example. Recently I got a simple requirement. When we create multiline text box in SharePoint, unfortunately there is no option to limit the number of characters in that. It is available in single line of text field but not in multiline text.

Ok, what is the solution? Yes, we can create custom field and ready to go. Yes I agree. But this will take time to create custom field and deploy on the server which may administrator in the company does not give access easily to upload anything.

Hummm…..So what to do? Answer is use jQuery. JQuery is here to save you.

All you have to do is add content editor web part on the page, and just bind keypressed event of textbox and count the number of characters. That is it. So simple. If it exceeds certain number of characters, you popup some message and then do not allow to enter more character in that.

Sounds great. Isn’t it? I know, yes of course.

At least this is far better than developing custom field type and then installs it in server through WSP.

Make sure that you add content editor web part in New Form as well as Edit Form both.

Let us say I have reason filed as multiline textbox in the list and I want to limit number of characters in that 100. We do not want to allow any more character to type in.

So here is the jQuery that you write. If you know that jQuery syntax, then this is not difficult to understand. Text area is what we are looking for with title Reason as list field.


And there you go, try to add more characters in reason and see the result.


So, doesn’t it save your lot of time to write custom field for such a common requirement? Do share your thoughts

Wednesday, April 28, 2010

Toggle multiline text area in SharePoint using jQuery

Hi All,

Let us explore more in to area of jQuery with respect to SharePoint. When we want some field to not appear in the NewForm or EditForm or so we can make a use of jQuery to hide them.

When we want to toggle the visibility of any field on the form, we can achieve the same with the jQuery.

jQuery has helped a lot in the world of SharePoint.

I’ve created one test list and I have one column named status. There are four entries in that as you can see in below figure.


Now I want to toggle the Reason text area below that. So I’ve written the following code in jQuery. Just add content editor web part and write down the following code. You have to modify your HTML portion based on your field name. Just observe the view source and check the hierarchy level for span, td and tr for the field and accordingly make the change.


Note: One big change. make sure that you write == sign to compare instead of = sign. make this change while writing the code for above figure.

We are handling the change event of dropdown here; you can do the same stuff with checkbox, just make sure to change the change event function to click function. That is the only change required if you would like to go with checkbox.

When I select the drop down and change the value, I get to see text area also toggles.


And when I change the drop down value


You can also use hide () and show () function to get the desired field on the page and use these methods to perform your own functions as per the need.

Tuesday, April 27, 2010

Disable OK button in SharePoint using jQuery

Hi All,

It is really funny but today I come to know the real power of jquery. I know that jQuery is real cool dude in web world. However when I applied some stuff, it got my relief because it solved my two problems.

When you want to disable OK button in NewForm, Editform of list or document library in SharePoint, you can achieve this with the help of jQuery and it helps a lot. Let us say that you have some requirement like if status is suspended then nobody should be allowed to make any changes in the status field.

Let us add complexity to this. We have attached a workflow that triggers on update. Now the problem with SharePoint is even though nothing is updated, then also it triggers the workflow. So if you do not disable OK button and you go and click on edit item. And then when you do not update anything, click on OK. Boom...workflow triggers. Man…I don’t like this.

Here comes jQuery to save us. Disable the status and disable OK button. That will solve the purpose.

What do you need to do? Well, I have created dummy list to demonstrate this.

I have few fields and one of them is status. Statuses are New, In Progress, Archived and suspended.

When the status is suspended, I do not want to allow any of the users to change the status and also there is workflow attached to this list which triggers if we update any item. Workflow is attached from the SharePoint designer. Hence we are even not writing a code in event handler to check for the item has changed or not in ItemAdding event.

So write down this jQuery in content editor web part. Just add CEWP on top with appending &toolpaneview=2 to the URL.

Add following code to the content editor web part. If you observe we have taken reference of jquery from shared document. You can download the jQuery and then give href to the document library path. What we have done in this jQuery is simply finding all drop downs and then checking its value. If it’s suspended, then we are again checking button OK by its class and once found, we are disabling the button. Hummm…Easy ha? Yes it is.


And see the result.


Get ready for some more exciting stuff with jQuery.

Tuesday, April 20, 2010

Adding custom activity to SharePoint designer Part – 1

Hi All,

This is one of the common questions being asked many times, that it is okay that we can develop some nice custom activity and then give it a try to use in different projects and also can give to other developer to work on it.

However what about to all designers who work in SharePoint designing team and know how to work with the workflow? Well, for them we have good news. You can create your own custom activity in the same way we saw in creating custom activities series. The fun part is you can modify the same activity and make that activity available for SharePoint designer.

Well before digging down in to exploring this stuff, let us spend some time understanding how SharePoint designer workflow actually works with activities and actions with SharePoint server.

All activities that you can see in SharePoint Designer come from one DLL named “Microsoft.SharePoint.WorkflowActions.dll”. There is one .ACTIONS file sitting under template folder that actually does the job for you.

This file is responsive for displaying all activities and also responsible for binding parameters to properties for the activities.

All we have to do is create a custom activity in the same way we have created earlier and then one more important stuff to do is create one .ACTIONS file so that SharePoint designer can understand that sentence written in .ACTIONS file and can display our activity in SPD. Also we need to add the assembly of custom activity to GAC by giving a strong name. Final step is to register that activity as AuthorizedType under web.config for the web application we are going to use it for.

We will cover all actions in part 2. Part 1 was more of informative about custom activity with SharePoint Designer.

Sunday, April 18, 2010

Create or Extend web application link not visible

Hi All,

Today I was facing one strange problem. I installed SharePoint and then when I went to Central Administration to create web application, what did I see there? Well, there was no Create or extend web application link exist.

Even if I was logged in as administrator of my machine and the account was showing system account, hence I should get an option for that, however that was not there.

Well, this is the first time I have faced such problem.

Well, time to find some information in internet. And guess what I found 5 different solutions for that. For most of the poeple second trick (mentioned below) out of five solutions did the majic.

Well let me tell you all solutions that I found, so that you can try each one of them one by one.

Tell you what I wasted my 3 hours to figure out and installing service packs and all. Well in my case it was not needed.

My suggestion, go one by one in order that I have mentioned here. Chances are more that problem will be resolved.

1) Open the central administrator from Start menu with run as administrator option.

2) Your central administration site should be on intranet mode not on internet mode. This is the key area and most likely problem will be solved with this. Go to Tools-Internet option-Local intranet-Sites-Advanced and then add your central administration URL. (This did a trick for me and saved my day) Thanks to jonas for this deadly finding. :)

3) If first two combined step cannot solve this problem, then open IE as administrator from start menu to open central administration.

4) Download WSS service pack 2 and SharePoint service pack 2 and then check.

Let me know how much this post saved your time. :)

Friday, April 16, 2010

Working with declarative workflows Part 3

Hi All,

Let us continue our experiment with declarative workflow. If you haven’t read part 1 and part 2, I recommend you read them and enjoy reading further.
Now then we know how to create basic declarative workflow; we will move ahead and create declarative workflow that can accept parameters.

Go ahead and add one more XML file and this time name is “ConditionalDeclarativeWorkflow.xml” and then immediately change its extension to .xoml.


Now add code behind fine and name it ConditionalDeclarativeWorkflow.xoml.cs.

And start adding following stuff and do observe each condition that we have associated with xoml.

public partial class ConditionalDeclarativeWorkflow : SequentialWorkflowActivity
{
private string _BirthDate = string.Empty;

public string BirthDate
{

get { return _BirthDate; }
set { _BirthDate = value; }

}

private void CheckValidBirthDate(object sender, ConditionalEventArgs e)
{
if(_BirthDate == string.Empty) e.Result=false;

try
{
if (Convert.ToDateTime(_BirthDate) > DateTime.Today)
{
e.Result = false;
}
else
{
e.Result = true;
}
}
catch (Exception ex)
{
e.Result = false;
}

}

private void CalculateAge(object sender, EventArgs e)
{
if (_BirthDate != string.Empty)
{
DateTime dtBirthDate = Convert.ToDateTime(_BirthDate);

System.TimeSpan diffResult = DateTime.Today - dtBirthDate;

double age = diffResult.Days / 365;

Console.WriteLine("
}

}


Now how we used WFC in our previous post, we will use the same way here also. Go ahead and open command prompt.

And generate the DLL in this way. This time we are going to give two parameters to wfc.exe, first definitely a xoml and the other xoml.cs file.


Now add newly generated DLL to the reference of console workflow application.

Our workflow accepts the parameter, hence we are going to declare parameters and then invoke workflow.

Console.WriteLine("Waiting for workflow to complete");

Dictionary parameters = new Dictionary();
parameters.Add("BirthDate","12/03/1982");


WorkflowRuntime runtime = new WorkflowRuntime();
WorkflowInstance instance = runtime.CreateWorkflow(typeof(ConditionalDeclarativeWorkflow), parameters);

instance.Start();

Console.WriteLine("Workflow completed...");

Console.ReadLine();


So we have given input and we got the result, now let’s pass incorrect birthdate.


That is it. Hope you will try more complex example.

Wednesday, April 14, 2010

Working with declarative workflows Part 2

Hi All,

Working with declarative workflows Part 1 was all about understanding the basics of declarative workflow. In this post, we will make our basics bit more strong by doing one more practical and almost the same stuff, but with little change.

Take the same example that we took in last Part 1. However before continuing further, let us explore one option that comes handy with workflow. Open “C:\Program Files\Microsoft SDKs\Windows\v6.0A\bin” folder. It may differ from OS to OS. So just make sure that you are under bin folder of Windows.

And observe one exe named “WFC.exe”. This is the command utility that will convert our declarative XML into DLL.


But hey why again DLL? So the answer is DLL execution is faster than XML execution. So you can also try this option after creating your workflow with declarative manner.

One other important note to understand is that when we will convert our declarative XML workflow using this utility, it will not work directly because this utility requires file which has xoml extension. So go ahead and open the declarativeworkflow.xml and rename it to declarativeworkflow.xoml.

Also observe one more change in declarativeworkflow.xoml this time. We need to add one more attribute and that is Class attribute. This is required because after compiling into the assembly, workflow utility will give this name to the generated DLL.

<SequentialWorkflowActivity x:Name = "Workflow1"
xmlns:x="http://schemas.microsoft.com/winfx/2006/xaml"
xmlns="http://schemas.microsoft.com/winfx/2006/xaml/workflow"
x:Class ="DeclarativeWorkflow">
<SequenceActivity x:Name="SequenceActivity1">
<DelayActivity TimeoutDuration="00:00:15" x:Name="DelayActivity1"></DelayActivity>
</SequenceActivity>
</SequentialWorkflowActivity>


Now open the command prompt and navigate to the directory till your project is. Infect navigate to the folder where we have this xoml file sitting.


And then just type in the path for WFC.exe and give our xoml file name as a parameter and hit enter and see the magic. You will see no error and no warning and will get DLL as in output.


Now go ahead and open your console workflow application and add the newly created DLL as reference.


And then run the workflow and see it in action.


Read Working with declarative workflows Part 3 for further reading.

Tuesday, April 13, 2010

Working with declarative workflows Part 1

Hi All,

We all know that we can create a great workflow using visual designer provided in visual studio as well as SharePoint designer. However there is one more way, we can create workflow. Yes the technique is called declarative workflow. Declarative workflow is all about writing XML code and then feeding this XML code to workflow runtime to execute the workflow.

Let me tell you why this can be a fun element while working in workflow. Let us say that you have defined many conditions in your workflow and you have created that workflow with Visual studio. Hence you compile that workflow and use the DLL to deploy and then use in application or in SharePoint. So you have to come back to designer, change your logic and again compile, get new DLL and deploy it to use it. This is bit overhead while working with designer. However designer workflows have their own advantages as well and there cannot be two ways on this. However we are talking about declarative workflow, so here is the advantage of using declarative workflow.

You can change your condition logic right away by just modifying the existing XML and then feeding the same to workflow runtime.

To work with XML based workflow, you only need at simples notepad and as advanced XML editor or visual studio itself.

One important part to note is whenever we work with declarative workflow; we have to use two namespaces in XML.

1) http://schemas.microsoft.com/winfx/2006/xaml
2) http://schemas.microsoft.com/winfx/2006/xaml/workflow

So let us do some particle on this.

Go ahead and create one console sequential workflow and immediately add new item and call it DeclarativeWorkflow.xml.

Open the file’s property and change its Copy to Output directory property to Copy If Newer.


And start adding following XML in that file. Moment you start typing the XMLNS attribute, it gives you an options of all namespace URIs.


Make sure that you write in proper caps. Even if you miss a single alphabet in capital letter or lower letter, you will not get an idea what is wrong with the workflow and you will receive an error while starting the workflow.

<SequentialWorkflowActivity x:Name = "Workflow1"
xmlns:x="http://schemas.microsoft.com/winfx/2006/xaml"
xmlns="http://schemas.microsoft.com/winfx/2006/xaml/workflow">
<SequenceActivity x:Name="SequenceActivity1">
<DelayActivity TimeoutDuration="00:00:15" x:Name="DelayActivity1"></DelayActivity>
</SequenceActivity>
</SequentialWorkflowActivity>


As you can notice, how we assign ID to the controls in ASP.Net, in the same way we have to assign the Name attribute to our activities in the XML.

Here we have defined very basic workflow with one single delay activity.

Now go ahead and add one code activity in designer surface and double click to generate handler for that and simply write down the following code in it.


And now run the application to see it in action.


Read Working with declarative workflows Part 2 for further reading.

Thursday, April 8, 2010

Creating custom activity in Workflow Part – 7

Hi All,

Let us continue exploring custom sequence activity and use it in real world. Take same sample code that we generated in Creating custom activity in Workflow Part – 6.

Now I am not going to write down the code here. I have created one dummy table in my database to demonstrate this example.

I am reading the parameter that is passed from client and then writing a code that will fetch the salary of an employee in GetEmployeeSalary code activity.

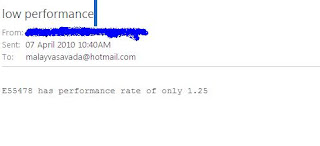
And then I am sending mail based on the condition. So what I am going to show you is final version of it. After writing a code in our custom sequence activity, I drag it again on console workflow application and then run it.

Set EmployeeId to the EmpoyeeID.


And then run the application.


And if I set to other employee then,


Hope that you have got a fair idea about how sequence custom activity works now.

Tuesday, April 6, 2010

Finally the result is out

Hi All,

Finally the result is out.

We asked people if their company is migrating from SharePoint 2007 to SharePoint 2010. Well here is the answer. seems there is 50-50 for this time.

Monday, April 5, 2010

Creating custom activity in Workflow Part – 6

Hi All,

Till now what we saw is creating a basic activity and play with it. Now in this post, we will move ahead and see how to achieve the same functionality of creating custom activity. However in this post we will create custom sequence activity instead of simple basic activity.

If you haven’t gone through the previous post, then I recommend reading Creating custom activity in Workflow Part – 1 first and then continue reading further.


Remember this is not a custom composite activity, this is custom sequence activity. Creating custom composite activity will take a lot of effort. We will put on those efforts in subsequent post.

First let us understand and create custom sequence activity. Add new workflow activity library project to your solution. Name it whatever you want but make sure you inherit the activity from sequence activity rather than activity.

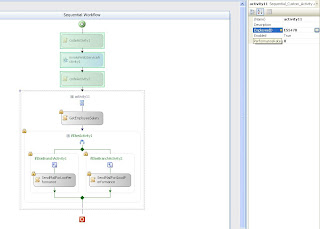
Let me give you highlights of what are we going to do in this activity. We will have one code activity which will get the Employee ID as a parameter. Internally we will get the employee from the table and then we will have if else condition, checking for each employee’s performance rate. Based on performance rate, we will shoot mail to manager with different subject and body line in mail.

So go ahead and add one Code activity in the designer surface, then drag one if else activity on surface. And then drag code activity and place on left branch, drag one more code activity and put on right branch.

Give Name “GetEmployeeSalary” to the First Code Activity which is outside of If else condition. Give Name “SendMailForLowPerformance” to left code activity and give Name “SendMailForGoodPerformance” for right side code activity.

Double click on each code activity to generate its respective handlers. Still you will notice one red circle for not setting branching condition. So go ahead and add declarative rule based condition for left branch if else activity.

Before adding that, write down following code. You will automatically have handlers for code activities as we generated few steps ago.

using System;
using System.ComponentModel;
using System.ComponentModel.Design;
using System.Collections;
using System.Drawing;
using System.Workflow.ComponentModel.Compiler;
using System.Workflow.ComponentModel.Serialization;
using System.Workflow.ComponentModel;
using System.Workflow.ComponentModel.Design;
using System.Workflow.Runtime;
using System.Workflow.Activities;
using System.Workflow.Activities.Rules;

namespace Sequential_Custom_Activity
{
public partial class Activity1 : SequenceActivity
{
public Activity1()
{
InitializeComponent();
}

public static DependencyProperty EmployeeIDProperty = DependencyProperty.Register

("EmployeeID", typeof(string), typeof(Activity1));


public string EmployeeID
{
get
{
return Convert.ToString(base.GetValue(EmployeeIDProperty));
}
set
{
base.SetValue(EmployeeIDProperty, value);
}
}

double _PerformanceRate;

public double PerformanceRate
{
get
{
return _PerformanceRate;
}
set
{
_PerformanceRate = value;
}
}


private void GetEmployeeSalary_ExecuteCode(object sender, EventArgs e)
{

}

private void SendMailForLowPerformance_ExecuteCode(object sender, EventArgs e)
{

}

private void SendMailForGoodPerformance_ExecuteCode(object sender, EventArgs e)
{

}
}


Go ahead and add declarative condition as shown in figure below.


As of now we haven’t done anything fancy.

Build the project. You should not find any error. Now create new console application workflow. Add our custom activity DLL to the toolbox. Drag and drop the custom sequence activity to the console workflow application. So should find something like shown below. Note that you are not allowed to make any changes in any of the branching conditions or nor the code condition as they are indicated by lock symbol.


Now in next post, we will be adding code in these blocks and will make it work.

Thursday, April 1, 2010

Sharepoint Custom so called KPI

Hay Guys,

In general KPI most of the time we are having simple requirement.

Like if Risk is high or status is incomplete then it should show in RED.
If Low then Green and Medium then orange.

Same functionality we had done for listview webpart which show Red/green/yellow icon based on status.

Here is the example
In our list we had a column called criticality with dropdown values

High
Low
Medium

Check the screenshot below


And check another one after what we had done.


So you can see it looks like KPI
This is similar like
http://www.sharepointkings.com/2008/12/highlight-sharepoint-list-rows.html
but everyone is asking regarding this KPI so we had done this.

Now, What we had done
It’s nothing just a trick of javascript/jquery
Here is the code

$(document).ready(function() {
var strURL = window.location.href;
if ((strURL.toUpperCase().indexOf("Lists/Risk%20Management".toUpperCase()) != -1) ||
(strURL.toUpperCase().indexOf("Lists/Risk Management".toUpperCase()) != -1)) {
//alert('pp');
$(".ms-vb2:contains('High')").each(function() {
var tempDIV = document.createElement("DIV");
tempDIV.style.cursor = "pointer";
tempDIV.innerHTML = "<img src='_LAYOUTS/SPKings/Images/Red.gif' />"; //$(this).text();
//alert($(this).html());
$(this).text("");
$(this).append(tempDIV);

});
$(".ms-vb2:contains('Low')").each(function() {
var tempDIV = document.createElement("DIV");
tempDIV.style.cursor = "pointer";
tempDIV.innerHTML = "<img src='_LAYOUTS/SPKings/Images/Green.gif' />"; //$(this).text();
//alert($(this).html());
$(this).text("");
$(this).append(tempDIV);

});
$(".ms-vb2:contains('Medium')").each(function() {
var tempDIV = document.createElement("DIV");
tempDIV.style.cursor = "pointer";
tempDIV.innerHTML = "<img src='_LAYOUTS/SPKings/Images/Amber.gif' />"; //$(this).text();
//alert($(this).html());
$(this).text("");
$(this).append(tempDIV);

});
$(".ms-vb2:contains('No Criticality')").each(function() {
var tempDIV = document.createElement("DIV");
tempDIV.style.cursor = "pointer";
tempDIV.innerHTML = "<img src='_LAYOUTS/SPKings/Images/NoData.gif' />"; //$(this).text();
//alert($(this).html());
$(this).text("");
$(this).append(tempDIV);

});
}

});


What we had done is we are checking URL
If it is out target list, then we apply javascript and as you can see we are finding High and replacing that with Red.gif.

Same way for other criticality also

You can use image from image library also. We had used images from layouts.

Don’t forget to include jquery.JS to make it work.

Guys, this is not recommended way for authentic KPI but for time being or for demo purpose where we are not having time and have to show a lot of thing this will act as icings on the cake. :)

Access denied error when I use web services in InfoPath

Hi All,
When I use user profile service or any other web service in InfoPath and run it on my local server it works fine and when I deploy same form on production server where there is SharePoint farm it fails to run and give access denied error. I have used host header for SharePoint site and I refer that host header to open that site.
The solution for this problem is to disable the loopback check on each SharePoint server in farm.
To set the DisableLoopbackCheck registry key yourself, follow these steps:
Set the DisableStrictNameChecking registry entry to
  1. For more information about how to do this, click the following article number to view the article in the Microsoft Knowledge Base:
    (http://support.microsoft.com/kb/281308/ ) Connecting to SMB share on a Windows 2000-based computer or a Windows Server 2003-based computer may not work with an alias name
  2. Click Start, click Run, type regedit, and then click OK.
  3. In Registry Editor, locate and then click the following registry key:
    HKEY_LOCAL_MACHINE\SYSTEM\CurrentControlSet\Control\Lsa
  4. Right-click Lsa, point to New, and then click DWORD Value.
  5. Type DisableLoopbackCheck, and then press ENTER.
  6. Right-click DisableLoopbackCheck, and then click Modify.
  7. In the Value data box, type 1, and then click OK.
  8. Quit Registry Editor, and then restart your computer.
    And run IISRESET on each server
    Reference: http://support.microsoft.com/kb/896861


Share your SharePoint Experiences with us...
As good as the SharePointKings is, we want to make it even better. One of our most valuable sources of input for our Blog Posts comes from ever enthusiastic Visitors/Readers. We welcome every Visitor/Reader to contribute their experiences with SharePoint. It may be in the form of a code stub, snippet, any tips and trick or any crazy thing you have tried with SharePoint.
Send your Articles to sharepointkings@gmail.com with your Profile Summary. We will Post them. The idea is to act as a bridge between you Readers!!!

If anyone would like to have their advertisement posted on this blog, please send us the requirement details to sharepointkings@gmail.com