Wednesday, March 31, 2010

Using Workflow as web service Part – 2

Hi All,

If you haven’t read previous post, then I recommend you read Using Workflow as web service Part - 1 and then continue reading here.

Now in this post we will deep dive into real practical example where in we will create on workflow and then expose the workflow as web service and then we will consume that web service from one console application.

If you have gone through consuming web service in workflow post, you must have remembered that we created web service of calculating square root of given number and consumed it from our workflow. Well, we will do the same stuff here. However our workflow will act as web service here.

First let us create one project. Add project with type sequential workflow library. Name it as a SquareRootService.

Now right click the project and add new class. Name it ISquareRoot.cs.

Change the definition from class to interface.

Add following method definition.

double GetSquareRoot(double dblNumber);

Now drag WebserviceInput activity to the designer surface.

Bind the interfaceType property to the one that we create just now.


Set IsActivating property to true and MethodName to GetSquareRoot.


Select dblNumber proprty now, and click on … to bring the bind dialogue box and create new propoerty to bind it with dblNumber paramter of the input.


Now double click on InputRecieved method and generate it’s method.


Write down following code.

private void webServiceInputActivity1_InputReceived(object sender, EventArgs e)
{
double inputvalue = this.webServiceInputActivity1_dblNumber1;

webServiceOutputActivity1__ReturnValue_1 = (double)Math.Sqrt(inputvalue);


}


Go ahead and add one webserviceoutput activity. Bind it with InputActivity by giving inputactivityName to the webServiceInputActivity1. Set return value to the property


Now go ahead and right click on project and publish as a web service. This is really a cool feature that workflow provides. We need not to worry about anything. Just clicking on the button does the wonder.


Rename the newly generated file with SquareRootService.asmx

Now build that newly created web service.

Now add one console application for the test. And then add web reference; find web service in the solution.


Write down a very simple line to call a web service, which actually call our workflow.

static void Main(string[] args)
{

SquareRootService.Workflow1_WebService objService = new ConsoleWorkflowTest.SquareRootService.Workflow1_WebService();

double returnvalue = objService.GetSquareRoot(49);

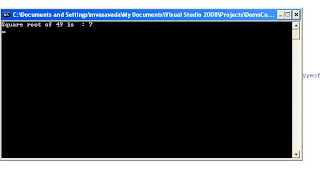
Console.WriteLine("Square Root of 49 is : " + returnvalue.ToString());

Console.ReadLine();

}


And see the output.


That is it. Your job is done. Feel free to ask any query.

Tuesday, March 30, 2010

How to know the site template out of the box

Hi All,

Many times we come across to a situation where we cannot write a code and site is completely branded. Hence we cannot make a decision on which template the site is created with.

Here is a way to know which template site is created in. you must be a site collection administrator to do this.

1) Save site as template into site template gallery.
2) Save that template from gallery to your local machine.
3) Change the file extension to the .cab.
4) Extract manifest.xml file.
5) Check out the TemplateID in that.
6) This ID tells you which template the site was created in.


If site template is any of the below, then it is that site. If it’s above 1000, then it should be custom.

ID 0 = Global, Configuration 0 = Global Template
ID 1 = STS or SharePoint Team Site, Config 0 = Team Site
ID 1, Config 1 = Blank Site
ID 1, Config 2 = Document Workspace
ID 2 = MPS, or Meeting Place Sites, Config 0 = Basic Meeting Workspace
ID 2, Config 1 = Blank Meeting Workspace
ID 2, Config 2 = Decision Meeting Workspace
ID 2, Config 3 = Social Meeting Workspace
ID 2, Config 4 = Multipage Meeting Workspace
ID 3 = Centraladmin, config 0 - Central Admin Site
ID 4 = WIKI, Config 0 = Wiki site
ID5, Config 0 = Blog

Thanks to John Creevy for this solution.

Hope this will help you.

Monday, March 29, 2010

Using Workflow as web service Part - 1

Hi All,

In last post, we saw how we can use web service in our workflow. In other word, we saw how we can consume web service in our workflow. So now in this post, we will perform the reverse operation. We will see how our workflow acts as a web service and how other applications can use the workflow as a web service.

It is not simple as creating a web service and just taking a reference from other application. It is much more than this. However Visual studio and workflow give us the great command to convert the entire workflow in web service. How can we use this feature? Well, we will see it later in this post.

First let us understand what all things are required for exposing workflow as web service. We will be using WebServiceInput and WebServiceOutput activities.

We must have at least one Input and at least one output activity in the workflow. We cannot have input activity without associating output activity and we cannot have output activity without associating it with some input activity.

Let us go ahead and deep dive into webserviceinput activity.

For Webserviceinput activity you need to set some properties and handle one event. Properties are as follows.

1) Interface Type: Get or Set the Interface data type for which we are going to expose our methods as web methods.

2) Is Activating: At least one of the activities must have this property set to true. This indicates that by calling this method, use can start the workflow. You can have more than one activity which has this property set true. However, if this is the case, then all these activities can start the workflow.

3) MethodName: Name of the method that can be exported as web method.

Out of these three properties, Is Activating is default set to false. All above properties must have values assigned otherwise be ready for validation errors.

Let us go ahead and now understand webserviceoutput activity.

Webserviceoutput activity must be bind with any of the webserviceinput activity for which you want to return the output. You must assign InputActivity name to the webserviceoutputactivity, otherwise validation error will be thrown.

If method returns void, then no need to bind the return parameter to the webserviceoutput, else you need to bind the appropriate return parameter to the webserviceoutputactivity.

More than one webserviceoutputactivity can be associated with one webserviceinputactivity. Reason being, let us say, we have one if else condition and in that we are processing some activities. Or we have parallel activities going on and it can take any of the branch path, then for each path ends, we need to return some values. Hence for each path end can be bind to the single input activity.

There is one more activity that we have to use in the workflow if we want to expose the workflow as web service.

Webservicefalut activity is same as webserviceoutputactivity and must be bind with the webserviceinputactivity. Only difference is that webservicefaultactivity is binded to the field or parameter of type Exception and to be set in Fault parameter of this property. This will ensure that if anything goes wrong, we need to send the exception or proper message to the calling client method.

Read Using Workflow as web service Part – 2 for further reading.

Tuesday, March 23, 2010

Consuming web service in workflow

Hi All,

Workflow gives us very decent and useful activity for fetching web service from your local computer, network or even from internet.

Let’s us directly dive in to the way how we can achieve calling web service from the workflow. We do not have to write any custom activity or write some code to call web service method. All is given by the built in activity called Invoke web service.

To demonstrate the example here, I have created one small ASP.Net web service project which calculates the square root for the given number. Now I know. This is not something very useful in real world. As I said earlier as well, that I believe in giving simple example and then leave user to play with complex example. Most welcome for any query.

The moment you drop the Invoke Web Service activity on designer surface, it opens up the window asking you for the web service URL, it is very similar to what you see when you add web reference in normal ASP.NeT project.

I have web service in my own machine so I chose find in machine option, if you have to use any of the service residing anywhere in the world, give that as a URL and fetch the web service.

Workflow does all the work for you for creating proxy class ready for you to use and call the methods.

(You can take console workflow as test project here)

Interesting part of this activity is, it knows about the parameter binding. Now there can be one or more parameters for the specific method. Now I have default Helloworld method and my own method called GetSquareRoot which takes parameter of type double.

Moment you are done with setting the web reference with your web service, you can see the red circle error showing you that the MethodName is not set. Hence we are going to go ahead and set the MethodName to my own method.


Now as you can see we have been asked for setting the number value which is the parameter for the GetQuareRoot method. Also notice return value at the top in property window. There has to be a return value after calculating the square root. So go ahead and click on each one of them and bind it to new properties.

Just make sure that you create properties, not fields.


Now go ahead and add two more code activities. One before invokewebservice activity and one after that as shown in figure below.


Double click on Code Activity1 and write following code. Here we are setting the value of our input parameter that we have given as input to the method.

private void codeActivity1_ExecuteCode_1(object sender, EventArgs e)
{
this.InputNumber = 49;
}


And then double click on Code Activity2 and write following code. Here we are fetching the value from the web service and storing the result of the return value from web service method and then writing a simple statement so that we can come to know the output.

private void codeActivity2_ExecuteCode(object sender, EventArgs e)
{
Console.WriteLine("Square root of " + this.InputNumber + " is : " + this.ReturnNumber);
Console.Read();

}


See the result. In this way we have now consumed web service from the workflow with the help of very helpful InvokeWebservice activity.

Monday, March 22, 2010

Result is out

Hi All,

Finally result is out. We asked people about problem that they face while using other browser than IE as far as SharePoint is concern. And it looks like MS has to work a lot on this fix. Well, let’s hope the next version 2010 does not have any browser problems.


Thank you for your responses.

Thursday, March 18, 2010

Creating custom activity in Workflow Part – 5

Hi All,

In previous parts, we saw how to deal with custom activities main validation logic, execution logic and some cosmetic tips. We will carry on some nice look and feel for the custom activity in this post as well.

If you haven’t gone through the previous post, then I recommend reading Creating custom activity in Workflow Part – 1 first and then continue reading further.

This post will show you the way we can implement an image associated with custom activity. When we drag and drop the custom activity on designer surface, we can attach PNG image of ideally 16 * 16 sizes.

We have to add ToolboxBitmap attribute to the CustomActivityDesigner class and the Custom Activity class with path to the 16 * 16 PNG picture.

If you apply ToolboxBitmap attribute to only Custom Activity class, then you will see the image on designer custom activity only. However, if you apply ToolboxBitmap attribute to CustomActivityDesigner class, then you will also find the image for custom activity in the toolbox as well.

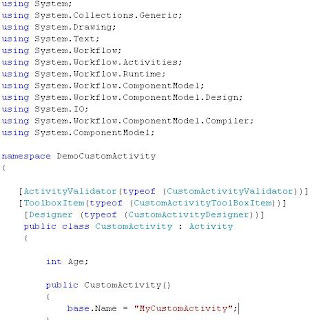
Modify the classes as shown below.


And below is the result of applying attribute to both classes.


Now you will wonder I have given local path of my system. If you give this custom activity’s DLL to any other developer, how image will appear.

Well, answer to the question is very simple. No need to worry about image. Image is built as a part of embedded resource in assembly. So image will automatically be included with DLL.

I hope that you have liked this series of basic custom activity. Share with us your thoughts on this.

Read Creating custom activity in Workflow Part – 6 to explore more.

Monday, March 15, 2010

MOSS 2007 Excel Services - Part 1

Excel Services !
Its one of the most powerful feature of MOSS 2007. But have you tried to have a look into it?
If not , this article explains you the basic steps required to get hands on experience with Excel services. What all is required is listed below:
1. Shared Service Provider (SSP).
2. Excel file
3. A MOSS site
4. Document library
So now if you have created all of the above components, lets start….

STEP 1 : Making the document library trusted in central admin

In order to work with excel services, you need to make the document library where you are going to keep an excel file declare as ‘trusted’ in the central admin site.
Open the central admin site and click on the SSP name. In this case, the name of SSP is MySSP. Click on Excel Services Trusted File Locations and add a new trusted location. Mention URL of the document library in the site where you wish to keep the excel file. Keep rest of the settings as it is and click on OK. Refer to the screenshot below:


STEP 2: Configure settings of the document library

Open the document library where you want to keep the excel file. Go to settings à Advance Settings and as shown in the screenshot below, find the option ‘Opening browser - enabled documents’ and select the option ‘Display as a web page’ . Press OK to complete the step.


STEP 3 Publishing file to the document library

There are two ways to store the excel file in the document library.
a. Uploading the file directly to the library.
b. Publishing the file to the library.
As we all know how to upload a document to the document library, I would like to explain the other way.
Open the excel file and open the option of file menu as shown in the figure below. Select publish and then Excel Services. Specify the URL of the document library and that’s it. The excel file will be published or uploaded at the specified location. Of course, no need to mention that you need to have permissions on that library for uploading.


STEP 4 : Start of the excel calculation services

In order to view an published excel file, the ‘Excel Calculation Services’ needs to be running. You can start the service by navigating to Central Admin à Operation à Services on server and start this particular service.


That’s it. You have successfully completed the basic hands on for working with excel services. To see what is there in the excel, click on the title of the excel you published in the document library. Intended result is that it will open in the browser itself displaying the data in excel format.
More hands on and information on excel services coming in subsequent posts.
Contributed by 'The Ace'

Creating custom activity in Workflow Part – 4

Hi All,

As we are approaching to some final posts of the series, I feel happy to share these posts with you all and make you aware of all things related to custom activity.

If you have not read previous articles, I recommend you reading Creating custom activity in Workflow Part – 1 First.

Here in this post, we will talk about the visual designer for the custom activity. It has nothing to do with functionality, so definitely this is not something which is required, However it is something which is nice to have.

So let us go ahead and understand how we can create visual appearance of custom activity.

By default when you drag and drop any activity, you will observe the shape and coloring same for each and every activity. We can change the shape, background color, border of our custom activity to give new fresh look. Hence I refer this visualization change of custom activity as makeup of activity. (Remember I used this term in post 1). :)

To achieve this, we need to implement three steps instead of two steps like other posts that we did.

1) Create a class which inherits from ActivityDesigner.
2) Create class which inherits from ActivityDesignerTheme.
3) Add ActivityDesignerTheme attribute to the class which inherits from ActivityDesigner.
4) Add Designer attribute to the Custom activity class.

So let’s start. Add one more class to our custom activity project. Name it CustomActivityDesignerTheme


Then add CustomActivityDesigner class which inherits from ActivityDesigner and add attribute as shown in figure below.


And then add designer attribute to the Custom activity class.


Now again just compile whole custom activity project, add activity to the console application and see the result. You will see our customized theme for our custom activity that we’ve just created.


Read Creating custom activity in Workflow Part – 5 for further reading.

Friday, March 12, 2010

How to hide breadcrumb on single page in SharePoint

Hi All,

May times we require to hide bread crumb on single page. Say you have created one web part page in one document library and when you visit the web part page, you will see your site->document library->web part page name.

And you do not want your user to click on document library and see the content in it.

Hence we can place one content editor web part on the page and write down following code. This will remove the bread crumb from the page.

I am creating one demopage.aspx under shared document library.


You can observe bread crumb, where user can click on it and go to the shared documents.


Now add one content editor web part and add the following code into.

<style rel="stylesheet" type="text/css" />
td.ms-titlearea { display:none; }
</style>


Just make sure that you set chrome type to none under appearance.

Simple, see the result. Bread crumb is no more on the page.


That's it. Your job is done.

Wednesday, March 10, 2010

Creating custom activity in Workflow Part – 3

Hi All,

In last two articles, we saw how to create basic activity and how to work with validations of properties.

If you haven't gone through previous parts, then i recommend you reading Creating custom activity in Workflow Part – 1 and Creating custom activity in Workflow Part – 2 post before continue reading here.

In this post, I am going to talk on Tool box item with respect to custom activity. When we want to initialize properties or want to perform any action when activity is being added (dropped) on visual designer, we can use toolbox item for this.

To achieve this functionality we have to implement two steps.

1) Create Toolboxitem class for custom activity deriving from ActivityToolboxItem class.

2) Add ToolBoxItem attribute to the custom activity class.

These two steps shown above are basic steps that you will find in all parts of this series. Because we have to perform above same steps (just inheritance is a difference) to achieve stuff for custom activity.

So let us go ahead and assign default birth date to our birth date property (I know it does not sounds anything practical, However as I said if we use simple example then it makes life easier).

One more important point to mention here is that we have to mark our class serializable and also we have to call deserialze in the constructor of the class. Reasons for this, well it is a topic of its own. I will explain it later. As of now, we will implement them to demonstrate our example and anyhow it’s merely two-three lines to write.

Go ahead and add class to our custom activity project. Name it CustomActivityToolBoxItem.


Then, go to the custom activity class and add System.ComponentModel which will help you to add attribute to the class.

Add the newly build assembly to the toolbox and drag and drop on visual surface and see the magic. You will see default birth date property being set by our code.


Read Creating custom activity in Workflow Part – 4 for more activities.

Monday, March 8, 2010

Creating custom activity in Workflow Part – 2

Hi All,

In my first post Creating custom activity in Workflow Part – 1 , we discussed about creating basic custom activity. Now as promised in this post, we will move a bit and hit the second topic of validation with custom activity.

When we gave input of birth date in first activity, we didn’t create any validations for it. This post will tell us how to create validation that will help us to validate the input user is providing to the parameters. So we will force user to provide correct birth date.

Bottom line is we can use the validation techniques in custom activity for each parameter that we define for our custom activity.

Adding validators consist of two steps.

1) We have to create a class which inherits from ActivityValidator Class.
2) Add ActivityValidator attribute to the custom activity class.


We have to override Validate method and we will return ValidationErrorCollection which hold all validation errors for birth date.

For validation logic, we will simply try to validate date against regular expression and if not matched, then we will throw the Error from our validator class.

Keep in mind that we are using the same custom activity that we’ve created in part 1. Hence if you haven’t gone through part 1, I recommend read it first and then carry on with this example.

So go ahead and add one class to the Workflow Custom activity project and name it CustomActivityValidator and inherit with ActivityValidator.


And then go to Custom Activity class and just add one attribute there on top of the class line and also add System.Workflow.ComponentModel.Compiler using statement.


Now just build the custom activity project again, and remove the previous custom activity on our console project and drag new (modified just now) activity to console application, and try to enter invalid date in property and valid property, and see. First we will enter valid date and then invalid date.


Read Creating custom activity in Workflow Part – 3 for furher reading.

Friday, March 5, 2010

Creating custom activity in Workflow Part – 1

Hi All,

After long time, I am back to the workflow and really I have spent many months without writing anything related to the workflow.

See Creating custom activity in Workflow Part – 2 for further reading after reading this post.

This post will talk about creating custom activity in workflow. Is this the right time to talk about this topic, when you have bunch of articles already written on the net and books. Well, I think almost all of them starts with complex example of creating custom activity. Even in some books, they start with complex example, never written simple examples.

So I thought of giving a change to myself to write down very basic stuff and example about custom activity.

Custom activity in workflow is just like the concept of creating custom control for .Net applications. It can be user controls or a custom control. In the same way, in workflow world it can be single activity (Basic activity) or composite activity. Creating single activity is somewhat easier than creating composite activity. For example, Delay is basic activity and While is a composite activity.

Other one important point to remember is basic activity derives from System.Workflow.ComponentModel.Activity and composite activity is derived from System.Workflow.ComponentModel.CompositeActivity.

An activity is made up of four components. All are not required, only definition is required for an activity. However definitely we want to execute something in that, hence executor is also important.

1) Definition: This is the definition of an activity where we define properties, events etc.
2) Validator : This is for validating input properties value.
3) Executor: Execute the actual code in the activity.
4) Toolbox: This will help us to assign default values to properties at the time of dragging on Visual Studio designer surface.
5) Designer: This is about makeup of the activity. (You will say, yes definitely a makeup :) )

We will see each one of them in different parts. We will start with part 1 in this post and continue to explore each option in series.

So let us go ahead and start writing our basic code to create custom activity.

First open visual studio and choose workflow under C# and then choose custom activity. Add a class and perform the following steps. As we are creating basic activity, we will inherit from Activity class.

Make sure that your class is marked public; otherwise you will not be able to place activity in toolbox itself.

We have to create one dependency property and we are going to create BirthDate property here and our basic activity will return the age of a person.

Then we will override the Execute method and execute my logic and then we will return our ActivityExecutionStatus, that means if it succeeds, we will return closed and if not, we have to return Faulting.


Now go ahead and add one more sequential console workflow project to existing solution, and click on choose items on toolbox, browse to the DLL of just created custom activity and there you go, you will have it in the toolbox, just drag and drop it on the surface. Enter the BirthDate in BirthDate property, we’ve created.


Run it, Debug it, try it and see for yourself.

Wednesday, March 3, 2010

Finally the result is out

Hi All,

Again thank you for your support in giving opinions about polling questions.

We asked about new ribbon control of SharePoint 2010 and almost people have welcomed this change.

Question was :

How do you see new ribbon interface in SharePoint 2010?

Options were :

1) Welcome change in SharePoint 2010. Making consistent with office product.
2) Have they really changed anything? It is just a way of presenting options differenty.

Here is a result.

Tuesday, March 2, 2010

Version difference in Site Settings and Central administration

Hi All,

One day somebody asked me, what is the version number of your SharePoint? And I did not have answer because I was not too sure where to look for. However it came in my mind that we can see version number on site settings page. Hence I opened my site settings page and gave answer to a person who asked me last evening.

So what is the big deal here in version number? Nothing new, you just have the version number of your SharePoint on site settings page.


Wait a minute. Have you ever observed version number as part of Farm Information in central administration. See below image for it.


In my machine, version number under site settings and version number under farm information are same. However, if you see a different version number in any of them, then there could be some reason for this. May be following reason is responsible for this version difference.

1) You may have applied some service packs related to MOSS / WSS 3.0 and you forgot to run SharePoint technology and configuration wizard. You must complete that wizard after applying service pack and that too successfully.

So bottom line is whenever you apply any service pack or when ever SharePoint asks you to run the wizard, just run it successfully and you should have same version number under both above mentioned screen.


Share your SharePoint Experiences with us...
As good as the SharePointKings is, we want to make it even better. One of our most valuable sources of input for our Blog Posts comes from ever enthusiastic Visitors/Readers. We welcome every Visitor/Reader to contribute their experiences with SharePoint. It may be in the form of a code stub, snippet, any tips and trick or any crazy thing you have tried with SharePoint.
Send your Articles to sharepointkings@gmail.com with your Profile Summary. We will Post them. The idea is to act as a bridge between you Readers!!!

If anyone would like to have their advertisement posted on this blog, please send us the requirement details to sharepointkings@gmail.com