If you are here first time I would recommend you to go and read part 1 before proceeding here.
Understanding Workflow Tracking Service - Part 1
Understanding Workflow Tracking Service - Part 3
Let’s continue our series of workflow tracking service.
Ok, once you are done with the basic understanding, let’s create necessary steps for this.
For workflow tracking service to be incorporated, we first need to create one separate database for workflow tracking. This database will contain necessary tables, views, stored procedures and function required for the tracking service. We are given built in SQL script that will create this database for us.
To start with, go to your database server and connect it with your credentials of Window Authentication or Forms Authentication.
Create a database and name it “WorkflowTracking”. Once you are done with this step and if you explore the database node in server explorer, you will see newly database that we have just created.
Now it’s time to find out scripts that are required for this. Typically it should be in your Windows Directory.
C:\WINDOWS\Microsoft.NET\Framework\v3.0\Windows Workflow Foundation\SQL\EN
If you have different Windows Directory, change it accordingly.
There you will find, Tracking_Schema.sql. Drag and drop in your SQL Server management studio or SQL Express. Be sure to use WorkflowTracking database only, else if you run the script, it will create all these stored procedures, tables in your default database and it will be overhead to remove them from it. So be sure to have WorkflowTracking database in use.
You can write use WorkflowTracking command at the top of the script before you run this.
Once you are done with running the script, you will see tables, stored procedures and functions created there.

Repeat the same steps for Tracking_Logic.sql. (Do not forget to use WorkflowTracking database at the top of the script before running it).
Now we have setup our database for tracking service. All we need to do now is create the Workflow and add the Tracking service in it and bind it with the database so that we can track the activities and much more.
Ok, open the Visual Studio and create a simple Sequential workflow Console Application and name it “TrackedWorkflow”.
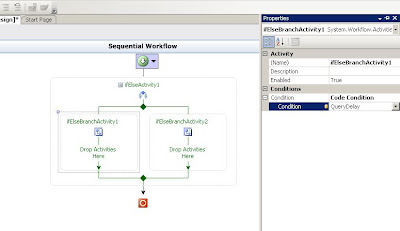
Drag IfElseActivity inside that and click left side IfElseActivity1 and set its property according to the figure shown below.

Now drag code activity from toolbox and place it in the First IfElseActivity1 that is Left branch.

Keep Adding the Delay Activity, set its interval to 10 seconds and then again code activity name it as AfterDelayActivity.

Write down the respective code in respective code activity methods
Console.WriteLine("Before Delay Activity....");and
Console.WriteLine("After Delay Activity....");
Write down the Code in that shown in figure below.

Add Application Configuration File in your console Workflow Application and add a reference of Systm.configuration.
Add ConnectionString in app.config File for WorkflowTracking database with your server credentials.
And then in Program.cs add SQLTrackingService to WorkflowRuntime like shown in figure below.
Remember to add reference to System.Workflow.Runtime and System.Workflow.Runtime.Tracking Library.

And then just see the magic, execute your workflow and then open your database and execute Select Query on ActivityInstance table. See you will get the result. Without writing code, we have made the database entry.

Ok, that’s it for this part. Now in next part, we will continue our exploration on tracking service and we will explore the SQLTrackingQuery to gain the knowledge on how to retrieve the information from these activities and workflow related tables and also how to track User Specific actions in the same tables.
All these in next part.


No comments:
Post a Comment