Friday, October 28, 2011

Result is out


The result is out and it seems that people wants a newer version of SharePoint to come to market.


Wednesday, October 19, 2011

Metadata term store management - Part-3


In this post, we are going to see how we can import terms into a term store management. If you haven’t gone through Part-1 and Part-2, I would recommend you reading them first and then continue reading from here.

So what do we do? Here is a solution. First we need to understand that term store management supports up to seven levels only. So we cannot go beyond that limit.


When you open term store management, you will observe a sample import file that can be viewed. Click on the file and see what pattern created in the file. Observe the format.


As you can see it can be up to seven levels only. So we have up to seven terms. You can define the term group, description of that group as well as individual term can be used for tagging or not. 


Once you import this file, you should see something like this.

So this is the way, we can create terms from the excel file.

To demonstrate, we are going to create a structure in excel the way we want. Here I have created a structure of Microsoft products and frameworks etc. that are used in a company to develop applications and solutions.

Make sure that the excel file should only have one sheet. No more than one sheet is allowed with this. So before saving your file to csv format, make sure that you have only one sheet in the excel file.

Following is the structure that I’ve defined in an excel file and then I’ve saved it as CSV file format.


Now go ahead and import this csv file to term store management.

And you get exactly this, the way we’ve configured in the file.


This is the easiest way to create a term set if it’s a complex and difficult to create term one after the other manually in term store management. I hope this must have helped you and you will try to implement in your scenario.

Keep reading Part-4 of this series.

Monday, October 17, 2011

Metadata term store management - Part-2


If you have not gone through part-1 of this series, I would recommend you reading it first and then continue reading from here.

When you are on term store management page, you should be viewing something like this.


The system folder that you see on the left side is the default folder that comes up with management store. All the keywords are defined by the users accessing the site. These keywords have come from tagging feature across the site. They belong to open submission policy. If a tag is not defined in these keywords list and if any user tags any content with some other phrase or word, then that word or phrase gets added to keywords store and becomes available for users to tag.

If you see on right side, you get to see options like importing a csv file to create a terms or terms set rather than creating it manually. Sometimes you may have many terms to enter, hence this option comes handy. We will look into this option in next part of this series.

You can define the term store administrator. Terms store administrators are the one who handles the overall piece of cake here. They are the main authorities to handle the overall term store management. The best part is they can create a term set group and can assign a group manager who maintains the terms that are part of that group.

Language selection is also an option. If you have multiple languages installed, then you get to choose different options as well. For me it’s only English and I am keeping it very simple.

When you click on the keyword, you get to see little different options on right.


You can here also define the owner of the keywords, contact person whom suggestion will go. If mentioned, then suggestion options become visible for users to send feedbacks for tags to this user.

You can also define stack holders to be notified when any major changes happen to a term set. Because when we talk about term set, it belongs to a group and group has some defined tags which need to be used by users across the group function. So this feature comes handy when any changes happen to the term sets.

You can have the entire keywords available for tagging or disable for tagging. When checkbox is checked, all users can view these options for tagging and when checkbox is not selected , that means user will not be able to tag any item by using these tags.

Here is the difference between these two; when selected and when not selected.


You can also hide individual term not be enabling for tagging.


If available for tagging then users gets this option otherwise they do not see this tag.

You can also delete or move a keyword to a term set. We will see move option very soon.

Now let’s go ahead and create a group term set. Term set is grouping of related terms.

Click on managed metadata service. Click on create group. Give a name technological.


 Now we need to add Term set, here we can either import or we can create. Right now we will create the Term Set. Give a name Technical.


Now we need to add terms inside it. So go ahead and add the Terms. Go ahead and add terms.


I’ve added terms and terms inside .Net term. We are creating hierarchy representation for .Net categories terms.

Now let’s go ahead and add tag some of the items to see how we get the term set appearing for tagging.

I am typing Silverlight, and it gets me a term suggestion coming from term store that we’ve defined.


When we start typing .Net, we get suggestion.

This way we can create hierarchy of terms that suits the requirement and accordingly can guide people to tag the item. This can definitely improve the search and saves the time for searching the content.

In next post, we will see how we can import Terms from CSV file because there are chances where you have many terms to define and manually defining terms can be a tedious task.

Read Part-3 for further reading.

Thursday, October 13, 2011

Attach ECB menu to field other than Title field

I was wondering if we can attach ECB menu other than Title field in SharePoint 2010 list.

I was digging to properties that can be used with Fields and I found one.I was creating a list definition and I needed to add ECB menu to other field than the title. I already have one list definition project ready which I have deployed.

Below it the project screen shot and following is the resulting list in the site.


As you can see only Title field gets the ECB menu, not the Order Name field. Let’s change our list definition a little. Add two attributes to order name field.


And here we go, deploy the solution again and you’ll see ECB menu attached to Order Name field.


Tuesday, October 11, 2011

A Web Part or Web Form Control on this Page cannot be displayed or imported. You don't have Add and Customize Pages permissions required to perform this action

I encountered very strange error yesterday and I was very thrilled to find a solution to this problem in SharePoint 2010. 


 Scenario is even the user has contribute permission on a specific web part page and try to add web parts, then also user cannot add the web part. Use keep getting message which says “A Web Part or Web form control on this page cannot be displayed or imported. You don’t have add and customized pages permissions required to perform this action.


Now the other problem, when the same user tried to add some other web parts like list view web part, they were added on a page without giving this error. 


Now this is something new that I‘ve encountered. So I try giving user a full permission on that web part page. Still user was not able to add content editor web part to a page but was able to add list view web part. I didn’t realize what is wrong with SharePoint 2010. User has full control even though need not to for actions that user wants to perform, then also user is not able to add content editor web part. 


Then I started Google information and found that if the user does not have design permission on a site level which itself has one permission called “Add and Customize the page” then user cannot add certain web parts to a page. 


Once you give user design permission or Add and Customize page permission, user should be good to go for adding content editor web part to a page. This permission is given by default to Designer group and not to contributor group. This may be due to a security constrain where user can write cross site query scripting to manipulate something.


There is one more attribute that is new in SharePoint 2010 which allows or disallow a user which has contribute permission to add specific web part on a page.


If you set Safe=”false” a user with contribute permission cannot add this web part if it is set to true then it allows to be added on a page.


As you can see already many web parts have this property set to True. You can play around and check yourself. Hope you’ve liked this post.

Monday, October 10, 2011

The result is out

Finally the result is out

People thinks 2012-2013 would be the best time when the real adoption will start of using development tools for Windows 8.


Thursday, October 6, 2011

Metadata term store management - Part-1


In SharePoint 2010, we can now have managed metadata in our sites. First let us understand what this metadata all about is.

Metadata actually plays a very critical role if implemented properly across the organization. When we want to identify any specific information, we tag the information as we saw in one of the series (Tagging and Clouding) in our blog.

The very simple basic point that is used as a base of metadata management is Term. Term is any phrase or a word given to identify specific content or information on a site.

Metadata plays very critical role in defining a strict policy of tagging items based on specific terms only which will internally help people to find and locate the information easily when they search any content specific to their area of interest. When any items tagged properly, then the search becomes very easy.

Term can later be defined as managed term and managed keywords. The difference between managed terms and keywords is terms are defined by administrators / contributors and keywords are defined by users who use the site.

Managed Term then can also be converted to Term set that can be represented in
hierarchical group of related terms.

Keyword can also be moved to be a part of term set.

This is where the concept of closed and open submission tag policy comes into a picture. Closed submission policy means user can tag items, document, and pages only from defined terms by administrators or term contributors. Open policy submission means user can tag item based on their own words or phrase and new phrases keep adding to the management store for other users to tag any item next time.

First I would like to give a quick highlight on where we can find these options. You can find these options in the site settings and in central administration.

Open site settings page and locate term store management under site administration option.


 And from central administration, go to Application Management -> Manage Service applications -> Managed Meta data services.


Start the service if not started.

Read Part-2 for further reading.

Monday, October 3, 2011

Show only specific part of page – content editor web part

We all know that if we have requirement to view another page on specific page in SharePoint, we can use page viewer web part.

 However the limitation of page viewer web part is that you cannot view specific portion of a page. You have to view entire page.

 We can resolve this with the help of content editor web part. Well, this is not something which is related to completely with SharePoint.

This is a general HTML concept, however as content editor allows us to place HTML code inside it; I thought this can be a kind of a trick as well.

 Add content editor web part to a page and what I am going to do is I am going to show a post from our very own SharePointKings in a content editor web part I would like to show only a post not an entire page. I would like to show Social Tagging and Clouding Part -3.


So here is what I have written in content editor web part and follows is the end result.

<div style="width: 499px; height: 231px; overflow: hidden"><iframe src="http://www.sharepointkings.com/" scrolling="no" style="margin-top: -400px; width: 900px; height: 900px; margin-right: 100px"></iframe></div>


You need to make changes in left and top margins accordingly for a page that you would like to show in web part. However one very important note is that this directly takes a portion from a live page and hence any content that is changed on a source page needs to be monitored accordingly otherwise this web part would start showing something else as original source page changes.

Thursday, September 29, 2011

Social Tagging and Clouding – Part 3

Let us explore more in to social tagging features in SharePoint 2010. If you have not gone through part-1 and part-2, I would recommend you going through them and then continue reading here on.

Let us first talk about tagging. You can tag individual list or list items, documents or document library or web pages.

You will find one common tag which is I Like it. This is the default tag that has been used in SharePoint. It is giving you functionality like your favorites. When you are interested in some link, you find any information useful; you can mark that information as I Like It. Then that tag becomes available in you’re my Profile page.
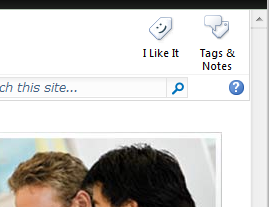


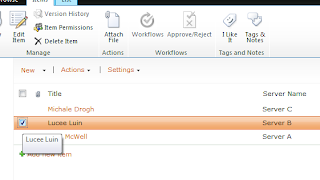
And when you are on a list item, then select the list item and then tag the I Like it button. When you are on a list view page, I like it tag do not appear visible. But when you select the list item, it turns in to enable mode.


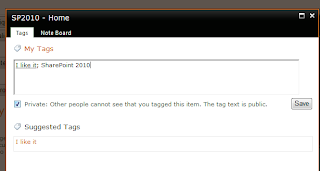
Let us tag a home page of a site with some keywords.


Now go to My profile page.
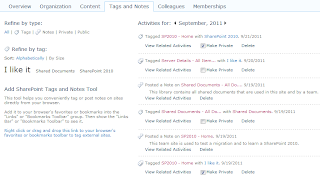


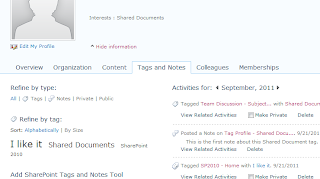
As you can see, tags that I’ve added appear on left side. This is the tag cloud. All the tags that I’ve tagged across the site appear here.

Observer that I Like It tag is bigger in text than other tags. That is because it is used more frequently. Frequently used tags are highlighted in bigger text than less used tags.

You can also see the list of all activities on right side. These activities indicates all things that you’ve done with respect to social tagging features like if you have written any note or tagged any item or document, it appears here with date. There is also an option to make the tags private. Notes are by default public, so you do not get an option to make private for that.

Private tags do not appear in someone’s profile. You can view all tags that have been defined by you which includes private as well; however public tags only can be views by others.

Let us have a look at social collaboration web parts available in SharePoint. Edit the page where you would like to add tag cloud.

Click on add web part, and add tag cloud web part.
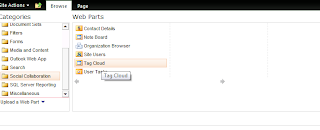


You can configure various properties as well once added to a page.



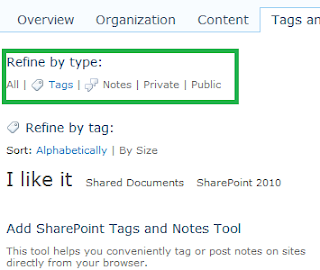
On you’re my profile page, you can refine your tags and notes by selecting what needs to be displayed there.


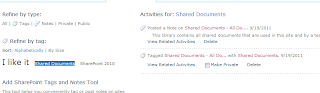
When you click on individual tag in your profile page inside the tag cloud, all activities for selected tag appears there.

For example, by selecting Shared Document, I get to know all activities for Shared Document tag.


Coming back to cloud web part that we’ve added, you can click on tag that will take you to a tag profile page. Each tag has its profile page just like each user has it. If you observe the URL tag is called a term and it has given its own ID. Term is nothing but a name or word given to a specific information or content.
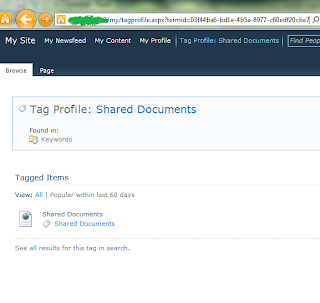


On a tag profile page, you can also add a note to a note board for this tag. All users who come to this tag profile will see all notes posted by all users as notes are public. You come to know who and when the tag was posted.

The other interesting stuff is link which says follow this tag in my newsfeed. When you click on it, you are subscribed to a newsfeed for the tag and when someone adds a tag to a page, you get notified.

The moment you add it, it appears in your interest category on your profile page.


You can also click on add to ask my about.
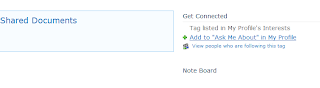


When you’ve added that, and when someone visits your profile, they come to know that they can contact you to ask about that specific tag of interest. The moment you click on it, it automatically sets some text in note board and concern person gets an email.
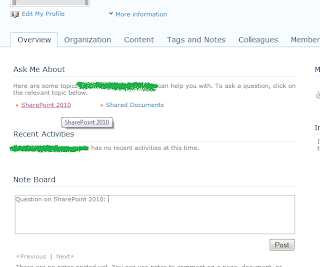


You can also view all people who are following this tag.

Let us have a look at Note Board web part available in social collaboration category. So go ahead and add a note board web part to a page.
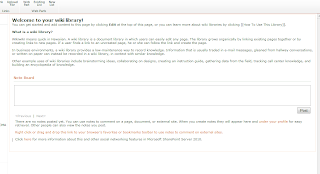


Note board helps you to not only have a comments section for any specific page, but for any lists or libraries or even a calendar item or almost anything which is relevant to SharePoint pages.

Let us see ratings feature available in SharePoint 2010. You can have list items or documents being rated by the user. All you have to do is go to list or library settings and turn the rating on and users would be able to rate the list item or documents.
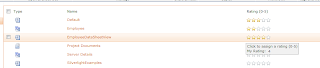


It shows the average rating from total ratings given by all users.

You can also rate items on edit and new page and also on display page.

I hope you like this series.

Monday, September 26, 2011

Social Tagging and Clouding – Part 2

In this post, we are going to discuss more on social features of SharePoint 2010. If you have not gone through part 1 of this, then I would recommend you reading it first and then continue reading here on.

We are going to see privacy and security features in social features. There are three key features available in SharePoint 2010 for privacy and security. Privacy related to an individual user’s data and security is related to organization related data.

1) Private Tag
2) Security trimming
3) Rating control

Let’s see each option in details.

1) Private tagging

We can define tag to be private or public when we are tagging any item. Private tags as name suggest are visible to only individual users. If the tag is public, it can be seen by all authenticated users.

2) Rating control

Rating control shows us the aggregated rating. It does not show a rating given by individual user and what rating given by individual rating.

3) Security Trimming

When any user adds tag, note or rate any item, it creates an activity inside SharePoint. SharePoint 2010 uses security trimming feature while displaying these activities. If a user does not have permission to view a web page, it does not show the activity.


Where can we see all these social tagging features in SharePoint? Well, the answer is very simple. We can see them on individual user’s profile page; result of following a tag and on a web page.

1) My Profile Page

When a user views my profile page of his / her own, then user can view the entire information about him / her, However when user views some other user’s my profile page, then the security trimming comes into a picture to display information.
When you view Tags and Notes of your own, then you view every tag in the cloud that you have defined. However in other tags and notes you can view only tags that are defined as public. Notes are by default public, so you can view all notes by other user as well.

When you select any tag, then all activities which are associated with this tag displays on a page. When you view an activity page, then that is also security trimmed.

Overview tab inside my profile page shows all activities done by a user and again that is security trimmed. If you are viewing of your own, then there is no restriction; however when you view of someone else’s then it is a security trimmed.

2) Following

You can follow a specific tag that you are interested in. you are notified when someone adds a tag to a web page. Again this notification is security trimmed. That means if someone adds a tag on a web page on which you do not have an access, then you do not get a notification.

When you add a person as a colleague, then you can get notification every time your colleague adds a tag to a web page.

3) Web Page

You can view all public tags defined on a web page and all notes defined on a page. Notes are always public.

Read Social Tagging and Clouding Part-3 for more reading.


Share your SharePoint Experiences with us...
As good as the SharePointKings is, we want to make it even better. One of our most valuable sources of input for our Blog Posts comes from ever enthusiastic Visitors/Readers. We welcome every Visitor/Reader to contribute their experiences with SharePoint. It may be in the form of a code stub, snippet, any tips and trick or any crazy thing you have tried with SharePoint.
Send your Articles to sharepointkings@gmail.com with your Profile Summary. We will Post them. The idea is to act as a bridge between you Readers!!!

If anyone would like to have their advertisement posted on this blog, please send us the requirement details to sharepointkings@gmail.com