Saturday, June 8, 2013

Rich text field in document library

You are working with document library and requirement comes in to add one rich text field in the document library. So go to document library settings and click on add column. Good. Let's go ahead.

Try to add a multi line of text and see what you get when you scroll down and look for rich text. you do not get the option.


Now this is different. Isn't this? When you go ahead and add the same multi line field in list, you get rich text setting options but in document library you do not get this.

Alright let us try something else.

Let us create a site column with multiline text and enhanced rich text.


Go back to the document library and let's add from existing site column.


So now we have the rich text multi line field in our library. so when we upload the document, we should get the RoleDescription metadata property and we should be good to go to add some rich content.

So let us upload a document and see what happens.
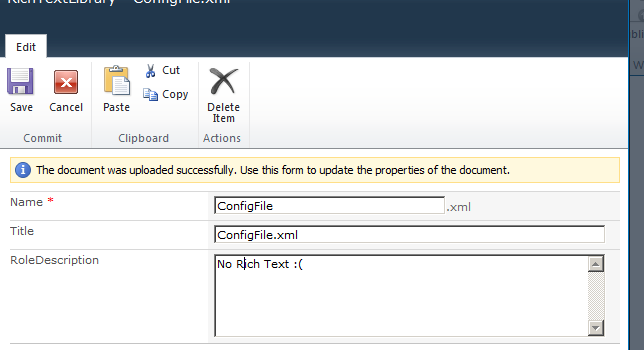


No luck. SharePoint converted the rich text to the normal text with multi line.

Even if you create a custom document content type and add site column to that it will not work.

Well then now we need to find out one more route.

So code comes to the rescue here.

Let's add simple code to a web part or event handler or wherever applicable in your case.
The bottom line is to use this code.


and there you go. execute this code. go back to the library, upload document or edit property of existing document and see what happens.


I hope this helps. 

Sunday, June 2, 2013

Access User profile in Sandbox solution

This post is all about accessing user profile in SharePoint sandbox solution. First let me highlight that you cannot access user profile in sandbox solution because SPUserProfileManager is not allowed to be used inside the sandbox solution.

If you try to use it you will get the build error. So no luck in that front. So question is how do you access user profile? Well, there are people mentioning something about site user information list approach.

So what is this user information list. So it is said that the user information list is the replica of user profile. That means you can access the properties of user and its values using this list.

When the web gets created, the information gets copied from the user profile and then populated to the user information list.

Now the question comes in do you get all the properties and all the values properly for all users? Well to be honest, answer is NO. This is very disappointing.

I have no idea what is the problem with this list. It just does not work. You may find people telling that the user profile synchronization service keeps running and keeps this list updated all the time when the properties or values are updated in user profile. But this does not happen in real.

It's a big disappointing. Especially when you are dealing with developing solutions in cloud (Office 365) and when you are working tenant environment or even you have dedicated plan in office but you simple cannot run anything on the server like PowerShell.

So here is what I encountered. If you add property in user profile and then try to access this list. 

You do not get this field at all in the user information list. Come back to central administration ( If you are trying this while in development - forget about this if you are working for Office 365 / SharePoint online solutions). Run all possible timer jobs possible for user profile and you will again run out of luck.

I just don't know how this things have been configured. 

When on user profile property, it is clearly written that check the box which says replicable and do other settings. Doing that also does not help. I have tried this on five different environment and it has failed in all five environment. so it's completely not working at all.


It will work only when you forcefully apply two STSADM command. Yes, its STSADM.
When the timer job updates the site collections with the profile properties, it maintains the sync details in a table

Stsadm.exe –o sync –listolddatabases 0

and then

Stsadm.exe –o sync –deleteolddatabases 0

After executing these two commands, go ahead and again run the timer job. After this if you access the list and items, you get the new property as field with values for users.

What is the point of having a solution like this? This just does not work out. I think we all are out of luck accessing user profile in sandbox solution specially if you are dealing with SharePoint online or office 365.

Another option can be accessing the web service to access data of user profile. But you again cannot call web service in SandBox solution. So again we run out of luck.


Sunday, May 19, 2013

Visual Web Part in SandBox solution

Hi,

If you are creating a sandbox solution let's say for SharePoint online and if you wish you create a visual web part, then you have no choice for that directly.

However you can still download an extension to your Visual Studio 2010 which will allow you to create a visual web part in sandbox environment.

It is called the VS 2010 SharePoint power tool.

http://visualstudiogallery.msdn.microsoft.com/8e602a8c-6714-4549-9e95-f3700344b0d9

I hope this helps.

Thursday, April 25, 2013

Save list as a template and create list from template using PowerShell

In this post we are going to see how we can save list as a template that saves it to the list template gallery and then how we can create a new list / library from the template from the saved template earlier.

Here is a simple script that we can write in PowerShell to do that

Here we are saving shared documents library as a template and then creating a library from the saved template.


[xml]$xmlfile = Get-Content ConfigFile.xml

foreach( $sitecoll in $xmlfile.Configuration.SiteCollection) 

    $site = $sitecoll.name


$spSite= Get-SPSite $site

$web = $spSite.OpenWeb()

Write-Host -foregroundcolor yellow 'Saving list as a template.....'

$list = $web.GetList("/sites/SharePointSite/Shared Documents/")

$list.SaveAsTemplate("SDWITHDOCSET","SD with DOCSET","Shared Doc with Doc Set",1)

Write-Host -foregroundcolor Green 'Saving list as a template successfully'

Write-Host -foregroundcolor yellow 'Creating documents library from the template...'

$listTemplates = $spSite.GetCustomListTemplates($web)

$web.Lists.Add("SDFromTemplateUsingPS", "", $listTemplates["SD with DOCSET"])

Write-Host -foregroundcolor green 'Creating documents library from the template completed successfully.'

I hope this helps.

Monday, April 22, 2013

Document Set Save as a template problem


In this post, we are going to see one problem which is not been addressed properly. I think not even from Microsoft in the form of SP1 or even in the form of CU.

Problem is, you have one document library and you have document set in that library with many other documents inside each document set.

The problem is when you save a library as a template with content and when you create a document library based on the template, you can see that the document sets have come. You can even see the icon indicating that these are the document sets. However when you click on the document set, boom!! page not found.

I did not find answer anywhere. Even if you save a web as a template including content and then try to create a web based on the template, you see a strange thing. In the document library, you will find those document set icon as folders not as a icon of the document sets.

Well only thing that I observed is you go ahead and manually edit the properties of those document sets and change the content type to the document set, that will resolve the issue and when you click , you get the welcome page and documents that were there inside the document set while saving site or list as a template.

But this is not a solution. Imaging you have more than 100 libraries and each having more than 50 document sets with each almost 100 documents inside it. !!! Not sure what Microsoft is thinking on this.

If anyone has come across to this and have found proper solution, please do let us know.

Friday, April 19, 2013

Create document set programmatically


In this post we are going to see how to create a document set in SharePoint programmatically.

To start with we need to activate the feature called document set at the site collection level.

If you would like to know more about document set, then I would recommend you reading Understand Document Set to get a fair idea on what document set is and what it offers.

I have one document library with the name Shared Document. To add document set programmatically, we first need to enable the content types on this library. So go to the library settings, advance settings and enable the allow management of content types.

Now click on add from existing content types.

On the page look for document set content type and add it to the library.

So you should have something like this


Now I am showing this with an example of feature activated event. I have one feature and on activating the feature I am creating a document set programmatically.

Here is a code that you need to write.


Now if you see what we have done here is first we have taken document set content type in to a code from current web. This will not work if you have not activated document set feature at a site collection level.

Document set has properties, so we have set one property - document set description. This needs to be done with HashTable.

Then we are creating a document set by DocumentSet.Create method. To get this done you need to add reference to one DLL and for the HashTable you need to one DLL.

These are the DLLs you need to refer.

using System.Collections;
using Microsoft.Office.DocumentManagement.DocumentSets;

After creating Document Set, the important line of code to note is the ProgId of the item to be set to SharePoint.DocumentSet.

If you do not do this, then all you get is just a folder and not actual document set. You can see the difference in the icon as well as when you click on the folder.

Finally we update the item.

So let's deploy the WSP and activate the feature and see what happens.


See the icon. Icon indicates that this is the document set and not the plain folder. Click on the title.


See the description is also set. You can also set additional properties at the time of creating document set.

I hope this helps.


Thursday, April 11, 2013

Checking for validation error programatically in InfoPath

In case if you are writing a code in button click event of InfoPath page and you would like to validate the required fields input or any other validation, then here is a one liner code that you need to write.

this.errors.count 

if the count is 0 that means there is no error, else there are errors.

Happy coding!!

Thursday, April 4, 2013

Allocate tasks to users inside group in start approval process in SharePoint Designer


In this post we are going to see how we can assign tasks to the users inside start approval process on this item with these users action inside SharePoint designer.

To demonstrate I have one list with one title column and one group name column which has group as well as users settings done.


Let us open the SharePoint Designer and connect to the site. Click on list workflow and select list on which you want to add the workflow.

 Select start approval process from the actions menu.

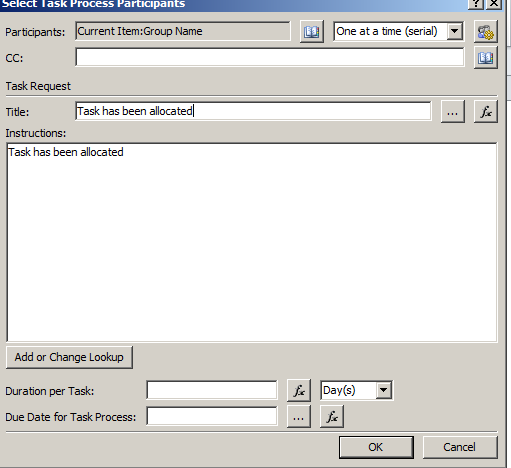
Click on these users.


Select workflow lookup and then from current item, select the field.


Configure this workflow on start automatically on create and on edit

Now go ahead and create one item in the list.


I have added one list item with selecting engineers as a group on which approval will start.
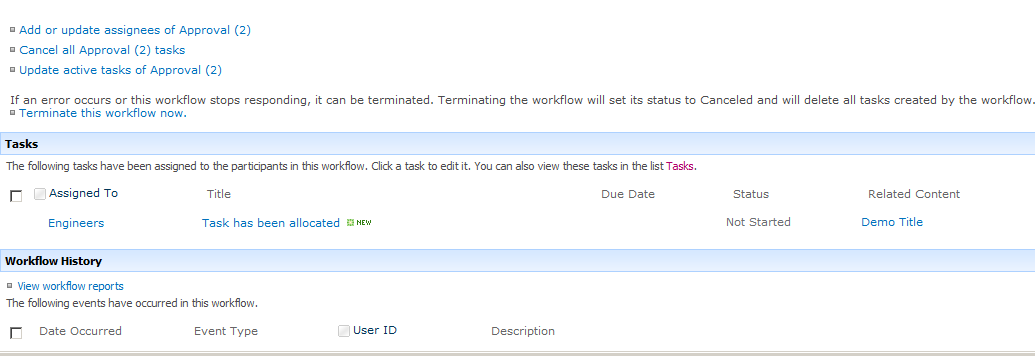
As you can see workflow is in progress.


Click on in progress and as you can see it is assigned to the group and not to the users inside group.


So how to actually allocate tasks to the users inside the group. Well there is a small change.

Go back to the workflow in designer. Select the step and click on advanced properties from ribbon.


And change the expand group to yes.

Publish the workflow now.

Create one more item in the list, click on the in progress status of the workflow. and there you go.


Task is now allocated to the user inside the group. As this approval is set as a serial, go ahead and approve this. You will see the next task allocated to the next user in the group.


I hope this helps.

Tuesday, April 2, 2013

Display list item in edit mode in InfoPath Form Web Part


In this post we are going to see how we can open a list item in edit mode in InfoPath Form Web Part. This initially seems to be an easy job. But it is not.

I really had to invest a lot of time figuring out this solution. What we want to achieve is actually a list form customized using InfoPath by using customize this form in InfoPath ribbon option and then by using the InfoPath form web part we display the form of the list.
I have a list called orders.


and I have used customized the form in InfoPath option from ribbon so that new item, edit item and view item opens up in InfoPath form and not the list form.


If you select the list item and click on edit the item, you can see item is opened in the InfoPath.


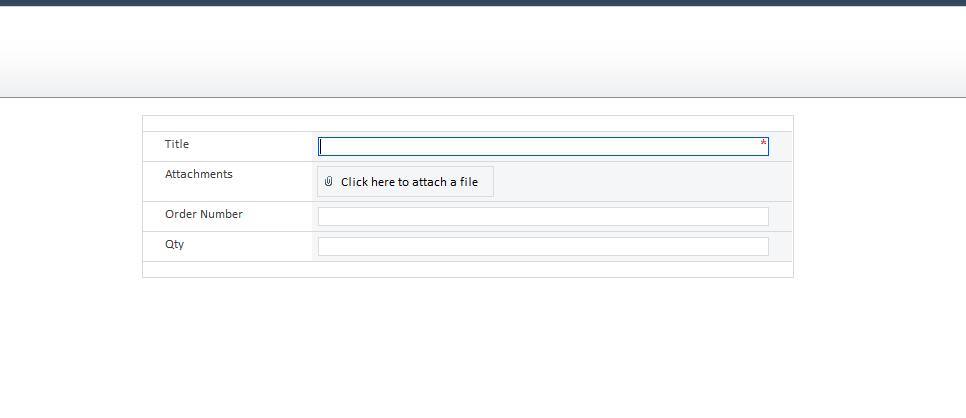
Now here comes a tough part. Assume that you want to have another web parts on the page and on the same web part page you would like to have this order list item new entry form to be displayed.

Well, this is not as tough as you think. you can simple add the InfoPath form web part and then set the list name to order and you are good to go.


Once you click on ok, you can see the form has been added on the web part.


Now comes the challenging part, how would you open any list item in the InfoPath Form Web Part. Now again this seems an easy job but it is not as I stated earlier.

I had to go through lot of blog posts and articles. Many of them mentioned that you need to have source list and then bind the connection between InfoPath Form web part and source list so that when you select the source list item, that item gets populated in the InfoPath Form Web Part.

However this is not the solution that we want. We cannot add a source list in our case, orders to the same page and connect these two web part.

There can be a scenario where you are just passing ID of the list item from another page and based on the query string you want to show the edit form in the InfoPath form web part.

So here is a solution that I came out with. But yes if you do not have code option available to you, then you have to go with the connect web part approach. But for that you will have a list also displayed on the same web part page.

All we need to do is create one simple web part (not the visual web part) . add a reference to the c:\Program Files\Common Files\Microsoft Shared\Web Server Extensions\14\ISAPI\Microsoft.Office.Server.dll DLL.

protected override void CreateChildControls()
        {
            BrowserFormWebPart web = new BrowserFormWebPart();

            web.FormLocation = @"{siteURL}/Lists/Orders/Item/editifs.aspx?List={list GUID}&LItemID={ITEMID}&Source={siteURL}%2FLists%2FOrders%2FAllItems%2Easpx&ContentTypeId=0x01005AFFDCC34451FF46B97FDD902EA436AF";
            this.Controls.Add(web);

        }

Just replace the List GUID, site URL and ID with the actual list GUID, site URL and list item ID. you can get these through query string or as per your requirement.

Deploy the web part and you are good to go. Now you have a InfoPath Form web part which shows list item in edit mode. 

Thursday, March 28, 2013

Add web part page using PowerShell


Imagine a scenario where you need to create 100 web part pages with different templates. You would spend a lot of time creating those pages. One of the approaches can be having a PowerShell script which can create web part pages for templates that you want.

Here is a simple script that creates web part pages in a loop.

[xml]$xmlfile = Get-Content ConfigFile.xml 

foreach( $sitecoll in $xmlfile.Configuration.SiteCollection) 
{ $site = $sitecoll.name }

 $spSite= Get-SPSite $site 
$web = $spSite.OpenWeb() 
$layoutTemplate = 4 # Template code 
$web = $spSite.OpenWeb() 
$list = $web.GetList("/sites/SharePointSite/SitePages/")
 $i = 1
 while ($i -le 5)
 { Write-Host $pageTitle = "WebPartPage& + $i 

$xml = "<?xml version=""1.0"" encoding=""UTF-8""?&gt;

<Method ID=""0,NewWebPage""><SetList Scope=""Request"">" + $list.ID + "</SetList><SetVar Name=""Cmd"">NewWebPage</SetVar><SetVar Name=""ID"">New</SetVar><SetVar Name=""Type"">WebPartPage</SetVar><SetVar Name=""WebPartPageTemplate"">" + $layoutTemplate + "</SetVar><SetVar Name=""Overwrite"">true</SetVar><SetVar Name=""Title"">" + $pageTitle + "</SetVar></Method>"

 $result = $web.ProcessBatchData($xml)

 $i++ 

Write-Host -foregroundcolor Green $pageTitle 'created successfully' 

}

and when you run here is the output of the script and then final result


If you observe closely here we have specified layouttemplate, we have specified 4. This related to various templates like three column, four columns, headers the template that we select while creating web part page.

 Possible LayoutTemplate values are :

# 1 - Full Page, Vertical
# 2 - Header, Footer, 3 Columns
# 3 - Header, Left Column, Body
# 4 - Header, Right Column, Body
# 5 - Header, Footer, 2 Columns, 4 Rows
# 6 - Header, Footer, 4 Columns, Top Row
# 7 - Left Column, Header, Footer, Top Row, 3 Columns
# 8 - Right Column, Header, Footer, Top Row, 3 Columns


Share your SharePoint Experiences with us...
As good as the SharePointKings is, we want to make it even better. One of our most valuable sources of input for our Blog Posts comes from ever enthusiastic Visitors/Readers. We welcome every Visitor/Reader to contribute their experiences with SharePoint. It may be in the form of a code stub, snippet, any tips and trick or any crazy thing you have tried with SharePoint.
Send your Articles to sharepointkings@gmail.com with your Profile Summary. We will Post them. The idea is to act as a bridge between you Readers!!!

If anyone would like to have their advertisement posted on this blog, please send us the requirement details to sharepointkings@gmail.com