Let us explore more in to social tagging features in SharePoint 2010. If you have not gone through part-1 and part-2, I would recommend you going through them and then continue reading here on.
Let us first talk about tagging. You can tag individual list or list items, documents or document library or web pages.
You will find one common tag which is I Like it. This is the default tag that has been used in SharePoint. It is giving you functionality like your favorites. When you are interested in some link, you find any information useful; you can mark that information as I Like It. Then that tag becomes available in you’re my Profile page.
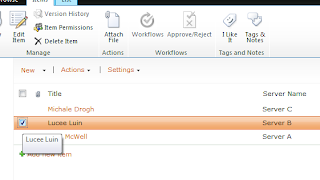
And when you are on a list item, then select the list item and then tag the I Like it button. When you are on a list view page, I like it tag do not appear visible. But when you select the list item, it turns in to enable mode.
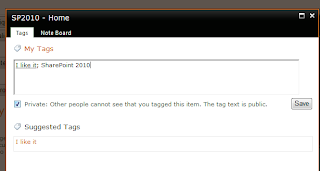
Let us tag a home page of a site with some keywords.
Now go to My profile page.
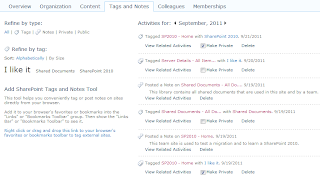
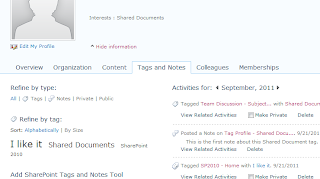
As you can see, tags that I’ve added appear on left side. This is the tag cloud. All the tags that I’ve tagged across the site appear here.
Observer that I Like It tag is bigger in text than other tags. That is because it is used more frequently. Frequently used tags are highlighted in bigger text than less used tags.
You can also see the list of all activities on right side. These activities indicates all things that you’ve done with respect to social tagging features like if you have written any note or tagged any item or document, it appears here with date. There is also an option to make the tags private. Notes are by default public, so you do not get an option to make private for that.
Private tags do not appear in someone’s profile. You can view all tags that have been defined by you which includes private as well; however public tags only can be views by others.
Let us have a look at social collaboration web parts available in SharePoint. Edit the page where you would like to add tag cloud.
Click on add web part, and add tag cloud web part.
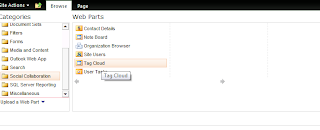
You can configure various properties as well once added to a page.
On you’re my profile page, you can refine your tags and notes by selecting what needs to be displayed there.
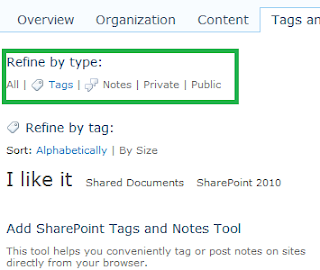
When you click on individual tag in your profile page inside the tag cloud, all activities for selected tag appears there.
For example, by selecting Shared Document, I get to know all activities for Shared Document tag.
Coming back to cloud web part that we’ve added, you can click on tag that will take you to a tag profile page. Each tag has its profile page just like each user has it. If you observe the URL tag is called a term and it has given its own ID. Term is nothing but a name or word given to a specific information or content.
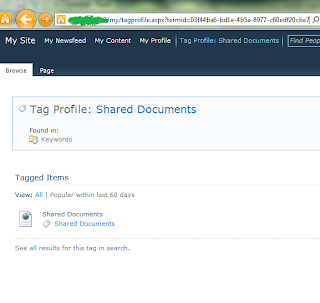
On a tag profile page, you can also add a note to a note board for this tag. All users who come to this tag profile will see all notes posted by all users as notes are public. You come to know who and when the tag was posted.
The other interesting stuff is link which says follow this tag in my newsfeed. When you click on it, you are subscribed to a newsfeed for the tag and when someone adds a tag to a page, you get notified.
The moment you add it, it appears in your interest category on your profile page.
You can also click on add to ask my about.
When you’ve added that, and when someone visits your profile, they come to know that they can contact you to ask about that specific tag of interest. The moment you click on it, it automatically sets some text in note board and concern person gets an email.
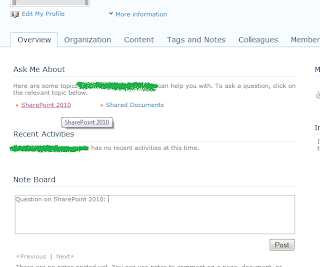
You can also view all people who are following this tag.
Let us have a look at Note Board web part available in social collaboration category. So go ahead and add a note board web part to a page.
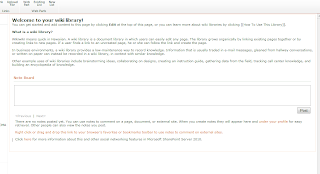
Note board helps you to not only have a comments section for any specific page, but for any lists or libraries or even a calendar item or almost anything which is relevant to SharePoint pages.
Let us see ratings feature available in SharePoint 2010. You can have list items or documents being rated by the user. All you have to do is go to list or library settings and turn the rating on and users would be able to rate the list item or documents.
It shows the average rating from total ratings given by all users.
You can also rate items on edit and new page and also on display page.
I hope you like this series.
SharePoint Kings,Technosavvy guys hunting SharePoint Challenges... SharePoint 2013, SharePoint 2010, MOSS 2007, Windows Workflow Foundation, Project Server and Other Related Technologies.
Thursday, September 29, 2011
Monday, September 26, 2011
Social Tagging and Clouding – Part 2
In this post, we are going to discuss more on social features of SharePoint 2010. If you have not gone through part 1 of this, then I would recommend you reading it first and then continue reading here on.
We are going to see privacy and security features in social features. There are three key features available in SharePoint 2010 for privacy and security. Privacy related to an individual user’s data and security is related to organization related data.
1) Private Tag
2) Security trimming
3) Rating control
Let’s see each option in details.
1) Private tagging
We can define tag to be private or public when we are tagging any item. Private tags as name suggest are visible to only individual users. If the tag is public, it can be seen by all authenticated users.
2) Rating control
Rating control shows us the aggregated rating. It does not show a rating given by individual user and what rating given by individual rating.
3) Security Trimming
When any user adds tag, note or rate any item, it creates an activity inside SharePoint. SharePoint 2010 uses security trimming feature while displaying these activities. If a user does not have permission to view a web page, it does not show the activity.
Where can we see all these social tagging features in SharePoint? Well, the answer is very simple. We can see them on individual user’s profile page; result of following a tag and on a web page.
1) My Profile Page
When a user views my profile page of his / her own, then user can view the entire information about him / her, However when user views some other user’s my profile page, then the security trimming comes into a picture to display information.
When you view Tags and Notes of your own, then you view every tag in the cloud that you have defined. However in other tags and notes you can view only tags that are defined as public. Notes are by default public, so you can view all notes by other user as well.
When you select any tag, then all activities which are associated with this tag displays on a page. When you view an activity page, then that is also security trimmed.
Overview tab inside my profile page shows all activities done by a user and again that is security trimmed. If you are viewing of your own, then there is no restriction; however when you view of someone else’s then it is a security trimmed.
2) Following
You can follow a specific tag that you are interested in. you are notified when someone adds a tag to a web page. Again this notification is security trimmed. That means if someone adds a tag on a web page on which you do not have an access, then you do not get a notification.
When you add a person as a colleague, then you can get notification every time your colleague adds a tag to a web page.
3) Web Page
You can view all public tags defined on a web page and all notes defined on a page. Notes are always public.
Read Social Tagging and Clouding Part-3 for more reading.
Friday, September 23, 2011
Wednesday, September 21, 2011
Social Tagging and Clouding – Part 1
Social tagging and clouding of information residing inside a SharePoint 2010 is a new feature that has been introduced in SharePoint 2010. Tagging information is nothing but categorizing certain data or information residing in the SharePoint to match with individuals interest.
People from finance department may tag certain information with their own attributes that are related to finance. So that people searching for specific information can search from that tag only. User can keep adding tag to identify various information based on their interest.
Tag is just a word that identifies whole information.
First let us see what all features are available in social tagging in SharePoint 2010.
1) Social Tags
2) Tag Cloud
3) Note Board
4) Ratings
5) Bookmarklets
We will deep dive in each one of these individual in details. Here I would first like to give an overview and how does it actually works inside the SharePoint.
1) Social Tags
Social tag is just a word given by a user to identify a piece of information as mentioned earlier. When a user tags something in SharePoint, it stores the information in separate social tagging database with tagged by user, URL of information and the tag word itself. Tags can be defined as a private or as a public. If defined as a private, then as a name suggest, only user who has defined it can see it. If defined public, then all authenticated users would be able to view that tag.
2) Tag Cloud
Tag Cloud is an aggregated view of all tags defined by authorized user inside SharePoint site. SharePoint has one web part called Tag Cloud web part. If you have observed this web part appears by default in My Site. We can customize the tag cloud as well; example, if you want to see tags inside cloud only of certain groups, then you can do so.
Tags that are frequently used are highlighted in larger text than tags that are used less which are highlighted in smaller text.
3) Note Board
Note board is a web part that comes with social feature in SharePoint 2010 which allows you to add comments. Earlier this feature was there only in the blogging site. Now we also have this as a separate web part, however this does not require approval or so. It’s simple typing comment inside the multiline textbox which is a note board.
Once posted, all authenticated users will be able to see all comments posted there in the web part.
Note board is always public and only authenticated users can post a note.
4) Rating
Rating is a classification of content on a scale as on how well particular information matches the criteria. Average score can range from 1 to 100. You can also have additional pop up window that will help you to give additional information about the score.
Users can rate documents, list items and web pages. Users need not to have write permission to perform this operation
Each rating again store information in social tagging database with user who rated the item, URL of rated item, and rating itself. Also it stored date and time of rating.
5) Bookmarklets
This allows user to rate, comment and rate items outside of SharePoint environment and share them with the users inside SharePoint environment.
When a user tags an external Web site, and when any other user visits user profile page which is My Site for another user then all tags and notes entered on external site page will then appear there.
Each bookmarklet again store information in social tagging database with user who bookmarked the item, URL of bookmarked item, and bookmarked word.
Read Social Tagging and Clouding part-2 for further reading.
Monday, September 19, 2011
Visio Services 2010 – Part 5
In this post I am going to show you the various connectivity options that come along with Visio web access web part.
Before reading on this post, I would recommend if you have not gone through the part-1 to part-4, then please read them first and then continue reading from here.
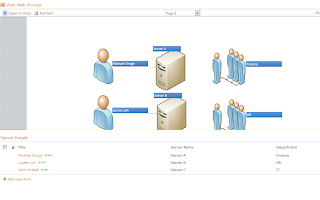
Open the page where you have Visio Web Access web parts where you have displayed Visio diagram in the web part. Edit the page and add the list which is used as a source for the Visio diagram. In our case it is Server Details list. Add that list to the page.
We will try to cover all options that Visio web access web part gives us for connectivity.
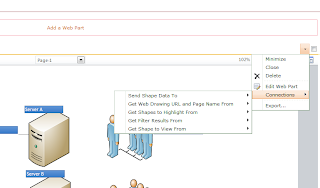
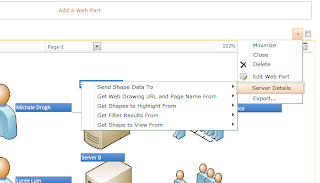
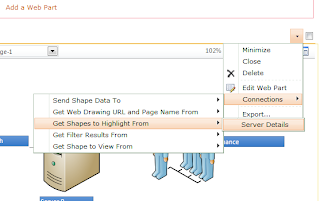
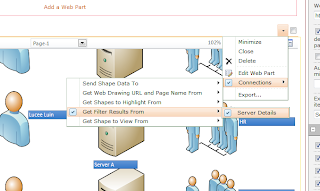
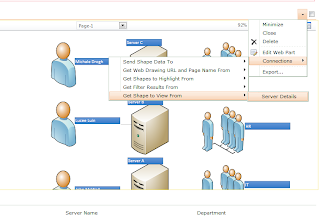
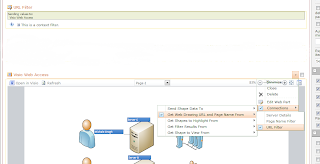
Edit the page, edit the Visio web access and click on connection.
Here as you can see we have total five ways to connect to source and update the diagram and increase the interactivity with the source.
But before we go ahead and check out each option, there is one very important change that we need to make to the Visio diagram is to name those Shapes properly so that the source can identify the proper filter.
We need to have name of the shapes similar to the list items name.
First where do we see the name of the Shape in rendered diagram?
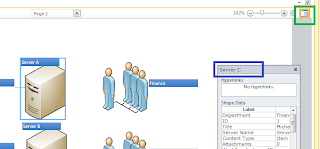
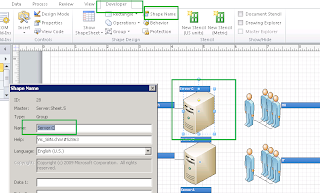
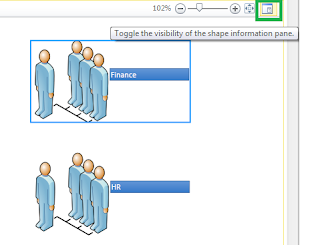
Here is an answer, select any shape; click on the right side square (highlighted in green) and here is what you get.
The one which is highlighted in blue is the name of the shape. If you see in this diagram I have the name as Server C which is the value of one of the list items server field.
So open your Visio diagram in Visio Client.
Now where you can find the name of the shape? There is no where you can see the name of the shape. It’s neither visible on the diagram nor is there in the property of the shape.
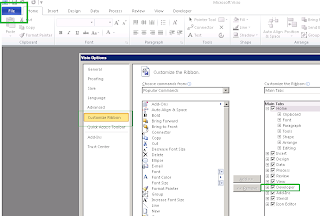
Well, here we need to enable one more option which is the developer tab in the ribbon.
Now then you have developer tab visible in the ribbon. Click on the shape and then click on developer tab, click on shape name. There you can see a shape name. You need to change the name of the shape to reflect the value of the list item. Then only you would be able to perform all connectivity operations.
Make all the necessary changes and then upload it to the SharePoint library again to reflect these changes there on the server.
Let us deep dive in to each of the options one after the other.
1) Send Shape Data To
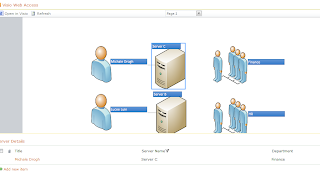
Here when we click on the shape it sends the data to the source list that we’ve placed on the page. To have this interactivity, to connect Visio diagram and list through this option, edit the web part. Click on connection, select Send Shape data to and then select your list.
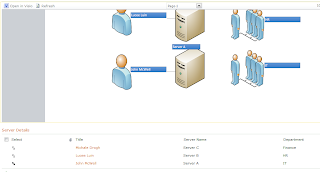
This is how we can send data when we click on shape in the diagram and accordingly list shows up the data.
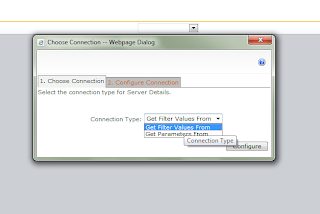
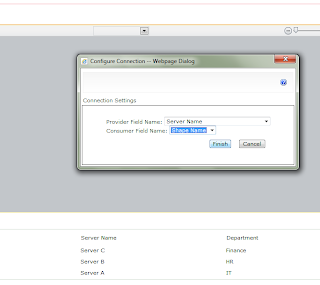
And then it asks you to configure the input. Select get the filter value from
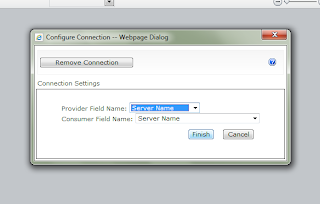
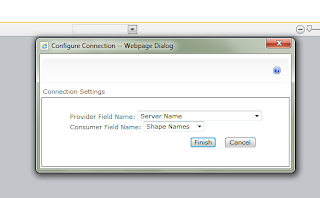
And then provide the association. Here we are associating the name of the Shape to the Server Name. Only one shape can be linked with the list.
Click on finish.
Once you are done with this step, then go ahead and click on any server name, the respective list item will appear in the list view web part.
2) Get Shaped To highlight From
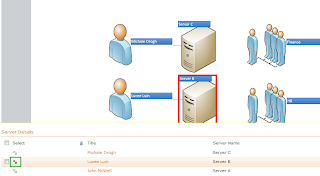
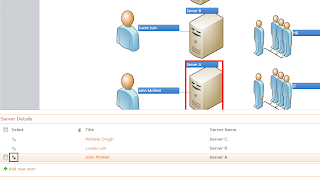
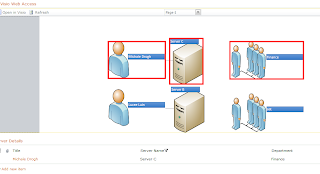
Here we can click on particular list item and based on our selection, the Shape gets highlighted based on the connection that you’ve set up. We will set up a connection for server name field from list to shape name to Visio Diagram.
Now when you select the list item, corresponding shape gets highlighted
Red color which is highlighted is not something that I’ve highlighted to show you. It is highlighted from SharePoint Visio Services.
3) Get Filter Results from
Here you can filter the list items, and based on filter Visio highlighted that entire list item matching figures or diagram.
Here you do not need to configure any parameter values from either side.
And once you have set this then.
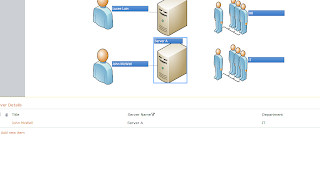
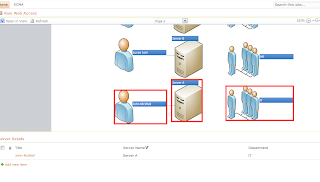
Putting filter on Server A, gets us this.
Putting filter on Server C, gets us this. This filter works with anything. It can be with title, department etc on any list field.
4) Get Shape to view from
Here the potion in the diagram is highlighted by getting that portion to the center of the Visio web access diagram web part. It actually comes in center to highlight that.
Define the relation between web parts.
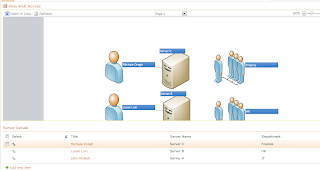
Select First list item and you get associated shapes to come in center
Select Last list item and you get associated shaped to come in center
5) Get Web Drawing URL and Page name from
The advantage of having this connection in place is that you can have one single Visio web access web part on a page but can define different Visio diagrams to be rendered in that.
Use one Query String filter web part. Give the query string parameter a name and then connect that web part with the Visio Web Part.
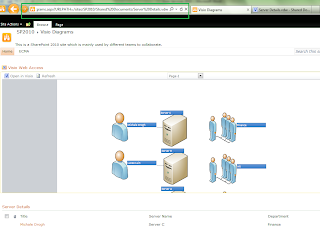
And then when from some other link you are navigating to this page, just pass Query string in to the page like what I have done. My query string name is URLPATH and I am passing the path where this Visio diagram file is uploaded.
And when passed in this way, it rendered the Visio diagram in Visio web access web part.
I hope the entire series will help you a lot to understand the basics of Visio services. We will explore more into this when we get a more chance to explore. There is a scope even to write all these connections with programmatic approach. do try it this till then.
Thursday, September 15, 2011
Visio Services 2010 – Part 4
In earlier post Part-3 of this series I mentioned that refresh time for Visio diagram is something which is very interesting. If you have not gone through Part-1 to Part-3, I would recommend you reading them first and then continue reading on.
Then Visio Graph Services
Then Global Settings
So now if you see this screen, you will get an idea that you can configure various options for Visio services on this page.
You can set minimum and maximum Cache Age. You can also set the limit on the size of Visio web drawing in improve the rendering time.
Keep reading Part-5 for further exploration.
Monday, September 12, 2011
Visio Services 2010 – Part 3
This post is the continuation part of the last post. So if you have not gone through Part 1 and Part 2, I would recommend reading them first and then continue reading from here on.
In this post, we are going to see how to add the diagram that we’ve created into the SharePoint and how to display it in the SharePoint site inside the browser even though the client does not have Visio client installed in the machine.
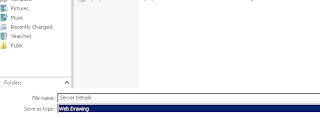
Open the same diagram that we have created in part-2. This time instead of saving it as drawing, save it as a web drawing.
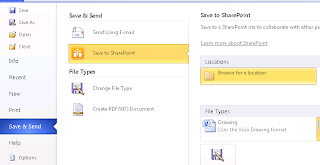
Now we have two options, we can directly use publish button and give path of document library inside a SharePoint site where you want to publish or you can upload manually this wen drawing file that we’ve just saved.
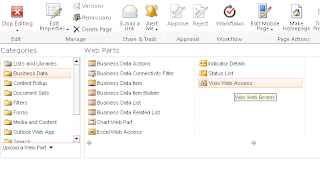
Now open a SharePoint web part page or a page where you want to add this Visio diagram. Edit the page and click on Add Web part and add Visio web access from business data category.
You can also directly click on the drawing file from library. This will open the diagram in full page.
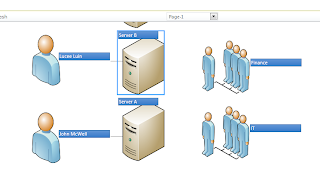
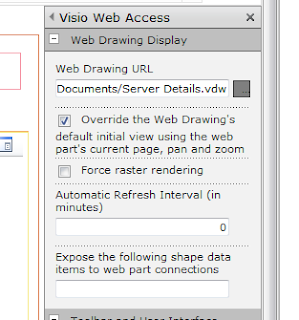
Open the tool pane if you’ve added web part; select the Visio web drawing file from document library and click on Ok. Now we have the diagram displayed inside the SharePoint.
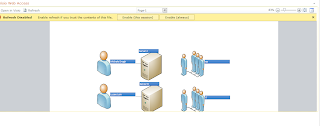
You can see all options like Open in Visio, Zoom buttons, refresh buttons, fit to screen, paging and drag the diagram by using hand tool inside web part options. These options are configurable in web access web part’s properties. However because this web drawing is rendered in Silverlight, hence we get all these options. Should you company has blocked the Silverlight in browsers, then this diagram would have rendered as a PNG image and you do not get several options.
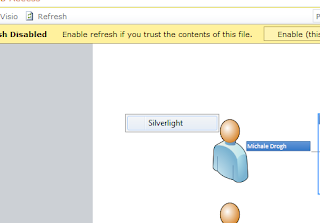
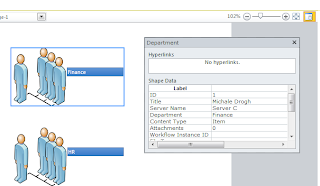
One of the very important feature of rending it as a Silverlight is that you can select the object and then see its properties. That actually gives you an idea about the entire row from database or that specific list item details.
Select the object and click on the icon which is on the right upper corner of the web part which looks like square.
Click the icon gets us the details.
Main advantage of rendering as Silverlight is the interactivity that comes along with shape. We will see it in future post when one shape interacts with other in the drawing.
As you can see it says enable refresh. That means let the web part allow refreshing the drawing by clicking on refresh button. This is due to some untrusted connection. We can always enable the refreshing when we know the data source of the diagram.
Now go ahead and change the list items and come back and see the difference. Let’s change Server A for IT and Server B for finance and see if our diagram changes.
And it does not reflect the change immediately. You can click on refresh and even though it does not change. You need to wait some time and after that click on refresh, and Visio drawing updates automatically.
You can also have auto refresh property setup that determines when to refresh.
0 means the default time used in SharePoint for updating the diagram. Now go ahead and set that timing to one minute. Change the list value, come back to a diagram, and wait for one minute. And bingo you get the updated diagram. Cool, isn’t it? In this case we are lucky. There may be a time where setting one minutes or two minutes or any time in the property may not reflect the changes in diagram. Why is that? Why so? What can be the reason? You need to keep reading to find that out.
Read Visio Services Part-4 for further reading.
Subscribe to:
Posts (Atom)
Share your SharePoint Experiences with us...
As good as the SharePointKings is, we want to make it even better. One of our most valuable sources of input for our Blog Posts comes from ever enthusiastic Visitors/Readers. We welcome every Visitor/Reader to contribute their experiences with SharePoint. It may be in the form of a code stub, snippet, any tips and trick or any crazy thing you have tried with SharePoint.
Send your Articles to sharepointkings@gmail.com with your Profile Summary. We will Post them. The idea is to act as a bridge between you Readers!!!
If anyone would like to have their advertisement posted on this blog, please send us the requirement details to sharepointkings@gmail.com